
User Guide
Page 2
...Kodak Driver Software installation 12 Installing application software 13 Scanner components 14 Locking the scanner 16 3 Using the Scanner 17 Turning the scanner on and off 17 Scanner positions 17 Tilting the scanner body 18 Adjusting the output tray 19 Adjusting the input tray 21 Adjusting the side guides 22 Start and stop scanning 22 Document... preparation 23 Verifying your scanner installation 24 Viewing test images 26 Understanding your scanning environment 26 Application software 26 ...
...Kodak Driver Software installation 12 Installing application software 13 Scanner components 14 Locking the scanner 16 3 Using the Scanner 17 Turning the scanner on and off 17 Scanner positions 17 Tilting the scanner body 18 Adjusting the output tray 19 Adjusting the input tray 21 Adjusting the side guides 22 Start and stop scanning 22 Document... preparation 23 Verifying your scanner installation 24 Viewing test images 26 Understanding your scanning environment 26 Application software 26 ...

User Guide
Page 3
...the TWAIN datasource 41 Terminology and features 41 How do I begin 42 Selecting Image settings 43 Selecting Device settings 45 The main Kodak Scanner window 46 The Image Settings window 49 Preview area 50 General tab 51 Size tab 53 Adjustments tab: black and white 56 Adjustments... 60 Advanced Image Setup 62 Advanced tab 62 Content Settings tab 65 Creating color/grayscale or black and white images based on the content of a document - Example 3 . . . . . 71 Creating a new Setting Shortcut 73 Changing Image Settings 75 The Device Settings window 76 Device - Debug tab 82 ...
...the TWAIN datasource 41 Terminology and features 41 How do I begin 42 Selecting Image settings 43 Selecting Device settings 45 The main Kodak Scanner window 46 The Image Settings window 49 Preview area 50 General tab 51 Size tab 53 Adjustments tab: black and white 56 Adjustments... 60 Advanced Image Setup 62 Advanced tab 62 Content Settings tab 65 Creating color/grayscale or black and white images based on the content of a document - Example 3 . . . . . 71 Creating a new Setting Shortcut 73 Changing Image Settings 75 The Device Settings window 76 Device - Debug tab 82 ...
User Guide
Page 4
... lights and error codes 113 Clearing a document jam 114 Problem solving 115 Appendix A Specifications 116 Appendix B TWAIN Image Processing Terminology 117 Appendix C Warranty - 5 Maintenance 101 Cleaning the scanner 101 Replacing parts 101 Opening the scanner cover 102 Cleaning the rollers and transport ...module tires 105 Replacing the pre-separation pad 106 Cleaning or replacing the feed module 108 Replacing the tires on Kodak Scanners 119 Warranty exclusions 120 Installation Warning and Disclaimer 121 How to obtain limited warranty service 121 Packaging and shipping ...
... lights and error codes 113 Clearing a document jam 114 Problem solving 115 Appendix A Specifications 116 Appendix B TWAIN Image Processing Terminology 117 Appendix C Warranty - 5 Maintenance 101 Cleaning the scanner 101 Replacing parts 101 Opening the scanner cover 102 Cleaning the rollers and transport ...module tires 105 Replacing the pre-separation pad 106 Cleaning or replacing the feed module 108 Replacing the tires on Kodak Scanners 119 Warranty exclusions 120 Installation Warning and Disclaimer 121 How to obtain limited warranty service 121 Packaging and shipping ...
User Guide
Page 5
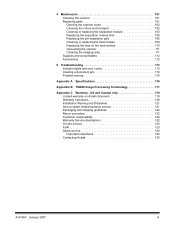
.../i1300 Scanners also can expect from Kodak. Kodak i1320 Scanner - a duplex scanner which provides color scanning at up to 30 pages per minute and black and white and grayscale scanning at up to email, print or various applications with a touch of a button. For support of angles to 30 pages per minute at 200 dpi. a simplex scanner which...
.../i1300 Scanners also can expect from Kodak. Kodak i1320 Scanner - a duplex scanner which provides color scanning at up to 30 pages per minute and black and white and grayscale scanning at up to email, print or various applications with a touch of a button. For support of angles to 30 pages per minute at 200 dpi. a simplex scanner which...

User Guide
Page 6
...searchable PDF • Scans up to 1500 pages per day using the i1200 Series Scanners or 3000 pages per day using the i1300 Series Scanners • Scans up to 21.6 x 86 cm / 8.5 x 34 inches using the automatic document feeder or as small as 50 x 63 mm / 2.0 x 2.5 inches ...• An optional A4 tethered flatbed accessory provides added scanning capability for exception documents and easily connects and disconnects to the scanner • Choose color, black and white, grayscale, simultaneous black and white and grayscale, or simultaneous black and white and color ...
...searchable PDF • Scans up to 1500 pages per day using the i1200 Series Scanners or 3000 pages per day using the i1300 Series Scanners • Scans up to 21.6 x 86 cm / 8.5 x 34 inches using the automatic document feeder or as small as 50 x 63 mm / 2.0 x 2.5 inches ...• An optional A4 tethered flatbed accessory provides added scanning capability for exception documents and easily connects and disconnects to the scanner • Choose color, black and white, grayscale, simultaneous black and white and grayscale, or simultaneous black and white and color ...

User Guide
Page 7
...dirt or debris to another location within 1.52 metres (5 feet) of the Kodak i1200/i1300 Series Scanners and any other mechanical devices. • The Kodak i1200/i1300 Series Scanners are available on the Kodak website at: www.kodak.com/go/msds. See the section entitled, "Supplies and consumables" later in ... part of the job description for the operator of the scanner and is located within the scanner, which could be used indoors in this guide for reuse or recycling. • The Kodak i1200/i1300 Series Scanners are Energy Star compliant and are replaced during maintenance or ...
...dirt or debris to another location within 1.52 metres (5 feet) of the Kodak i1200/i1300 Series Scanners and any other mechanical devices. • The Kodak i1200/i1300 Series Scanners are available on the Kodak website at: www.kodak.com/go/msds. See the section entitled, "Supplies and consumables" later in ... part of the job description for the operator of the scanner and is located within the scanner, which could be used indoors in this guide for reuse or recycling. • The Kodak i1200/i1300 Series Scanners are Energy Star compliant and are replaced during maintenance or ...

User Guide
Page 10
... quickly turn piles of paper and photos into editable electronic documents that look just like never before with text, tables and graphics. Robust new tools enable you begin open the box and check the contents: • Kodak i1210 or i1220 Scanner or Kodak i1310 or i1320 Scanner • Output tray • Output tray extender and exit...
... quickly turn piles of paper and photos into editable electronic documents that look just like never before with text, tables and graphics. Robust new tools enable you begin open the box and check the contents: • Kodak i1210 or i1220 Scanner or Kodak i1310 or i1320 Scanner • Output tray • Output tray extender and exit...
User Guide
Page 11
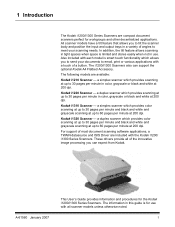
... IV, 3.2 GHz processor, 512 MB RAM - Install the Kodak Driver Software on scanner power and finalize the Kodak Driver Software installation. 6. Verify your scanner and PC. 4. Insert the installation CD in the following order: 1. For documents up to 660 mm (26 in your desktop. Installing the Kodak Driver Software Install the driver software before connecting the...
... IV, 3.2 GHz processor, 512 MB RAM - Install the Kodak Driver Software on scanner power and finalize the Kodak Driver Software installation. 6. Verify your scanner and PC. 4. Insert the installation CD in the following order: 1. For documents up to 660 mm (26 in your desktop. Installing the Kodak Driver Software Install the driver software before connecting the...

User Guide
Page 12
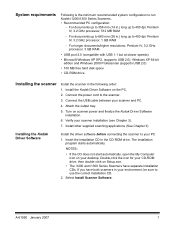
The Kodak i1200/i1300 Series Scanner Installation window will be displayed. 5. 3. Click Yes. The Welcome window will be displayed depending upon what was previously installed on your computer. 4. NOTE: This window may or may not be displayed. Click Next. 8 A-61560 January 2007
The Kodak i1200/i1300 Series Scanner Installation window will be displayed. 5. 3. Click Yes. The Welcome window will be displayed depending upon what was previously installed on your computer. 4. NOTE: This window may or may not be displayed. Click Next. 8 A-61560 January 2007

User Guide
Page 14
...into the wall outlet. 10 A-61560 January 2007 Plug the output power cord from the supply of power cords packed with the Kodak i1200/ i1300 Series Scanner. After the drivers have been installed, connect the power supply and power cord to the power supply. 3. Do not substitute ... or another manufacturer's power supply. Make sure that was provided with your power type to the scanner. Select the appropriate AC power cord for your scanner. 2. Connecting the power cord to the scanner Use only the power supply that the power outlet is located within 1.52 metres (5 feet)...
...into the wall outlet. 10 A-61560 January 2007 Plug the output power cord from the supply of power cords packed with the Kodak i1200/ i1300 Series Scanner. After the drivers have been installed, connect the power supply and power cord to the power supply. 3. Do not substitute ... or another manufacturer's power supply. Make sure that was provided with your power type to the scanner. Select the appropriate AC power cord for your scanner. 2. Connecting the power cord to the scanner Use only the power supply that the power outlet is located within 1.52 metres (5 feet)...

User Guide
Page 15
...2007 11 NOTE: The output tray can be placed in Chapter 3 for more information. Attach the B end of the scanner. 2. Attaching the output tray • Slide the output tray underneath the scanner platform along the center guide. The USB cable supplied with your scanning needs. Attach the A end of the USB ...cable to the proper USB port on the back of the USB cable to meet your scanner has two different ends. A B 1. Connecting the USB cable IMPORTANT: If you have not installed the Kodak Driver Software, do that now before proceeding.
...2007 11 NOTE: The output tray can be placed in Chapter 3 for more information. Attach the B end of the scanner. 2. Attaching the output tray • Slide the output tray underneath the scanner platform along the center guide. The USB cable supplied with your scanning needs. Attach the A end of the USB ...cable to the proper USB port on the back of the USB cable to meet your scanner has two different ends. A B 1. Connecting the USB cable IMPORTANT: If you have not installed the Kodak Driver Software, do that now before proceeding.
User Guide
Page 16
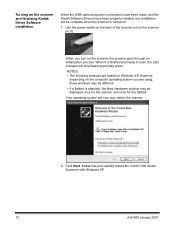
...Windows XP. NOTES: • The following windows are using, these windows may be complete when the scanner is turned on. 1. Kodak has successfully tested the i1200/i1300 Series Scanners with Windows XP. 12 A-61560 January 2007 Your operating system will be displayed once for the... scanner and once for the flatbed. However, depending on the computer operating system you turn the scanner on (I). Turning on the scanner and finalizing Kodak Driver Software installation When the USB cable and power connections have...
...Windows XP. NOTES: • The following windows are using, these windows may be complete when the scanner is turned on. 1. Kodak has successfully tested the i1200/i1300 Series Scanners with Windows XP. 12 A-61560 January 2007 Your operating system will be displayed once for the... scanner and once for the flatbed. However, depending on the computer operating system you turn the scanner on (I). Turning on the scanner and finalizing Kodak Driver Software installation When the USB cable and power connections have...

User Guide
Page 17
Click Finish. Other scanning applications are also provided on the CDs packed with your scanner (e.g., Kodak Capture Software Lite, Nuance ScanSoft PaperPort 10 Software, Nuance ScanSoft OmniPage Pro 14 Software). Installing application software 3. You may also use the software. The Kodak Scan Validation Tool is available on how to install and use other scanning...
Click Finish. Other scanning applications are also provided on the CDs packed with your scanner (e.g., Kodak Capture Software Lite, Nuance ScanSoft PaperPort 10 Software, Nuance ScanSoft OmniPage Pro 14 Software). Installing application software 3. You may also use the software. The Kodak Scan Validation Tool is available on how to install and use other scanning...

User Guide
Page 18
... into a different position. illuminates or flashes indicating scanner status. • Steady green: ready to select or scroll through 9. Start button - launches the selected application that is encountered. E will be extended when scanning documents longer than 8.5 x 11 inches (A4). The ... holds up to the internal components of your choice. Scanner components Front view Scanner cover Input tray Function window Scroll button Start button LED indicator Tilt release button Output tray Scanner cover - provides access to 50 documents (20 lb./75 g/m2) in the function window....
... into a different position. illuminates or flashes indicating scanner status. • Steady green: ready to select or scroll through 9. Start button - launches the selected application that is encountered. E will be extended when scanning documents longer than 8.5 x 11 inches (A4). The ... holds up to the internal components of your choice. Scanner components Front view Scanner cover Input tray Function window Scroll button Start button LED indicator Tilt release button Output tray Scanner cover - provides access to 50 documents (20 lb./75 g/m2) in the function window....

User Guide
Page 19
... be removed when cleaning or replacing the feed module or feed module tires. Scanner cover release lever - Feed module cover - this cover needs to remove the separation module for documents that require special handling. Feed module, Separation module and Rollers - A-61560...January 2007 15 Paper Present sensor - Separation module release lever - provides smooth document feeding and separation of various sizes, thicknesses and textures of documents in the input tray. opens the scanner to allow access to manually adjust the space between the feed module and ...
... be removed when cleaning or replacing the feed module or feed module tires. Scanner cover release lever - Feed module cover - this cover needs to remove the separation module for documents that require special handling. Feed module, Separation module and Rollers - A-61560...January 2007 15 Paper Present sensor - Separation module release lever - provides smooth document feeding and separation of various sizes, thicknesses and textures of documents in the input tray. opens the scanner to allow access to manually adjust the space between the feed module and ...

User Guide
Page 20
... tethered flatbed accessory to secure your scanner. A security lock port is available if you want to the scanner. Use the looped end of the scanner and turn the key to lock the scanner in place. 2. turns the scanner on and off. connects the scanner to the scanner. Insert the lock into the back... of the cable to secure the cable and scanner to the scanner. connects the power...
... tethered flatbed accessory to secure your scanner. A security lock port is available if you want to the scanner. Use the looped end of the scanner and turn the key to lock the scanner in place. 2. turns the scanner on and off. connects the scanner to the scanner. Insert the lock into the back... of the cable to secure the cable and scanner to the scanner. connects the power...

User Guide
Page 21
... input and output trays. Scanner positions After you can be used in tight spaces when space is not connected to the host PC and the self-test completes, the red indicator will be on and the function window will be blank. The Kodak i1200 and i1300 Series Scanners are equipped with a tilt... feature which allows the scanner to be placed in use. or 65-degree angle. 25-degree angle A-61560 January 2007 17 Simply press ...
... input and output trays. Scanner positions After you can be used in tight spaces when space is not connected to the host PC and the self-test completes, the red indicator will be on and the function window will be blank. The Kodak i1200 and i1300 Series Scanners are equipped with a tilt... feature which allows the scanner to be placed in use. or 65-degree angle. 25-degree angle A-61560 January 2007 17 Simply press ...

User Guide
Page 22
65-degree angle Tilting the scanner body In addition to provide even more scanning flexibility. See the following sections for information on adjusting the input and output trays. IMPORTANT: When using the tilt feature, be adjusted to tilting the scanner body, the input and output trays can be sure the scanner cover is closed. • Press the Tilt release button and rotate the scanner body into the desired position. 18 A-61560 January 2007
65-degree angle Tilting the scanner body In addition to provide even more scanning flexibility. See the following sections for information on adjusting the input and output trays. IMPORTANT: When using the tilt feature, be adjusted to tilting the scanner body, the input and output trays can be sure the scanner cover is closed. • Press the Tilt release button and rotate the scanner body into the desired position. 18 A-61560 January 2007

User Guide
Page 23
... jobs of position. • The output tray can be positioned so it lies flat on the release tabs and pull it 's storage position underneath the scanner: • Press down on the table. Output tray extender A-61560 January 2007 19 To remove the output tray from it out of more than 5 pages...
... jobs of position. • The output tray can be positioned so it lies flat on the release tabs and pull it 's storage position underneath the scanner: • Press down on the table. Output tray extender A-61560 January 2007 19 To remove the output tray from it out of more than 5 pages...

User Guide
Page 24
...extender: - Rail - Turn the output tray over and slide the output tray extender along the rail of mixed document sets. Turn the output tray right-side up to accommodate documents up and slide it under the scanner until it locks into place. • The output tray extender is best used when the... scanner is ideal for scanning large batches of the output tray. End stop can be opened at various angles. ...
...extender: - Rail - Turn the output tray over and slide the output tray extender along the rail of mixed document sets. Turn the output tray right-side up to accommodate documents up and slide it under the scanner until it locks into place. • The output tray extender is best used when the... scanner is ideal for scanning large batches of the output tray. End stop can be opened at various angles. ...


