
User Guide
Page 3
... feeding 3-9 Continuous feeding 3-10 Manual feeding 3-10 Feeding documents that require special handling 3-11 Calibrating the scanner 3-11 Image calibration 3-12 Ultrasonics calibration 3-15 4 The...parts 5-3 Cleaning procedures 5-4 Replacement procedures 5-12 Replacing the feed module or feed module tires 5-12 Replacing the separation roller or separation roller tires 5-16 Replacing the pre-separation pad 5-17 Replacing the imaging guides 5-17 6 Troubleshooting 6-1 Indicator lights 6-1 Accessing the Operator Log 6-3 i600 Series Scanners Message listing 6-6 i600 Series Scanners...
... feeding 3-9 Continuous feeding 3-10 Manual feeding 3-10 Feeding documents that require special handling 3-11 Calibrating the scanner 3-11 Image calibration 3-12 Ultrasonics calibration 3-15 4 The...parts 5-3 Cleaning procedures 5-4 Replacement procedures 5-12 Replacing the feed module or feed module tires 5-12 Replacing the separation roller or separation roller tires 5-16 Replacing the pre-separation pad 5-17 Replacing the imaging guides 5-17 6 Troubleshooting 6-1 Indicator lights 6-1 Accessing the Operator Log 6-3 i600 Series Scanners Message listing 6-6 i600 Series Scanners...

User Guide
Page 8
...regulated due to repair. • The Kodak i600/i700 Series Scanners contain lead in the circuit board solder. Do not attempt to environmental considerations. These include, but are shipped from the factory with these precautions a part of the job description for replacement. ...Use appropriate precautions when relocating the scanner. • Do not wear loose clothing, unbuttoned sleeves, etc. • Do not wear ...
...regulated due to repair. • The Kodak i600/i700 Series Scanners contain lead in the circuit board solder. Do not attempt to environmental considerations. These include, but are shipped from the factory with these precautions a part of the job description for replacement. ...Use appropriate precautions when relocating the scanner. • Do not wear loose clothing, unbuttoned sleeves, etc. • Do not wear ...
User Guide
Page 12
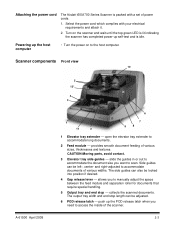
...release lever - CAUTION:Moving parts, avoid contact. 3 Elevator tray side guides - slide the guides in or out to accommodate the document size you to access ...width and end stop - provides smooth document feeding of power cords. 1. Side guides can also be left-, center- collects the scanned documents. Turn on to accommodate documents of the scanner. 2-3 Scanner components Front view 10 A-61500 April ...scanner has completed power-up self-test and is packed with your electrical requirements and attach it. 2. Attaching the power cord The Kodak i600/i700 Series Scanner...
...release lever - CAUTION:Moving parts, avoid contact. 3 Elevator tray side guides - slide the guides in or out to accommodate the document size you to access ...width and end stop - provides smooth document feeding of power cords. 1. Side guides can also be left-, center- collects the scanned documents. Turn on to accommodate documents of the scanner. 2-3 Scanner components Front view 10 A-61500 April ...scanner has completed power-up self-test and is packed with your electrical requirements and attach it. 2. Attaching the power cord The Kodak i600/i700 Series Scanner...
User Guide
Page 23
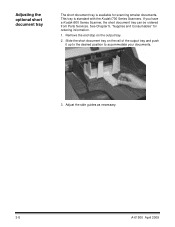
If you have a Kodak i600 Series Scanner, the short document tray can be ordered from Parts Services. Remove the end stop on the rail of the output tray and push it up to the desired position to accommodate your documents. 3. This tray is available for ordering information. 1. Slide the short document tray on the output tray. 2. See...
If you have a Kodak i600 Series Scanner, the short document tray can be ordered from Parts Services. Remove the end stop on the rail of the output tray and push it up to the desired position to accommodate your documents. 3. This tray is available for ordering information. 1. Slide the short document tray on the output tray. 2. See...

User Guide
Page 39
... as recommended should take approximately 5 to prevent costly interruptions during production scanning. NOTES: • Follow the recommended Kodak cleaning procedures. Following this manual. Some document types generate more paper dust and debris and may require more frequent cleaning than recommended. These cleaners only displace the... does not always mean that are worn or damaged. A-61500 April 2009 5-1 After cleaning, inspect the tires for parts that the tires are customer-replaceable IMPORTANT: Scanner components marked with a green tab indicate operator-accessible...
... as recommended should take approximately 5 to prevent costly interruptions during production scanning. NOTES: • Follow the recommended Kodak cleaning procedures. Following this manual. Some document types generate more paper dust and debris and may require more frequent cleaning than recommended. These cleaners only displace the... does not always mean that are worn or damaged. A-61500 April 2009 5-1 After cleaning, inspect the tires for parts that the tires are customer-replaceable IMPORTANT: Scanner components marked with a green tab indicate operator-accessible...
User Guide
Page 41
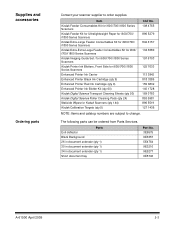
... deflector Black Background 26 in document extender (qty 1) 30 in document extender (qty 1) 34 in document extender (qty 1) Short document tray Part No. 3E9575 9E3357 5E4754 9E3216 9E5277 9E5746 A-61500 April 2009 5-3 Supplies and accessories Ordering parts Contact your scanner supplier to change. Item Kodak Feeder Consumables Kit for i600/i700/i1800 Series Scanners Kodak Feeder Kit for Ultralightweight Paper...
... deflector Black Background 26 in document extender (qty 1) 30 in document extender (qty 1) 34 in document extender (qty 1) Short document tray Part No. 3E9575 9E3357 5E4754 9E3216 9E5277 9E5746 A-61500 April 2009 5-3 Supplies and accessories Ordering parts Contact your scanner supplier to change. Item Kodak Feeder Consumables Kit for i600/i700/i1800 Series Scanners Kodak Feeder Kit for Ultralightweight Paper...

User Guide
Page 75
... plugged in the back of wear and replace as a guide to check possible solutions to problems you are using the Kodak i600/i700 Series Scanners. The Image calibration target and Ultrasonics calibration target are different. • the imaging guides are clean. • the transport is poor...the receptacle in and the power is oriented correctly for signs of wear and replace these parts if necessary. • a very dark document on the elevator tray. • you are clean. Problem Possible Solution Scanner does not power on Make sure that : • the output tray and side guides...
... plugged in the back of wear and replace as a guide to check possible solutions to problems you are using the Kodak i600/i700 Series Scanners. The Image calibration target and Ultrasonics calibration target are different. • the imaging guides are clean. • the transport is poor...the receptacle in and the power is oriented correctly for signs of wear and replace these parts if necessary. • a very dark document on the elevator tray. • you are clean. Problem Possible Solution Scanner does not power on Make sure that : • the output tray and side guides...


