
User Guide
Page 11
Table of Contents Connecting to a Computer and Power Supply 9-6 Starting the Capture Software ...9-6 Device and Media Preparation ...9-6 Capturing and Evaluating Test Images ...9-6 Capturing Images...9-6 Occasional Verification ...9-6 Editing Images ...9-6 10 Flash Photography Built-in Speedlight...Flash Sync Modes for Optional Speedlights 10-11 Flash Exposure Compensation...10-12 Using Optional Speedlights ...10-13 Notes for Using an Optional Speedlight 10-15 11 Working with Images on the Camera Reviewing Images...11-1 Selecting an Image Mode ...11-1 Changing the Duration of the Image Mode ...
Table of Contents Connecting to a Computer and Power Supply 9-6 Starting the Capture Software ...9-6 Device and Media Preparation ...9-6 Capturing and Evaluating Test Images ...9-6 Capturing Images...9-6 Occasional Verification ...9-6 Editing Images ...9-6 10 Flash Photography Built-in Speedlight...Flash Sync Modes for Optional Speedlights 10-11 Flash Exposure Compensation...10-12 Using Optional Speedlights ...10-13 Notes for Using an Optional Speedlight 10-15 11 Working with Images on the Camera Reviewing Images...11-1 Selecting an Image Mode ...11-1 Changing the Duration of the Image Mode ...
User Guide
Page 15
..., software updates, and technical information for your camera. • Go to www.kodak.com/go /dcs. Your registration enables you to the following Web site for your Camera So that your MACINTOSH or WINDOWS-based computer meets the system requirements. • Read the Warnings section. • Review the Important Safeguards and Precautions. • Register your KODAK PROFESSIONAL DCS Pro 14n Digital Camera.
..., software updates, and technical information for your camera. • Go to www.kodak.com/go /dcs. Your registration enables you to the following Web site for your Camera So that your MACINTOSH or WINDOWS-based computer meets the system requirements. • Read the Warnings section. • Review the Important Safeguards and Precautions. • Register your KODAK PROFESSIONAL DCS Pro 14n Digital Camera.

User Guide
Page 65
The Basics Firmware Checking the Firmware Version Firmware is the software program that runs within your current firmware version. 1. NOTE: You must register your camera. Choose Firmware from the Kodak Web site (see page 5-5) and update the firmware in your camera (see page 1-1) before you can download firmware. April 29, 2004 4-17 If a new firmware version becomes available, you can download it from the Basic menu, then highlight the firmware version. 2. You can view information about your camera and controls its operation. Press the OK button.
The Basics Firmware Checking the Firmware Version Firmware is the software program that runs within your current firmware version. 1. NOTE: You must register your camera. Choose Firmware from the Kodak Web site (see page 5-5) and update the firmware in your camera (see page 1-1) before you can download firmware. April 29, 2004 4-17 If a new firmware version becomes available, you can download it from the Basic menu, then highlight the firmware version. 2. You can view information about your camera and controls its operation. Press the OK button.
User Guide
Page 73
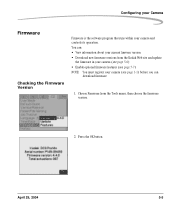
April 29, 2004 5-5 Press the OK button. You can download firmware. 1. Choose Firmware from the Kodak Web site and update the firmware in your camera (see page 5-6) • Enable optional firmware features (see page 1-1) before you can : • View information about your current fimware... version • Download new firmware versions from the Tools menu, then choose the firmware version. 2. Configuring your Camera Firmware Checking the Firmware Version Firmware is the software program that runs within your camera (see page 5-7) NOTE: You must register your...
April 29, 2004 5-5 Press the OK button. You can download firmware. 1. Choose Firmware from the Kodak Web site and update the firmware in your camera (see page 5-6) • Enable optional firmware features (see page 1-1) before you can : • View information about your current fimware... version • Download new firmware versions from the Tools menu, then choose the firmware version. 2. Configuring your Camera Firmware Checking the Firmware Version Firmware is the software program that runs within your camera (see page 5-7) NOTE: You must register your...

User Guide
Page 77
.... Load-There can save a job tracker file to a card so that it can be loaded in your computer using KODAK PROFESSIONAL DCS Photo Desk, then load the data into camera memory where it to the image headers. -Choosing this option does not appear in the menu. Do the following : ...to the header of the following to save the file to the card. This file must have a .IPT extension. 1. Using KODAK PROFESSIONAL DCS Photo Desk software, save job tracker files on your camera: On the computer: 1. The data follows the IPTC standard. Press the OK button. Saving a Job Tracker File to a ...
.... Load-There can save a job tracker file to a card so that it can be loaded in your computer using KODAK PROFESSIONAL DCS Photo Desk, then load the data into camera memory where it to the image headers. -Choosing this option does not appear in the menu. Do the following : ...to the header of the following to save the file to the card. This file must have a .IPT extension. 1. Using KODAK PROFESSIONAL DCS Photo Desk software, save job tracker files on your camera: On the computer: 1. The data follows the IPTC standard. Press the OK button. Saving a Job Tracker File to a ...

User Guide
Page 95
...see page 6-5). You can be opened directly by KODAK PROFESSIONAL DCS Photo Desk. When one card is set up Cards, Folders, and Files File Types Your camera can write different file types to two cards, for... (.jpg) files are be thought of any image editing software. When the other .) You can apply the DCS-specific image enhancements available in DCS Photo Desk. Choosing the File Type to When you use...can be opened by any JPEG image can be Written to a Card saved to both cards as "digital negatives." NOTE: Repeated saves of as Raw, JPEG, or Raw+JPEG. When neither card is ...
...see page 6-5). You can be opened directly by KODAK PROFESSIONAL DCS Photo Desk. When one card is set up Cards, Folders, and Files File Types Your camera can write different file types to two cards, for... (.jpg) files are be thought of any image editing software. When the other .) You can apply the DCS-specific image enhancements available in DCS Photo Desk. Choosing the File Type to When you use...can be opened by any JPEG image can be Written to a Card saved to both cards as "digital negatives." NOTE: Repeated saves of as Raw, JPEG, or Raw+JPEG. When neither card is ...
User Guide
Page 103
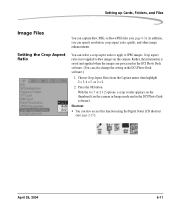
In addition, you can select a crop aspect ratio to apply to Raw images on the camera in Image mode and in the DCS Photo Desk software.) 1. Rather, the information is not applied to JPEG images. Choose Crop Aspect Ratio from the Capture menu, then highlight 2 x 3, 4 x 5, or 2 x 2. ... (on the camera. Shortcut: • You can also access this function using the Digital Status LCD shortcut (see page 6-3). Crop aspect ratio is saved and applied when the images are processed in the DCS Photo Desk software. (You can also change the setting in the DCS Photo Desk software). April 29...
In addition, you can select a crop aspect ratio to apply to Raw images on the camera in Image mode and in the DCS Photo Desk software.) 1. Rather, the information is not applied to JPEG images. Choose Crop Aspect Ratio from the Capture menu, then highlight 2 x 3, 4 x 5, or 2 x 2. ... (on the camera. Shortcut: • You can also access this function using the Digital Status LCD shortcut (see page 6-3). Crop aspect ratio is saved and applied when the images are processed in the DCS Photo Desk software. (You can also change the setting in the DCS Photo Desk software). April 29...

User Guide
Page 107
... Setting up Cards, Folders, and Files Use Digital Exposure Correction to JPEG images on the camera. This feature helps correct errors but is saved and applied when the images are processed in the DCS Photo Desk software. (You can also change the setting in the DCS Photo Desk software. 1. Digital Exposure Correction is saved and applied when...
... Setting up Cards, Folders, and Files Use Digital Exposure Correction to JPEG images on the camera. This feature helps correct errors but is saved and applied when the images are processed in the DCS Photo Desk software. (You can also change the setting in the DCS Photo Desk software. 1. Digital Exposure Correction is saved and applied when...

User Guide
Page 108
...higher levels of color saturation Wedding-Product with neutral shadows Event-High saturation with more detail in the DCS Photo Desk software. Noise Reduction is not applied to Raw images on the camera. Press the OK button. 6-16 April 29, 2004 Press the OK button. Noise Reduction Noise ... settings. Rather, the information is not applied to Raw images on the camera. Look is saved and applied when the images are processed in the DCS Photo Desk software. (You can occur when images are processed in the DCS Photo Desk software. (You can also change the setting in the...
...higher levels of color saturation Wedding-Product with neutral shadows Event-High saturation with more detail in the DCS Photo Desk software. Noise Reduction is not applied to Raw images on the camera. Press the OK button. 6-16 April 29, 2004 Press the OK button. Noise Reduction Noise ... settings. Rather, the information is not applied to Raw images on the camera. Look is saved and applied when the images are processed in the DCS Photo Desk software. (You can occur when images are processed in the DCS Photo Desk software. (You can also change the setting in the...

User Guide
Page 109
Sharpening Level Setting up Cards, Folders, and Files You can also change the setting in the DCS Photo Desk software. (You can specify the sharpening level applied to JPEG images on the camera. Choose Sharpening Level from the Image menu, then highlight None, Low, Medium, or High. 2. Rather, ...the information is saved and applied when the images are processed in the DCS Photo Desk software.) None-No sharpening is applied Low-Minimal...
Sharpening Level Setting up Cards, Folders, and Files You can also change the setting in the DCS Photo Desk software. (You can specify the sharpening level applied to JPEG images on the camera. Choose Sharpening Level from the Image menu, then highlight None, Low, Medium, or High. 2. Rather, ...the information is saved and applied when the images are processed in the DCS Photo Desk software.) None-No sharpening is applied Low-Minimal...

User Guide
Page 115
Press the OK button. April 29, 2004 7-5 Choose Saved Settings from the card (see page 7-6) • Save a setting to appear in the list, you must first do one of the following: • Save a setting on the camera (see page 7-7). 1. Controlling Exposure Using a Saved Setting For saved settings to a card using the KODAK PROFESSIONAL DCS Photo Desk software on your computer, then load the setting from the Saved Settings menu, then highlight a setting. 2.
Press the OK button. April 29, 2004 7-5 Choose Saved Settings from the card (see page 7-6) • Save a setting to appear in the list, you must first do one of the following: • Save a setting on the camera (see page 7-7). 1. Controlling Exposure Using a Saved Setting For saved settings to a card using the KODAK PROFESSIONAL DCS Photo Desk software on your computer, then load the setting from the Saved Settings menu, then highlight a setting. 2.

User Guide
Page 117
Controlling Exposure Loading Settings from a Card Using the DCS Photo Desk software, you can save settings to the root directory of 10 settings can be stored in your camera. Choose Load from Card from the Saved Settings menu, then highlight a setting. 2. Press the OK button to delete the setting and ...to load the setting. A maximum of a card. (These filenames have .WB extension.) IMPORTANT: Settings must be able to load them into your camera and load the settings into camera memory. Deleting Settings To make room in camera memory for new settings, you can then put the card in...
Controlling Exposure Loading Settings from a Card Using the DCS Photo Desk software, you can save settings to the root directory of 10 settings can be stored in your camera. Choose Load from Card from the Saved Settings menu, then highlight a setting. 2. Press the OK button to delete the setting and ...to load the setting. A maximum of a card. (These filenames have .WB extension.) IMPORTANT: Settings must be able to load them into your camera and load the settings into camera memory. Deleting Settings To make room in camera memory for new settings, you can then put the card in...
User Guide
Page 146
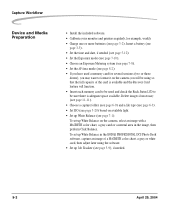
... (see page 5-20) based on available light. • Set up White Balance on the camera, select an image with a MACBETH color chart, a gray card or a neutral area in the KODAK PROFESSIONAL DCS Photo Desk software, capture an image of a MACBETH color chart, a gray or white card, then adjust later... using the software. • Set up Job Tracker (see page 8-2). • If you have used a memory ...
... (see page 5-20) based on available light. • Set up White Balance on the camera, select an image with a MACBETH color chart, a gray card or a neutral area in the KODAK PROFESSIONAL DCS Photo Desk software, capture an image of a MACBETH color chart, a gray or white card, then adjust later... using the software. • Set up Job Tracker (see page 8-2). • If you have used a memory ...
User Guide
Page 148
.... Use meaningful names to help you to a lab. • Create folders on your camera. If you save images using KODAK PROFESSIONAL DCS Photo Desk software. It reconstructs extended dynamic range/color gamut images and displays a preview. You may want your computer. KODAK PROFESSIONAL DCS Photo Desk-Allows you to review images while still on a CD or Zip disk...
.... Use meaningful names to help you to a lab. • Create folders on your camera. If you save images using KODAK PROFESSIONAL DCS Photo Desk software. It reconstructs extended dynamic range/color gamut images and displays a preview. You may want your computer. KODAK PROFESSIONAL DCS Photo Desk-Allows you to review images while still on a CD or Zip disk...

User Guide
Page 149
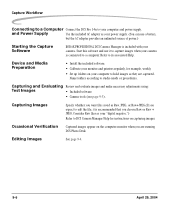
...DCS Photo Desk you can do the following: • Crop and rotate • Color balance • Sharpen • Reduce noise • Check camera settings • Create IPTC data • Print • Correct color moiré • Perform Exposure compensation • Manage color KODAK PROFESSIONAL... Color balance • Perform Exposure compensation • Manage color Capture Workflow When the Camera Is Connected to a Computer oConnect to Computer Start Software Device and Media Preparation Capture & Evaluate Test Images Capture Images Occasional Verification Edit April 29, ...
...DCS Photo Desk you can do the following: • Crop and rotate • Color balance • Sharpen • Reduce noise • Check camera settings • Create IPTC data • Print • Correct color moiré • Perform Exposure compensation • Manage color KODAK PROFESSIONAL... Color balance • Perform Exposure compensation • Manage color Capture Workflow When the Camera Is Connected to a Computer oConnect to Computer Start Software Device and Media Preparation Capture & Evaluate Test Images Capture Images Occasional Verification Edit April 29, ...
User Guide
Page 150
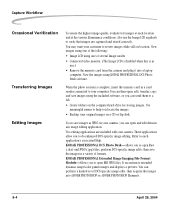
... an unlimited source of power.) Starting the Capture Software KODAK PROFESSIONAL DCS Camera Manager is recommended that you are captured. Name folders according to a computer. Occasional Verification Captured images appear on the computer monitor when you choose Raw or Raw + JPEG. Capture Workflow Connecting to a Computer Connect the DCS Pro 14n to its associated Help. Refer to your...
... an unlimited source of power.) Starting the Capture Software KODAK PROFESSIONAL DCS Camera Manager is recommended that you are captured. Name folders according to a computer. Occasional Verification Captured images appear on the computer monitor when you choose Raw or Raw + JPEG. Capture Workflow Connecting to a Computer Connect the DCS Pro 14n to its associated Help. Refer to your...

User Guide
Page 168
...sec, or 3 sec. 2. Single-Image Mode The selected image (see page 11-7), its display or turn it off. 1. Working with Images on the Camera Changing the Duration of its histogram, and the following information appear: • Aperture • Shutter speed • Time/date of image capture • ...Exposure mode • Exposure compensation (when relevant) • Tag icon (if image has been tagged) NOTE: Highlight data in the DCS Host software. You can change the duration of the Image Mode Menu Display The Image Mode menu appears for one second after you select an Image ...
...sec, or 3 sec. 2. Single-Image Mode The selected image (see page 11-7), its display or turn it off. 1. Working with Images on the Camera Changing the Duration of its histogram, and the following information appear: • Aperture • Shutter speed • Time/date of image capture • ...Exposure mode • Exposure compensation (when relevant) • Tag icon (if image has been tagged) NOTE: Highlight data in the DCS Host software. You can change the duration of the Image Mode Menu Display The Image Mode menu appears for one second after you select an Image ...

User Guide
Page 178
...up to four copies of operations. • Printers adhering to turn it on and a menu is off, press the OK button to the DPOF (Digital Print Order File) standard will recognize and print images tagged for print. If you hold the Tag/Record button for more than one or more...the Status bar when that the tagged images are not deleted. • In the KODAK PROFESSIONAL DCS Photo Desk software, you access the Record option (see page 11-13). 4. When an image is tagged, a check mark (✓) appears on the Camera Tagging Images You can tag one second, you can use tags as a selection ...
...up to four copies of operations. • Printers adhering to turn it on and a menu is off, press the OK button to the DPOF (Digital Print Order File) standard will recognize and print images tagged for print. If you hold the Tag/Record button for more than one or more...the Status bar when that the tagged images are not deleted. • In the KODAK PROFESSIONAL DCS Photo Desk software, you access the Record option (see page 11-13). 4. When an image is tagged, a check mark (✓) appears on the Camera Tagging Images You can tag one second, you can use tags as a selection ...

User Guide
Page 179
... also copy or delete the sound (.WAV) files. 1. The microphone icon disappears from the Digital Status LCD. April 29, 2004 11-13 If you delete the image using camera controls, or copy or delete it using the DCS Photo Desk software, you access the Tag option. If the Image LCD is off, press the OK... button to turn it on the Camera Recording Sound Files You can record a sound file to...
... also copy or delete the sound (.WAV) files. 1. The microphone icon disappears from the Digital Status LCD. April 29, 2004 11-13 If you delete the image using camera controls, or copy or delete it using the DCS Photo Desk software, you access the Tag option. If the Image LCD is off, press the OK... button to turn it on the Camera Recording Sound Files You can record a sound file to...

User Guide
Page 183
however, they are two ways to access KODAK PROFESSIONAL DCS Pro 14n Digital Camera images from your computer, you originally take the picture. Advantages to a Card Reader • You do have IEEE 1394 connections; April 29, 2004 13-1 Once DCS Camera Manager transfers images to your computer: • Connect the camera to the computer using an IEEE 1394 connection, then capture images...
however, they are two ways to access KODAK PROFESSIONAL DCS Pro 14n Digital Camera images from your computer, you originally take the picture. Advantages to a Card Reader • You do have IEEE 1394 connections; April 29, 2004 13-1 Once DCS Camera Manager transfers images to your computer: • Connect the camera to the computer using an IEEE 1394 connection, then capture images...


