User Manual
Page 4
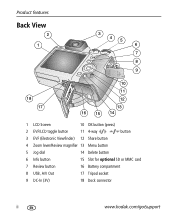
Product features Back View 2 1 3 45 6 7 8 9 18 17 10 11 12 13 16 15 14 1 LCD Screen 10 OK button (press) 2 EVF/LCD toggle button 11 4-way button 3 EVF (Electronic Viewfinder) 12 Share button 4 Zoom lever/Review magnifier 13 Menu button 5 Jog dial 14 Delete button 6 Info button 15 Slot for optional SD or MMC card 7 Review button 16 Battery compartment 8 USB, A/V Out 17 Tripod socket 9 DC-In (3V) 18 Dock connector ii www.kodak.com/go/support
Product features Back View 2 1 3 45 6 7 8 9 18 17 10 11 12 13 16 15 14 1 LCD Screen 10 OK button (press) 2 EVF/LCD toggle button 11 4-way button 3 EVF (Electronic Viewfinder) 12 Share button 4 Zoom lever/Review magnifier 13 Menu button 5 Jog dial 14 Delete button 6 Info button 15 Slot for optional SD or MMC card 7 Review button 16 Battery compartment 8 USB, A/V Out 17 Tripod socket 9 DC-In (3V) 18 Dock connector ii www.kodak.com/go/support

User Manual
Page 5
... the battery 2 Turning on the camera 3 Setting the language and date/time, first time 3 Setting the language and date/time, other times 4 Storing pictures on an SD or MMC card 4 2 Taking pictures and videos 5 Taking a picture 5 Reviewing pictures and videos 9 Using optical...camera 21 Picture-taking modes 21 Changing the flash settings 25 Using the focus button 26 Using self-timer, burst, and exposure bracketing 27 Using the histogram to view picture brightness 29 Using exposure compensation with exposure bracketing 29 PASM modes 30 Changing picture-taking settings 32 www.kodak...
... the battery 2 Turning on the camera 3 Setting the language and date/time, first time 3 Setting the language and date/time, other times 4 Storing pictures on an SD or MMC card 4 2 Taking pictures and videos 5 Taking a picture 5 Reviewing pictures and videos 9 Using optical...camera 21 Picture-taking modes 21 Changing the flash settings 25 Using the focus button 26 Using self-timer, burst, and exposure bracketing 27 Using the histogram to view picture brightness 29 Using exposure compensation with exposure bracketing 29 PASM modes 30 Changing picture-taking settings 32 www.kodak...
User Manual
Page 13
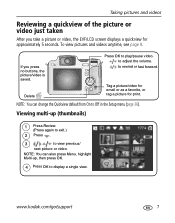
...for print. Tag a picture/video for email or as a favorite, or tag a picture for approximately 5 seconds. Delete Press OK to adjust the volume. www.kodak.com/go/support 7 Viewing multi-up , then press OK. 4 Press OK to view previous/ next picture or video. NOTE: You can also press Menu, ...highlight Multi-up (thumbnails) 1 Press Review. (Press again to exit.) 2 Press . 3 to display a single view. to play/pause video. to Off in the Setup menu (page 36). NOTE: You...
...for print. Tag a picture/video for email or as a favorite, or tag a picture for approximately 5 seconds. Delete Press OK to adjust the volume. www.kodak.com/go/support 7 Viewing multi-up , then press OK. 4 Press OK to view previous/ next picture or video. NOTE: You can also press Menu, ...highlight Multi-up (thumbnails) 1 Press Review. (Press again to exit.) 2 Press . 3 to display a single view. to play/pause video. to Off in the Setup menu (page 36). NOTE: You...
User Manual
Page 15
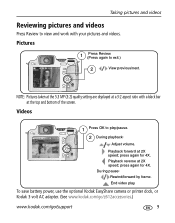
... at the 5.3 MP (3:2) quality setting are displayed at a 3:2 aspect ratio with your pictures and videos. Playback reverse at 2X speed; To save battery power, use the optional Kodak EasyShare camera or printer dock, or Kodak 3-volt AC adapter. (See www.kodak.com/go/z612accessories.) www.kodak.com/go/support 9 press again for 4X. Pictures 1 Press Review. (Press again...
... at the 5.3 MP (3:2) quality setting are displayed at a 3:2 aspect ratio with your pictures and videos. Playback reverse at 2X speed; To save battery power, use the optional Kodak EasyShare camera or printer dock, or Kodak 3-volt AC adapter. (See www.kodak.com/go/z612accessories.) www.kodak.com/go/support 9 press again for 4X. Pictures 1 Press Review. (Press again...
User Manual
Page 16
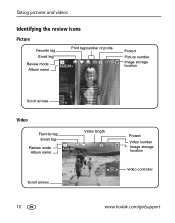
Taking pictures and videos Identifying the review icons Picture Favorite tag Email tag Review mode Album name Print tag/number of prints Protect Picture number Image storage location Scroll arrows Video Favorite tag Email tag Review mode Album name Scroll arrows 10 Video length Protect Video number Image storage location Video controller www.kodak.com/go/support
Taking pictures and videos Identifying the review icons Picture Favorite tag Email tag Review mode Album name Print tag/number of prints Protect Picture number Image storage location Scroll arrows Video Favorite tag Email tag Review mode Album name Scroll arrows 10 Video length Protect Video number Image storage location Video controller www.kodak.com/go/support

User Manual
Page 17
... 7) Action Print (page 41) Setup Menu (page 36) Protect (page 14) Checking camera and picture status 1 Press Review. (Press again to access review options for : • Status icons on • Status icons off • Histogram and picture/video info www.kodak.com/go/support 11 Some settings may be unavailable in some modes. Taking...
... 7) Action Print (page 41) Setup Menu (page 36) Protect (page 14) Checking camera and picture status 1 Press Review. (Press again to access review options for : • Status icons on • Status icons off • Histogram and picture/video info www.kodak.com/go/support 11 Some settings may be unavailable in some modes. Taking...

User Manual
Page 18
...Wide Angle (W) to take the picture. (When taking videos, press and release the Shutter button.) 12 www.kodak.com/go/support The Zoom indicator shows zoom status. 3 Press the Shutter button halfway to set the exposure ...and focus, then press completely down to zoom out. Zoom indicator Optical zoom range Digital zoom range 2 Press Telephoto (T) to 1X. Press OK to return to zoom in. to view other parts... frame your subject. Taking pictures and videos Magnifying a picture during review Use this feature to view the magnification of the picture.
...Wide Angle (W) to take the picture. (When taking videos, press and release the Shutter button.) 12 www.kodak.com/go/support The Zoom indicator shows zoom status. 3 Press the Shutter button halfway to set the exposure ...and focus, then press completely down to zoom out. Zoom indicator Optical zoom range Digital zoom range 2 Press Telephoto (T) to 1X. Press OK to return to zoom in. to view other parts... frame your subject. Taking pictures and videos Magnifying a picture during review Use this feature to view the magnification of the picture.
User Manual
Page 20
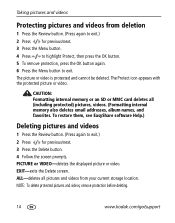
...: To delete protected pictures and videos, remove protection before deleting. 14 www.kodak.com/go/support The picture or video is protected and cannot be deleted. To restore them, see EasyShare software Help.) Deleting pictures and videos 1 Press the Review button. (Press again to exit. PICTURE or VIDEO-deletes the displayed picture or...
...: To delete protected pictures and videos, remove protection before deleting. 14 www.kodak.com/go/support The picture or video is protected and cannot be deleted. To restore them, see EasyShare software Help.) Deleting pictures and videos 1 Press the Review button. (Press again to exit. PICTURE or VIDEO-deletes the displayed picture or...

User Manual
Page 34
...2 Press the Shutter button halfway to take the picture. Doing more storage space. The camera stops taking pictures when you can delete all pictures in Review (see page 14). 28 www.kodak.com/go/support To delete selectively, do so in the burst series. For Burst settings,... or 1.0 EV. NOTE: To cancel self-timer and shutter delay during countdown, press the Shutter button again. (The setting remains on your camera Exposure Bracketing 3 Flash forced off. Determine the best exposure level for your conditions based on .) NOTE: During quickview you release the Shutter button...
...2 Press the Shutter button halfway to take the picture. Doing more storage space. The camera stops taking pictures when you can delete all pictures in Review (see page 14). 28 www.kodak.com/go/support To delete selectively, do so in the burst series. For Burst settings,... or 1.0 EV. NOTE: To cancel self-timer and shutter delay during countdown, press the Shutter button again. (The setting remains on your camera Exposure Bracketing 3 Flash forced off. Determine the best exposure level for your conditions based on .) NOTE: During quickview you release the Shutter button...

User Manual
Page 35
... exposure is achieved when the peak is dark. If exposure compensation is set to taken are the default +/-0.3 -0.3, 0.0, +0.3 +0.7, +1.0, +1.3 -1.3, -1.0, -0.7 www.kodak.com/go/support 29 Histogram graph NOTE: If a scene is set to 0.0 +1.0 -1.0 And if the exposure bracketing Then the exposures interval is dark or light..., you take a picture. If the peak is to turn the histogram On/Off. Doing more with your camera Using the histogram to view picture brightness Use the histogram in Capture or Review to evaluate the distribution of light before taking the picture.
... exposure is achieved when the peak is dark. If exposure compensation is set to taken are the default +/-0.3 -0.3, 0.0, +0.3 +0.7, +1.0, +1.3 -1.3, -1.0, -0.7 www.kodak.com/go/support 29 Histogram graph NOTE: If a scene is set to 0.0 +1.0 -1.0 And if the exposure bracketing Then the exposures interval is dark or light..., you take a picture. If the peak is to turn the histogram On/Off. Doing more with your camera Using the histogram to view picture brightness Use the histogram in Capture or Review to evaluate the distribution of light before taking the picture.

User Manual
Page 45
... email addresses, album names, and favorites; Internal Memory-deletes everything on the card; Camera name and firmware version. www.kodak.com/go/support 39 Viewing picture/video information In Review mode, press the Info button to view the settings. 1 Press Review. (Press again to exit.) 2 Press the Info button until this view is displayed...
... email addresses, album names, and favorites; Internal Memory-deletes everything on the card; Camera name and firmware version. www.kodak.com/go/support 39 Viewing picture/video information In Review mode, press the Info button to view the settings. 1 Press Review. (Press again to exit.) 2 Press the Info button until this view is displayed...

User Manual
Page 46
... 2 Press to highlight Copy, then press the OK button. 3 Press to the Review menu. See Image Storage, table on page 32. Tags that : I The camera's picture storage location is inserted in the camera. ALL-copies all pictures and videos from the original location after copying, delete them ...(see page 14. 40 www.kodak.com/go/support I A card is set to the location from...
... 2 Press to highlight Copy, then press the OK button. 3 Press to the Review menu. See Image Storage, table on page 32. Tags that : I The camera's picture storage location is inserted in the camera. ALL-copies all pictures and videos from the original location after copying, delete them ...(see page 14. 40 www.kodak.com/go/support I A card is set to the location from...
User Manual
Page 47
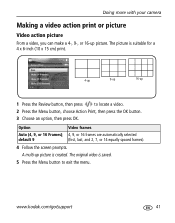
... default 9 (first, last, and 2, 7, or 14 equally spaced frames). 4 Follow the screen prompts. A multi-up 1 Press the Review button, then press to exit the menu. www.kodak.com/go/support 41 Doing more with your camera Making a video action print or picture Video action picture From a video, you can make a 4-, 9-, or 16-up...
... default 9 (first, last, and 2, 7, or 14 equally spaced frames). 4 Follow the screen prompts. A multi-up 1 Press the Review button, then press to exit the menu. www.kodak.com/go/support 41 Doing more with your camera Making a video action print or picture Video action picture From a video, you can make a 4-, 9-, or 16-up...

User Manual
Page 48
There may be limitations to the size you can make a still picture from a single frame of the small picture size (much smaller than minimum picture size). 1 Press the Review button, then press to locate a video. 2 Press the Menu button, choose Make Picture, then press the OK button. The original video is saved. 3 Follow the screen prompts. 4 Press the Menu button to exit the menu. 42 www.kodak.com/go/support Doing more with your camera Video picture You can print because of a video.
There may be limitations to the size you can make a still picture from a single frame of the small picture size (much smaller than minimum picture size). 1 Press the Review button, then press to locate a video. 2 Press the Menu button, choose Make Picture, then press the OK button. The original video is saved. 3 Follow the screen prompts. 4 Press the Menu button to exit the menu. 42 www.kodak.com/go/support Doing more with your camera Video picture You can print because of a video.

User Manual
Page 49
... cropped. (The original picture is saved.) A cropped picture cannot be enhanced again on the camera. Kodak Perfect Touch technology can only be used with your camera Using Kodak Perfect Touch technology Kodak Perfect Touch technology helps ensure better, brighter pictures. 1 Press Review. 2 for previous/next picture. 3 Press Menu, select Crop, then press OK. 4 Press the Zoom...
... cropped. (The original picture is saved.) A cropped picture cannot be enhanced again on the camera. Kodak Perfect Touch technology can only be used with your camera Using Kodak Perfect Touch technology Kodak Perfect Touch technology helps ensure better, brighter pictures. 1 Press Review. 2 for previous/next picture. 3 Press Menu, select Crop, then press OK. 4 Press the Zoom...

User Manual
Page 50
..., press and hold . 3 Press the OK button. Doing more with your camera Running a slide show on a television or on the LCD screen. To save battery power, use an optional Kodak 3-volt AC adapter. (Visit www.kodak.com/go /support Each picture and video is displayed once. To interrupt the ...Slide Show, press the OK button. to 60 seconds. 1 On the Slide Show menu, press OK button. Changing the slide show 1 Press the Review button, then press...
..., press and hold . 3 Press the OK button. Doing more with your camera Running a slide show on a television or on the LCD screen. To save battery power, use an optional Kodak 3-volt AC adapter. (Visit www.kodak.com/go /support Each picture and video is displayed once. To interrupt the ...Slide Show, press the OK button. to 60 seconds. 1 On the Slide Show menu, press OK button. Changing the slide show 1 Press the Review button, then press...
User Manual
Page 51
... show is correct (see table on page 36). The Loop feature remains until battery power is running. 1 Connect an audio/video cable from the camera USB, A/V Out port to the computer. Displaying pictures and videos on a television You can display pictures and videos on a television, computer monitor,... then press the OK button. 2 Press to create album names on your television user's guide for details. First-on the television. See Kodak EasyShare software Help for details. 2 Review pictures and videos on your computer Use Kodak EasyShare software that came with those album names.
... show is correct (see table on page 36). The Loop feature remains until battery power is running. 1 Connect an audio/video cable from the camera USB, A/V Out port to the computer. Displaying pictures and videos on a television You can display pictures and videos on a television, computer monitor,... then press the OK button. 2 Press to create album names on your television user's guide for details. First-on the television. See Kodak EasyShare software Help for details. 2 Review pictures and videos on your computer Use Kodak EasyShare software that came with those album names.

User Manual
Page 52
... feature in Review mode to your computer, Kodak EasyShare software opens and categorizes your pictures in your camera with album names. See Kodak EasyShare software Help for details. See the Kodak EasyShare software Help for details. 46 www.kodak.com/go/support Repeat to the camera's internal memory. First-on your computer Use Kodak EasyShare software that came with your camera to create...
... feature in Review mode to your computer, Kodak EasyShare software opens and categorizes your pictures in your camera with album names. See Kodak EasyShare software Help for details. See the Kodak EasyShare software Help for details. 46 www.kodak.com/go/support Repeat to the camera's internal memory. First-on your computer Use Kodak EasyShare software that came with your camera to create...

User Manual
Page 53
...Third-transfer to more than one album. www.kodak.com/go/support 47 See Kodak EasyShare software Help for each album. To add the..., select Clear All. 5 Press to scroll through the pictures. The album name appears with your camera Second-on your pictures and videos in the appropriate album folder. A plus (+) after the album name...button. When the picture you transfer the tagged pictures and videos to your computer, the Kodak EasyShare software opens and categorizes your camera 1 Press the Review button, then locate the picture or video. 2 Press the Menu button. 3 Press...
...Third-transfer to more than one album. www.kodak.com/go/support 47 See Kodak EasyShare software Help for each album. To add the..., select Clear All. 5 Press to scroll through the pictures. The album name appears with your camera Second-on your pictures and videos in the appropriate album folder. A plus (+) after the album name...button. When the picture you transfer the tagged pictures and videos to your computer, the Kodak EasyShare software opens and categorizes your camera 1 Press the Review button, then locate the picture or video. 2 Press the Menu button. 3 Press...
User Manual
Page 54
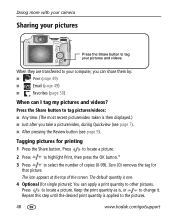
...most recent picture/video taken is one. 4 Optional (for single picture): You can I After pressing the Review button (see page 7). Keep the print quantity as is applied to the pictures. 48 www.kodak.com/go/support Repeat this step until the desired print quantity is , or to change it. The ...icon appears at the top of copies (0-99). Press to locate a picture. 2 Press to highlight Print, then press the OK button.* 3 Press to locate a picture. Doing more with your camera Sharing...
...most recent picture/video taken is one. 4 Optional (for single picture): You can I After pressing the Review button (see page 7). Keep the print quantity as is applied to the pictures. 48 www.kodak.com/go/support Repeat this step until the desired print quantity is , or to change it. The ...icon appears at the top of copies (0-99). Press to locate a picture. 2 Press to highlight Print, then press the OK button.* 3 Press to locate a picture. Doing more with your camera Sharing...


