User Manual
Page 1
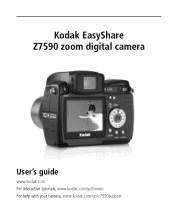
Kodak EasyShare Z7590 zoom digital camera FPO User's guide www.kodak.com For interactive tutorials, www.kodak.com/go/howto For help with your camera, www.kodak.com/go/z7590support
Kodak EasyShare Z7590 zoom digital camera FPO User's guide www.kodak.com For interactive tutorials, www.kodak.com/go/howto For help with your camera, www.kodak.com/go/z7590support

User Manual
Page 7
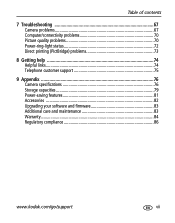
...the display, EVF or LCD 7 Checking camera and picture status 7 Storing pictures on a SD or MMC card 8 2 Taking pictures and videos 9 Taking a picture 9 Taking a video 14 Quickview-Reviewing the picture or video just taken 15 Using optical zoom 16 Using advanced digital zoom 16 Picture-taking modes 17 Using... landscape pictures 27 Using exposure bracketing 28 Using burst 29 Changing picture-taking settings 30 Using setup to customize your camera 36 Putting yourself in the picture or video 38 Pre-tagging for album names 39 Tips for better pictures 40 www.kodak.com/go/support v
...the display, EVF or LCD 7 Checking camera and picture status 7 Storing pictures on a SD or MMC card 8 2 Taking pictures and videos 9 Taking a picture 9 Taking a video 14 Quickview-Reviewing the picture or video just taken 15 Using optical zoom 16 Using advanced digital zoom 16 Picture-taking modes 17 Using... landscape pictures 27 Using exposure bracketing 28 Using burst 29 Changing picture-taking settings 30 Using setup to customize your camera 36 Putting yourself in the picture or video 38 Pre-tagging for album names 39 Tips for better pictures 40 www.kodak.com/go/support v

User Manual
Page 8
... and videos for emailing 58 Tagging pictures as favorites 59 6 Transferring and printing pictures 62 Transferring pictures/videos with the USB cable 62 Printing from a Kodak EasyShare printer dock or your computer 63 Printing from an optional SD or MMC card 63 Ordering prints online 63 Direct printing with a PictBridge-enabled printer...
... and videos for emailing 58 Tagging pictures as favorites 59 6 Transferring and printing pictures 62 Transferring pictures/videos with the USB cable 62 Printing from a Kodak EasyShare printer dock or your computer 63 Printing from an optional SD or MMC card 63 Ordering prints online 63 Direct printing with a PictBridge-enabled printer...
User Manual
Page 9
Table of contents 7 Troubleshooting 67 Camera problems 67 Computer/connectivity problems 70 Picture quality problems 70 Power-ring-light status 72 Direct printing (PictBridge) problems 73 8 Getting help 74 Helpful links 74 Telephone customer support 75 9 Appendix 76 Camera specifications 76 Storage capacities 79 Power-saving features 81 Accessories 82 Upgrading your software and firmware 83 Additional care and maintenance 83 Warranty...84 Regulatory compliance 86 www.kodak.com/go/support vii
Table of contents 7 Troubleshooting 67 Camera problems 67 Computer/connectivity problems 70 Picture quality problems 70 Power-ring-light status 72 Direct printing (PictBridge) problems 73 8 Getting help 74 Helpful links 74 Telephone customer support 75 9 Appendix 76 Camera specifications 76 Storage capacities 79 Power-saving features 81 Accessories 82 Upgrading your software and firmware 83 Additional care and maintenance 83 Warranty...84 Regulatory compliance 86 www.kodak.com/go/support vii
User Manual
Page 11
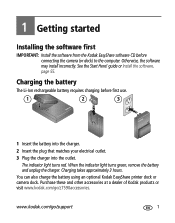
.... Charging the battery The Li-Ion rechargeable battery requires charging before connecting the camera (or dock) to the computer. You can also charge the battery using an optional Kodak EasyShare printer dock or camera dock. See the Start Here! guide or Install the software, page 55.... When the indicator light turns green, remove the battery and unplug the charger. www.kodak.com/go /z7590accessories. 1 Getting started Installing...
.... Charging the battery The Li-Ion rechargeable battery requires charging before connecting the camera (or dock) to the computer. You can also charge the battery using an optional Kodak EasyShare printer dock or camera dock. See the Start Here! guide or Install the software, page 55.... When the indicator light turns green, remove the battery and unplug the charger. www.kodak.com/go /z7590accessories. 1 Getting started Installing...
User Manual
Page 12
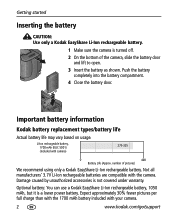
... Inserting the battery CAUTION: Use only a Kodak EasyShare Li-Ion rechargeable battery. 1 Make sure the camera is turned off. 2 On the bottom of pictures) We recommend using only a Kodak EasyShare Li-Ion rechargeable battery. Li-Ion rechargeable battery, 1700 mAh (KLIC 5001) (included with the camera. number of the camera, slide the battery door and lift to...
... Inserting the battery CAUTION: Use only a Kodak EasyShare Li-Ion rechargeable battery. 1 Make sure the camera is turned off. 2 On the bottom of pictures) We recommend using only a Kodak EasyShare Li-Ion rechargeable battery. Li-Ion rechargeable battery, 1700 mAh (KLIC 5001) (included with the camera. number of the camera, slide the battery door and lift to...
User Manual
Page 13
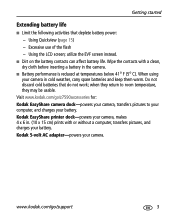
... - Using Quickview (page 15) - Kodak 5-volt AC adapter-powers your battery. www.kodak.com/go /z7590accessories for: Kodak EasyShare camera dock-powers your camera, transfers pictures to room temperature, they return to your computer, and charges your camera. Visit www.kodak.com/go /support 3 Wipe the contacts...Limit the following activities that do not work; When using your battery. when they may be usable. Using the LCD screen; Kodak EasyShare printer dock-powers your camera, makes 4 x 6 in. (10 x 15 cm) prints with a clean, dry cloth before inserting a battery in ...
... - Using Quickview (page 15) - Kodak 5-volt AC adapter-powers your battery. www.kodak.com/go /z7590accessories for: Kodak EasyShare camera dock-powers your camera, transfers pictures to room temperature, they return to your computer, and charges your camera. Visit www.kodak.com/go /support 3 Wipe the contacts...Limit the following activities that do not work; When using your battery. when they may be usable. Using the LCD screen; Kodak EasyShare printer dock-powers your camera, makes 4 x 6 in. (10 x 15 cm) prints with a clean, dry cloth before inserting a battery in ...
User Manual
Page 15
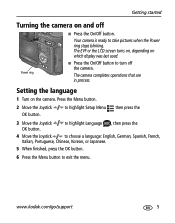
... operations that are in process. Press the Menu button. 2 Move the Joystick OK button. www.kodak.com/go/support 5 Getting started Turning the camera on which display was last used. to highlight Language , then press the 4 Move the Joystick to choose a language: English, German, Spanish, French, Italian...Korean, or Japanese. 5 When finished, press the OK button. 6 Press the Menu button to take pictures when the Power ring stops blinking. Your camera is ready to exit the menu. to turn off ■ Press the On/Off button. Power ring ■ Press the On/Off button to ...
... operations that are in process. Press the Menu button. 2 Move the Joystick OK button. www.kodak.com/go/support 5 Getting started Turning the camera on which display was last used. to highlight Language , then press the 4 Move the Joystick to choose a language: English, German, Spanish, French, Italian...Korean, or Japanese. 5 When finished, press the OK button. 6 Press the Menu button to take pictures when the Power ring stops blinking. Your camera is ready to exit the menu. to turn off ■ Press the On/Off button. Power ring ■ Press the On/Off button to ...
User Manual
Page 16
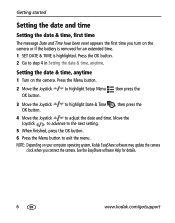
... Setting the date & time, anytime. NOTE: Depending on your computer operating system, Kodak EasyShare software may update the camera clock when you turn on the camera. See the EasyShare software Help for an extended time. 1 SET DATE & TIME is removed for details. 6 www.kodak.com/go/support Getting started Setting the date and time Setting the...
... Setting the date & time, anytime. NOTE: Depending on your computer operating system, Kodak EasyShare software may update the camera clock when you turn on the camera. See the EasyShare software Help for an extended time. 1 SET DATE & TIME is removed for details. 6 www.kodak.com/go/support Getting started Setting the date and time Setting the...
User Manual
Page 17
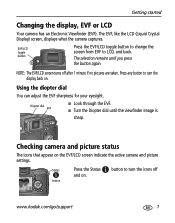
... to turn the icons off after 1 minute if no pictures are taken. The selection remains until the viewfinder image is sharp. Checking camera and picture status The icons that appear on . Using the diopter dial You can adjust the EVF sharpness for your eyesight. Getting started...). Status Press the Status button to LCD, and back. The EVF, like the LCD (Liquid Crystal Display) screen, displays what the camera captures. button www.kodak.com/go/support 7 Diopter dial EVF ■ Look through the EVF. ■ Turn the Diopter dial until you press the button again...
... to turn the icons off after 1 minute if no pictures are taken. The selection remains until the viewfinder image is sharp. Checking camera and picture status The icons that appear on . Using the diopter dial You can adjust the EVF sharpness for your eyesight. Getting started...). Status Press the Status button to LCD, and back. The EVF, like the LCD (Liquid Crystal Display) screen, displays what the camera captures. button www.kodak.com/go/support 7 Diopter dial EVF ■ Look through the EVF. ■ Turn the Diopter dial until you press the button again...

User Manual
Page 18
CAUTION: The card can purchase optional SD cards at a dealer of Kodak products or at www.kodak.com/global/en/digital/accessories for removable, reusable storage for your pictures, card, or camera. 1 Turn off the camera. doing so may damage the camera or card. Do not insert or remove a card when the green ... Orient the card as shown on a SD or MMC card Your camera has 32 MB of the SD Card Association.) When using the card for storage capacities. 8 www.kodak.com/go/support Push the card in this camera before taking pictures (see page 38). You can only be inserted one...
CAUTION: The card can purchase optional SD cards at a dealer of Kodak products or at www.kodak.com/global/en/digital/accessories for removable, reusable storage for your pictures, card, or camera. 1 Turn off the camera. doing so may damage the camera or card. Do not insert or remove a card when the green ... Orient the card as shown on a SD or MMC card Your camera has 32 MB of the SD Card Association.) When using the card for storage capacities. 8 www.kodak.com/go/support Push the card in this camera before taking pictures (see page 38). You can only be inserted one...

User Manual
Page 19
www.kodak.com/go/support 9 An Open Flash warning appears on the EVF/LCD screen when the flash ...LCD screen displays a mode description and a live view. NOTE: Use Auto for general picture-taking situations. (See page 17 for other camera-mode options.) 3 Use the EVF or LCD screen to frame your subject. (Press the EVF/LCD toggle button to switch to the other.... NOTE: To take pictures-in Review, Share, or Setup but not in Favorites. (In Video mode, the camera captures video.) 1 Press the On/Off button. 2 Turn the Mode dial to the desired setting. 2 Taking pictures and videos Taking a...
www.kodak.com/go/support 9 An Open Flash warning appears on the EVF/LCD screen when the flash ...LCD screen displays a mode description and a live view. NOTE: Use Auto for general picture-taking situations. (See page 17 for other camera-mode options.) 3 Use the EVF or LCD screen to frame your subject. (Press the EVF/LCD toggle button to switch to the other.... NOTE: To take pictures-in Review, Share, or Setup but not in Favorites. (In Video mode, the camera captures video.) 1 Press the On/Off button. 2 Turn the Mode dial to the desired setting. 2 Taking pictures and videos Taking a...
User Manual
Page 21
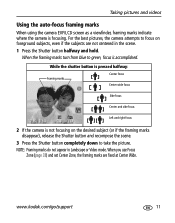
...shutter button is pressed halfway: Framing marks Center focus Center wide focus Side focus Center and side focus Left and right focus 2 If the camera is not focusing on foreground subjects, even if the subjects are fixed at Center Wide. Taking pictures and videos Using the auto-focus framing... marks When using the camera EVF/LCD screen as a viewfinder, framing marks indicate where the camera is accomplished. When the framing marks turn from blue to take the picture. www.kodak.com/go/support 11 When you use Focus Zone (page 33) and...
...shutter button is pressed halfway: Framing marks Center focus Center wide focus Side focus Center and side focus Left and right focus 2 If the camera is not focusing on foreground subjects, even if the subjects are fixed at Center Wide. Taking pictures and videos Using the auto-focus framing... marks When using the camera EVF/LCD screen as a viewfinder, framing marks indicate where the camera is accomplished. When the framing marks turn from blue to take the picture. www.kodak.com/go/support 11 When you use Focus Zone (page 33) and...
User Manual
Page 22
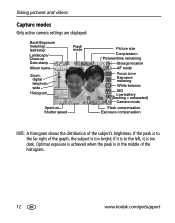
...the peak is too bright; Taking pictures and videos Capture modes Only active camera settings are displayed: Burst/ Exposure metering/ Self-timer Landscape/ Close-up Date stamp Album name Zoom: digital telephoto wide Histogram Flash mode Aperture Shutter speed Picture size Compression Pictures/time remaining...AF mode Focus zone Exposure metering White balance ISO Low battery (flashing = exhausted) Camera mode Flash compensation Exposure compensation NOTE: A histogram shows the distribution of the histogram. 12 www.kodak.com/go/support if it is to the far right of the graph, the ...
...the peak is too bright; Taking pictures and videos Capture modes Only active camera settings are displayed: Burst/ Exposure metering/ Self-timer Landscape/ Close-up Date stamp Album name Zoom: digital telephoto wide Histogram Flash mode Aperture Shutter speed Picture size Compression Pictures/time remaining...AF mode Focus zone Exposure metering White balance ISO Low battery (flashing = exhausted) Camera mode Flash compensation Exposure compensation NOTE: A histogram shows the distribution of the histogram. 12 www.kodak.com/go/support if it is to the far right of the graph, the ...

User Manual
Page 24
to highlight the desired Size, then press the 4 To eliminate camera noise during ) video recording. 1 Turn the Mode dial to begin recording. To stop recording, press and release the Shutter button again. Recording also stops if ... (but not during recording, turn off Continuous AF (see page 7.) 6 Press the Shutter button completely down and hold it for video storage capacities. 14 www.kodak.com/go/support Move the Joystick press the OK button. During recording, REC blinks on the screen and the elapsed time is full. NOTE: If...
to highlight the desired Size, then press the 4 To eliminate camera noise during ) video recording. 1 Turn the Mode dial to begin recording. To stop recording, press and release the Shutter button again. Recording also stops if ... (but not during recording, turn off Continuous AF (see page 7.) 6 Press the Shutter button completely down and hold it for video storage capacities. 14 www.kodak.com/go/support Move the Joystick press the OK button. During recording, REC blinks on the screen and the elapsed time is full. NOTE: If...

User Manual
Page 26
... toward Telephoto (T) to the telephoto optical zoom limit (10X). The EVF or LCD screen displays the zoomed image and the zoom indicator. 16 www.kodak.com/go/support Optical zoom is effective when the lens is no closer than 2 ft (0.6 m) from 12X to zoom out. Taking pictures and... you take high-zoom pictures. 1 Use the EVF or LCD screen to your subject. IMPORTANT: Place the camera on page 40.) You can change optical zoom before (but not during) video recording. Zoom indicator Digital zoom range Optical zoom range 2 Push the Zoom button toward Wide Angle (W) to 30X.
... toward Telephoto (T) to the telephoto optical zoom limit (10X). The EVF or LCD screen displays the zoomed image and the zoom indicator. 16 www.kodak.com/go/support Optical zoom is effective when the lens is no closer than 2 ft (0.6 m) from 12X to zoom out. Taking pictures and... you take high-zoom pictures. 1 Use the EVF or LCD screen to your subject. IMPORTANT: Place the camera on page 40.) You can change optical zoom before (but not during) video recording. Zoom indicator Digital zoom range Optical zoom range 2 Push the Zoom button toward Wide Angle (W) to 30X.

User Manual
Page 27
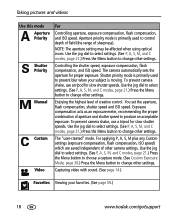
... 4 x 6 in printed image quality when using digital zoom. Use this mode Auto For General picture-taking modes Mode dial Choose the mode that the slider remains blue. www.kodak.com/go/support 17 Program Controlling exposure compensation (how much light enters the camera) and flash compensation. The camera automatically sets the shutter speed and...
... 4 x 6 in printed image quality when using digital zoom. Use this mode Auto For General picture-taking modes Mode dial Choose the mode that the slider remains blue. www.kodak.com/go/support 17 Program Controlling exposure compensation (how much light enters the camera) and flash compensation. The camera automatically sets the shutter speed and...
User Manual
Page 28
...and C modes, page 21.) Press the Menu button to control depth of field (the range of aperture and shutter speed to change other camera settings. Controlling the shutter speed, exposure compensation, flash compensation, and ISO speed. Exposure compensation acts as an exposure meter, recommending the proper ... a tripod for slow shutter speeds. Aperture priority mode is primarily used to prevent blur when your favorites. (See page 59.) 18 www.kodak.com/go/support You set the aperture, flash compensation, shutter speed and ISO speed. Use the jog dial to select settings. (See ...
...and C modes, page 21.) Press the Menu button to control depth of field (the range of aperture and shutter speed to change other camera settings. Controlling the shutter speed, exposure compensation, flash compensation, and ISO speed. Exposure compensation acts as an exposure meter, recommending the proper ... a tripod for slow shutter speeds. Aperture priority mode is primarily used to prevent blur when your favorites. (See page 59.) 18 www.kodak.com/go/support You set the aperture, flash compensation, shutter speed and ISO speed. Use the jog dial to select settings. (See ...

User Manual
Page 29
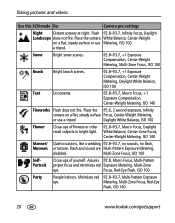
...White Balance, ISO 100 Landscape. The camera pre-settings are f/2.8-f/3.7, Multi-Pattern Exposure...background blur. Taking pictures and videos Use this SCN mode For Camera pre-settings Close-up Subjects closer than 28 in motion. Shutter...Macro Focus, CenterWeight Metering, Center-Zone Focus, ISO 100 Landscape Distant scenery. The camera pre-settings are f/2.8-f/3.7, Multi-Pattern Exposure Metering, Multi-Zone Focus, ISO 100. Use... or low-light Metering, Multi-Zone Focus, ISO 140 conditions. Place the camera on a flat, steady surface or use a tripod. Allows the subject to...
...White Balance, ISO 100 Landscape. The camera pre-settings are f/2.8-f/3.7, Multi-Pattern Exposure...background blur. Taking pictures and videos Use this SCN mode For Camera pre-settings Close-up Subjects closer than 28 in motion. Shutter...Macro Focus, CenterWeight Metering, Center-Zone Focus, ISO 100 Landscape Distant scenery. The camera pre-settings are f/2.8-f/3.7, Multi-Pattern Exposure Metering, Multi-Zone Focus, ISO 100. Use... or low-light Metering, Multi-Zone Focus, ISO 140 conditions. Place the camera on a flat, steady surface or use a tripod. Allows the subject to...
User Manual
Page 30
Taking pictures and videos Use this SCN mode For Camera pre-settings Night Distant scenery at night. Place the camera White Balance, Center-Weight on a flat, steady surface Focus, Center-Weight Metering, or use Metering, ISO 100 a tripod. Daylight..., Multi-Pattern proper focus and minimizes red Exposure Metering, Multi-Zone eye. Metering, Multi-Zone Focus, Red-Eye Flash, ISO 140 20 www.kodak.com/go/support Minimizes red f/2.8-f/3.7, Multi-Pattern Exposure eye. Snow Bright snow scenes. Flash and sound are Multi-Pattern Exposure Metering, disabled. f/2.8-f/3.7, ...
Taking pictures and videos Use this SCN mode For Camera pre-settings Night Distant scenery at night. Place the camera White Balance, Center-Weight on a flat, steady surface Focus, Center-Weight Metering, or use Metering, ISO 100 a tripod. Daylight..., Multi-Pattern proper focus and minimizes red Exposure Metering, Multi-Zone eye. Metering, Multi-Zone Focus, Red-Eye Flash, ISO 140 20 www.kodak.com/go/support Minimizes red f/2.8-f/3.7, Multi-Pattern Exposure eye. Snow Bright snow scenes. Flash and sound are Multi-Pattern Exposure Metering, disabled. f/2.8-f/3.7, ...


