
User guide
Page 22
...remove card while the camera is operating normally. In Review mode, you do ■ Check the image storage location setting. (See the Setup menu.) not see page 18). 22 www.kodak.com/go /zd15support and select Interactive Troubleshooting & Repairs. Camera does not turn &#...pictures and videos, including protected files. Pictures remaining ■ The camera is on . ■ Charge rechargeable batteries. does not function, visit www.kodak.com/go /easysharecenter 4 Solving camera problems Status Solution Camera does not turn ■ Remove the battery, then reinsert or ...
...remove card while the camera is operating normally. In Review mode, you do ■ Check the image storage location setting. (See the Setup menu.) not see page 18). 22 www.kodak.com/go /zd15support and select Interactive Troubleshooting & Repairs. Camera does not turn &#...pictures and videos, including protected files. Pictures remaining ■ The camera is on . ■ Charge rechargeable batteries. does not function, visit www.kodak.com/go /easysharecenter 4 Solving camera problems Status Solution Camera does not turn ■ Remove the battery, then reinsert or ...
Extended user guide
Page 5
... zoom 8 Using the flash 9 Using the Focus button 10 Using the self-timer 11 Using burst 11 Taking panoramic pictures 12 Getting help from your camera ...13 P, A, S, and M modes 14 Using exposure compensation to adjust brightness 16 Using the histogram to view picture brightness 17 Understanding the picture-taking icons 17 3 Working with pictures/videos 18 Reviewing... pictures/videos 18 Deleting pictures/videos 19 Using shortcuts 21 Using the menu button in Review 21 Adding sound tags 22 Cropping pictures 23 Using KODAK PERFECT TOUCH Technology 24 www.kodak...
... zoom 8 Using the flash 9 Using the Focus button 10 Using the self-timer 11 Using burst 11 Taking panoramic pictures 12 Getting help from your camera ...13 P, A, S, and M modes 14 Using exposure compensation to adjust brightness 16 Using the histogram to view picture brightness 17 Understanding the picture-taking icons 17 3 Working with pictures/videos 18 Reviewing... pictures/videos 18 Deleting pictures/videos 19 Using shortcuts 21 Using the menu button in Review 21 Adding sound tags 22 Cropping pictures 23 Using KODAK PERFECT TOUCH Technology 24 www.kodak...

Extended user guide
Page 6
.../videos on a television 29 Viewing pictures/videos in different ways 30 Selecting multiple pictures/videos 30 Copying pictures/videos 31 Understanding the review icons 31 4 Using the menu button 32 Using the Setup menu 35 5 Transferring, printing, and sharing pictures 38 Installing the ...USB cable 39 Printing pictures 40 Marking your pictures 42 6 Troubleshooting 46 7 Getting help 51 Helpful links 51 8 Appendix 53 Camera specifications 53 Storage capacities 55 Important safety instructions 56 Upgrading your software and firmware 57 Battery life 57 Care and maintenance 58 ...
.../videos on a television 29 Viewing pictures/videos in different ways 30 Selecting multiple pictures/videos 30 Copying pictures/videos 31 Understanding the review icons 31 4 Using the menu button 32 Using the Setup menu 35 5 Transferring, printing, and sharing pictures 38 Installing the ...USB cable 39 Printing pictures 40 Marking your pictures 42 6 Troubleshooting 46 7 Getting help 51 Helpful links 51 8 Appendix 53 Camera specifications 53 Storage capacities 55 Important safety instructions 56 Upgrading your software and firmware 57 Battery life 57 Care and maintenance 58 ...

Extended user guide
Page 17
... the picture/pictures after a 10-second delay. Using burst Use the Burst feature to take pictures. www.kodak.com/go/support 11 The camera takes up to get into the scene). 2 seconds-A picture is taken after the delay. To delete selectively, do so in quick succession. A second ...picture is taken after a 10-second delay (so you have time to 3 pictures in Review (see page 19). NOTE: Burst is unavailable...
... the picture/pictures after a 10-second delay. Using burst Use the Burst feature to take pictures. www.kodak.com/go/support 11 The camera takes up to get into the scene). 2 seconds-A picture is taken after the delay. To delete selectively, do so in quick succession. A second ...picture is taken after a 10-second delay (so you have time to 3 pictures in Review (see page 19). NOTE: Burst is unavailable...

Extended user guide
Page 26
The Protect icon appears with pictures/videos Protecting pictures/videos from deletion 1 Press the Review button, then to find a picture. 2 Press the Menu button. 3 Press to exit the menu. CAUTION: Formatting internal memory or an SD or SDHC...deletes all (including protected) pictures/videos. (Formatting internal memory also deletes email addresses, tag names, and favorites.) IMPORTANT: Your camera offers a built-in Help system. See page 13. 20 www.kodak.com/go/support Working with the protected picture/video. ■ Press the Menu button to highlight Protect, then press OK....
The Protect icon appears with pictures/videos Protecting pictures/videos from deletion 1 Press the Review button, then to find a picture. 2 Press the Menu button. 3 Press to exit the menu. CAUTION: Formatting internal memory or an SD or SDHC...deletes all (including protected) pictures/videos. (Formatting internal memory also deletes email addresses, tag names, and favorites.) IMPORTANT: Your camera offers a built-in Help system. See page 13. 20 www.kodak.com/go/support Working with the protected picture/video. ■ Press the Menu button to highlight Protect, then press OK....

Extended user guide
Page 27
...press OK. 4 Choose an option, then press OK. www.kodak.com/go/support 21 To hide the shortcuts again, press . See page 13. Shortcuts Using the menu button in Help system. IMPORTANT: Your camera offers a built-in Review 1 Press the Review button, then the Menu button. 2 Press to choose a... tab: ■ Review to view pictures/videos ■ Edit to edit pictures/videos ■ Setup for other...
...press OK. 4 Choose an option, then press OK. www.kodak.com/go/support 21 To hide the shortcuts again, press . See page 13. Shortcuts Using the menu button in Help system. IMPORTANT: Your camera offers a built-in Review 1 Press the Review button, then the Menu button. 2 Press to choose a... tab: ■ Review to view pictures/videos ■ Edit to edit pictures/videos ■ Setup for other...

Extended user guide
Page 28
...NOTE: Only one sound tag can record a voice or sound (up to 1 minute long) to add to stop playback. Recording a sound tag 1 Press the Review button, then 2 Press the Menu button, then to exit the menu. See page 13. The sound tag is applied to your picture. ■ Press the... tags You can be added to each picture (not to highlight Sound Tag, then press OK. 4 Follow the screen prompts. Review 22 www.kodak.com/go/support Playing a sound tag 1 Press the Review button, then to find a picture. Working with a "Play Sound Tag" prompt. 2 Press to play the sound tag. 3 Press ...
...NOTE: Only one sound tag can record a voice or sound (up to 1 minute long) to add to stop playback. Recording a sound tag 1 Press the Review button, then 2 Press the Menu button, then to exit the menu. See page 13. The sound tag is applied to your picture. ■ Press the... tags You can be added to each picture (not to highlight Sound Tag, then press OK. 4 Follow the screen prompts. Review 22 www.kodak.com/go/support Playing a sound tag 1 Press the Review button, then to find a picture. Working with a "Play Sound Tag" prompt. 2 Press to play the sound tag. 3 Press ...

Extended user guide
Page 29
... the Menu button, then to highlight the Edit tab. 3 Press to highlight Crop, then press OK. 4 Press the Zoom lever (T/W) to zoom in Help system. IMPORTANT: Your camera offers a built-in /out. to exit the menu. See page 13. Working with pictures/videos Cropping pictures You can ... (You cannot crop these pictures: panoramic, 16:9, video action prints, pictures from a video, or pictures that are already cropped.) 1 Press the Review button, then picture. Press box. Then press OK. The picture is cropped, the original saved. (Cropped pictures cannot be cropped again.) ■...
... the Menu button, then to highlight the Edit tab. 3 Press to highlight Crop, then press OK. 4 Press the Zoom lever (T/W) to zoom in Help system. IMPORTANT: Your camera offers a built-in /out. to exit the menu. See page 13. Working with pictures/videos Cropping pictures You can ... (You cannot crop these pictures: panoramic, 16:9, video action prints, pictures from a video, or pictures that are already cropped.) 1 Press the Review button, then picture. Press box. Then press OK. The picture is cropped, the original saved. (Cropped pictures cannot be cropped again.) ■...
Extended user guide
Page 30
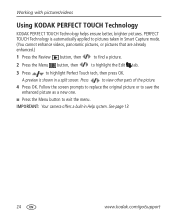
...view other parts of the picture. 4 Press OK. Working with pictures/videos Using KODAK PERFECT TOUCH Technology KODAK PERFECT TOUCH Technology helps ensure better, brighter pictures. See page 13. 24 www.kodak.com/go/support A preview is automatically applied to pictures taken in Smart Capture ..., or pictures that are already enhanced.) 1 Press the Review button, then to find a picture. 2 Press the Menu button, then to highlight the Edit tab. 3 Press to highlight Perfect Touch tech, then press OK. IMPORTANT: Your camera offers a built-in a split screen. Press to exit...
...view other parts of the picture. 4 Press OK. Working with pictures/videos Using KODAK PERFECT TOUCH Technology KODAK PERFECT TOUCH Technology helps ensure better, brighter pictures. See page 13. 24 www.kodak.com/go/support A preview is automatically applied to pictures taken in Smart Capture ..., or pictures that are already enhanced.) 1 Press the Review button, then to find a picture. 2 Press the Menu button, then to highlight the Edit tab. 3 Press to highlight Perfect Touch tech, then press OK. IMPORTANT: Your camera offers a built-in a split screen. Press to exit...

Extended user guide
Page 31
..., then the Edit tab. Press video frames. See page 13. button, then to make a picture suitable for printing. 1 Press the Review video. www.kodak.com/go/support 25 Working with pictures/videos Editing videos Making a picture from a video You can choose a single frame from the beginning... or end of a video. 1 Press the Review video. The video is saved.) ■ Press the Menu button to pause). to navigate through 5 During play the video. (Press OK to exit the menu. IMPORTANT: Your camera offers a built-in Help system. Video Trimmed video 3 ...
..., then the Edit tab. Press video frames. See page 13. button, then to make a picture suitable for printing. 1 Press the Review video. www.kodak.com/go/support 25 Working with pictures/videos Editing videos Making a picture from a video You can choose a single frame from the beginning... or end of a video. 1 Press the Review video. The video is saved.) ■ Press the Menu button to pause). to navigate through 5 During play the video. (Press OK to exit the menu. IMPORTANT: Your camera offers a built-in Help system. Video Trimmed video 3 ...

Extended user guide
Page 32
... (T) button. 26 www.kodak.com/go/support To return to add bookmarks. When finished adding up to 9 bookmarks, press . ■ Press the Menu button to highlight the Edit tab. IMPORTANT: Your camera offers a built-in your video, then jump from one bookmark to another. Setting bookmarks 1 Press the Review video. button, then to... menu. Working with pictures/videos Using video bookmarks You can set bookmarks at interesting places in Help system. See page 13. Using bookmarks 1 Press the Review video.
... (T) button. 26 www.kodak.com/go/support To return to add bookmarks. When finished adding up to 9 bookmarks, press . ■ Press the Menu button to highlight the Edit tab. IMPORTANT: Your camera offers a built-in your video, then jump from one bookmark to another. Setting bookmarks 1 Press the Review video. button, then to... menu. Working with pictures/videos Using video bookmarks You can set bookmarks at interesting places in Help system. See page 13. Using bookmarks 1 Press the Review video.

Extended user guide
Page 33
...6-inch (10 x 15 cm) print. 1 Press the Review video. See page 13. If you can make a 4-, 9-, or 16-up picture is created. the camera chooses 2, 7, or 14 equally spaced frames. ■ Use Bookmarks: Bookmarked frames are used . www.kodak.com/go/support 27 Working with pictures/videos Making a video ...action print From a video, you have less than 4 or 9 bookmarks, equally spaced video frames are used . ■ Press the Menu button to exit the menu. IMPORTANT: Your camera offers a built-in...
...6-inch (10 x 15 cm) print. 1 Press the Review video. See page 13. If you can make a 4-, 9-, or 16-up picture is created. the camera chooses 2, 7, or 14 equally spaced frames. ■ Use Bookmarks: Bookmarked frames are used . www.kodak.com/go/support 27 Working with pictures/videos Making a video ...action print From a video, you have less than 4 or 9 bookmarks, equally spaced video frames are used . ■ Press the Menu button to exit the menu. IMPORTANT: Your camera offers a built-in...

Extended user guide
Page 34
...OK. After the slide show plays, you may save or modify it . 28 www.kodak.com/go/support To show all pictures/videos 1 Press the Review button. 2 Press the Menu button, then to highlight the Review tab. 3 Press to highlight Multimedia Slide Show, then press OK. 4 Press to... highlight Preview Slide Show, then press OK. When finished, press to highlight Done, then press OK. 6 Press to continue adding pictures/videos. IMPORTANT: Your camera offers a built-in Help...
...OK. After the slide show plays, you may save or modify it . 28 www.kodak.com/go/support To show all pictures/videos 1 Press the Review button. 2 Press the Menu button, then to highlight the Review tab. 3 Press to highlight Multimedia Slide Show, then press OK. 4 Press to... highlight Preview Slide Show, then press OK. When finished, press to highlight Done, then press OK. 6 Press to continue adding pictures/videos. IMPORTANT: Your camera offers a built-in Help...

Extended user guide
Page 37
...inserted in Help system. To remove pictures/videos from internal memory to a card. Understanding the review icons Video duration Shortcuts Select picture Add text tag View multi-up Play video Print tag/number ... Picture/Video number Upload tag Favorite tag Text tag name Battery level Date stamp www.kodak.com/go/support 31 See page 13. Working with pictures/videos Copying pictures/videos You... location after copying, delete them (see page 19). Copy pictures/videos: 1 Press the Review button, then the Menu button. 2 Press to highlight Copy, then press OK. 3 Press to highlight ...
...inserted in Help system. To remove pictures/videos from internal memory to a card. Understanding the review icons Video duration Shortcuts Select picture Add text tag View multi-up Play video Print tag/number ... Picture/Video number Upload tag Favorite tag Text tag name Battery level Date stamp www.kodak.com/go/support 31 See page 13. Working with pictures/videos Copying pictures/videos You... location after copying, delete them (see page 19). Copy pictures/videos: 1 Press the Review button, then the Menu button. 2 Press to highlight Copy, then press OK. 3 Press to highlight ...

Extended user guide
Page 48
..., printing, and sharing pictures Marking your pictures You can apply a print quantity to other pictures. The Print icon appears in EASYSHARE Software. 42 www.kodak.com/go/support Press to highlight Print, then press OK. 3 Press to locate a picture. 2 Press the Menu button....printing 1 Press the Review button. Repeat this step until the desired print quantity is , or press to Capture mode. Optional: You can mark your computer, the EASYSHARE Software print screen opens. See page 13. Press to select the number of copies. IMPORTANT: Your camera offers a built-in...
..., printing, and sharing pictures Marking your pictures You can apply a print quantity to other pictures. The Print icon appears in EASYSHARE Software. 42 www.kodak.com/go/support Press to highlight Print, then press OK. 3 Press to locate a picture. 2 Press the Menu button....printing 1 Press the Review button. Repeat this step until the desired print quantity is , or press to Capture mode. Optional: You can mark your computer, the EASYSHARE Software print screen opens. See page 13. Press to select the number of copies. IMPORTANT: Your camera offers a built-in...

Extended user guide
Page 49
... To send the pictures/videos to email using KODAK EASYSHARE Software. The email address or name is displayed, press OK. www.kodak.com/go/support 43 First, create a new email address. (See "Add a new email address or name" on -camera keyboard, then press OK. To mark other ...address, scroll through them. The Email icon appears in EASYSHARE Software. When you transfer the marked pictures/videos to highlight New Email or New Tag, then press OK. 4 Use the on page 43.) 1 Press the Review button. IMPORTANT: Your camera offers a built-in Help system. Transferring, printing,...
... To send the pictures/videos to email using KODAK EASYSHARE Software. The email address or name is displayed, press OK. www.kodak.com/go/support 43 First, create a new email address. (See "Add a new email address or name" on -camera keyboard, then press OK. To mark other ...address, scroll through them. The Email icon appears in EASYSHARE Software. When you transfer the marked pictures/videos to highlight New Email or New Tag, then press OK. 4 Use the on page 43.) 1 Press the Review button. IMPORTANT: Your camera offers a built-in Help system. Transferring, printing,...

Extended user guide
Page 50
... and categorizes your favorite pictures/videos easier to locate in EASYSHARE Software, you can mark them as favorites. 1 Press the Review button, then to locate a picture/video. 2 Press the Share button. See page 13. 44 www.kodak.com/go/support The favorite mark appears with the picture.... name" on page 43.) 1 Press the Review button, then locate a picture/video. 2 Press the Menu button. 3 Highlight Tag, then press OK. 4 Highlight a tag name, then press OK. To assign the tag to locate a picture, then press OK. IMPORTANT: Your camera offers a built-in Help system. Transferring, ...
... and categorizes your favorite pictures/videos easier to locate in EASYSHARE Software, you can mark them as favorites. 1 Press the Review button, then to locate a picture/video. 2 Press the Share button. See page 13. 44 www.kodak.com/go/support The favorite mark appears with the picture.... name" on page 43.) 1 Press the Review button, then locate a picture/video. 2 Press the Menu button. 3 Highlight Tag, then press OK. 4 Highlight a tag name, then press OK. To assign the tag to locate a picture, then press OK. IMPORTANT: Your camera offers a built-in Help system. Transferring, ...

Extended user guide
Page 52
...9632; Remove the battery, then reinsert or replace it. number does not decrease after taking pictures. In Review mode, ■ Check the image storage location setting (page 35). If the camera still does turn on . Continue taking a picture. Keep corrupted. rechargeable batteries charged. ■ Transfer ... or internal memory (see a picture (or the expected picture) on the LCD screen. 46 www.kodak.com/go/support turn off. Do not remove card while the camera is operating normally. CAUTION: Formatting a card deletes all pictures and videos, including protected files. you do...
...9632; Remove the battery, then reinsert or replace it. number does not decrease after taking pictures. In Review mode, ■ Check the image storage location setting (page 35). If the camera still does turn on . Continue taking a picture. Keep corrupted. rechargeable batteries charged. ■ Transfer ... or internal memory (see a picture (or the expected picture) on the LCD screen. 46 www.kodak.com/go/support turn off. Do not remove card while the camera is operating normally. CAUTION: Formatting a card deletes all pictures and videos, including protected files. you do...

Extended user guide
Page 53
...green, press the Shutter button completely down. ■ Place the camera on external ■ See the external device's user's guide. www.kodak.com/go/support 47 Slide show does ■ Adjust the camera Video Out setting (NTSC or PAL, see page 37). Shutter ...button does not work. ■ Turn on the flash (page 9). ■ Move so there is displayed CAUTION: Formatting a card deletes all pictures and videos, instead of the following In Review...
...green, press the Shutter button completely down. ■ Place the camera on external ■ See the external device's user's guide. www.kodak.com/go/support 47 Slide show does ■ Adjust the camera Video Out setting (NTSC or PAL, see page 37). Shutter ...button does not work. ■ Turn on the flash (page 9). ■ Move so there is displayed CAUTION: Formatting a card deletes all pictures and videos, instead of the following In Review...
Extended user guide
Page 63
... Review and Slide Show features sparingly. ■ Keep battery contacts/terminals clean. Wipe with a dry cloth. ■ Fully charge Ni-MH batteries prior to use and occasionally discharge to room temperature, they may vary based on the KODAK EASYSHARE Software CD and the camera ...MH batteries. ■ Battery performance is reduced at low temperatures. www.kodak.com/go /zd15downloads. Battery life ■ KODAK MAX Alkaline Batteries, AA: < 150 pictures ■ KODAK Ni-MH Rechargeable Digital Camera Batteries: 280 pictures Battery life per CIPA testing method using your software ...
... Review and Slide Show features sparingly. ■ Keep battery contacts/terminals clean. Wipe with a dry cloth. ■ Fully charge Ni-MH batteries prior to use and occasionally discharge to room temperature, they may vary based on the KODAK EASYSHARE Software CD and the camera ...MH batteries. ■ Battery performance is reduced at low temperatures. www.kodak.com/go /zd15downloads. Battery life ■ KODAK MAX Alkaline Batteries, AA: < 150 pictures ■ KODAK Ni-MH Rechargeable Digital Camera Batteries: 280 pictures Battery life per CIPA testing method using your software ...


