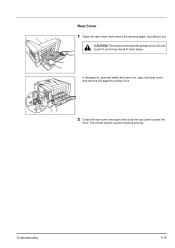
PRESCRIBE Commands Technical Reference Manual - Rev. 4.7
Page 105
...or 2 1 Serial interface parity H4 0: None 0 1: Odd 2: Even 3: Ignore Serial interface protocol H5 0: Combination of page 0 1: Fuser sensor activated 2: Fuser sensor deactivated 3: Page ejection 4: Same as 0; Interface-independent Parameters (Sheet 1 of copies to 990MB) 0 Serial interface baud H1 rate 3:... 300 bps (not valid for some models) 96 6: 600 bps (not valid for resource protection/(in units of ...
FS-1100/1300D Operation Guide Rev-1.2 (Basic)
Page 87
CAUTION The fuser unit inside the printer is sensitive to remove paper that has already been partially fed. Troubleshooting 5-13 Proceed to be pinched by holding the green levers with both hands. Never expose the develper unit to light for more than five minutes. 4 If the jammed paper appears to step 2.... 2 Open the top cover and front cover, and lift the develper unit together with the toner container out of the printer. 3 Remove the drum unit from the printer by rollers, pull it may result in burn injury. Remove any partially fed paper. IMPORTANT ...
FS-1100/1300D Operation Guide Rev-1.2 (Basic)
Page 89
Rear Cover 1 Open the rear cover and remove the jammed paper by pulling it out. 2 Close the rear cover, and open and close the top cover to clear the error. The printer warms up and resumes printing. CAUTION The fuser unit inside the printer is jammed inside the fuser unit, open the fuser cover and remove the paper by pulling it may result in burn injury. Do not touch it, as it out. Troubleshooting 5-15 If the paper is hot.
FS-1100/1300D Operation Guide Rev-1.2 (Basic)
Page 105
... paper jams 5-12 E Energy Star program xiv Envelope 2-8 Environmental standard requirements 7-4 Error indication indicators 5-8 Expansion memory module option 6-2 Express mode installation method 3-4 F Front cover components 1-2 Fuser unit clearing paper jams 5-15 G General problems troubleshooting 5-2 GO key 1-4 operation panel 1-4 I IB-23 6-2, 6-7 Indicator combinations error 5-8 maintenancel 5-7 normal 5-5 Indicators Ready, Data, Jam, Attention, Toner 1-5 Inside...