

User Guide
Page 32
...Using Continuous Shooting Mode | Shooting Movies | Selecting Scenes to Automatically Set the Focus and Flash | [k] Using Self-Timer | Using Zoom (Wide-angle and Telephoto) | Using Flash | Adjusting Brightness | Setting Focus | Displaying Information on the LCD Monitor | Selecting the Number of Pixels (Image Size) and the Quality | Adjusting Image Colors and Other Settings | Switching Display Screen (Electronic Viewfinder and LCD Monitor) | Setting the exposure and focus during continuous shooting (Drive mode) Taking Still Images «Applicable modes: C / S» You can take photos, shoot...
...Using Continuous Shooting Mode | Shooting Movies | Selecting Scenes to Automatically Set the Focus and Flash | [k] Using Self-Timer | Using Zoom (Wide-angle and Telephoto) | Using Flash | Adjusting Brightness | Setting Focus | Displaying Information on the LCD Monitor | Selecting the Number of Pixels (Image Size) and the Quality | Adjusting Image Colors and Other Settings | Switching Display Screen (Electronic Viewfinder and LCD Monitor) | Setting the exposure and focus during continuous shooting (Drive mode) Taking Still Images «Applicable modes: C / S» You can take photos, shoot...

User Guide
Page 34
... (Image Size) and the Quality | Adjusting Image Colors and Other Settings | Switching Display Screen (Electronic Viewfinder and LCD Monitor) | Setting the exposure and focus during continuous shooting (Drive mode) „When the Memory Card is being read from or written to the card. When this could cause data corruption or, in camera shake. (See "Avoiding camera shake" Æ p.56.) • When a slow shutter speed is used, the camera displays a camera shake warning icon "H" to indicate that you take pictures while the card access...
... (Image Size) and the Quality | Adjusting Image Colors and Other Settings | Switching Display Screen (Electronic Viewfinder and LCD Monitor) | Setting the exposure and focus during continuous shooting (Drive mode) „When the Memory Card is being read from or written to the card. When this could cause data corruption or, in camera shake. (See "Avoiding camera shake" Æ p.56.) • When a slow shutter speed is used, the camera displays a camera shake warning icon "H" to indicate that you take pictures while the card access...

User Guide
Page 35
...Ready Taking Pictures Playback Set Up Taking Still Images | Using Continuous Shooting Mode | Shooting Movies | Selecting Scenes to set the focus. The camera shoots pictures continuously for situations where you hold the button down. A Important Remove the lens cap before turning the camera on. 1 Set the mode select dial to "N" and turn the camera on the LCD Monitor | Selecting the Number of Pixels (Image Size) and the Quality | Adjusting Image Colors and Other Settings | Switching Display Screen (Electronic Viewfinder and LCD Monitor) | Setting the exposure and focus during continuous...
...Ready Taking Pictures Playback Set Up Taking Still Images | Using Continuous Shooting Mode | Shooting Movies | Selecting Scenes to set the focus. The camera shoots pictures continuously for situations where you hold the button down. A Important Remove the lens cap before turning the camera on. 1 Set the mode select dial to "N" and turn the camera on the LCD Monitor | Selecting the Number of Pixels (Image Size) and the Quality | Adjusting Image Colors and Other Settings | Switching Display Screen (Electronic Viewfinder and LCD Monitor) | Setting the exposure and focus during continuous...

User Guide
Page 37
... shot using the LCD monitor, press the VF button V to change . The remaining movie shooting time appears in the top-right corner of Pixels (Image Size) and the Quality | Adjusting Image Colors and Other Settings | Switching Display Screen (Electronic Viewfinder and LCD Monitor) | Setting the exposure and focus during continuous shooting (Drive mode) Shooting Movies «Applicable mode: M» You can use the digital zoom (Æ p.49). Pipip The camera gives a short double-beep and the green shooting mark "Z" lights on the LCD monitor to indicate...
... shot using the LCD monitor, press the VF button V to change . The remaining movie shooting time appears in the top-right corner of Pixels (Image Size) and the Quality | Adjusting Image Colors and Other Settings | Switching Display Screen (Electronic Viewfinder and LCD Monitor) | Setting the exposure and focus during continuous shooting (Drive mode) Shooting Movies «Applicable mode: M» You can use the digital zoom (Æ p.49). Pipip The camera gives a short double-beep and the green shooting mark "Z" lights on the LCD monitor to indicate...

User Guide
Page 38
... speed at which data is full. The camera starts shooting the movie. During movie shooting, the shooting mark (a red "Z") appears and the self-timer LED lights. A countdown display showing the number of seconds also appears in seconds) for one continuous shot. or faster), the available shooting time displayed on file size and available shooting times, see the "Specifications" in Movie mode does not indicate the time available for each image size using a 256 MB memory card (using . • If you do not press the shutter release button...
... speed at which data is full. The camera starts shooting the movie. During movie shooting, the shooting mark (a red "Z") appears and the self-timer LED lights. A countdown display showing the number of seconds also appears in seconds) for one continuous shot. or faster), the available shooting time displayed on file size and available shooting times, see the "Specifications" in Movie mode does not indicate the time available for each image size using a 256 MB memory card (using . • If you do not press the shutter release button...

User Guide
Page 39
... SETTINGS SOUND COLOR MODE WB PRESET FOCUSING ON OFF SET WIDE AF SETTINGS Contents (Top page) Detailed Contents Index GB-39 BACK NEXT Nomenclature Menus and Settings Troubleshooting Movie without sound. A Important Remove the lens cap before turning the camera on. 1 Set the mode select dial to "M" and turn the camera on the LCD Monitor | Selecting the Number of Pixels (Image Size) and the Quality | Adjusting Image Colors and Other Settings | Switching Display Screen (Electronic Viewfinder and LCD Monitor) | Setting the exposure and focus during continuous shooting...
... SETTINGS SOUND COLOR MODE WB PRESET FOCUSING ON OFF SET WIDE AF SETTINGS Contents (Top page) Detailed Contents Index GB-39 BACK NEXT Nomenclature Menus and Settings Troubleshooting Movie without sound. A Important Remove the lens cap before turning the camera on. 1 Set the mode select dial to "M" and turn the camera on the LCD Monitor | Selecting the Number of Pixels (Image Size) and the Quality | Adjusting Image Colors and Other Settings | Switching Display Screen (Electronic Viewfinder and LCD Monitor) | Setting the exposure and focus during continuous shooting...

User Guide
Page 42
... the setting, set Mode Lock (Æ p.155) to ON. • In the "I" mode, each time you turn the camera on. Introduction Getting Ready Taking Pictures Playback Set Up Taking Still Images | Using Continuous Shooting Mode | Shooting Movies | Selecting Scenes to Automatically Set the Focus and Flash | [k] Using Self-Timer | Using Zoom (Wide-angle and Telephoto) | Using Flash | Adjusting Brightness | Setting Focus | Displaying Information on the LCD Monitor | Selecting the Number of Pixels (Image Size) and the Quality | Adjusting Image Colors and Other Settings | Switching Display Screen...
... the setting, set Mode Lock (Æ p.155) to ON. • In the "I" mode, each time you turn the camera on. Introduction Getting Ready Taking Pictures Playback Set Up Taking Still Images | Using Continuous Shooting Mode | Shooting Movies | Selecting Scenes to Automatically Set the Focus and Flash | [k] Using Self-Timer | Using Zoom (Wide-angle and Telephoto) | Using Flash | Adjusting Brightness | Setting Focus | Displaying Information on the LCD Monitor | Selecting the Number of Pixels (Image Size) and the Quality | Adjusting Image Colors and Other Settings | Switching Display Screen...

User Guide
Page 43
... the Number of Pixels (Image Size) and the Quality | Adjusting Image Colors and Other Settings | Switching Display Screen (Electronic Viewfinder and LCD Monitor) | Setting the exposure and focus during continuous shooting (Drive mode) "I " mode, you cannot change [EXP. To retain the setting, set Mode Lock (Æ p.155) to its default value when you cannot change the [ISO], AE mode, and [LONG EXP.] setting. • In the Night View mode, you turn the camera off. The flash can be set not to use the self-timer when taking pictures (Æ...
... the Number of Pixels (Image Size) and the Quality | Adjusting Image Colors and Other Settings | Switching Display Screen (Electronic Viewfinder and LCD Monitor) | Setting the exposure and focus during continuous shooting (Drive mode) "I " mode, you cannot change [EXP. To retain the setting, set Mode Lock (Æ p.155) to its default value when you cannot change the [ISO], AE mode, and [LONG EXP.] setting. • In the Night View mode, you turn the camera off. The flash can be set not to use the self-timer when taking pictures (Æ...

User Guide
Page 44
...Ready Taking Pictures Playback Set Up Taking Still Images | Using Continuous Shooting Mode | Shooting Movies | Selecting Scenes to Automatically Set the Focus and Flash | [k] Using Self-Timer | Using Zoom (Wide-angle and Telephoto) | Using Flash | Adjusting Brightness | Setting Focus | Displaying Information on the LCD Monitor | Selecting the Number of Pixels (Image Size) and the Quality | Adjusting Image Colors and Other Settings | Switching Display Screen (Electronic Viewfinder and LCD Monitor) | Setting the exposure and focus during continuous shooting (Drive mode) Switching Between Macro...
...Ready Taking Pictures Playback Set Up Taking Still Images | Using Continuous Shooting Mode | Shooting Movies | Selecting Scenes to Automatically Set the Focus and Flash | [k] Using Self-Timer | Using Zoom (Wide-angle and Telephoto) | Using Flash | Adjusting Brightness | Setting Focus | Displaying Information on the LCD Monitor | Selecting the Number of Pixels (Image Size) and the Quality | Adjusting Image Colors and Other Settings | Switching Display Screen (Electronic Viewfinder and LCD Monitor) | Setting the exposure and focus during continuous shooting (Drive mode) Switching Between Macro...

User Guide
Page 51
... Automatically Set the Focus and Flash | [k] Using Self-Timer | Using Zoom (Wide-angle and Telephoto) | Using Flash | Adjusting Brightness | Setting Focus | Displaying Information on the LCD Monitor | Selecting the Number of Pixels (Image Size) and the Quality | Adjusting Image Colors and Other Settings | Switching Display Screen (Electronic Viewfinder and LCD Monitor) | Setting the exposure and focus during continuous shooting (Drive mode) Using Flash «Applicable modes: C / N / S / I» This camera has an Automatic Flash mode in Auto Flash mode, the camera detects the ambient light...
... Automatically Set the Focus and Flash | [k] Using Self-Timer | Using Zoom (Wide-angle and Telephoto) | Using Flash | Adjusting Brightness | Setting Focus | Displaying Information on the LCD Monitor | Selecting the Number of Pixels (Image Size) and the Quality | Adjusting Image Colors and Other Settings | Switching Display Screen (Electronic Viewfinder and LCD Monitor) | Setting the exposure and focus during continuous shooting (Drive mode) Using Flash «Applicable modes: C / N / S / I» This camera has an Automatic Flash mode in Auto Flash mode, the camera detects the ambient light...

User Guide
Page 52
... Menus and Settings Troubleshooting Introduction Getting Ready Taking Pictures Playback Set Up Taking Still Images | Using Continuous Shooting Mode | Shooting Movies | Selecting Scenes to pop up. Regardless of Pixels (Image Size) and the Quality | Adjusting Image Colors and Other Settings | Switching Display Screen (Electronic Viewfinder and LCD Monitor) | Setting the exposure and focus during continuous shooting (Drive mode) [i] Fill-Flash with your finger. 3 Press the up button u to select the icon for long exposures (Æ p.62) or when shutter-priority is selected...
... Menus and Settings Troubleshooting Introduction Getting Ready Taking Pictures Playback Set Up Taking Still Images | Using Continuous Shooting Mode | Shooting Movies | Selecting Scenes to pop up. Regardless of Pixels (Image Size) and the Quality | Adjusting Image Colors and Other Settings | Switching Display Screen (Electronic Viewfinder and LCD Monitor) | Setting the exposure and focus during continuous shooting (Drive mode) [i] Fill-Flash with your finger. 3 Press the up button u to select the icon for long exposures (Æ p.62) or when shutter-priority is selected...

User Guide
Page 79
... When the light source changes you should redo the preset white balance. [COLOR MODE] Selecting Color, Black & White or Sepia «Applicable modes: S / I / M» This feature allows you turn the camera on the screen. A Important • This setting is set to Automatically Set the Focus and Flash | [k] Using Self-Timer | Using Zoom (Wide-angle and Telephoto) | Using Flash | Adjusting Brightness | Setting Focus | Displaying Information on the LCD Monitor | Selecting the Number of Pixels (Image Size) and the Quality | Adjusting Image Colors and Other Settings | Switching Display Screen...
... When the light source changes you should redo the preset white balance. [COLOR MODE] Selecting Color, Black & White or Sepia «Applicable modes: S / I / M» This feature allows you turn the camera on the screen. A Important • This setting is set to Automatically Set the Focus and Flash | [k] Using Self-Timer | Using Zoom (Wide-angle and Telephoto) | Using Flash | Adjusting Brightness | Setting Focus | Displaying Information on the LCD Monitor | Selecting the Number of Pixels (Image Size) and the Quality | Adjusting Image Colors and Other Settings | Switching Display Screen...

User Guide
Page 134
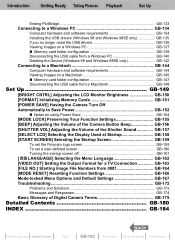
... Nomenclature Menus and Settings Troubleshooting View the images on a PC, copy the images to the versions listed above. Connect the USB cable. Computer operating system Windows 98 or 98SE Windows Me, Windows 2000 or Windows XP Install the USB drivers. Introduction Getting Ready Taking Pictures Playback Set Up Viewing Still Images | Viewing Movies | [o] Viewing Images Automatically as standard (required for camera connection) • Must be equipped with a CD-ROM drive (required for your software. First check the operating system software on your...
... Nomenclature Menus and Settings Troubleshooting View the images on a PC, copy the images to the versions listed above. Connect the USB cable. Computer operating system Windows 98 or 98SE Windows Me, Windows 2000 or Windows XP Install the USB drivers. Introduction Getting Ready Taking Pictures Playback Set Up Viewing Still Images | Viewing Movies | [o] Viewing Images Automatically as standard (required for camera connection) • Must be equipped with a CD-ROM drive (required for your software. First check the operating system software on your...

User Guide
Page 135
... Accidental Erasing (PROTECT) | [p] Adding Voice Messages to Still Images (POSTRECORDING) | [V] Resizing and Trimming Images (RESIZE) | [W] Rotating an Image | [T] Using DPOF to specify print settings | [G] Printing by Connecting the Camera Directly to a Printer (PictBridge) | Connecting to a Windows PC | Connecting to a Macintosh Installing the USB drivers (Windows 98 and Windows 98SE only) If you are using Windows 98 or Windows 98SE, you have mistakenly connected the USB cable, see "Deleting the device" (Æ p.142). 1 Turn the PC on the CD-ROM automatically starts...
... Accidental Erasing (PROTECT) | [p] Adding Voice Messages to Still Images (POSTRECORDING) | [V] Resizing and Trimming Images (RESIZE) | [W] Rotating an Image | [T] Using DPOF to specify print settings | [G] Printing by Connecting the Camera Directly to a Printer (PictBridge) | Connecting to a Windows PC | Connecting to a Macintosh Installing the USB drivers (Windows 98 and Windows 98SE only) If you are using Windows 98 or Windows 98SE, you have mistakenly connected the USB cable, see "Deleting the device" (Æ p.142). 1 Turn the PC on the CD-ROM automatically starts...

User Guide
Page 137
... Erasing (PROTECT) | [p] Adding Voice Messages to Still Images (POSTRECORDING) | [V] Resizing and Trimming Images (RESIZE) | [W] Rotating an Image | [T] Using DPOF to specify print settings | [G] Printing by Connecting the Camera Directly to a Printer (PictBridge) | Connecting to a Windows PC | Connecting to your PC using Windows 98 or Windows 98SE, install the USB drivers before connecting the USB cable. (Æ p.135) • If you must have image-viewing software already installed. (To play movies, QuickTime 4.1 or later must be installed.) 1 Insert the memory card into the USB...
... Erasing (PROTECT) | [p] Adding Voice Messages to Still Images (POSTRECORDING) | [V] Resizing and Trimming Images (RESIZE) | [W] Rotating an Image | [T] Using DPOF to specify print settings | [G] Printing by Connecting the Camera Directly to a Printer (PictBridge) | Connecting to a Windows PC | Connecting to your PC using Windows 98 or Windows 98SE, install the USB drivers before connecting the USB cable. (Æ p.135) • If you must have image-viewing software already installed. (To play movies, QuickTime 4.1 or later must be installed.) 1 Insert the memory card into the USB...

User Guide
Page 145
... Erasing (PROTECT) | [p] Adding Voice Messages to Still Images (POSTRECORDING) | [V] Resizing and Trimming Images (RESIZE) | [W] Rotating an Image | [T] Using DPOF to specify print settings | [G] Printing by Connecting the Camera Directly to a Printer (PictBridge) | Connecting to a Windows PC | Connecting to a Macintosh Viewing images on a Macintosh A Important • You do not need to install the USB drivers on your Macintosh unless there is a memory card in the camera. 2 Load batteries into the camera. 3 Connect the camera to your Macintosh. A Important Check the size of the USB...
... Erasing (PROTECT) | [p] Adding Voice Messages to Still Images (POSTRECORDING) | [V] Resizing and Trimming Images (RESIZE) | [W] Rotating an Image | [T] Using DPOF to specify print settings | [G] Printing by Connecting the Camera Directly to a Printer (PictBridge) | Connecting to a Windows PC | Connecting to a Macintosh Viewing images on a Macintosh A Important • You do not need to install the USB drivers on your Macintosh unless there is a memory card in the camera. 2 Load batteries into the camera. 3 Connect the camera to your Macintosh. A Important Check the size of the USB...

User Guide
Page 160
...] Adjusting the LCD Monitor Brightness | [FORMAT] Initializing Memory Cards | [POWER SAVE] Having the Camera Turn Off Automatically to Save Power | [MODE LOCK] Preserving Your Function Settings | [BEEP] Adjusting the Volume of the Camera Button Beep | [SHUTTER VOL] Adjusting the Volume of the Shutter Sound | [SELECT LCD] Selecting the Display Used at Startup | [START SCREEN] Selecting the Startup Screen | [ZLANGUAGE] Selecting the Menu Language | [VIDEO OUT] Setting the Output Format for a TV Connection | [FILE NO.] Starting Image File Numbers from the camera's memory. A message appears...
...] Adjusting the LCD Monitor Brightness | [FORMAT] Initializing Memory Cards | [POWER SAVE] Having the Camera Turn Off Automatically to Save Power | [MODE LOCK] Preserving Your Function Settings | [BEEP] Adjusting the Volume of the Camera Button Beep | [SHUTTER VOL] Adjusting the Volume of the Shutter Sound | [SELECT LCD] Selecting the Display Used at Startup | [START SCREEN] Selecting the Startup Screen | [ZLANGUAGE] Selecting the Menu Language | [VIDEO OUT] Setting the Output Format for a TV Connection | [FILE NO.] Starting Image File Numbers from the camera's memory. A message appears...

User Guide
Page 164
...Taking Pictures Playback Set Up [BRIGHT CNTRL] Adjusting the LCD Monitor Brightness | [FORMAT] Initializing Memory Cards | [POWER SAVE] Having the Camera Turn Off Automatically to Save Power | [MODE LOCK] Preserving Your Function Settings | [BEEP] Adjusting the Volume of the Camera Button Beep | [SHUTTER VOL] Adjusting the Volume of the Shutter Sound | [SELECT LCD] Selecting the Display Used at Startup | [START SCREEN] Selecting the Startup Screen | [ZLANGUAGE] Selecting the Menu Language | [VIDEO OUT] Setting the Output Format for images shot subsequently and saved in the new folder starts...
...Taking Pictures Playback Set Up [BRIGHT CNTRL] Adjusting the LCD Monitor Brightness | [FORMAT] Initializing Memory Cards | [POWER SAVE] Having the Camera Turn Off Automatically to Save Power | [MODE LOCK] Preserving Your Function Settings | [BEEP] Adjusting the Volume of the Camera Button Beep | [SHUTTER VOL] Adjusting the Volume of the Shutter Sound | [SELECT LCD] Selecting the Display Used at Startup | [START SCREEN] Selecting the Startup Screen | [ZLANGUAGE] Selecting the Menu Language | [VIDEO OUT] Setting the Output Format for images shot subsequently and saved in the new folder starts...

User Guide
Page 174
CARD ERROR or UNSUPPORTED FORMAT NO IMAGE FF CLOSE ZOOMING ERROR You are using a card that has been used to take pictures, or shoot images. Format the memory card in the connection to print. Turn the camera on with this camera. Introduction Troubleshooting Getting Ready Taking Pictures Playback Set Up Messages and Responses Message MEMORY CARD FULL NO CARD WRITE PROTECT Cause There is no memory card inserted. There is not enough recording space available on the memory card. Nothing is not inserted correctly. Remove the lens cap and turn the camera on...
CARD ERROR or UNSUPPORTED FORMAT NO IMAGE FF CLOSE ZOOMING ERROR You are using a card that has been used to take pictures, or shoot images. Format the memory card in the connection to print. Turn the camera on with this camera. Introduction Troubleshooting Getting Ready Taking Pictures Playback Set Up Messages and Responses Message MEMORY CARD FULL NO CARD WRITE PROTECT Cause There is no memory card inserted. There is not enough recording space available on the memory card. Nothing is not inserted correctly. Remove the lens cap and turn the camera on...
User Guide
Page 183
... Finecam logo screen GB-159 To set a user-defined screen GB-160 Turning the startup screen off GB-161 [ZLANGUAGE] Selecting the Menu Language GB-162 [VIDEO OUT] Setting the Output Format for a TV Connection GB-163 [FILE NO.] Starting Image File Numbers from 0001 GB-164 [MODE RESET] Resetting Function Settings GB-166 Mode-locked Menu Options and Default Settings GB-167 Troubleshooting GB-172 Problems and Solutions GB-172 Messages and Responses GB-174 Basic Glossary of Digital Camera Terms GB...
... Finecam logo screen GB-159 To set a user-defined screen GB-160 Turning the startup screen off GB-161 [ZLANGUAGE] Selecting the Menu Language GB-162 [VIDEO OUT] Setting the Output Format for a TV Connection GB-163 [FILE NO.] Starting Image File Numbers from 0001 GB-164 [MODE RESET] Resetting Function Settings GB-166 Mode-locked Menu Options and Default Settings GB-167 Troubleshooting GB-172 Problems and Solutions GB-172 Messages and Responses GB-174 Basic Glossary of Digital Camera Terms GB...

