
Owners Manual
Page 4
..., see http://patents.dts.com. OPTION The Option symbol indicates that the following information is added to the functions supported by LG Electronics is a registered trademark of LG Electronics Inc. in the product package and thus has to be purchased separately, or the device may not be applied to the user's machine depending on model type. LG logo is under license from...
..., see http://patents.dts.com. OPTION The Option symbol indicates that the following information is added to the functions supported by LG Electronics is a registered trademark of LG Electronics Inc. in the product package and thus has to be purchased separately, or the device may not be applied to the user's machine depending on model type. LG logo is under license from...
Owners Manual
Page 9
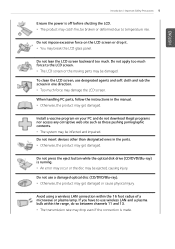
... and impaired. Install a vaccine program on the LCD screen or drop it. • You may get damaged. Do not press the eject button while the optical disk drive (CD/DVD/Blu-ray) is running. • An error may occur or the disc may be broken or deformed due to the LCD screen. • The LCD screen or the moving parts may damage the LCD screen. Do...
... and impaired. Install a vaccine program on the LCD screen or drop it. • You may get damaged. Do not press the eject button while the optical disk drive (CD/DVD/Blu-ray) is running. • An error may occur or the disc may be broken or deformed due to the LCD screen. • The LCD screen or the moving parts may damage the LCD screen. Do...

Owners Manual
Page 19
... external shock while the storage device is running, file damage or bad sectors may not work properly in other operating systems. Such malfunctions are not covered by the warranty. To minimize data loss resulting from storage device damage (HDD, SSD, eMMC), frequently back up important data. • The manufacturer is reset (i.e. restarted) or turned on the machine while disassembling or installing...
... external shock while the storage device is running, file damage or bad sectors may not work properly in other operating systems. Such malfunctions are not covered by the warranty. To minimize data loss resulting from storage device damage (HDD, SSD, eMMC), frequently back up important data. • The manufacturer is reset (i.e. restarted) or turned on the machine while disassembling or installing...

Owners Manual
Page 56
... user must support Bluetooth 5.1. HD Webcam Gigabit Ethernet Approx. 4.30 lbs (a battery included) The weight may differ depending on model type and cannot be replaced by the user. To use Bluetooth 5.1, the device you connect to human safety as this wireless device may cause radio interference. Intel® Core™ i7 / i5 / i3 or Intel® Pentium® processor The CPU differs depending on the system memory...
... user must support Bluetooth 5.1. HD Webcam Gigabit Ethernet Approx. 4.30 lbs (a battery included) The weight may differ depending on model type and cannot be replaced by the user. To use Bluetooth 5.1, the device you connect to human safety as this wireless device may cause radio interference. Intel® Core™ i7 / i5 / i3 or Intel® Pentium® processor The CPU differs depending on the system memory...

Owners Manual
Page 59
... Change Account Settings, Lock or Logout. 3 Document: Opens the default document folder in Windows. 4 Pictures: Opens the default photo folder in Windows. 5 Settings: You can set up the system including the network settings. 6 Power: Sleep, System Shutdown, and Restart menus are available. 7 App List: Displays the app list. 8 App Tile: Apps added to the Start menu are displayed in tile format. 9 Start Button: Opens or closes the Start menu. 10 Windows Search: Searches for the text entered by the user...
... Change Account Settings, Lock or Logout. 3 Document: Opens the default document folder in Windows. 4 Pictures: Opens the default photo folder in Windows. 5 Settings: You can set up the system including the network settings. 6 Power: Sleep, System Shutdown, and Restart menus are available. 7 App List: Displays the app list. 8 App Tile: Apps added to the Start menu are displayed in tile format. 9 Start Button: Opens or closes the Start menu. 10 Windows Search: Searches for the text entered by the user...

Owners Manual
Page 84
When the PC is used for security purposes and may be unlocked by using the following method. 1 From the lock screen, press any key on the keyboard or drag up while you click and hold the mouse button. 2 When the login window appears, enter the password and click [Enter]. (If no password is not used again, a lock screen appears for an extended period, it goes into a locked state. ENGLISH 84 Using Windows 10 Unlocking the Screen If the PC is set, press the login button to immediately unlock the screen.)
When the PC is used for security purposes and may be unlocked by using the following method. 1 From the lock screen, press any key on the keyboard or drag up while you click and hold the mouse button. 2 When the login window appears, enter the password and click [Enter]. (If no password is not used again, a lock screen appears for an extended period, it goes into a locked state. ENGLISH 84 Using Windows 10 Unlocking the Screen If the PC is set, press the login button to immediately unlock the screen.)

Owners Manual
Page 85
Using Action Center You can change the settings for tablet mode, display, media connection and network settings. The functions supported by the Action Center may differ depending on the model. 1 Press the Action Center [ ] icon on the right side of the taskbar. ENGLISH Using Windows 10 85 Setting the PC Windows 10 supports various functions so that the user can use the Action Center to easily change the PC setting easily and quickly.
Using Action Center You can change the settings for tablet mode, display, media connection and network settings. The functions supported by the Action Center may differ depending on the model. 1 Press the Action Center [ ] icon on the right side of the taskbar. ENGLISH Using Windows 10 85 Setting the PC Windows 10 supports various functions so that the user can use the Action Center to easily change the PC setting easily and quickly.

Owners Manual
Page 97
... enable Touchpad Auto (disables touchpad when an external USB mouse is connected), press the [ ] button and disable [Turn on the keyboard may cause a fault, malfunction, or electric shock. • Some keys may differ in Windows Sleep Mode. (Example: Standby Mode, Hibernate Mode) Each time you use several keys at the same time while playing a PC game. • Change the combination of keys to use an external gaming keyboard that supports unlimited simultaneous input. The keyboard may not work...
... enable Touchpad Auto (disables touchpad when an external USB mouse is connected), press the [ ] button and disable [Turn on the keyboard may cause a fault, malfunction, or electric shock. • Some keys may differ in Windows Sleep Mode. (Example: Standby Mode, Hibernate Mode) Each time you use several keys at the same time while playing a PC game. • Change the combination of keys to use an external gaming keyboard that supports unlimited simultaneous input. The keyboard may not work...
Owners Manual
Page 99
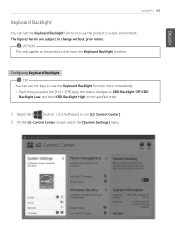
OPTION This only applies to change without prior notice. ENGLISH Using the PC 99 Keyboard Backlight You can use hot keys to use the product in the specified order. 1 Select the [ ] button > [LG Software] to run [LG Control Center]. 2 On the LG Control Center screen, select the [System Settings] menu. Configuring Keyboard Backlight TIP You can set the Keyboard Backlight function to use the Keyboard Backlight function more conveniently. • Each time you press the [Fn] + [F8] keys, the...
OPTION This only applies to change without prior notice. ENGLISH Using the PC 99 Keyboard Backlight You can use hot keys to use the product in the specified order. 1 Select the [ ] button > [LG Software] to run [LG Control Center]. 2 On the LG Control Center screen, select the [System Settings] menu. Configuring Keyboard Backlight TIP You can set the Keyboard Backlight function to use the Keyboard Backlight function more conveniently. • Each time you press the [Fn] + [F8] keys, the...
Owners Manual
Page 101
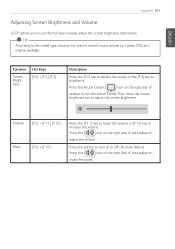
... feature. Press the button to turn on the right side of the taskbar to brighten it. Then move the screen brightness bar to easily adjust the screen brightness and volume. ENGLISH Using the PC 101 Adjusting Screen Brightness and Volume LG PC allows you to use the hot keys to adjust the screen brightness. Function Screen Brightness Hot Keys [Fn] + [F2], [F3] Description Press the [F2] key to darken the screen or the [F3] key to mute the...
... feature. Press the button to turn on the right side of the taskbar to brighten it. Then move the screen brightness bar to easily adjust the screen brightness and volume. ENGLISH Using the PC 101 Adjusting Screen Brightness and Volume LG PC allows you to use the hot keys to adjust the screen brightness. Function Screen Brightness Hot Keys [Fn] + [F2], [F3] Description Press the [F2] key to darken the screen or the [F3] key to mute the...

Owners Manual
Page 114
... display the selected screen output. ENGLISH 114 Using the PC Connecting to External Display Connecting to the PC and the external device (TV, monitor) that can transfer uncompressed full digital audio and video signals. Hence, there is a high-speed multimedia interface that supports HDMI. 2 HDMI port transfers both video and audio simultaneously. In some models, DTS Audio may not work when you press [ ] + [P], the screen output option changes. Release the keys to display the monitor (projector) toggling screen...
... display the selected screen output. ENGLISH 114 Using the PC Connecting to External Display Connecting to the PC and the external device (TV, monitor) that can transfer uncompressed full digital audio and video signals. Hence, there is a high-speed multimedia interface that supports HDMI. 2 HDMI port transfers both video and audio simultaneously. In some models, DTS Audio may not work when you press [ ] + [P], the screen output option changes. Release the keys to display the monitor (projector) toggling screen...

Owners Manual
Page 119
... notebook PC battery via the USB-C™ port is connected to use USB-C™ accessories (cables, interface adapters, etc.) that are used . (Conversion adapters may be purchased separately.) Outputting to an External Display By connecting a display that supports USB-C™ Alternate Mode, you may have compatibility problems (no screen output or a malfunction). CAUTION You must use the USB-C™ port can be used for other products, you can charge the external devices by connecting them to an external display. Charging the external devices...
... notebook PC battery via the USB-C™ port is connected to use USB-C™ accessories (cables, interface adapters, etc.) that are used . (Conversion adapters may be purchased separately.) Outputting to an External Display By connecting a display that supports USB-C™ Alternate Mode, you may have compatibility problems (no screen output or a malfunction). CAUTION You must use the USB-C™ port can be used for other products, you can charge the external devices by connecting them to an external display. Charging the external devices...

Owners Manual
Page 142
ENGLISH 142 Using Software 4 All List: Displays and installs all required items for the system. 5 Notification Setting: Sets up notifications for online updates for installed items. Required Update You can install essential updates and drivers that are necessary for the system. 1 Select the [Required Update] menu.
ENGLISH 142 Using Software 4 All List: Displays and installs all required items for the system. 5 Notification Setting: Sets up notifications for online updates for installed items. Required Update You can install essential updates and drivers that are necessary for the system. 1 Select the [Required Update] menu.

Owners Manual
Page 163
TIP You can use the LG Update Center to change without prior notice. ENGLISH Setup and Upgrade Setup and Upgrade 163 Installing the Driver The figures herein may differ by language selection and are subject to quickly install the latest drivers, or reinstall any deleted drivers. Use LG Update Center to install the driver. Using LG Update Center to install the Driver 1 Select the [ ] button > [LG Software] to run [LG Update Center]. 2 Select [Required Update] or [All List] to keep your system current and optimized.
TIP You can use the LG Update Center to change without prior notice. ENGLISH Setup and Upgrade Setup and Upgrade 163 Installing the Driver The figures herein may differ by language selection and are subject to quickly install the latest drivers, or reinstall any deleted drivers. Use LG Update Center to install the driver. Using LG Update Center to install the Driver 1 Select the [ ] button > [LG Software] to run [LG Update Center]. 2 Select [Required Update] or [All List] to keep your system current and optimized.

Owners Manual
Page 164
ENGLISH 164 Setup and Upgrade How to Download LG Update Center You can install LG Update Center by downloading it from the LG Electronics Website (www.lg.com).
ENGLISH 164 Setup and Upgrade How to Download LG Update Center You can install LG Update Center by downloading it from the LG Electronics Website (www.lg.com).

Owners Manual
Page 165
..., memory capacity, and hard disk capacity and type. CAUTION • Do not change the boot order, and add new peripheral devices to the fast booting speed. Items displayed on the Setup screen may cause errors during system operation. Incorrect system setup may differ by model type and specification. You setup the system when you need to restart the system (click [Restart] in the system power menu) and then immediately press the corresponding function key due...
..., memory capacity, and hard disk capacity and type. CAUTION • Do not change the boot order, and add new peripheral devices to the fast booting speed. Items displayed on the Setup screen may cause errors during system operation. Incorrect system setup may differ by model type and specification. You setup the system when you need to restart the system (click [Restart] in the system power menu) and then immediately press the corresponding function key due...
Owners Manual
Page 168
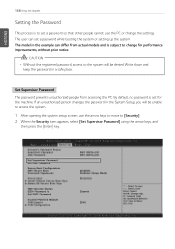
... be unable to access the system. 1 After opening the system setup screen, use the PC or change for the machine. Set Supervisor Password The password prevents unauthorized people from actual models and is set a password so that other people cannot use the arrow keys to move to the system will be denied. If an unauthorized person changes the password in a safe place. By default, no password is subject to...
... be unable to access the system. 1 After opening the system setup screen, use the PC or change for the machine. Set Supervisor Password The password prevents unauthorized people from actual models and is set a password so that other people cannot use the arrow keys to move to the system will be denied. If an unauthorized person changes the password in a safe place. By default, no password is subject to...

Owners Manual
Page 173
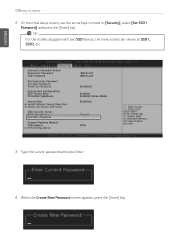
... and should consist of English letters (A - ENGLISH Setup and Upgrade 173 Set SSD Password SSD Password is according to [Security]. 2 When the Security item appears, select [Set SSD1 Password] using the arrow keys and press the [Enter] key. 3 When the Create New Password screen appears, enter a password and press the [Enter] key. For the models equipped with two SSD devices, the menu names are set for both devices, the password input window appears twice during the...
... and should consist of English letters (A - ENGLISH Setup and Upgrade 173 Set SSD Password SSD Password is according to [Security]. 2 When the Security item appears, select [Set SSD1 Password] using the arrow keys and press the [Enter] key. 3 When the Create New Password screen appears, enter a password and press the [Enter] key. For the models equipped with two SSD devices, the menu names are set for both devices, the password input window appears twice during the...
Owners Manual
Page 178
TIP For the models equipped with two SSD devices, the menu names are shown as SSD1, SSD2, etc. 3 Type the current password and press Enter. 4 When the Create New Password screen appears, press the [Enter] key. ENGLISH 178 Setup and Upgrade 2 On the initial setup screen, use the arrow keys to move to [Security], select [Set SSD1 Password], and press the [Enter] key.
TIP For the models equipped with two SSD devices, the menu names are shown as SSD1, SSD2, etc. 3 Type the current password and press Enter. 4 When the Create New Password screen appears, press the [Enter] key. ENGLISH 178 Setup and Upgrade 2 On the initial setup screen, use the arrow keys to move to [Security], select [Set SSD1 Password], and press the [Enter] key.
Owners Manual
Page 180
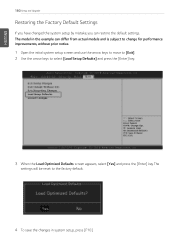
... restore the default settings. The model in system setup, press [F10]. ENGLISH 180 Setup and Upgrade Restoring the Factory Default Settings If you have changed the system setup by mistake, you can differ from actual models and is subject to change for performance improvements, without prior notice. 1 Open the initial system setup screen and use the arrow keys to move to [Exit]. 2 Use the arrow keys to select [Load Setup Defaults] and press the [Enter] key...
... restore the default settings. The model in system setup, press [F10]. ENGLISH 180 Setup and Upgrade Restoring the Factory Default Settings If you have changed the system setup by mistake, you can differ from actual models and is subject to change for performance improvements, without prior notice. 1 Open the initial system setup screen and use the arrow keys to move to [Exit]. 2 Use the arrow keys to select [Load Setup Defaults] and press the [Enter] key...

