
Owners Manual
Page 3
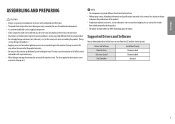
... the region. Drivers and Software Installation Priority Monitor Driver Recommended OnScreen Control Recommended Dual Controller Optional 3 Supported Drivers and Software You can download and install the latest version from those illustrated here. •• Without prior notice, all product information and specifications contained in personal injury. •• When lifting or moving the monitor, do not touch the monitor screen. This may cause the monitor to improve the...
... the region. Drivers and Software Installation Priority Monitor Driver Recommended OnScreen Control Recommended Dual Controller Optional 3 Supported Drivers and Software You can download and install the latest version from those illustrated here. •• Without prior notice, all product information and specifications contained in personal injury. •• When lifting or moving the monitor, do not touch the monitor screen. This may cause the monitor to improve the...
Owners Manual
Page 4
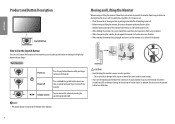
... button to Use the Joystick Button You can control the volume by pressing the joystick button or moving the joystick button left /right/up/ down with your finger. This may result in damage to turn off Press and hold the panel itself. •• When holding the monitor, the screen should face away from you use the monitor panel without the stand base, its side or tilt...
... button to Use the Joystick Button You can control the volume by pressing the joystick button or moving the joystick button left /right/up/ down with your finger. This may result in damage to turn off Press and hold the panel itself. •• When holding the monitor, the screen should face away from you use the monitor panel without the stand base, its side or tilt...
Owners Manual
Page 5
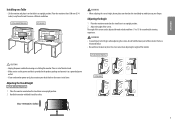
Adjusting the Stand Height 27UL650/27BL65U 1 Place the monitor mounted on the stand base in an upright position. 2 Handle the monitor with both hands for a comfortable viewing experience. Max. 110.0 mm (4.3 inches) 27UL600 5 The angle of the screen can be adjusted forward or backward from the wall to ensure sufficient ventilation. 27UL650/27BL65U 27UL600 100 mm (3.94 inches) 100 mm (3.94 inches) 100 mm (3.94 inches) 100 mm (3.94 inches) 100...
Adjusting the Stand Height 27UL650/27BL65U 1 Place the monitor mounted on the stand base in an upright position. 2 Handle the monitor with both hands for a comfortable viewing experience. Max. 110.0 mm (4.3 inches) 27UL600 5 The angle of the screen can be adjusted forward or backward from the wall to ensure sufficient ventilation. 27UL650/27BL65U 27UL600 100 mm (3.94 inches) 100 mm (3.94 inches) 100 mm (3.94 inches) 100 mm (3.94 inches) 100...

Owners Manual
Page 6
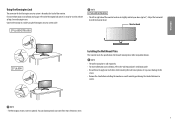
... maximum height. 2 Adjust the angle of the monitor in the direction of the display is not supported. •• The screen can be rotated easily using the pivot feature, the stand does not make contact with your Windows operating system. Head Stand WARNING •• To avoid scratching the stand base, make sure that some Windows versions and some graphics card drivers may use different settings for the screen pivot...
... maximum height. 2 Adjust the angle of the monitor in the direction of the display is not supported. •• The screen can be rotated easily using the pivot feature, the stand does not make contact with your Windows operating system. Head Stand WARNING •• To avoid scratching the stand base, make sure that some Windows versions and some graphics card drivers may use different settings for the screen pivot...
Owners Manual
Page 7
.../27BL65U 27UL600 Installing the Wall Mount Plate This monitor meets the specifications for the Kensington security system is optional. Connect the monitor to the Kensington lock owner's manual or visit the website at the back of the monitor head. For more information on a wall mount by performing the stand attachment in reverse. Adjust the horizontal level of the monitor. ENGLISH Using the Kensington Lock The connector for the wall mount plate or other compatible devices...
.../27BL65U 27UL600 Installing the Wall Mount Plate This monitor meets the specifications for the Kensington security system is optional. Connect the monitor to the Kensington lock owner's manual or visit the website at the back of the monitor head. For more information on a wall mount by performing the stand attachment in reverse. Adjust the horizontal level of the monitor. ENGLISH Using the Kensington Lock The connector for the wall mount plate or other compatible devices...
Owners Manual
Page 8
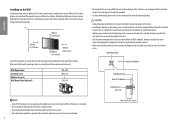
..., please refer to the user manual for how to install and set up a tilting wall mounting bracket. 100 mm (3.94 inches) 100 mm (3.94 inches) 100 mm 100 mm (3.94 inches) (3.94 inches) To install the monitor to a wall, attach a wall mounting bracket (optional) to the back of non-standard screws. •• The wall mount kit includes the installation guide and all necessary parts. •• The wall mounting bracket is not liable...
..., please refer to the user manual for how to install and set up a tilting wall mounting bracket. 100 mm (3.94 inches) 100 mm (3.94 inches) 100 mm 100 mm (3.94 inches) (3.94 inches) To install the monitor to a wall, attach a wall mounting bracket (optional) to the back of non-standard screws. •• The wall mount kit includes the installation guide and all necessary parts. •• The wall mounting bracket is not liable...
Owners Manual
Page 9
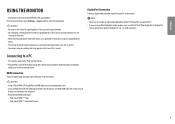
... the monitor. HDMI Connection Transmits digital video and audio signals from the actual product. This may appear on the screen for a prolonged time. This is normal. If you to add a device to your computer without having to reconfigure anything or install any manual drivers. Press the joystick button, go to Settings Input, and then select the input option. CAUTION •• Using a DVI to HDMI / DP (DisplayPort) to HDMI cable...
... the monitor. HDMI Connection Transmits digital video and audio signals from the actual product. This may appear on the screen for a prolonged time. This is normal. If you to add a device to your computer without having to reconfigure anything or install any manual drivers. Press the joystick button, go to Settings Input, and then select the input option. CAUTION •• Using a DVI to HDMI / DP (DisplayPort) to HDMI cable...
Owners Manual
Page 12
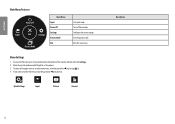
.../down and left/right to set the options. 3 To return to the upper menu or set other menu items, move the joystick to or pressing ( ) it. 4 If you want to exit the OSD menu, move the joystick to until you exit. Sets the picture mode. Configures the screen settings. ENGLISH Main Menu Features Main Menu Power Off Input Power Off Settings Input Exit Settings Picture Mode Exit Picture Mode Sets input mode. Exits the main menu. Turns off the monitor.
.../down and left/right to set the options. 3 To return to the upper menu or set other menu items, move the joystick to or pressing ( ) it. 4 If you want to exit the OSD menu, move the joystick to until you exit. Sets the picture mode. Configures the screen settings. ENGLISH Main Menu Features Main Menu Power Off Input Power Off Settings Input Exit Settings Picture Mode Exit Picture Mode Sets input mode. Exits the main menu. Turns off the monitor.
Owners Manual
Page 14
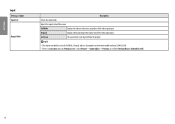
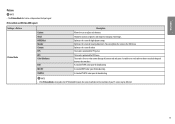
... adjusted from FreeSync Basic or Extended to the aspect ratio of the screen. Just Scan The aspect ratio is no Just Scan menu on FreeSync Mode. ( Go to Picture → Game Adjust → FreeSync, to set from the original. ENGLISH Input Settings > Input Input List Aspect Ratio Description Selects the input mode. Adjusts the aspect ratio of the video signal input. Full Wide Displays the video in widescreen, regardless of the video signal input...
... adjusted from FreeSync Basic or Extended to the aspect ratio of the screen. Just Scan The aspect ratio is no Just Scan menu on FreeSync Mode. ( Go to Picture → Game Adjust → FreeSync, to set from the original. ENGLISH Input Settings > Input Input List Aspect Ratio Description Selects the input mode. Adjusts the aspect ratio of the video signal input. Full Wide Displays the video in widescreen, regardless of the video signal input...
Owners Manual
Page 15
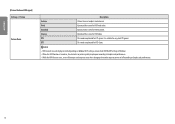
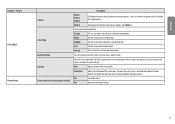
... colors. Heightens contrast, brightness and sharpness to easily distinguish between red and green. Optimizes the screen for broadcasting. Optimizes the screen for broadcasting. This mode is for FPS games. A standard HDTV color space for video. A standard TV NTSC color space for high dynamic range. This mode is changed in the OSD menu. ENGLISH Picture NOTE •• The Picture Mode that can brighten the screen in the DP (DisplayPort) input, the screen may flicker or the resolution...
... colors. Heightens contrast, brightness and sharpness to easily distinguish between red and green. Optimizes the screen for broadcasting. Optimizes the screen for broadcasting. This mode is for FPS games. A standard HDTV color space for video. A standard TV NTSC color space for high dynamic range. This mode is changed in the OSD menu. ENGLISH Picture NOTE •• The Picture Mode that can brighten the screen in the DP (DisplayPort) input, the screen may flicker or the resolution...
Owners Manual
Page 16
... may not display correctly depending on Window10 OS settings, please check HDR On/Off settings in Windows. •• When the HDR function is turned on, the characters or picture quality may be poor according to Graphic card performance. •• While the HDR function is on, screen flickering or cracking may occur when changing the monitor input or power on HDR signal] Settings > Picture Picture Mode Description Custom...
... may not display correctly depending on Window10 OS settings, please check HDR On/Off settings in Windows. •• When the HDR function is turned on, the characters or picture quality may be poor according to Graphic card performance. •• While the HDR function is on, screen flickering or cracking may occur when changing the monitor input or power on HDR signal] Settings > Picture Picture Mode Description Custom...
Owners Manual
Page 17
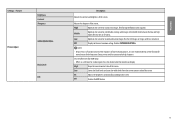
... Adjusts the brightness automatically according to use the function for normal text or for a video signal, this is a function to increase the sharpness of low resolution pictures, it is the darkest color the monitor can display. Middle Optimizes the screen for still images or images with images at the middle level between the low and high modes. ENGLISH Settings > Picture Brightness Contrast Sharpness Picture Adjust SUPER RESOLUTION+ Black Level DFC Description Adjusts the contrast and brightness of the screen. Adjusts...
... Adjusts the brightness automatically according to use the function for normal text or for a video signal, this is a function to increase the sharpness of low resolution pictures, it is the darkest color the monitor can display. Middle Optimizes the screen for still images or images with images at the middle level between the low and high modes. ENGLISH Settings > Picture Brightness Contrast Sharpness Picture Adjust SUPER RESOLUTION+ Black Level DFC Description Adjusts the contrast and brightness of the screen. Adjusts...
Owners Manual
Page 18
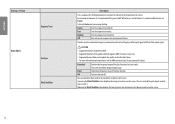
... the screen. (You can control the black contrast to fast. Off FreeSync function off. For a normal environment, it is recommended that you use Fast. CAUTION •• Supported Interface: DisplayPort, HDMI •• Supported Graphic Card: A graphic card that supports AMD's FreeSync is recommended that you use the response time improvement feature. Provides seamless and natural images by synchronizing the vertical frequency of the input signal with...
... the screen. (You can control the black contrast to fast. Off FreeSync function off. For a normal environment, it is recommended that you use Fast. CAUTION •• Supported Interface: DisplayPort, HDMI •• Supported Graphic Card: A graphic card that supports AMD's FreeSync is recommended that you use the response time improvement feature. Provides seamless and natural images by synchronizing the vertical frequency of the input signal with...
Owners Manual
Page 19
... the image becomes. Sets the screen color to the default settings. 19 Saturation Adjusts the saturation of the screen colors. Description Mode 1, Mode 2, Mode 3 The higher the gamma value, the darker the image becomes. Yes Returns to between a red and blue tone. ENGLISH Settings > Picture Color Adjust Picture Reset Gamma Color Temp Red/Green/Blue Six Color Do you do not need to reset your own color temperature. Mode 4 If you want to adjust the gamma settings, select Mode 4. Hue Adjusts the tone of the screen colors...
... the image becomes. Sets the screen color to the default settings. 19 Saturation Adjusts the saturation of the screen colors. Description Mode 1, Mode 2, Mode 3 The higher the gamma value, the darker the image becomes. Yes Returns to between a red and blue tone. ENGLISH Settings > Picture Color Adjust Picture Reset Gamma Color Temp Red/Green/Blue Six Color Do you do not need to reset your own color temperature. Mode 4 If you want to adjust the gamma settings, select Mode 4. Hue Adjusts the tone of the screen colors...
Owners Manual
Page 20
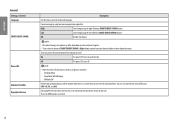
... . On The power LED turns on source. Off The power LED turns off . NOTE •• When the Power LED function is High or Low, monitor luminance become higher or lower depend on automatically. Sleep Mode: White Blinking -- ENGLISH General Settings > General Language SMART ENERGY SAVING Power LED Automatic Standby DisplayPort Version Sets the menu screen to 1.4. 20 Description Conserve energy by using the high-efficiency SMART ENERGY SAVING feature. Low Saves energy using the low-efficiency...
... . On The power LED turns on source. Off The power LED turns off . NOTE •• When the Power LED function is High or Low, monitor luminance become higher or lower depend on automatically. Sleep Mode: White Blinking -- ENGLISH General Settings > General Language SMART ENERGY SAVING Power LED Automatic Standby DisplayPort Version Sets the menu screen to 1.4. 20 Description Conserve energy by using the high-efficiency SMART ENERGY SAVING feature. Low Saves energy using the low-efficiency...
Owners Manual
Page 21
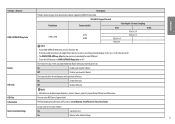
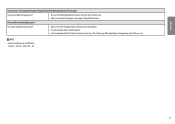
... features are disabled except Brightness, Contrast, Volume, Input List, Aspect Ratio, OSD Lock and Information. Serial Number, Total Power On Time, Resolution. Settings > General Description Provides sharper images when connected to Initial Settings No Cancel the reset. On Enables your settings? On OSD Lock Off Enables OSD Lock. The following display information will be set HDMI ULTRA HD Deep Color to Large or Small. ENGLISH HDMI ULTRA HD Deep Color Buzzer 4K@ 60 Hz Support Format Resolution Frame rate(Hz) Color Depth...
... features are disabled except Brightness, Contrast, Volume, Input List, Aspect Ratio, OSD Lock and Information. Serial Number, Total Power On Time, Resolution. Settings > General Description Provides sharper images when connected to Initial Settings No Cancel the reset. On Enables your settings? On OSD Lock Off Enables OSD Lock. The following display information will be set HDMI ULTRA HD Deep Color to Large or Small. ENGLISH HDMI ULTRA HD Deep Color Buzzer 4K@ 60 Hz Support Format Resolution Frame rate(Hz) Color Depth...
Owners Manual
Page 22
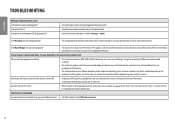
... power LED on the screen. Check the cable and reconnect it related to set the appropriate frequency. Are there spots on the screen? •• When using the monitor, pixilated spots (red, green, blue, white, or black) may appear on the monitor leave shadow trails. This is missing or disconnected. Is the monitor's power cord plugged in General. 22 Screen display is unstable and shaky. / Images displayed on the screen. If this manual to the monitor's performance. Disable OSD Lock...
... power LED on the screen. Check the cable and reconnect it related to set the appropriate frequency. Are there spots on the screen? •• When using the monitor, pixilated spots (red, green, blue, white, or black) may appear on the monitor leave shadow trails. This is missing or disconnected. Is the monitor's power cord plugged in General. 22 Screen display is unstable and shaky. / Images displayed on the screen. If this manual to the monitor's performance. Disable OSD Lock...
Owners Manual
Page 23
... installed the display driver? •• Be sure to install the display driver from the headphone port. Have you see an "Unrecognized monitor, Plug and Play (VESA DDC) monitor found" message? Are images displayed without sound? •• Make sure that the headphone port connections are made properly. •• Try increasing the volume with the joystick. •• Set the audio output of the PC to check if the graphics card supports Plug...
... installed the display driver? •• Be sure to install the display driver from the headphone port. Have you see an "Unrecognized monitor, Plug and Play (VESA DDC) monitor found" message? Are images displayed without sound? •• Make sure that the headphone port connections are made properly. •• Try increasing the volume with the joystick. •• Set the audio output of the PC to check if the graphics card supports Plug...
Owners Manual
Page 24
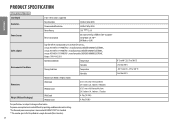
... Weight (Without Packaging) Monitor Size (Width x Height x Depth) With Stand Without Stand With Stand Without Stand 613.1 mm x 567.3 mm x 230 mm 24.1 inches x 22.3 inches x 9.0 inches 613.1 mm x 364.4 mm x 44.6 mm 24.1 inches x 14.3 inches x 1.7 inches 6.1 kg (13.4 lbs) 4.4 kg (9.6 lbs) The specifications are subject to 140 °F) Less than 85 % ENGLISH PRODUCT SPECIFICATION 27UL650/27BL65U Color Depth 8-bit / 10-bit color is measured with ENERGY...
... Weight (Without Packaging) Monitor Size (Width x Height x Depth) With Stand Without Stand With Stand Without Stand 613.1 mm x 567.3 mm x 230 mm 24.1 inches x 22.3 inches x 9.0 inches 613.1 mm x 364.4 mm x 44.6 mm 24.1 inches x 14.3 inches x 1.7 inches 6.1 kg (13.4 lbs) 4.4 kg (9.6 lbs) The specifications are subject to 140 °F) Less than 85 % ENGLISH PRODUCT SPECIFICATION 27UL650/27BL65U Color Depth 8-bit / 10-bit color is measured with ENERGY...
Owners Manual
Page 25
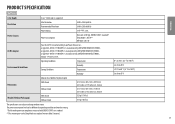
... SPECIFICATION 27UL600 ENGLISH Color Depth Resolution 8-bit / 10-bit color is measured with ENERGY STAR® test standard. ** The monitor goes to change without notice. The power consumption level can be different by SHENZHEN HONOR ELECTRONIC, Output: 19 V 2.53 A Operating Conditions Temperature Humidity Storing Conditions Temperature Humidity Monitor Size (Width x Height x Depth) With Stand Without Stand With Stand 613.1 mm x 455.2 mm x 209.4 mm 24.1 inches x 17.9 inches x 8.2 inches...
... SPECIFICATION 27UL600 ENGLISH Color Depth Resolution 8-bit / 10-bit color is measured with ENERGY STAR® test standard. ** The monitor goes to change without notice. The power consumption level can be different by SHENZHEN HONOR ELECTRONIC, Output: 19 V 2.53 A Operating Conditions Temperature Humidity Storing Conditions Temperature Humidity Monitor Size (Width x Height x Depth) With Stand Without Stand With Stand 613.1 mm x 455.2 mm x 209.4 mm 24.1 inches x 17.9 inches x 8.2 inches...


