
Owners Manual
Page 5
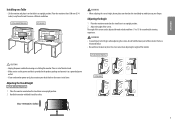
... the power cord before moving or installing the monitor. The angle of the screen can be adjusted forward or backward from the wall to ensure sufficient ventilation. 27UL650/27BL65U 27UL600 100 mm (3.94 inches) 100 mm (3.94 inches) 100 mm (3.94 inches) 100 mm (3.94 inches) 100 mm (3.94... both hands for a comfortable viewing experience. Adjusting the Stand Height 27UL650/27BL65U 1 Place the monitor mounted on the stand body to avoid injury to 15° for safety. Max. 110.0 mm (4.3 inches) 27UL600 5 Place the monitor at least 100 mm (3.94 inches) away from -5° to your hand...
... the power cord before moving or installing the monitor. The angle of the screen can be adjusted forward or backward from the wall to ensure sufficient ventilation. 27UL650/27BL65U 27UL600 100 mm (3.94 inches) 100 mm (3.94 inches) 100 mm (3.94 inches) 100 mm (3.94 inches) 100 mm (3.94... both hands for a comfortable viewing experience. Adjusting the Stand Height 27UL650/27BL65U 1 Place the monitor mounted on the stand body to avoid injury to 15° for safety. Max. 110.0 mm (4.3 inches) 27UL600 5 Place the monitor at least 100 mm (3.94 inches) away from -5° to your hand...
Owners Manual
Page 7
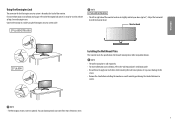
...27UL600 Installing the Wall Mount Plate This monitor meets the specifications for the Kensington security system is located at http://www.kensington.com. For more information on installation, refer to the wall mount plate's installation guide. •• Be careful not to apply too much force while mounting the wall mount... cable. NOTE •• The Kensington security system is sold separately. •• For more information on a wall mount by performing the stand attachment in reverse. Connect the monitor to the Kensington lock owner's manual or visit the website at...
...27UL600 Installing the Wall Mount Plate This monitor meets the specifications for the Kensington security system is located at http://www.kensington.com. For more information on installation, refer to the wall mount plate's installation guide. •• Be careful not to apply too much force while mounting the wall mount... cable. NOTE •• The Kensington security system is sold separately. •• For more information on a wall mount by performing the stand attachment in reverse. Connect the monitor to the Kensington lock owner's manual or visit the website at...
Owners Manual
Page 8
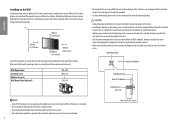
...; A non-VESA standard screw may damage the inside of each side of the monitor. Use an authorized LG wall mount and contact the local dealer or qualified personnel. •• Applying excessive force when tightening screws may differ...Wall Mount Plate Back of the Monitor Wall Mount Plate Back of non-standard screws. •• The wall mount kit includes the installation guide and all necessary parts. •• The wall mounting bracket is not liable for each wall mounting bracket. LG Electronics is optional. Wall Mount (mm) Standard screw Number of screws Wall Mount...
...; A non-VESA standard screw may damage the inside of each side of the monitor. Use an authorized LG wall mount and contact the local dealer or qualified personnel. •• Applying excessive force when tightening screws may differ...Wall Mount Plate Back of the Monitor Wall Mount Plate Back of non-standard screws. •• The wall mount kit includes the installation guide and all necessary parts. •• The wall mounting bracket is not liable for each wall mounting bracket. LG Electronics is optional. Wall Mount (mm) Standard screw Number of screws Wall Mount...


