
Specification
Page 2
...8226; Key Lock • Closed Caption • SIMPLINK™ (HDMI CEC) • Language 3 (English/Spanish/French) LGusa.com LG Electronics U.S.A., Inc. 1000 Sylvan Avenue Englewood Cliffs, NJ 07632 Customer Service and Technical Support: (800) 243-0000 CONVENIENCE FEATURES Auto Tuning/...Programming • Channel Add/Delete • Favorite Channel Programming • Auto/Manual Clock • On/Off Timer • Sleep Timer • Auto Off/Auto Sleep (When no video is present) &#...
...8226; Key Lock • Closed Caption • SIMPLINK™ (HDMI CEC) • Language 3 (English/Spanish/French) LGusa.com LG Electronics U.S.A., Inc. 1000 Sylvan Avenue Englewood Cliffs, NJ 07632 Customer Service and Technical Support: (800) 243-0000 CONVENIENCE FEATURES Auto Tuning/...Programming • Channel Add/Delete • Favorite Channel Programming • Auto/Manual Clock • On/Off Timer • Sleep Timer • Auto Off/Auto Sleep (When no video is present) &#...

User Manual
Page 1
ENGLISH PLASMA TV OWNER'S MANUAL PLASMA TV MODELS 42PJ3* * 50PJ3* * 42PJ6* * 50PJ6* * 50PK5* * 60PK5* * Please read this information. Model : Serial No. : Trade Mark of the TV. Refer to 1996) To your TV. Record the model number and serial number of the DVB Digital Video Broadcasting Project (1991 to the label on the back cover and quote this manual carefully before operating your dealer when requiring any service. Retain it for future reference.
ENGLISH PLASMA TV OWNER'S MANUAL PLASMA TV MODELS 42PJ3* * 50PJ3* * 42PJ6* * 50PJ6* * 50PK5* * 60PK5* * Please read this information. Model : Serial No. : Trade Mark of the TV. Refer to 1996) To your TV. Record the model number and serial number of the DVB Digital Video Broadcasting Project (1991 to the label on the back cover and quote this manual carefully before operating your dealer when requiring any service. Retain it for future reference.

User Manual
Page 3
...Edit 21 Software Update 23 Diagnostics 25 Selecting the Programme List 26 Favourite Programme Setup 27 Input List 28 Input Label 29 Simple manual 30 31 AV Mode 34 Initializing (Reset to original factory settings) ..35 MHEG (MULTIMEDIA AND HYPERMEDIA INFORMATION CODING EXPERT GROUP)(... CONTROL Picture Size (Aspect Ratio) Control 61 Picture Wizard 63 Energy Saving 64 Preset Picture Settings - Picture Mode-Preset 65 Manual Picture Adjustment - Picture Mode-User option 66 Picture Improvement Technology 67 Expert Picture Control 68 Picture Reset 71 Image Sticking Minimization(...
...Edit 21 Software Update 23 Diagnostics 25 Selecting the Programme List 26 Favourite Programme Setup 27 Input List 28 Input Label 29 Simple manual 30 31 AV Mode 34 Initializing (Reset to original factory settings) ..35 MHEG (MULTIMEDIA AND HYPERMEDIA INFORMATION CODING EXPERT GROUP)(... CONTROL Picture Size (Aspect Ratio) Control 61 Picture Wizard 63 Energy Saving 64 Preset Picture Settings - Picture Mode-Preset 65 Manual Picture Adjustment - Picture Mode-User option 66 Picture Improvement Technology 67 Expert Picture Control 68 Picture Reset 71 Image Sticking Minimization(...
User Manual
Page 5
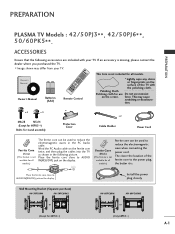
... Do not use excessive on the ferrite core twice, and then plug the cables into the TV as shown in the PC Audio cable. Owner's Manual BACK INFO ENERGY SAVING AV MODE 1 INPUT 42 RATDV/ 753 LIST 8 6 09 MENU OK FAMVARK RATIO MUTE GUIDE PP A G E Q.MENU Q.VIEW EXIT ...FREEZE Owner's Manual Batteries (AAA) Remote Control This item is not included for all models. * Lightly wipe any stains or fingerprints on the display. Wind the PC Audio ...
... Do not use excessive on the ferrite core twice, and then plug the cables into the TV as shown in the PC Audio cable. Owner's Manual BACK INFO ENERGY SAVING AV MODE 1 INPUT 42 RATDV/ 753 LIST 8 6 09 MENU OK FAMVARK RATIO MUTE GUIDE PP A G E Q.MENU Q.VIEW EXIT ...FREEZE Owner's Manual Batteries (AAA) Remote Control This item is not included for all models. * Lightly wipe any stains or fingerprints on the display. Wind the PC Audio ...

User Manual
Page 9
... back of the bolt. 1 Carefully place the TV screen side down on a cushioned surface to suit your TV. If you can adjust the TV set manually to the left or right direction by 20 degrees to protect the screen from damage. I Image shown may differ from your TV. NOT USING THE...
... back of the bolt. 1 Carefully place the TV screen side down on a cushioned surface to suit your TV. If you can adjust the TV set manually to the left or right direction by 20 degrees to protect the screen from damage. I Image shown may differ from your TV. NOT USING THE...
User Manual
Page 16
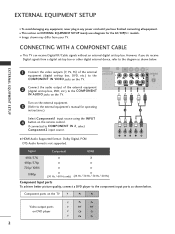
... box or other digital external device, refer to the component input ports as shown below . Turn on the external equipment. 3 (Refer to the external equipment's manual for the 42/50PJ3** models. Signal Component HDMI 480i/576i O X 480p/576p O O 720p/1080i O O 1080p O O (50 Hz / 60 Hz only) (24 Hz / 30 Hz / 50...
... box or other digital external device, refer to the component input ports as shown below . Turn on the external equipment. 3 (Refer to the external equipment's manual for the 42/50PJ3** models. Signal Component HDMI 480i/576i O X 480p/576p O O 720p/1080i O O 1080p O O (50 Hz / 60 Hz only) (24 Hz / 30 Hz / 50...

User Manual
Page 17
G If the DVD does not support Auto HDMI, you must set -top box, DVD, etc.) to the external equipment's manual for operating instructions.) 3 Select HDMI1, HDMI2 or HDMI3 input source using an HDMI cable. Please use the latest cables that your HDMI cable is version 1.3 ...
G If the DVD does not support Auto HDMI, you must set -top box, DVD, etc.) to the external equipment's manual for operating instructions.) 3 Select HDMI1, HDMI2 or HDMI3 input source using an HDMI cable. Please use the latest cables that your HDMI cable is version 1.3 ...

User Manual
Page 18
... output of the PC to HDMI/DVI IN 1 jack on the TV. 2 Connect the audio output of the digital set -top box or the PC manual for operating instructions.) 1 2 4 Select HDMI1 input source using the INPUT button on the remote control.
... output of the PC to HDMI/DVI IN 1 jack on the TV. 2 Connect the audio output of the digital set -top box or the PC manual for operating instructions.) 1 2 4 Select HDMI1 input source using the INPUT button on the remote control.

User Manual
Page 19
... Left = white, and Audio Right = red) 2 Insert a video tape into the VCR and press PLAY on AV IN 2 the VCR. (Refer to the VCR owner's manual.) Or, Operate the corresponding external equipment. (Refer to external equipment operating guide.) 3 Select A V 2 input source using the INPUT button on the TV. 2 Connect the antenna...
... Left = white, and Audio Right = red) 2 Insert a video tape into the VCR and press PLAY on AV IN 2 the VCR. (Refer to the VCR owner's manual.) Or, Operate the corresponding external equipment. (Refer to external equipment operating guide.) 3 Select A V 2 input source using the INPUT button on the TV. 2 Connect the antenna...

User Manual
Page 21
... Output (Optical) port. COMPONENT IN AV IN 1 EXTERNAL EQUIPMENT SETUP DIGITAL AUDIO OUT SETUP Sending the TV's audio signal to the external audio equipment instruction manual for operation. Looking at the laser beam may damage your vision. ! tal audio (Optical) input on the back of TV to a Home Theater (or amp...
... Output (Optical) port. COMPONENT IN AV IN 1 EXTERNAL EQUIPMENT SETUP DIGITAL AUDIO OUT SETUP Sending the TV's audio signal to the external audio equipment instruction manual for operation. Looking at the laser beam may damage your vision. ! tal audio (Optical) input on the back of TV to a Home Theater (or amp...
User Manual
Page 27
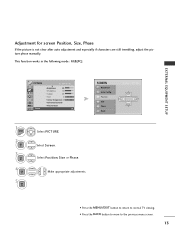
... for screen Position, Size, Phase If the picture is not clear after auto adjustment and especially if characters are still trembling, adjust the picture phase manually.
... for screen Position, Size, Phase If the picture is not clear after auto adjustment and especially if characters are still trembling, adjust the picture phase manually.
User Manual
Page 29
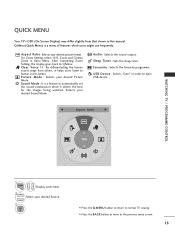
... helps users listen to human voices better. Aspect Ratio: Selects your desired Picture Mode. For Zoom Setting, select 14:9, Zoom and Cinema Zoom in this manual. Sleep Timer : Sets the sleep timer. Picture Mode : Selects your desired picture format. USB Device : Selects "Eject" in order to Q.Menu. Clear Voice II : By...
... helps users listen to human voices better. Aspect Ratio: Selects your desired Picture Mode. For Zoom Setting, select 14:9, Zoom and Cinema Zoom in this manual. Sleep Timer : Sets the sleep timer. Picture Mode : Selects your desired picture format. USB Device : Selects "Eject" in order to Q.Menu. Clear Voice II : By...

User Manual
Page 30
...to return to normal TV viewing. • Press the BACK button to move to the previous menu screen. 16 SETUP Auto Tuning Manual Tuning Programme Edit Software Update Diagnostics Move OK : On PICTURE Move OK Aspect Ratio : 16:9 Picture Wizard Energy Saving : Intelligent ...• Treble 50 • Bass 50 • Reset E OK R OPTION Move OK Audio Language Subtitle Language Disabled Assistance Country Input Label SIMPLINK Simple Manual Set ID E : English : English : Australia : On : 1 SETUP PICTURE AUDIO TIME OPTION LOCK INPUT USB TIME Move OK Clock Off Time :...
...to return to normal TV viewing. • Press the BACK button to move to the previous menu screen. 16 SETUP Auto Tuning Manual Tuning Programme Edit Software Update Diagnostics Move OK : On PICTURE Move OK Aspect Ratio : 16:9 Picture Wizard Energy Saving : Intelligent ...• Treble 50 • Bass 50 • Reset E OK R OPTION Move OK Audio Language Subtitle Language Disabled Assistance Country Input Label SIMPLINK Simple Manual Set ID E : English : English : Australia : On : 1 SETUP PICTURE AUDIO TIME OPTION LOCK INPUT USB TIME Move OK Clock Off Time :...
User Manual
Page 31
... return to normal TV viewing. • Press the BACK button to move to input a 4-digit pass- SETUP Auto Tuning Manual Tuning Programme Edit Software Update Diagnostics Move OK : On SETUP Auto Tuning Manual Tuning Programme Edit Software Update Diagnostics Move OK : On Check your antenna connection. word in Lock System 'O n'. • If...
... return to normal TV viewing. • Press the BACK button to move to input a 4-digit pass- SETUP Auto Tuning Manual Tuning Programme Edit Software Update Diagnostics Move OK : On SETUP Auto Tuning Manual Tuning Programme Edit Software Update Diagnostics Move OK : On Check your antenna connection. word in Lock System 'O n'. • If...
User Manual
Page 32
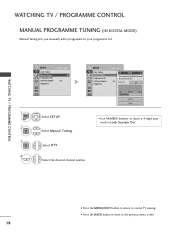
... Tuning MMaannuuaall TTuunniinngg Programme Edit Software Update Diagnostics Move OK : On Select SETUP. WATCHING TV / PROGRAMME CONTROL WATCHING TV / PROGRAMME CONTROL MANUAL PROGRAMME TUNING (IN DIGITAL MODE) Manual Tuning lets you manually add a programme to your channel list. : On UHF CH. 30 Bad Normal Good Update Close • Use NUMBER buttons to input...
... Tuning MMaannuuaall TTuunniinngg Programme Edit Software Update Diagnostics Move OK : On Select SETUP. WATCHING TV / PROGRAMME CONTROL WATCHING TV / PROGRAMME CONTROL MANUAL PROGRAMME TUNING (IN DIGITAL MODE) Manual Tuning lets you manually add a programme to your channel list. : On UHF CH. 30 Bad Normal Good Update Close • Use NUMBER buttons to input...

User Manual
Page 33
...V/UHF 4 FG C 04 Store Close 1 MENU Select SETUP. 6 Select V/UHF or Cable. 2 OK 3 OK 4 5 Select Manual Tuning. MANUAL PROGRAMME TUNING (IN ANALOGUE MODE) Manual Tuning lets you desire. Select a TV system. • Press the MENU/EXIT button to return to normal TV viewing. • ...Press the BACK button to move to the previous menu screen. • Use NUMBER buttons to input a 4-digit password in whatever order you manually tune and arrange the stations in Lock System 'O n'. • B G : PAL B/G (Europe / East Europe / Asia / New Zealand / M.East / Africa / ...
...V/UHF 4 FG C 04 Store Close 1 MENU Select SETUP. 6 Select V/UHF or Cable. 2 OK 3 OK 4 5 Select Manual Tuning. MANUAL PROGRAMME TUNING (IN ANALOGUE MODE) Manual Tuning lets you desire. Select a TV system. • Press the MENU/EXIT button to return to normal TV viewing. • ...Press the BACK button to move to the previous menu screen. • Use NUMBER buttons to input a 4-digit password in whatever order you manually tune and arrange the stations in Lock System 'O n'. • B G : PAL B/G (Europe / East Europe / Asia / New Zealand / M.East / Africa / ...
User Manual
Page 34
... make OK your choice of the second char- acter, and so on. Select Manual Tuning. WATCHING TV / PROGRAMME CONTROL WATCHING TV / PROGRAMME CONTROL SETUP Auto Tuning Manual Tuning Programme Edit Software Update Diagnostics Move OK : On SETUP Auto Tuning Manual Tuning Programme Edit Software Update Diagnostics Move OK F Storage : On System Band Channel...
... make OK your choice of the second char- acter, and so on. Select Manual Tuning. WATCHING TV / PROGRAMME CONTROL WATCHING TV / PROGRAMME CONTROL SETUP Auto Tuning Manual Tuning Programme Edit Software Update Diagnostics Move OK : On SETUP Auto Tuning Manual Tuning Programme Edit Software Update Diagnostics Move OK F Storage : On System Band Channel...
User Manual
Page 35
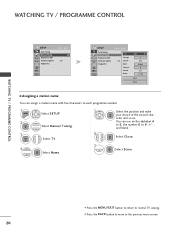
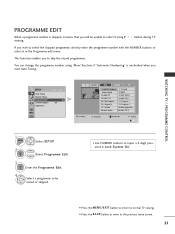
SETUP Auto Tuning Manual Tuning PPrrooggrraammmmee EEddiitt Software Update Diagnostics Move OK : On 1 Pr. This function enables you wish to select the skipped programme, directly enter the programme number ...
SETUP Auto Tuning Manual Tuning PPrrooggrraammmmee EEddiitt Software Update Diagnostics Move OK : On 1 Pr. This function enables you wish to select the skipped programme, directly enter the programme number ...

User Manual
Page 37
Select Software Update. 3 OK 4 OK Save. WATCHING TV / PROGRAMME CONTROL SOFTWARE UPDATE Software Update means software can be displayed to notify that new software is found. 23 Select O n or O f f. • If you select O n, a user confirm message box will be downloaded through the digital terrestrial broadcasting system. SETUP Auto Tuning Manual Tuning Programme Edit Software Update Diagnostics Move OK : : OOnn SETUP Auto Tuning Manual Tuning Programme Edit Software Update Diagnostics Move OK :: OOnn Off OOnn 1 MENU 2 OK Select SETUP.
Select Software Update. 3 OK 4 OK Save. WATCHING TV / PROGRAMME CONTROL SOFTWARE UPDATE Software Update means software can be displayed to notify that new software is found. 23 Select O n or O f f. • If you select O n, a user confirm message box will be downloaded through the digital terrestrial broadcasting system. SETUP Auto Tuning Manual Tuning Programme Edit Software Update Diagnostics Move OK : : OOnn SETUP Auto Tuning Manual Tuning Programme Edit Software Update Diagnostics Move OK :: OOnn Off OOnn 1 MENU 2 OK Select SETUP.
User Manual
Page 39
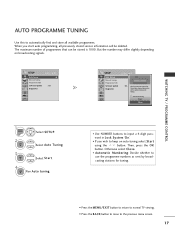
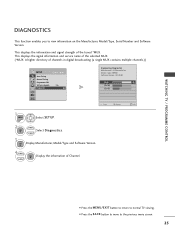
... the previous menu screen. 25 This displays the information and signal strength of channels in digital broadcasting (a single MUX contains multiple channels.)) SETUP Auto Tuning Manual Tuning Programme Edit Software Update Diagnostics Move OK : On Engineering Diagnostics Manufacturer...
... the previous menu screen. 25 This displays the information and signal strength of channels in digital broadcasting (a single MUX contains multiple channels.)) SETUP Auto Tuning Manual Tuning Programme Edit Software Update Diagnostics Move OK : On Engineering Diagnostics Manufacturer...

