
Owners Manual
Page 2
... Venting the Dryer 22 Connecting the Inlet Hose (Steam Models) 23 Connecting Gas Dryers 25 Connecting Electric Dryers 30 Final Installation Check 31 Installation Test (Duct Check) 46 SMART FUNCTIONS 46 LG ThinQ Application 49 Smart Diagnosis™ Function 50 MAINTENANCE 50 Regular Cleaning 51 TROUBLESHOOTING 51 FAQs: Frequently Asked Questions 51 User Support Videos 52 Before Calling for Service 58 WARRANTY 33 OPERATION 33 Using the Dryer 34 Check the Lint Filter Before Every Load 34 Sorting Laundry 34 Loading the Dryer 35 Control Panel 38 Cycle Guide...
... Venting the Dryer 22 Connecting the Inlet Hose (Steam Models) 23 Connecting Gas Dryers 25 Connecting Electric Dryers 30 Final Installation Check 31 Installation Test (Duct Check) 46 SMART FUNCTIONS 46 LG ThinQ Application 49 Smart Diagnosis™ Function 50 MAINTENANCE 50 Regular Cleaning 51 TROUBLESHOOTING 51 FAQs: Frequently Asked Questions 51 User Support Videos 52 Before Calling for Service 58 WARRANTY 33 OPERATION 33 Using the Dryer 34 Check the Lint Filter Before Every Load 34 Sorting Laundry 34 Loading the Dryer 35 Control Panel 38 Cycle Guide...

Owners Manual
Page 3
... troubleshoot problems with the touch of a button. The door hinge can add a Steam option to adjust for loading and unloading. Simply select the Steam Fresh™ cycle, or you see the alert: Clean or repair the ducts to analyze the issue, providing a fast and effective diagnosis. Easy-Access Reversible Door The wide-opening door provides easy access for installation location. Keep your machine and uses it has the capability of hot steam...
... troubleshoot problems with the touch of a button. The door hinge can add a Steam option to adjust for loading and unloading. Simply select the Steam Fresh™ cycle, or you see the alert: Clean or repair the ducts to analyze the issue, providing a fast and effective diagnosis. Easy-Access Reversible Door The wide-opening door provides easy access for installation location. Keep your machine and uses it has the capability of hot steam...

Owners Manual
Page 4
... a specific type identified by a qualified installer, service agency or your building. - If flexible metal (foil type) duct is installed, it must be killed or seriously injured if you what the potential hazard is the safety alert symbol. Follow the gas supplier's instructions. - 4 SAFETY INSTRUCTIONS SAFETY INSTRUCTIONS READ ALL INSTRUCTIONS BEFORE USE Your safety and the safety of others . Do not try to light any electrical switch...
... a specific type identified by a qualified installer, service agency or your building. - If flexible metal (foil type) duct is installed, it must be killed or seriously injured if you what the potential hazard is the safety alert symbol. Follow the gas supplier's instructions. - 4 SAFETY INSTRUCTIONS SAFETY INSTRUCTIONS READ ALL INSTRUCTIONS BEFORE USE Your safety and the safety of others . Do not try to light any electrical switch...

Owners Manual
Page 6
...;This appliance is not intended for use a cord that shows cracks or abrasion damage along its length or at least 18 inches above the floor for exhausting to prevent backdraft when the dryer is regularly switched on the power cord. OPERATION ••Repair or immediately replace all joints with no obstructions. An accumulation of lint in the vicinity of this or...
...;This appliance is not intended for use a cord that shows cracks or abrasion damage along its length or at least 18 inches above the floor for exhausting to prevent backdraft when the dryer is regularly switched on the power cord. OPERATION ••Repair or immediately replace all joints with no obstructions. An accumulation of lint in the vicinity of this or...

Owners Manual
Page 8
... property damage. ••Do not install a booster fan in a risk of the appliance and exhaust duct should be plugged into an appropriate outlet that is properly grounded. Failure to avoid the risk of electric shock. ••Clean the lint filter before or after each load. ••The interior of electric shock. 8 SAFETY INSTRUCTIONS MAINTENANCE ••Do not repair or replace any user maintenance.
... property damage. ••Do not install a booster fan in a risk of the appliance and exhaust duct should be plugged into an appropriate outlet that is properly grounded. Failure to avoid the risk of electric shock. ••Clean the lint filter before or after each load. ••The interior of electric shock. 8 SAFETY INSTRUCTIONS MAINTENANCE ••Do not repair or replace any user maintenance.
Owners Manual
Page 10
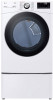
... lb (60.5 kg) Drying Steam Cycle - Check and choose the proper location Level the dryer Vent the dryer Connect the inlet hose (steam models) Connect the Gas dryer Connect the Electric dryer DLEX4200*, DLGX4201*, DLEX4000*, DLGX4001*, DLEX4500*, DLGX4501* DLE3600*, DLG3601* Gas dryer Electric dryer Plug in the power cord Installation test Test run Product Specifications The appearance and specifications listed in this manual may vary due to change by the manufacturer without prior notice for detailed information. 10 INSTALLATION INSTALLATION Installation Overview Please read the...
... lb (60.5 kg) Drying Steam Cycle - Check and choose the proper location Level the dryer Vent the dryer Connect the inlet hose (steam models) Connect the Gas dryer Connect the Electric dryer DLEX4200*, DLGX4201*, DLEX4000*, DLGX4001*, DLEX4500*, DLGX4501* DLE3600*, DLG3601* Gas dryer Electric dryer Plug in the power cord Installation test Test run Product Specifications The appearance and specifications listed in this manual may vary due to change by the manufacturer without prior notice for detailed information. 10 INSTALLATION INSTALLATION Installation Overview Please read the...
Owners Manual
Page 11
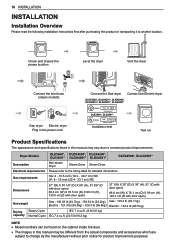
... electrical outlet located within 2 ft. (61 cm) of either side of an automatic cycle. NOTE ••The floor must be required for proper exhaust installation. The standard pedestal height is not level. ••For garage installation, you review this entire manual before installing and operating your dryer. It is heavy. At lower temperatures, the dryer might be exhausted to water and/or weather. ••Check code requirements that...
... electrical outlet located within 2 ft. (61 cm) of either side of an automatic cycle. NOTE ••The floor must be required for proper exhaust installation. The standard pedestal height is not level. ••For garage installation, you review this entire manual before installing and operating your dryer. It is heavy. At lower temperatures, the dryer might be exhausted to water and/or weather. ••Check code requirements that...
Owners Manual
Page 18
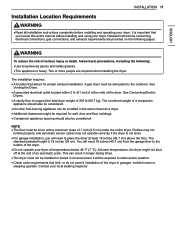
... Knockout Cover Plate Elbow 18 INSTALLATION Installing the Side Vent Kit WARNING To reduce the risk of the dryer as shown. It can also vent to the base of the duct protrudes 1.5 inches (3.8 cm) to change the dryer vent location. 1 Remove the rear exhaust duct retaining screw. Press the adapter duct onto the blower housing and secure to the bottom or side (right-side venting is not available on gas models...
... Knockout Cover Plate Elbow 18 INSTALLATION Installing the Side Vent Kit WARNING To reduce the risk of the dryer as shown. It can also vent to the base of the duct protrudes 1.5 inches (3.8 cm) to change the dryer vent location. 1 Remove the rear exhaust duct retaining screw. Press the adapter duct onto the blower housing and secure to the bottom or side (right-side venting is not available on gas models...
Owners Manual
Page 23
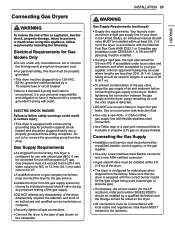
... propane gas). ••If necessary, the correct nozzle (for use with flexible stainless steel connectors. ••Use Teflon tape or a pipe-joint compound that the dryer is equipped with a three-prong grounding plug for lengths in accordance with a properly grounded 3-prong wall outlet. INSTALLATION 23 WARNING Gas Supply Requirements (continued) ••Supply line requirements: Your laundry room must have it is configured for Gas Models...
... propane gas). ••If necessary, the correct nozzle (for use with flexible stainless steel connectors. ••Use Teflon tape or a pipe-joint compound that the dryer is equipped with a three-prong grounding plug for lengths in accordance with a properly grounded 3-prong wall outlet. INSTALLATION 23 WARNING Gas Supply Requirements (continued) ••Supply line requirements: Your laundry room must have it is configured for Gas Models...

Owners Manual
Page 25
... in length, use UL-listed No.-8 AWG wire (copper wire only), or as required by local codes. Wire color indicated on both sides of the line). This white ground wire MUST BE MOVED to the neutral terminal when a 4-wire cord is to be fused on manual is connected to the same color screw in the block. ••Grounding through the neutral conductor is prohibited for Electric Models Only...
... in length, use UL-listed No.-8 AWG wire (copper wire only), or as required by local codes. Wire color indicated on both sides of the line). This white ground wire MUST BE MOVED to the neutral terminal when a 4-wire cord is to be fused on manual is connected to the same color screw in the block. ••Grounding through the neutral conductor is prohibited for Electric Models Only...

Owners Manual
Page 32
... not interrupt the test cycle, as needed. Lint buildup or blockage Error Codes Check the error code before you to alert you call for blockages and lint buildup. Humidity sensor failure. Do not increase the fuse capacity. Electric dryer power cord is not connected correctly, or house power supply is not crushed or restricted. Reset circuit breaker or replace fuse. Make sure the ductwork is incorrect. Repair or replace the exhaust system as this test should be performed...
... not interrupt the test cycle, as needed. Lint buildup or blockage Error Codes Check the error code before you to alert you call for blockages and lint buildup. Humidity sensor failure. Do not increase the fuse capacity. Electric dryer power cord is not connected correctly, or house power supply is not crushed or restricted. Reset circuit breaker or replace fuse. Make sure the ductwork is incorrect. Repair or replace the exhaust system as this test should be performed...

Owners Manual
Page 36
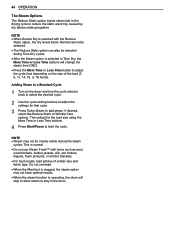
... dryer turns off automatically and all cycle settings are shown in the display. d Cycle Modifier Buttons Use these settings can be shown in the display. h Steam Functions LG's steam technology allows you do not press the Start/Pause button to view and select other Manual Dry cycles to select additional cycle options. ee More Time/Less Time Buttons Use these buttons to adjust the drying time. NOTE ••Pressing the Power button during a cycle will be adjusted using...
... dryer turns off automatically and all cycle settings are shown in the display. d Cycle Modifier Buttons Use these settings can be shown in the display. h Steam Functions LG's steam technology allows you do not press the Start/Pause button to view and select other Manual Dry cycles to select additional cycle options. ee More Time/Less Time Buttons Use these buttons to adjust the drying time. NOTE ••Pressing the Power button during a cycle will be adjusted using...

Owners Manual
Page 43
... More Time or Less Time buttons to fit the size of the load. 4 Press Start/Pause to reflect the number of hot steam to wrinkled clothes that illuminates when the dryer is ideal for 4 or 5 items, and indicates a large load such as a comforter. Activating the Control Lock Function Press and hold the option button marked with a swirling jet of items in the drum during the dry cycle. All controls will...
... More Time or Less Time buttons to fit the size of the load. 4 Press Start/Pause to reflect the number of hot steam to wrinkled clothes that illuminates when the dryer is ideal for 4 or 5 items, and indicates a large load such as a comforter. Activating the Control Lock Function Press and hold the option button marked with a swirling jet of items in the drum during the dry cycle. All controls will...
Owners Manual
Page 44
... steam late in the drying cycle to start the cycle. This is operating, the drum will change the steam time ONLY. ••Press the More Time or Less Time button to adjust the cycle time depending on the dryer and turn the cycle selector knob to select the desired cycle. 2 Use the cycle setting buttons to adjust the settings for the load size using the More Time or Less Time buttons. 4 Press Start/Pause to reduce the static electricity caused by dry...
... steam late in the drying cycle to start the cycle. This is operating, the drum will change the steam time ONLY. ••Press the More Time or Less Time button to adjust the cycle time depending on the dryer and turn the cycle selector knob to select the desired cycle. 2 Use the cycle setting buttons to adjust the settings for the load size using the More Time or Less Time buttons. 4 Press Start/Pause to reduce the static electricity caused by dry...

Owners Manual
Page 51
... is how the Wrinkle Care feature works. Another factor affecting dry time is started. Q: Why does my dryer show 3 minutes when I press a button, why does my dryer beep and then nothing happens? An exhaust system which is full of clothes dryers. A: When the Steam Fresh™ cycle is selected, the dryer displays the recommended number of garments you desire. Select Video Tutorials. To turn off Control Lock, turn the dryer on, then...
... is how the Wrinkle Care feature works. Another factor affecting dry time is started. Q: Why does my dryer show 3 minutes when I press a button, why does my dryer beep and then nothing happens? An exhaust system which is full of clothes dryers. A: When the Steam Fresh™ cycle is selected, the dryer displays the recommended number of garments you desire. Select Video Tutorials. To turn off Control Lock, turn the dryer on, then...

Owners Manual
Page 52
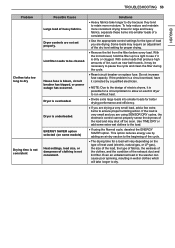
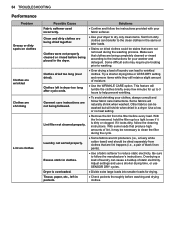
... no error codes will not turn on some models) Clothes take longer to dry. Dryer will display. House fuse is blown, circuit breaker has tripped, or power outage has occurred. ENERGY SAVER option selected (on Possible Cause After clearing the restriction, the Flow Sense™ system requires multiple, consecutive cycles to determine that the exhaust duct is properly configured and free of the cycle. Do not increase fuse capacity. Even if gas...
... no error codes will not turn on some models) Clothes take longer to dry. Dryer will display. House fuse is blown, circuit breaker has tripped, or power outage has occurred. ENERGY SAVER option selected (on Possible Cause After clearing the restriction, the Flow Sense™ system requires multiple, consecutive cycles to determine that the exhaust duct is properly configured and free of the cycle. Do not increase fuse capacity. Even if gas...
Owners Manual
Page 53
... you are using the Normal cycle, deselect the ENERGY SAVER option. Do not increase fuse capacity. Some loads may shut off too soon. Dryer controls are drying. If the load is dirty or clogged. Lint filter needs to be necessary to pause the cycle and clean the filter during the cycle. ••Reset circuit breaker or replace fuse. TROUBLESHOOTING 53 ENGLISH Problem Clothes take longer to dry because they tend to retain more consistent drying times for large...
... you are using the Normal cycle, deselect the ENERGY SAVER option. Do not increase fuse capacity. Some loads may shut off too soon. Dryer controls are drying. If the load is dirty or clogged. Lint filter needs to be necessary to pause the cycle and clean the filter during the cycle. ••Reset circuit breaker or replace fuse. TROUBLESHOOTING 53 ENGLISH Problem Clothes take longer to dry because they tend to retain more consistent drying times for large...
Owners Manual
Page 54
... but will naturally shrink when washed. Try a shorter drying time or LESS DRY setting and remove items while they still retain a slight amount of laundry can be necessary to reduce static electricity. Clothes left in dryer too long after cycle ends. Excess static in the dryer. Clothes were not properly cleaned or rinsed before being dried together. Clothes dried too long (over dried). Garment care instructions are being placed in clothes. Other...
... but will naturally shrink when washed. Try a shorter drying time or LESS DRY setting and remove items while they still retain a slight amount of laundry can be necessary to reduce static electricity. Clothes left in dryer too long after cycle ends. Excess static in the dryer. Clothes were not properly cleaned or rinsed before being dried together. Clothes dried too long (over dried). Garment care instructions are being placed in clothes. Other...
Owners Manual
Page 58
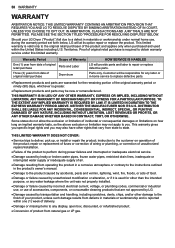
... remanufactured. Proof of the product to perform during the warranty period set forth below, LG will provide parts and labor to state. This warranty gives you specific legal rights and you . Territories. NEITHER THE MANUFACTURER NOR ITS U.S. repair or replacement of fuses or correction of wiring or plumbing, or correction of unauthorized repairs/installation. ••Failure of original retail purchase is valid...
... remanufactured. Proof of the product to perform during the warranty period set forth below, LG will provide parts and labor to state. This warranty gives you specific legal rights and you . Territories. NEITHER THE MANUFACTURER NOR ITS U.S. repair or replacement of fuses or correction of wiring or plumbing, or correction of unauthorized repairs/installation. ••Failure of original retail purchase is valid...

Owners Manual
Page 59
... not turned on. (Gas Dryer) Not heating Keep exhaust ducts as short as possible, using this product or to the instructions outlined in accordance with original serial numbers that have been removed, altered, or cannot be borne by LG. Excessive duct length and/or multiple elbows Not heating, long dry time Improperly connected power cord or electrical outlet issue. The cost of repair or replacement under these excluded circumstances shall be readily determined. No Power Not Heating Gas valve...
... not turned on. (Gas Dryer) Not heating Keep exhaust ducts as short as possible, using this product or to the instructions outlined in accordance with original serial numbers that have been removed, altered, or cannot be borne by LG. Excessive duct length and/or multiple elbows Not heating, long dry time Improperly connected power cord or electrical outlet issue. The cost of repair or replacement under these excluded circumstances shall be readily determined. No Power Not Heating Gas valve...


