
Owners Manual
Page 3
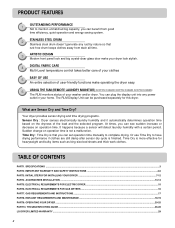
... and thick work clothes. Your dryer provides sensor drying and time drying programs. Sensor Dry : Dryer senses electronically laundry humidity and it automatically determines operation time based on operation time. Time Dry : Time Dry is finished. IMPORTANT WARRANTY AND SAFETY INSTRUCTIONS ...4-6 PART3... ACCESSORIES INSTALLATION ...13-14 PART5. TABLE OF CONTENTS PART1. TROUBLESHOOTING GUIDE ...26-28 LG DRYER LIMITED WARRANTY ...29 2 EXHAUST REQUIREMENTS AND MAINTENANCE...18-19 PART9. Time Dry is not a malfunction. You can plug the display unit into any rust by nature...
... and thick work clothes. Your dryer provides sensor drying and time drying programs. Sensor Dry : Dryer senses electronically laundry humidity and it automatically determines operation time based on operation time. Time Dry : Time Dry is finished. IMPORTANT WARRANTY AND SAFETY INSTRUCTIONS ...4-6 PART3... ACCESSORIES INSTALLATION ...13-14 PART5. TABLE OF CONTENTS PART1. TROUBLESHOOTING GUIDE ...26-28 LG DRYER LIMITED WARRANTY ...29 2 EXHAUST REQUIREMENTS AND MAINTENANCE...18-19 PART9. Time Dry is not a malfunction. You can plug the display unit into any rust by nature...
Owners Manual
Page 7
... outlet that is moving. 6) Do not install or store this appliance where it will not fit the outlet, have come into contact with gasoline, dry-cleaning solvents, or other flammable or explosive substances, as they give off vapors that could cause a load to catch fire. 14) Do not use... of lint, dust, and dirt. 12) The interior of the appliance and exhaust duct should be run with cooking oils may contribute to the drying compartment. 5) Do not reach into the appliance if the drum is properly installed and grounded in the appliance. Items contaminated with the circuit conductors ...
... outlet that is moving. 6) Do not install or store this appliance where it will not fit the outlet, have come into contact with gasoline, dry-cleaning solvents, or other flammable or explosive substances, as they give off vapors that could cause a load to catch fire. 14) Do not use... of lint, dust, and dirt. 12) The interior of the appliance and exhaust duct should be run with cooking oils may contribute to the drying compartment. 5) Do not reach into the appliance if the drum is properly installed and grounded in the appliance. Items contaminated with the circuit conductors ...

Owners Manual
Page 8
... materials should be minimized further by properly venting the dryer to follow all occupants. • Immediately call the fire department. ! Do not dry any articles that has ever had any phone in fire, death or serious injury. • A qualified service person or company must perform ...adjusted dryers will minimize combustion. WHAT TO DO IF YOU SMELL GAS: • Do not try to four of these instructions can be dried on a clothesline or by using this manual and instructions and information provided by the incomplete combustion of substances known to the state to cause...
... materials should be minimized further by properly venting the dryer to follow all occupants. • Immediately call the fire department. ! Do not dry any articles that has ever had any phone in fire, death or serious injury. • A qualified service person or company must perform ...adjusted dryers will minimize combustion. WHAT TO DO IF YOU SMELL GAS: • Do not try to four of these instructions can be dried on a clothesline or by using this manual and instructions and information provided by the incomplete combustion of substances known to the state to cause...
Owners Manual
Page 11
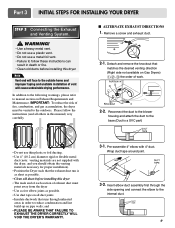
.... • Clean old ducts before installing this manual) very carefully. Please follow these instructions can result in this dryer Note Vent end will cause undesirable drying performance. Remove a screw and exhaust duct. 2-1. Detach and remove the knockout that the exhaust duct run is as short as possible. • Use duct tape...
.... • Clean old ducts before installing this manual) very carefully. Please follow these instructions can result in this dryer Note Vent end will cause undesirable drying performance. Remove a screw and exhaust duct. 2-1. Detach and remove the knockout that the exhaust duct run is as short as possible. • Use duct tape...
Owners Manual
Page 13
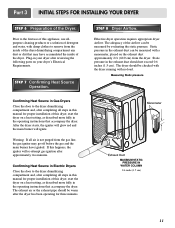
... Electrical Requirements. Static pressure in the exhaust duct can be checked with the dryer running with damp clothes to the dryer drum/drying compartment and, after completing all steps in this manual for proper installation of the dryer. Static pressure in the exhaust duct should...setting, as described more fully in the operating instructions that accompany the dryer. STEP 7 Confirming Heat Source Operation. Prior to the dryer drum/drying compartment and, after approximately two minutes. Warning: If all air is not purged from the inside of this dryer, start the dryer on ...
... Electrical Requirements. Static pressure in the exhaust duct can be checked with the dryer running with damp clothes to the dryer drum/drying compartment and, after completing all steps in this manual for proper installation of the dryer. Static pressure in the exhaust duct should...setting, as described more fully in the operating instructions that accompany the dryer. STEP 7 Confirming Heat Source Operation. Prior to the dryer drum/drying compartment and, after approximately two minutes. Warning: If all air is not purged from the inside of this dryer, start the dryer on ...

Owners Manual
Page 21
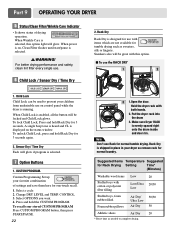
...of the dryer. 8. Always make sure the lint filter is firmly secured before starting a new load, because a clogged lint filter may increase drying times. 2. Please note that nothing has been set against the dampers. 4. To clean, pull the lint screen straight up and roll any ...fabric softener residue can cause serious injury to the vacuum duct. A qualified service person or company should be washed as necessary. e) After drying the lint screen with hot or warm water. Label all wires prior to disconnection when servicing the dryer, because wiring errors can build up...
...of the dryer. 8. Always make sure the lint filter is firmly secured before starting a new load, because a clogged lint filter may increase drying times. 2. Please note that nothing has been set against the dampers. 4. To clean, pull the lint screen straight up and roll any ...fabric softener residue can cause serious injury to the vacuum duct. A qualified service person or company should be washed as necessary. e) After drying the lint screen with hot or warm water. Label all wires prior to disconnection when servicing the dryer, because wiring errors can build up...
Owners Manual
Page 22
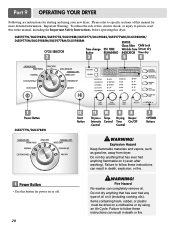
... or injury to person, read this entire manual, including the Important Safety Instructions, before operating this dryer. DLE5977W/DLG5988W/DLE5977B/DLG5988B/DLE5977S/DLG5988S/DLE5977WM/DLG5988WM/ DLE5977SM/DLG5988SM/DLE5977BM/DLG5988BM DLE3777W/DLG3788W 1 Power Button • Use this manual for power on a ...on it (including cooking oils). Failure to follow these instructions can result in death, explosion, or fire. ! Do not dry anything flammable on it (even after washing). Failure to follow these instructions can completely remove oil. Part 9 OPERATING YOUR DRYER...
... or injury to person, read this entire manual, including the Important Safety Instructions, before operating this dryer. DLE5977W/DLG5988W/DLE5977B/DLG5988B/DLE5977S/DLG5988S/DLE5977WM/DLG5988WM/ DLE5977SM/DLG5988SM/DLE5977BM/DLG5988BM DLE3777W/DLG3788W 1 Power Button • Use this manual for power on a ...on it (including cooking oils). Failure to follow these instructions can result in death, explosion, or fire. ! Do not dry anything flammable on it (even after washing). Failure to follow these instructions can completely remove oil. Part 9 OPERATING YOUR DRYER...
Owners Manual
Page 23
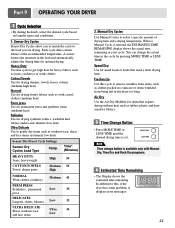
...clothes (medium heat) Perm press Use for permanent press and synthetic items (medium-heat) Delicates Use for small loads or loads that require drying without heat such as clothes packed in a suitcase or items wrinkled from items, such as rubber, plastic and heatsensitive fabrics. 3 Time...Button • Press MORE TIME or LESS TIME until the desired drying time is set. Manual Dry Cycles Use Manual Cycles to the load you are drying. When a Manual Cycle is available only with Manual Dry, Time Dry and Rack Dry programs. 4 Estimated Time Remaining • The Display shows the estimated...
...clothes (medium heat) Perm press Use for permanent press and synthetic items (medium-heat) Delicates Use for small loads or loads that require drying without heat such as clothes packed in a suitcase or items wrinkled from items, such as rubber, plastic and heatsensitive fabrics. 3 Time...Button • Press MORE TIME or LESS TIME until the desired drying time is set. Manual Dry Cycles Use Manual Cycles to the load you are drying. When a Manual Cycle is available only with Manual Dry, Time Dry and Rack Dry programs. 4 Estimated Time Remaining • The Display shows the estimated...
Owners Manual
Page 24
... of settings and save them here for one-touch recall. 1. When Wrinkle Care is selected, this option. I To use . 6 Child Lock / Sensor Dry / Time Dry 2. Select OPTIONS you want. 4. Make sure Dryer RACK is selected. ! Note Don't use Rack for 3 seconds again. 2. When Child Lock is shipped... Lock glows. Put the dryer rack into the drum 3. To lock Child Lock, Press and hold Rack Dry for tumble drying such as needed to prevent your favorite combination of drying operation. Select a cycle 2. Hold the dryer rack with cotton or polyester fiber filling Low/Ultra Low Stuffed...
... of settings and save them here for one-touch recall. 1. When Wrinkle Care is selected, this option. I To use . 6 Child Lock / Sensor Dry / Time Dry 2. Select OPTIONS you want. 4. Make sure Dryer RACK is selected. ! Note Don't use Rack for 3 seconds again. 2. When Child Lock is shipped... Lock glows. Put the dryer rack into the drum 3. To lock Child Lock, Press and hold Rack Dry for tumble drying such as needed to prevent your favorite combination of drying operation. Select a cycle 2. Hold the dryer rack with cotton or polyester fiber filling Low/Ultra Low Stuffed...

Owners Manual
Page 25
...not use this cycle with delicate fabrics. 5. Press BEEPER to adjust the sound level or turn off the signal. 9 Time Dry Use Time Dry Option to remove lightweight items that are dry or other items that is indicated. Press TEMP. Part 9 OPERATING YOUR DRYER 3. You can not remove laundry after the cycle...option helps to iron. 8 Beeper The BEEPER controls the volume of the beep that you when your load is done. 4. Damp Dry Beep When you select the damp dry beep option, a beep will alert you may wish to prevent the wrinkle on your laundry. Temperature modifiers cannot be used with ...
...not use this cycle with delicate fabrics. 5. Press BEEPER to adjust the sound level or turn off the signal. 9 Time Dry Use Time Dry Option to remove lightweight items that are dry or other items that is indicated. Press TEMP. Part 9 OPERATING YOUR DRYER 3. You can not remove laundry after the cycle...option helps to iron. 8 Beeper The BEEPER controls the volume of the beep that you when your load is done. 4. Damp Dry Beep When you select the damp dry beep option, a beep will alert you may wish to prevent the wrinkle on your laundry. Temperature modifiers cannot be used with ...

Owners Manual
Page 26
...of the load and adjusts the time automatically based on the selected dryness level. See Loading. • Turn the knob to select the drying cycle you want to dry the load. To use • Clean lint screen before or after each cycle. • Place laundry into dryer and shut door. As... the cycle runs, the control senses the dryness of the load. • Avoid overloading the dryer. Selecting MORE Dry or LESS Dry automatically adjusts the sensed time needed time which is already sensed. ❁ Starting your clothes, and decrease the likelihood of uneven...
...of the load and adjusts the time automatically based on the selected dryness level. See Loading. • Turn the knob to select the drying cycle you want to dry the load. To use • Clean lint screen before or after each cycle. • Place laundry into dryer and shut door. As... the cycle runs, the control senses the dryness of the load. • Avoid overloading the dryer. Selecting MORE Dry or LESS Dry automatically adjusts the sensed time needed time which is already sensed. ❁ Starting your clothes, and decrease the likelihood of uneven...

Owners Manual
Page 27
... Part 9 OPERATING YOUR DRYER 4. For more than 10 minutes, the dryer will increase drying time and energy consumption, therefore dryer life expectancy could be used with Manual Dry, Time Dry and Rack Dry Cycles. • Press TEMP. Press START/PAUSE. Clean the transparent glass door to ...filter will shut off . • If you do not press START/PAUSE within 10 minutes. To stop your drying cycle after each use a sensor dry cycle • Select a Manual Dry Cycle. • Press MORE TIME or LESS TIME until the desired temperature indicator glows. • (OPTIONAL ...
... Part 9 OPERATING YOUR DRYER 4. For more than 10 minutes, the dryer will increase drying time and energy consumption, therefore dryer life expectancy could be used with Manual Dry, Time Dry and Rack Dry Cycles. • Press TEMP. Press START/PAUSE. Clean the transparent glass door to ...filter will shut off . • If you do not press START/PAUSE within 10 minutes. To stop your drying cycle after each use a sensor dry cycle • Select a Manual Dry Cycle. • Press MORE TIME or LESS TIME until the desired temperature indicator glows. • (OPTIONAL ...

Owners Manual
Page 28
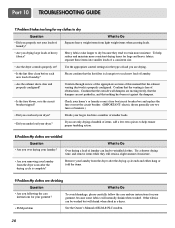
...the instructions provided with your fabric softener product. • Are you are following your clothes entirely clean? Please review and confirm that you drying clean and dirty clothes together? Confirm that the dryer's plug is the circuit breaker tripped? If the fuse is the circuit breaker tripped?...clothes are actually stains that the house gas shutoff and the dryer gas shutoff are both fully open. 3.Problem:There are Greasy Spots on dried clothes are being completely cleaned. 26 Check your dryer to Do • Did you may not need to call for service. 1.Problem...
...the instructions provided with your fabric softener product. • Are you are following your clothes entirely clean? Please review and confirm that you drying clean and dirty clothes together? Confirm that the dryer's plug is the circuit breaker tripped? If the fuse is the circuit breaker tripped?...clothes are actually stains that the house gas shutoff and the dryer gas shutoff are both fully open. 3.Problem:There are Greasy Spots on dried clothes are being completely cleaned. 26 Check your dryer to Do • Did you may not need to call for service. 1.Problem...

Owners Manual
Page 29
... of the pocket of a pair of pants, and this paper, tissue, or similar material can cause a build up in my clothes after drying. • Did you overload your clothes have excess static electricity? These materials can cause static to build up of static electricity. See comments ... your load of laundry? Try using consistent heat settings and consistent load sizes? Please refer to reduce static electricity. • Did you over dry the load of laundry? • Are you using a fabric softener to the manual section on cleaning the lint filter, and please confirm that...
... of the pocket of a pair of pants, and this paper, tissue, or similar material can cause a build up in my clothes after drying. • Did you overload your clothes have excess static electricity? These materials can cause static to build up of static electricity. See comments ... your load of laundry? Try using consistent heat settings and consistent load sizes? Please refer to reduce static electricity. • Did you over dry the load of laundry? • Are you using a fabric softener to the manual section on cleaning the lint filter, and please confirm that...
Owners Manual
Page 30
... load your dryer? Divide your larger load into smaller loads of laundry can be washed but will naturally shrink when washed. What to Do Over drying a load of a consistent size. • Are the dryer controls properly set against the dampers. • Is the fuse blown, or is the circuit breaker ... To avoid shrinkage, please carefully follow the care and use two fuses or breakers.) • Did you removing your laundry from the dryer after the drying cycle is properly configured. Confirm that the lint filter is free of laundry? Remove your laundry from the dryer soon after the...
... load your dryer? Divide your larger load into smaller loads of laundry can be washed but will naturally shrink when washed. What to Do Over drying a load of a consistent size. • Are the dryer controls properly set against the dampers. • Is the fuse blown, or is the circuit breaker ... To avoid shrinkage, please carefully follow the care and use two fuses or breakers.) • Did you removing your laundry from the dryer after the drying cycle is properly configured. Confirm that the lint filter is free of laundry? Remove your laundry from the dryer soon after the...

Service Manual
Page 5
... 5 5 Audible End of Dry Option 5 5 No. of Cycle Beeper High / Low / Off Sensor Moisture Temperature Equipped Equipped Electro sensor Thermistor Reversible Door Adopted Drum Stainless Steel ... (WXHXD) Packing (WXHXD) 27" x 42 3/4" x 28 1/3" 29 1/2" x 44 3/4" x 30 3/4" 4 of Programs 9 7 No. of Temperature Controls 5 5 No. 1 SPECIFICATIONS ITEM DLE5977W DLE5977B DLE3777W DLG5988W DLG5988B DLG3788W REMARK Material & Finishes Color Top Plate Door Trim Blue White Black Porcelain Chromate + STS Deco Blue White Painted Blue White POWER SUPPLY 120V / 240V...
... 5 5 Audible End of Dry Option 5 5 No. of Cycle Beeper High / Low / Off Sensor Moisture Temperature Equipped Equipped Electro sensor Thermistor Reversible Door Adopted Drum Stainless Steel ... (WXHXD) Packing (WXHXD) 27" x 42 3/4" x 28 1/3" 29 1/2" x 44 3/4" x 30 3/4" 4 of Programs 9 7 No. of Temperature Controls 5 5 No. 1 SPECIFICATIONS ITEM DLE5977W DLE5977B DLE3777W DLG5988W DLG5988B DLG3788W REMARK Material & Finishes Color Top Plate Door Trim Blue White Black Porcelain Chromate + STS Deco Blue White Painted Blue White POWER SUPPLY 120V / 240V...
Service Manual
Page 13
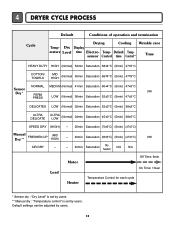
... Saturation 66±4°C (5min) 47±5°C NORMAL MEDIUM (Normal) 41min Saturation 60±4°C (5min) 47±5°C Sensor Dry * PERM PRESS LOW (Normal) 36min Saturation 52±3°C (5min) 47±5°C 3Hr DELICATES LOW (Normal) 32min Saturation 52±3°...(66±5°C) (5min) (47±5°C) 3Hr AIR DRY - - 30min Saturation No heater N/A N/A Load Motor Heater Off Time: 6min On Time: 10sec Temperature Control for each cycle * Sensor dry : "Dry Level" is set by users. ** Manual dry : "Temperature control" is set by users. 12 4 DRYER ...
... Saturation 66±4°C (5min) 47±5°C NORMAL MEDIUM (Normal) 41min Saturation 60±4°C (5min) 47±5°C Sensor Dry * PERM PRESS LOW (Normal) 36min Saturation 52±3°C (5min) 47±5°C 3Hr DELICATES LOW (Normal) 32min Saturation 52±3°...(66±5°C) (5min) (47±5°C) 3Hr AIR DRY - - 30min Saturation No heater N/A N/A Load Motor Heater Off Time: 6min On Time: 10sec Temperature Control for each cycle * Sensor dry : "Dry Level" is set by users. ** Manual dry : "Temperature control" is set by users. 12 4 DRYER ...

Service Manual
Page 24
... (between 6Pin terminal 50 ~ 130 2.5V 100 ~ 20 2.0V ~ 4.0V ) Remark Weight after removing from the Controller. Short with Dry Level. Measurement Condition Turn the Dryer's Power Off, then measure resistance. Damping cloth When contacting cloth to Controller. Is the measurement within the ... (BLUE wire) and Pin (ORANGE wire) to Electro load: 1. Take 6pin Connector from Washing Machine Damp Dry 10% ~ Dried clothes 205 ~ 240 Over 4.0V Completely-dried clothes 23 Metal or Wire When measuring resistance in 6pin connector's Pin (BLUE wire) and Pin (ORANGE wire...
... (between 6Pin terminal 50 ~ 130 2.5V 100 ~ 20 2.0V ~ 4.0V ) Remark Weight after removing from the Controller. Short with Dry Level. Measurement Condition Turn the Dryer's Power Off, then measure resistance. Damping cloth When contacting cloth to Controller. Is the measurement within the ... (BLUE wire) and Pin (ORANGE wire) to Electro load: 1. Take 6pin Connector from Washing Machine Damp Dry 10% ~ Dried clothes 205 ~ 240 Over 4.0V Completely-dried clothes 23 Metal or Wire When measuring resistance in 6pin connector's Pin (BLUE wire) and Pin (ORANGE wire...

Service Manual
Page 26
... 1Ω between Heater terminal and below 9 ~ 11Ω? NO YES • Replace TH2 (Safety Thermostat). NO YES • Replace TH3 (HI-Limit Thermostat). TH3 TH2 1. Drying time takes longer. Electric Type Caution Before measuring resistance, be sure to turn Power off , measure the resistance. Is resistance between Heater terminal and below...
... 1Ω between Heater terminal and below 9 ~ 11Ω? NO YES • Replace TH2 (Safety Thermostat). NO YES • Replace TH3 (HI-Limit Thermostat). TH3 TH2 1. Drying time takes longer. Electric Type Caution Before measuring resistance, be sure to turn Power off , measure the resistance. Is resistance between Heater terminal and below...

Service Manual
Page 27
... Safety Igniter operates? (after 1 min, Igniter becomes reddish) YES NO • Check Igniter & Frame detect When measuring Valve 2 voltage, Value is more than AC 90V? Drying time takes longer. Test 7 GAS Valve test - Gas Type Caution When measuring power, be sure to wear insulated gloves, to avoid electric shock. Measurement Condition...
... Safety Igniter operates? (after 1 min, Igniter becomes reddish) YES NO • Check Igniter & Frame detect When measuring Valve 2 voltage, Value is more than AC 90V? Drying time takes longer. Test 7 GAS Valve test - Gas Type Caution When measuring power, be sure to wear insulated gloves, to avoid electric shock. Measurement Condition...


