
Owners Manual
Page 3
...time efficiency, quiet operation and energy saving system. 2 STAINLESS STEEL DRUM Stainless steel drum doesn't generate any power outlet in your washer and/or dryer. TABLE OF CONTENTS PART1. INITIAL STEPS FOR INSTALLING YOUR DRYER ...7-12 PART4. ELECTRICAL REQUIREMENTS FOR ELECTRIC DRYER...15... Dry? Or use Time Dry to complete drying. SPECIFICATIONS ...3 PART2. GAS REQUIREMENTS AND INSTRUCTIONS ...17 PART8. TROUBLESHOOTING GUIDE ...26-28 LG DRYER LIMITED WARRANTY ...29 2 What are still damp after sensor dry cycle is more effective for this dryer. IMPORTANT WARRANTY AND SAFETY ...
...time efficiency, quiet operation and energy saving system. 2 STAINLESS STEEL DRUM Stainless steel drum doesn't generate any power outlet in your washer and/or dryer. TABLE OF CONTENTS PART1. INITIAL STEPS FOR INSTALLING YOUR DRYER ...7-12 PART4. ELECTRICAL REQUIREMENTS FOR ELECTRIC DRYER...15... Dry? Or use Time Dry to complete drying. SPECIFICATIONS ...3 PART2. GAS REQUIREMENTS AND INSTRUCTIONS ...17 PART8. TROUBLESHOOTING GUIDE ...26-28 LG DRYER LIMITED WARRANTY ...29 2 What are still damp after sensor dry cycle is more effective for this dryer. IMPORTANT WARRANTY AND SAFETY ...

Owners Manual
Page 8
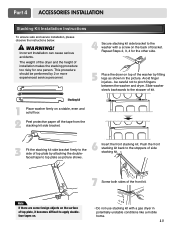
... shock, property damage, personal injury or death when using this appliance, please follow these instructions can be dried on it, even after washing. • No washer can result in fire, death or serious injury. • A qualified service person or company must perform installation and service of this appliance. • Do not...
... shock, property damage, personal injury or death when using this appliance, please follow these instructions can be dried on it, even after washing. • No washer can result in fire, death or serious injury. • A qualified service person or company must perform installation and service of this appliance. • Do not...
Owners Manual
Page 15
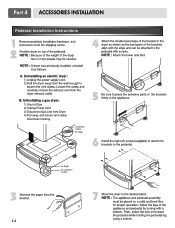
...- Push the front stacking kit back to the stopper of kit. Incorrect Installation can cause serious accidents. Stacking kit 1 Place washer firmly on the back of the washer by fitting legs as picture shows. 6 Insert the front stacking kit. The weight of the dryer and the height of installation... makes the stacking procedure too risky for the other side. 5 Place the dryer on top of bracket. Slide washer slowly backwards to the stoppers of side stacking kit. 7 Screw both sides of top plate by 2 or more experienced service personnel. 4 Secure ...
...- Push the front stacking kit back to the stopper of kit. Incorrect Installation can cause serious accidents. Stacking kit 1 Place washer firmly on the back of the washer by fitting legs as picture shows. 6 Insert the front stacking kit. The weight of the dryer and the height of installation... makes the stacking procedure too risky for the other side. 5 Place the dryer on top of bracket. Slide washer slowly backwards to the stoppers of side stacking kit. 7 Screw both sides of top plate by 2 or more experienced service personnel. 4 Secure ...
Owners Manual
Page 16
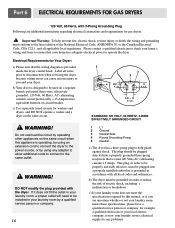
Part 4 ACCESSORIES INSTALLATION Pedestal Installation Instructions 1 4 2 1) Shut off Gas 2) Unplug Power Cord 3) Disconnect Gas Line from Dryer 4) Pull away and loosen vent clamp. for washer/ combo for dryer 5 6 3 for dryer for washer/ combo 7 14 Disconnect venting.
Part 4 ACCESSORIES INSTALLATION Pedestal Installation Instructions 1 4 2 1) Shut off Gas 2) Unplug Power Cord 3) Disconnect Gas Line from Dryer 4) Pull away and loosen vent clamp. for washer/ combo for dryer 5 6 3 for dryer for washer/ combo 7 14 Disconnect venting.
Owners Manual
Page 18
... fuse, equivalent fusetron or circuit breaker. WARNING! DO NOT modify the plug provided with all local codes and ordinances. Electrical Requirements for washers and dryers, and DO NOT operate a washer and a dryer on the same circuit. ! c) If your laundry room's electrical supply for gas dryers. ! Part 6 ELECTRICAL REQUIREMENTS FOR GAS DRYERS 120...
... fuse, equivalent fusetron or circuit breaker. WARNING! DO NOT modify the plug provided with all local codes and ordinances. Electrical Requirements for washers and dryers, and DO NOT operate a washer and a dryer on the same circuit. ! c) If your laundry room's electrical supply for gas dryers. ! Part 6 ELECTRICAL REQUIREMENTS FOR GAS DRYERS 120...
Owners Manual
Page 22
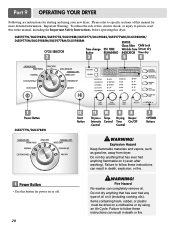
...Please refer to person, read this entire manual, including the Important Safety Instructions, before operating this dryer. DLE5977W/DLG5988W/DLE5977B/DLG5988B/DLE5977S/DLG5988S/DLE5977WM/DLG5988WM/ DLE5977SM/DLG5988SM/DLE5977BM/DLG5988BM DLE3777W/DLG3788W 1 Power Button • Use this manual for more detailed ...information. Failure to follow these instructions can result in death or fire. WARNING! Fire Hazard No washer can result in death, explosion, or fire. ! Failure to follow these instructions can completely remove oil. Do not dry anything...
...Please refer to person, read this entire manual, including the Important Safety Instructions, before operating this dryer. DLE5977W/DLG5988W/DLE5977B/DLG5988B/DLE5977S/DLG5988S/DLE5977WM/DLG5988WM/ DLE5977SM/DLG5988SM/DLE5977BM/DLG5988BM DLE3777W/DLG3788W 1 Power Button • Use this manual for more detailed ...information. Failure to follow these instructions can result in death or fire. WARNING! Fire Hazard No washer can result in death, explosion, or fire. ! Failure to follow these instructions can completely remove oil. Do not dry anything...

Service Manual
Page 3
... damage. The manufacturer or seller cannot be returned to ground are present everywhere. RECONNECT ALL GROUNDING DEVICES If grounding wires, screws, straps, clips, nuts, or washers used to complete a path to their original position and properly fastened. The new control assembly may appear to a green ground connection point or unpainted metal...
... damage. The manufacturer or seller cannot be returned to ground are present everywhere. RECONNECT ALL GROUNDING DEVICES If grounding wires, screws, straps, clips, nuts, or washers used to complete a path to their original position and properly fastened. The new control assembly may appear to a green ground connection point or unpainted metal...

Service Manual
Page 35
Open the top plate. 2. Remove the bolt and washer. 6. Remove the Drum assembly. 4. Pull the Tub Drum [Rear] towards the front. 34 Remove 3 screws. 3. Remove the Cover Cabinet and Tub Drum [Front]. 3. Remove 2 screws and cover(Air guide). 5. Remove 7 screws. 5. Remove the Drum assembly. 4. Pull the fan. 7. Open the top plate. 2. Pull the grill. 4. 1. Disconnect the motor clamp and motor. 1. Remove the Cover Cabinet and Tub Drum [Front]. 3. Remove the filter. 2. Disconnect electro sensor. 1.
Open the top plate. 2. Remove the bolt and washer. 6. Remove the Drum assembly. 4. Pull the Tub Drum [Rear] towards the front. 34 Remove 3 screws. 3. Remove the Cover Cabinet and Tub Drum [Front]. 3. Remove 2 screws and cover(Air guide). 5. Remove 7 screws. 5. Remove the Drum assembly. 4. Pull the fan. 7. Open the top plate. 2. Pull the grill. 4. 1. Disconnect the motor clamp and motor. 1. Remove the Cover Cabinet and Tub Drum [Front]. 3. Remove the filter. 2. Disconnect electro sensor. 1.


