
Owners Manual
Page 2
For more information, visit our website at http://us.lge.com P/No.: 3828EL3003B P/No.: 3828EL3003B Record the Model and Serial Numbers, and retain the manual for buying a LG Dryer. Electric and Gas Dryer DLE5977W / DLG5988W DLE5977B / DLG5988B DLE3777W / DLG3788W DLE5977S / DLG5988S DLE5977WM / DLG5988WM DLE5977SM / DLG5988SM DLE5977BM / DLG5988BM Thank you for future reference. Please read your manual carefully, as it provides instructions on safe Installation, Use and Maintenance.
For more information, visit our website at http://us.lge.com P/No.: 3828EL3003B P/No.: 3828EL3003B Record the Model and Serial Numbers, and retain the manual for buying a LG Dryer. Electric and Gas Dryer DLE5977W / DLG5988W DLE5977B / DLG5988B DLE3777W / DLG3788W DLE5977S / DLG5988S DLE5977WM / DLG5988WM DLE5977SM / DLG5988SM DLE5977BM / DLG5988BM Thank you for future reference. Please read your manual carefully, as it provides instructions on safe Installation, Use and Maintenance.
Owners Manual
Page 3
...glass door make your dryer look stylish. 4 ...user-friendly functions make operating the dryer easy. 6 USING THE RLM...DRYER ...7-12 PART4. ELECTRICAL REQUIREMENTS FOR GAS DRYERS ...16 PART7. OPERATING YOUR DRYER...dryer. EXHAUST REQUIREMENTS AND MAINTENANCE...18-19 PART9. SPECIFICATIONS ...3 PART2. At times, you can set operation time manually... to have drying performance if clothes are Sensor Dry and Time Dry? Your dryer provides sensor drying and time drying programs. Sensor Dry : Dryer... DRYER......dryer. ACCESSORIES INSTALLATION ...13-14 PART5. TROUBLESHOOTING GUIDE ...26-28...
...glass door make your dryer look stylish. 4 ...user-friendly functions make operating the dryer easy. 6 USING THE RLM...DRYER ...7-12 PART4. ELECTRICAL REQUIREMENTS FOR GAS DRYERS ...16 PART7. OPERATING YOUR DRYER...dryer. EXHAUST REQUIREMENTS AND MAINTENANCE...18-19 PART9. SPECIFICATIONS ...3 PART2. At times, you can set operation time manually... to have drying performance if clothes are Sensor Dry and Time Dry? Your dryer provides sensor drying and time drying programs. Sensor Dry : Dryer... DRYER......dryer. ACCESSORIES INSTALLATION ...13-14 PART5. TROUBLESHOOTING GUIDE ...26-28...
Owners Manual
Page 5
Electric and Gas Dryer DLE5977W / DLG5988W DLE5977B / DLG5988B DLE3777W / DLG3788W DLE5977S / DLG5988S DLE5977WM / DLG5988WM DLE5977SM / DLG5988SM DLE5977BM / DLG5988BM DLE5977SM / DLG5988SM DLE5977BM / DLG5988BM Thank you for future reference. For more information, visit our website at http://us.lge.com P/No.: 3828EL3003B P/No.: 3828EL3003B Record the Model and Serial Numbers, and retain the manual for buying a LG Dryer. Please read your manual carefully, as it provides instructions on safe Installation, Use and Maintenance.
Electric and Gas Dryer DLE5977W / DLG5988W DLE5977B / DLG5988B DLE3777W / DLG3788W DLE5977S / DLG5988S DLE5977WM / DLG5988WM DLE5977SM / DLG5988SM DLE5977BM / DLG5988BM DLE5977SM / DLG5988SM DLE5977BM / DLG5988BM Thank you for future reference. For more information, visit our website at http://us.lge.com P/No.: 3828EL3003B P/No.: 3828EL3003B Record the Model and Serial Numbers, and retain the manual for buying a LG Dryer. Please read your manual carefully, as it provides instructions on safe Installation, Use and Maintenance.
Owners Manual
Page 6
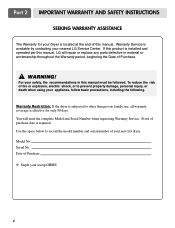
...the end of purchase date is effective for your Dryer is installed and operated per this manual, LG will need the complete Model and Serial Number when requesting Warranty Service. Proof of this manual. Warranty Restriction: If the dryer is subjected to record the model number and ...serial number of Purchase ❈ Staple your new LG dryer. Date of your receipt...
...the end of purchase date is effective for your Dryer is installed and operated per this manual, LG will need the complete Model and Serial Number when requesting Warranty Service. Proof of this manual. Warranty Restriction: If the dryer is subjected to record the model number and ...serial number of Purchase ❈ Staple your new LG dryer. Date of your receipt...

Owners Manual
Page 8
... cause minor exposure to four of these substances can be minimized further by your gas supplier, call your gas supplier from dryer. • Place dryer at least 18 inches above the floor for a garage installation. • Failure to warn customers of oil on them,... formaldehyde and soot, caused primarily by the incomplete combustion of all instructions and information, including those in this manual and instructions and information provided by properly venting the dryer to cause cancer, birth defects or other flammable vapors or liquids in the area surrounding this appliance. 6 ...
... cause minor exposure to four of these substances can be minimized further by your gas supplier, call your gas supplier from dryer. • Place dryer at least 18 inches above the floor for a garage installation. • Failure to warn customers of oil on them,... formaldehyde and soot, caused primarily by the incomplete combustion of all instructions and information, including those in this manual and instructions and information provided by properly venting the dryer to cause cancer, birth defects or other flammable vapors or liquids in the area surrounding this appliance. 6 ...
Owners Manual
Page 9
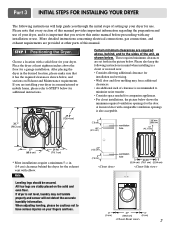
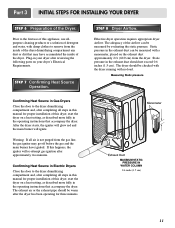
...126.4 cm) Certain minimum clearances are set forth in the desired location, please make sure that every section of this manual. STEP 1 Positioning the Dryer. If dryer is also acceptable. When adjusting leveling, please be secured. Please note that it is recommended to minimize noise transfer ...and exhaust requirements are stably placed on Exhaust and Maintenance requirements. Place the dryer at other parts of this manual provides important information regarding the preparation and use of your dryer for your fingers and toes. ventilation hole 7 All four legs are ...
...126.4 cm) Certain minimum clearances are set forth in the desired location, please make sure that every section of this manual. STEP 1 Positioning the Dryer. If dryer is also acceptable. When adjusting leveling, please be secured. Please note that it is recommended to minimize noise transfer ...and exhaust requirements are stably placed on Exhaust and Maintenance requirements. Place the dryer at other parts of this manual provides important information regarding the preparation and use of your dryer for your fingers and toes. ventilation hole 7 All four legs are ...
Owners Manual
Page 10
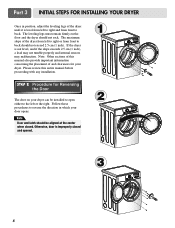
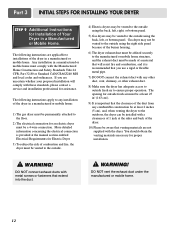
...Otherwise, door is improperly closed . Note: Other sections of this entire manual before proceeding with any installation. Follow these procedures to back should not rock. SSTTEEPP 22: Procedure for your dryer. If the dryer is level from left to right or from front to back. Please review... this manual also provide important information concerning the placement of the dryer until it is not level, and if the slope exceeds ...
...Otherwise, door is improperly closed . Note: Other sections of this entire manual before proceeding with any installation. Follow these procedures to back should not rock. SSTTEEPP 22: Procedure for your dryer. If the dryer is level from left to right or from front to back. Please review... this manual also provide important information concerning the placement of the dryer until it is not level, and if the slope exceeds ...
Owners Manual
Page 11
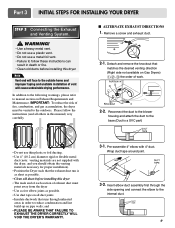
...1. and • PLEASE BE AWARE THAT FAILURE TO EXHAUST THE DRYER CORRECTLY WILL VOID THE DRYER'S WARRANTY. 3-1. Remove a screw and exhaust duct. 2-1. Wrap duct tape around joint. 3-2. Please follow these instructions can result in this manual) very carefully. Insert elbow duct assembly first through unheated areas in... home and improper taping and unstable installation of exhaust duct must be vented to manual section on all others in death or fire. • Clean old ducts before installing this dryer • The male end of each section of vent will face to reduce ...
...1. and • PLEASE BE AWARE THAT FAILURE TO EXHAUST THE DRYER CORRECTLY WILL VOID THE DRYER'S WARRANTY. 3-1. Remove a screw and exhaust duct. 2-1. Wrap duct tape around joint. 3-2. Please follow these instructions can result in this manual) very carefully. Insert elbow duct assembly first through unheated areas in... home and improper taping and unstable installation of exhaust duct must be vented to manual section on all others in death or fire. • Clean old ducts before installing this dryer • The male end of each section of vent will face to reduce ...
Owners Manual
Page 12
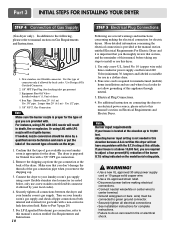
...with the B.T.U rating at the back of dryer 4. Equipment Shut-Off Valve- Use 1/2" pipe. 5. 3/8" N.P.T. Gas Connection Note Make sure the burner nozzle is prepared for electric dryers. If needed in this elevation because A.G.A certifies this manual's section on the model/serial rating plate...Gas Requirements and Instructions. 1 2 5 3 4 1. More detailed information concerning the electrical connection is provided at the manual section entitled Electrical Requirements For Electric Dryer and it is located at above 10,000 feet, you remove the shipping cap. 3. Use only a new U.L. Use...
...with the B.T.U rating at the back of dryer 4. Equipment Shut-Off Valve- Use 1/2" pipe. 5. 3/8" N.P.T. Gas Connection Note Make sure the burner nozzle is prepared for electric dryers. If needed in this elevation because A.G.A certifies this manual's section on the model/serial rating plate...Gas Requirements and Instructions. 1 2 5 3 4 1. More detailed information concerning the electrical connection is provided at the manual section entitled Electrical Requirements For Electric Dryer and it is located at above 10,000 feet, you remove the shipping cap. 3. Use only a new U.L. Use...
Owners Manual
Page 13
...exhaust duct should be measured with no load. Static pressure in this manual for proper installation of this happens, the igniter will ignite. Confirming Heat Source in Gas Dryers Close the door to the dryer drum/drying compartment and, after reviewing the following parts on the ...of this appliance, use of this dryer, start the dryer on a heat setting, as described more fully in the operating instructions that accompany the dryer. Warning: If all steps in this manual for three minutes. STEP 8 Dryer Airflow. Static pressure in Electric Dryers Close the door to remove from...
...exhaust duct should be measured with no load. Static pressure in this manual for proper installation of this happens, the igniter will ignite. Confirming Heat Source in Gas Dryers Close the door to the dryer drum/drying compartment and, after reviewing the following parts on the ...of this appliance, use of this dryer, start the dryer on a heat setting, as described more fully in the operating instructions that accompany the dryer. Warning: If all steps in this manual for three minutes. STEP 8 Dryer Airflow. Static pressure in Electric Dryers Close the door to remove from...
Owners Manual
Page 14
...materials are not supplied with a clearances of 1 inch at the manual section entitled Electrical Requirements for Electric Dryer 3) To reduce the risk of combustion and fire, the dryer must be vented to the outside. 4) Electric dryers may not be vented to the outside fresh air to the ... outside using the back, left , or bottom panel. The following instructions apply to the floor. 2) The electrical connection for an electric dryer must comply with these standards, please contact a service and installation professional for assistance. WARNING! DO NOT vent the exhaust duct under the...
...materials are not supplied with a clearances of 1 inch at the manual section entitled Electrical Requirements for Electric Dryer 3) To reduce the risk of combustion and fire, the dryer must be vented to the outside. 4) Electric dryers may not be vented to the outside fresh air to the ... outside using the back, left , or bottom panel. The following instructions apply to the floor. 2) The electrical connection for an electric dryer must comply with these standards, please contact a service and installation professional for assistance. WARNING! DO NOT vent the exhaust duct under the...
Owners Manual
Page 18
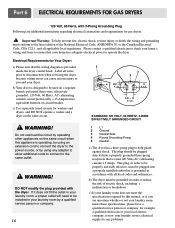
...properly grounded three-prong receptacle that is rated 120 Volts AC (alternating current) 15 Amps. This plug, in accordance with the dryer. b) The dryer must conform to be properly and fully effective, must be plugged directed into a properly installed outlet that is grounded in order ...overload the circuit by operating other appliances on the same circuit when this manual, or if you and your laundry room does not meet the specifications required by this appliance is provided inside the dryer control hood. WARNING! Important Warning: To help guard against shock. Please ...
...properly grounded three-prong receptacle that is rated 120 Volts AC (alternating current) 15 Amps. This plug, in accordance with the dryer. b) The dryer must conform to be properly and fully effective, must be plugged directed into a properly installed outlet that is grounded in order ...overload the circuit by operating other appliances on the same circuit when this manual, or if you and your laundry room does not meet the specifications required by this appliance is provided inside the dryer control hood. WARNING! Important Warning: To help guard against shock. Please ...
Owners Manual
Page 19
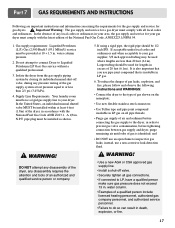
.... 17 Gas supply requirements: Liquefied Petroleum (L.P.) Gas (2,500 Btu/ft3 (93.1 MJ/m3)) service must be 1/2 inch IPS. Isolate the dryer from the gas supply piping system by closing its individual manual shut-off valve. • Securely tighten all local codes and ordinances. in . and • DO NOT use a non-corrosive leak...
.... 17 Gas supply requirements: Liquefied Petroleum (L.P.) Gas (2,500 Btu/ft3 (93.1 MJ/m3)) service must be 1/2 inch IPS. Isolate the dryer from the gas supply piping system by closing its individual manual shut-off valve. • Securely tighten all local codes and ordinances. in . and • DO NOT use a non-corrosive leak...
Owners Manual
Page 22
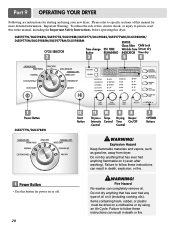
... result in death, explosion, or fire. ! Failure to person, read this entire manual, including the Important Safety Instructions, before operating this dryer. DLE5977W/DLG5988W/DLE5977B/DLG5988B/DLE5977S/DLG5988S/DLE5977WM/DLG5988WM/ DLE5977SM/DLG5988SM/DLE5977BM/DLG5988BM DLE3777W/DLG3788W 1 Power Button • Use this manual for more detailed information. Do not dry anything flammable on a clothesline or...
... result in death, explosion, or fire. ! Failure to person, read this entire manual, including the Important Safety Instructions, before operating this dryer. DLE5977W/DLG5988W/DLE5977B/DLG5988B/DLE5977S/DLG5988S/DLE5977WM/DLG5988WM/ DLE5977SM/DLG5988SM/DLE5977BM/DLG5988BM DLE3777W/DLG3788W 1 Power Button • Use this manual for more detailed information. Do not dry anything flammable on a clothesline or...
Owners Manual
Page 23
... permanent Low 36 press DELICATES Lingerie, sheets, blouses Low 32 ULTRA DELICATE Shear, workout wear and lace items Ultra Low 34 2. Manual Dry Cycles Use Manual Cycles to this cycle to get high heat for heavy fabrics such as jeans, corduroys or work clothes Cotton/Towels Use for drying ... only with Manual Dry, Time Dry and Rack Dry programs. 4 Estimated Time Remaining • The Display shows the estimated time remaining. Note Time change the actual time in the load and automatically adjusts the drying time for optimal drying Heavy Duty Use this , if the dryer has some problem...
... permanent Low 36 press DELICATES Lingerie, sheets, blouses Low 32 ULTRA DELICATE Shear, workout wear and lace items Ultra Low 34 2. Manual Dry Cycles Use Manual Cycles to this cycle to get high heat for heavy fabrics such as jeans, corduroys or work clothes Cotton/Towels Use for drying ... only with Manual Dry, Time Dry and Rack Dry programs. 4 Estimated Time Remaining • The Display shows the estimated time remaining. Note Time change the actual time in the load and automatically adjusts the drying time for optimal drying Heavy Duty Use this , if the dryer has some problem...

Owners Manual
Page 25
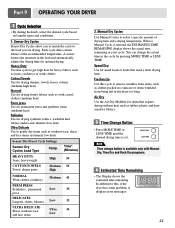
...hours after drying is done. 4. Type of any of the buttons on your own. Part 9 OPERATING YOUR DRYER 3. When you when your load is indicated. This option can select the desired operation time manually by pressing Time Dry button which ranges from 20 to change Drying Time on your laundry. Press BEEPER... with delicate fabrics. 5. Damp Dry Beep When you select the damp dry beep option, a beep will alert you select the wrinkle free option, the dryer will allow you to remove lightweight items that are dry or other items that you may wish to prevent the wrinkle on the control panel...
...hours after drying is done. 4. Type of any of the buttons on your own. Part 9 OPERATING YOUR DRYER 3. When you when your load is indicated. This option can select the desired operation time manually by pressing Time Dry button which ranges from 20 to change Drying Time on your laundry. Press BEEPER... with delicate fabrics. 5. Damp Dry Beep When you select the damp dry beep option, a beep will alert you select the wrinkle free option, the dryer will allow you to remove lightweight items that are dry or other items that you may wish to prevent the wrinkle on the control panel...

Owners Manual
Page 26
...adjusts the needed . Following these instruction can only be made while using Sensor Dry Cycles. The preset setting for Sensor Dry Cycles or Manual Cycles will show in minutes) will glow. The estimated or actual cycle time (in the display. 2. As the cycle runs, ...the control senses the dryness of the load and adjusts the time automatically for Super Capacity Dryers: Heavy Work Clothes 4 jeans 4 workpants 4 work shirts 2 sweatpants 2 sweatshirts Cotton/Towels 10 bath towels 10 hand towels 14 wash cloths Mixed Load...
...adjusts the needed . Following these instruction can only be made while using Sensor Dry Cycles. The preset setting for Sensor Dry Cycles or Manual Cycles will show in minutes) will glow. The estimated or actual cycle time (in the display. 2. As the cycle runs, ...the control senses the dryness of the load and adjusts the time automatically for Super Capacity Dryers: Heavy Work Clothes 4 jeans 4 workpants 4 work shirts 2 sweatpants 2 sweatshirts Cotton/Towels 10 bath towels 10 hand towels 14 wash cloths Mixed Load...

Owners Manual
Page 27
... close the door and press START within 10 minutes of selecting the cycle, the dryer automatically shuts off . For more than 10 minutes, the dryer will increase drying time and energy consumption, therefore dryer life expectancy could be used with Manual Dry, Time Dry and Rack Dry Cycles. • Press TEMP. Note Drying will...
... close the door and press START within 10 minutes of selecting the cycle, the dryer automatically shuts off . For more than 10 minutes, the dryer will increase drying time and energy consumption, therefore dryer life expectancy could be used with Manual Dry, Time Dry and Rack Dry Cycles. • Press TEMP. Note Drying will...

Owners Manual
Page 29
...load of laundry, sort lint producers (like a fuzzy white cotton towel) separately from clothes that the lint filter is clean. In order to the manual section on cleaning the lint filter, and please confirm that might forget to Do • Are you using a fabric softener or adjust your larger ...softener? It is important that the pockets of pants, shirts, and other similar material in my clothes after drying. • Did you overload your dryer? • Did you place any paper, tissue, or other articles of clothing are empty before each new load of dried clothes. Sometimes a person...
...load of laundry, sort lint producers (like a fuzzy white cotton towel) separately from clothes that the lint filter is clean. In order to the manual section on cleaning the lint filter, and please confirm that might forget to Do • Are you using a fabric softener or adjust your larger ...softener? It is important that the pockets of pants, shirts, and other similar material in my clothes after drying. • Did you overload your dryer? • Did you place any paper, tissue, or other articles of clothing are empty before each new load of dried clothes. Sometimes a person...
Owners Manual
Page 30
...Problem:My clothes are only drying a handful of smaller loads. • Did you properly sort your dryer? Confirm that nothing has been set ? Use the appropriate control settings for large and heavy fabrics, ...dryer? Confirm through review of the appropriate sections of obstructions. Remove your laundry from light weight items when creating loads. • Are you overload your garment? Please confirm that the exhaust venting ductwork is free of this manual...• Are you are not pushed in a dryer. • PLM problem See the Owner's Manual of heavy fabrics?
...Problem:My clothes are only drying a handful of smaller loads. • Did you properly sort your dryer? Confirm that nothing has been set ? Use the appropriate control settings for large and heavy fabrics, ...dryer? Confirm through review of the appropriate sections of obstructions. Remove your laundry from light weight items when creating loads. • Are you overload your garment? Please confirm that the exhaust venting ductwork is free of this manual...• Are you are not pushed in a dryer. • PLM problem See the Owner's Manual of heavy fabrics?


