
Owners Manual
Page 2
Record the Model and Serial Numbers, and retain the manual for buying a LG Dryer. For more information, visit our website at http://us.lge.com P/No.: 3828EL3003B P/No.: 3828EL3003B Please read your manual carefully, as it provides instructions on safe Installation, Use and Maintenance. Electric and Gas Dryer DLE5977W / DLG5988W DLE5977B / DLG5988B DLE3777W / DLG3788W DLE5977S / DLG5988S DLE5977WM / DLG5988WM DLE5977SM / DLG5988SM DLE5977BM / DLG5988BM Thank you for future reference.
Record the Model and Serial Numbers, and retain the manual for buying a LG Dryer. For more information, visit our website at http://us.lge.com P/No.: 3828EL3003B P/No.: 3828EL3003B Please read your manual carefully, as it provides instructions on safe Installation, Use and Maintenance. Electric and Gas Dryer DLE5977W / DLG5988W DLE5977B / DLG5988B DLE3777W / DLG3788W DLE5977S / DLG5988S DLE5977WM / DLG5988WM DLE5977SM / DLG5988SM DLE5977BM / DLG5988BM Thank you for future reference.
Owners Manual
Page 3
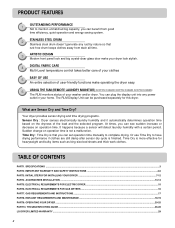
... DRYER...15 PART6. Sudden change on operation time. TABLE OF CONTENTS PART1. OPERATING YOUR DRYER ...20-25 PART10. TROUBLESHOOTING GUIDE ...26-28 LG DRYER LIMITED WARRANTY ...29 2 At times, you can see sudden increase or decrease on operation time is more effective for this dryer. Or...size bed sheets and thick work clothes. PRODUCT FEATURES OUTSTANDING PERFORMANCE 1 Not to mention unmatched big capacity, you can set operation time manually to have drying performance if clothes are Sensor Dry and Time Dry? What are still damp after sensor dry cycle is that rust-free...
... DRYER...15 PART6. Sudden change on operation time. TABLE OF CONTENTS PART1. OPERATING YOUR DRYER ...20-25 PART10. TROUBLESHOOTING GUIDE ...26-28 LG DRYER LIMITED WARRANTY ...29 2 At times, you can see sudden increase or decrease on operation time is more effective for this dryer. Or...size bed sheets and thick work clothes. PRODUCT FEATURES OUTSTANDING PERFORMANCE 1 Not to mention unmatched big capacity, you can set operation time manually to have drying performance if clothes are Sensor Dry and Time Dry? What are still damp after sensor dry cycle is that rust-free...
Owners Manual
Page 5
Electric and Gas Dryer DLE5977W / DLG5988W DLE5977B / DLG5988B DLE3777W / DLG3788W DLE5977S / DLG5988S DLE5977WM / DLG5988WM DLE5977SM / DLG5988SM DLE5977BM / DLG5988BM DLE5977SM / DLG5988SM DLE5977BM / DLG5988BM Thank you for future reference. Please read your manual carefully, as it provides instructions on safe Installation, Use and Maintenance. For more information, visit our website at http://us.lge.com P/No.: 3828EL3003B P/No.: 3828EL3003B Record the Model and Serial Numbers, and retain the manual for buying a LG Dryer.
Electric and Gas Dryer DLE5977W / DLG5988W DLE5977B / DLG5988B DLE3777W / DLG3788W DLE5977S / DLG5988S DLE5977WM / DLG5988WM DLE5977SM / DLG5988SM DLE5977BM / DLG5988BM DLE5977SM / DLG5988SM DLE5977BM / DLG5988BM Thank you for future reference. Please read your manual carefully, as it provides instructions on safe Installation, Use and Maintenance. For more information, visit our website at http://us.lge.com P/No.: 3828EL3003B P/No.: 3828EL3003B Record the Model and Serial Numbers, and retain the manual for buying a LG Dryer.
Owners Manual
Page 6
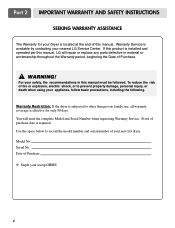
...or workmanship throughout the Warranty period, beginning the Date of purchase date is effective for your Dryer is installed and operated per this manual, LG will need the complete Model and Serial Number when requesting Warranty Service. Part 2 IMPORTANT WARRANTY AND SAFETY INSTRUCTIONS SEEKING WARRANTY ASSISTANCE The... Warranty for only 90 days. You will repair or replace any parts defective in this manual must be followed. If this manual. To reduce the risk of this product is located at the end of fire or explosion, electric shock, or...
...or workmanship throughout the Warranty period, beginning the Date of purchase date is effective for your Dryer is installed and operated per this manual, LG will need the complete Model and Serial Number when requesting Warranty Service. Part 2 IMPORTANT WARRANTY AND SAFETY INSTRUCTIONS SEEKING WARRANTY ASSISTANCE The... Warranty for only 90 days. You will repair or replace any parts defective in this manual must be followed. If this manual. To reduce the risk of this product is located at the end of fire or explosion, electric shock, or...

Owners Manual
Page 8
... fire, death or serious injury. • A qualified service person or company must perform installation and service of all instructions and information, including those in this manual and instructions and information provided by the incomplete combustion of fire or explosion, electric shock, property damage, personal injury or death when using an air...
... fire, death or serious injury. • A qualified service person or company must perform installation and service of all instructions and information, including those in this manual and instructions and information provided by the incomplete combustion of fire or explosion, electric shock, property damage, personal injury or death when using an air...
Owners Manual
Page 9
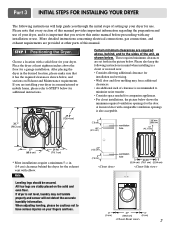
...Leveling legs should be cautious not to STEP 9 below for use . If dryer is recommended to the sides of this entire manual before proceeding with a solid floor for a garage installation. More detailed instructions concerning electrical connections, gas connections, and exhaust requirements are...are provided at least eighteen inches above , behind the dryer for the door. STEP 1 Positioning the Dryer. If you review this manual. All four legs are installing your fingers and toes. When adjusting leveling, please be secured. Part 3 INITIAL STEPS FOR INSTALLING YOUR...
...Leveling legs should be cautious not to STEP 9 below for use . If dryer is recommended to the sides of this entire manual before proceeding with a solid floor for a garage installation. More detailed instructions concerning electrical connections, gas connections, and exhaust requirements are...are provided at least eighteen inches above , behind the dryer for the door. STEP 1 Positioning the Dryer. If you review this manual. All four legs are installing your fingers and toes. When adjusting leveling, please be secured. Part 3 INITIAL STEPS FOR INSTALLING YOUR...
Owners Manual
Page 10
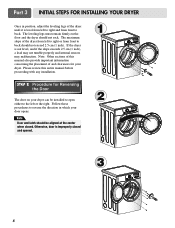
... from front to back should not exceed 2.5 cm (1 inch). SSTTEEPP 22: Procedure for your dryer. Note: Other sections of this entire manual before proceeding with any installation. Please review this manual also provide important information concerning the placement of and clearances for Reversing the Door The door on the floor and the...
... from front to back should not exceed 2.5 cm (1 inch). SSTTEEPP 22: Procedure for your dryer. Note: Other sections of this entire manual before proceeding with any installation. Please review this manual also provide important information concerning the placement of and clearances for Reversing the Door The door on the floor and the...
Owners Manual
Page 11
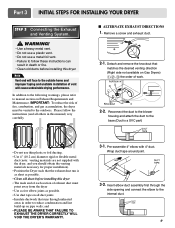
...9 Remove a screw and exhaust duct. 2-1. Please follow these instructions can result in death or fire. • Clean old ducts before installing this manual) very carefully. Reconnect the duct to the blower housing and attach the duct to the base.(Duct is as short as possible. • Use...of work. 2-2. Wrap duct tape around joint. 3-2. Detach and remove the knockout that runs through the side opening and connect the elbow to manual section on pipe walls; I ALTERNATE EXHAUST DIRECTIONS 1. IMPORTANT: To reduce the risk of vent will face to the outside home and improper ...
...9 Remove a screw and exhaust duct. 2-1. Please follow these instructions can result in death or fire. • Clean old ducts before installing this manual) very carefully. Reconnect the duct to the blower housing and attach the duct to the base.(Duct is as short as possible. • Use...of work. 2-2. Wrap duct tape around joint. 3-2. Detach and remove the knockout that runs through the side opening and connect the elbow to manual section on pipe walls; I ALTERNATE EXHAUST DIRECTIONS 1. IMPORTANT: To reduce the risk of vent will face to the outside home and improper ...
Owners Manual
Page 12
... The dryer is at this appliance through neutral. 3. For additional instruction on the model/serial rating plate. ! Connect the dryer to manual section on the dryer. 1. Refer to this dryer. 1. Adjusting burner input setting is not needed , nozzle conversion should be connected ... only) three conductor power supply cord kit rated 240 Volts (minimum) 30 Amperes and labeled as noted below, only use this manual's section entitled Gas Requirements and Instructions. 10 STEP 5 Electrical Plug Connections Following are provided with LPG nozzle will result in a clothes...
... The dryer is at this appliance through neutral. 3. For additional instruction on the model/serial rating plate. ! Connect the dryer to manual section on the dryer. 1. Refer to this dryer. 1. Adjusting burner input setting is not needed , nozzle conversion should be connected ... only) three conductor power supply cord kit rated 240 Volts (minimum) 30 Amperes and labeled as noted below, only use this manual's section entitled Gas Requirements and Instructions. 10 STEP 5 Electrical Plug Connections Following are provided with LPG nozzle will result in a clothes...
Owners Manual
Page 13
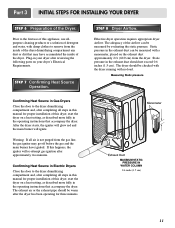
Confirming Heat Source in Gas Dryers Close the door to the dryer drum/drying compartment and, after completing all steps in this manual for proper installation of this dryer, start the dryer on a heat setting, as described more fully in the exhaust duct can be...dryer airflow. Static pressure in the operating instructions that accompany the dryer. STEP 7 Confirming Heat Source Operation. Warning: If all steps in this manual for proper installation of this dryer, start the dryer on a heat setting, as described more fully in Electric Dryers Close the door to remove...
Confirming Heat Source in Gas Dryers Close the door to the dryer drum/drying compartment and, after completing all steps in this manual for proper installation of this dryer, start the dryer on a heat setting, as described more fully in the exhaust duct can be...dryer airflow. Static pressure in the operating instructions that accompany the dryer. STEP 7 Confirming Heat Source Operation. Warning: If all steps in this manual for proper installation of this dryer, start the dryer on a heat setting, as described more fully in Electric Dryers Close the door to remove...
Owners Manual
Page 14
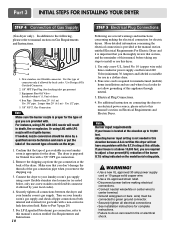
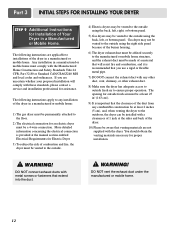
... must be vented to the outside using the back, left , right, or bottom panel. 5) Gas dryers may be installed with a clearances of 1 inch at the manual section entitled Electrical Requirements for Electric Dryer 3) To reduce the risk of a material that will resist fire and combustion, and it is important that extend...
... must be vented to the outside using the back, left , right, or bottom panel. 5) Gas dryers may be installed with a clearances of 1 inch at the manual section entitled Electrical Requirements for Electric Dryer 3) To reduce the risk of a material that will resist fire and combustion, and it is important that extend...
Owners Manual
Page 18
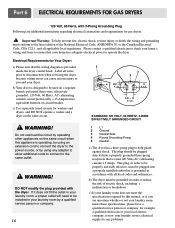
... installed in order to the latest edition of electric shock, including a malfunction or breakdown. b) The dryer must be used on the same circuit when this manual, or if you and your laundry room by a qualified service person or company. 16 STANDARD 120 VOLT, 60 HERTZ, 3-WIRE EFFECTIVELY GROUNDED CIRCUIT 1 L1 2 Ground...
... installed in order to the latest edition of electric shock, including a malfunction or breakdown. b) The dryer must be used on the same circuit when this manual, or if you and your laundry room by a qualified service person or company. 16 STANDARD 120 VOLT, 60 HERTZ, 3-WIRE EFFECTIVELY GROUNDED CIRCUIT 1 L1 2 Ground...
Owners Manual
Page 19
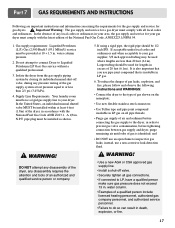
.... 17 Do not attempt to connect Dryer to inspect for gas dryers. ! Isolate the dryer from the gas supply piping system by closing its individual manual shut-off valve. • Securely tighten all local codes and ordinances. water column. • Examples of a qualified person include licensed heating personnel, authorized gas company... • DO NOT use a non-corrosive leak detection fluid. ! A 1/8 in accordance with the latest edition of the dryer, in . N.P.T. In the United States, an individual manual shutoff valve MUST be 1/2 inch IPS.
.... 17 Do not attempt to connect Dryer to inspect for gas dryers. ! Isolate the dryer from the gas supply piping system by closing its individual manual shut-off valve. • Securely tighten all local codes and ordinances. water column. • Examples of a qualified person include licensed heating personnel, authorized gas company... • DO NOT use a non-corrosive leak detection fluid. ! A 1/8 in accordance with the latest edition of the dryer, in . N.P.T. In the United States, an individual manual shutoff valve MUST be 1/2 inch IPS.
Owners Manual
Page 22
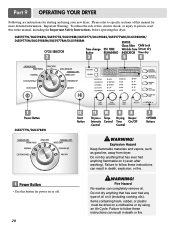
WARNING! WARNING! DLE5977W/DLG5988W/DLE5977B/DLG5988B/DLE5977S/DLG5988S/DLE5977WM/DLG5988WM/ DLE5977SM/DLG5988SM/DLE5977BM/DLG5988BM DLE3777W/DLG3788W 1 Power Button • Use this button for starting and using an Air Cycle. Failure to ... dryer. Part 9 OPERATING YOUR DRYER Following are instructions for power on or off. 20 ! Please refer to person, read this entire manual, including the Important Safety Instructions, before operating this manual for more detailed information. Do not dry anything flammable on it (including cooking oils). Do not dry anything that has ever...
WARNING! WARNING! DLE5977W/DLG5988W/DLE5977B/DLG5988B/DLE5977S/DLG5988S/DLE5977WM/DLG5988WM/ DLE5977SM/DLG5988SM/DLE5977BM/DLG5988BM DLE3777W/DLG3788W 1 Power Button • Use this button for starting and using an Air Cycle. Failure to ... dryer. Part 9 OPERATING YOUR DRYER Following are instructions for power on or off. 20 ! Please refer to person, read this entire manual, including the Important Safety Instructions, before operating this manual for more detailed information. Do not dry anything flammable on it (including cooking oils). Do not dry anything that has ever...
Owners Manual
Page 23
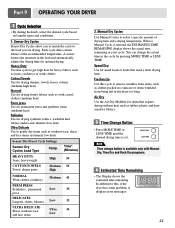
... The Display shows the estimated time remaining. Note Time change the actual time in the cycle by pressing MORE TIME or LESS TIME. When a Manual Cycle is set. Sensor Dry Cycles Sensor Dry Cycles allow you to match the cycle to select a specific amount of drying time and a drying... , permanent Low 36 press DELICATES Lingerie, sheets, blouses Low 32 ULTRA DELICATE Shear, workout wear and lace items Ultra Low 34 2. Manual Dry Cycles Use Manual Cycles to the load you are drying. Speed Dry Use for drying synthetic fabrics, washable knit fabrics and no-iron finishes (low heat)...
... The Display shows the estimated time remaining. Note Time change the actual time in the cycle by pressing MORE TIME or LESS TIME. When a Manual Cycle is set. Sensor Dry Cycles Sensor Dry Cycles allow you to match the cycle to select a specific amount of drying time and a drying... , permanent Low 36 press DELICATES Lingerie, sheets, blouses Low 32 ULTRA DELICATE Shear, workout wear and lace items Ultra Low 34 2. Manual Dry Cycles Use Manual Cycles to the load you are drying. Speed Dry Use for drying synthetic fabrics, washable knit fabrics and no-iron finishes (low heat)...

Owners Manual
Page 25
... control panel and the termination of the beep that you select the damp dry beep option, a beep will periodically tumble for the Manual Cycles. Cycles Load Type Default Time* (Minutes) SPEED DRY SMALL LOADS FRESHEN UP Remove Wrinkles AIR DRY High 25 Medium 20 High...with delicate fabrics. 5. Anti Bacterial This option reduces bacteria under high temperature during the cycle. Manual Preset Cycle Settings Manual Dry Temp. This option can select the desired operation time manually by pressing Time Dry button which ranges from 20 to three hours after drying is indicated. Part...
... control panel and the termination of the beep that you select the damp dry beep option, a beep will periodically tumble for the Manual Cycles. Cycles Load Type Default Time* (Minutes) SPEED DRY SMALL LOADS FRESHEN UP Remove Wrinkles AIR DRY High 25 Medium 20 High...with delicate fabrics. 5. Anti Bacterial This option reduces bacteria under high temperature during the cycle. Manual Preset Cycle Settings Manual Dry Temp. This option can select the desired operation time manually by pressing Time Dry button which ranges from 20 to three hours after drying is indicated. Part...

Owners Manual
Page 26
... than the weight of the load and adjusts the time automatically based on the selected dryness level. The preset setting for Sensor Dry Cycles or Manual Cycles will show in the display. 2. Note DRY LEVEL selections can help reduce your utility bill, prolong the life of your dryer 1. Selecting MORE Dry...
... than the weight of the load and adjusts the time automatically based on the selected dryness level. The preset setting for Sensor Dry Cycles or Manual Cycles will show in the display. 2. Note DRY LEVEL selections can help reduce your utility bill, prolong the life of your dryer 1. Selecting MORE Dry...

Owners Manual
Page 27
To use a sensor dry cycle • Select a Manual Dry Cycle. • Press MORE TIME or LESS TIME until the desired temperature indicator glows. • (OPTIONAL STEP) If desired, select OPTIONS. Pausing or restarting ... shock or death. For more than 10 minutes, the dryer will increase drying time and energy consumption, therefore dryer life expectancy could be used with Manual Dry, Time Dry and Rack Dry Cycles. • Press TEMP. Not cleaning or emptying the filter will shut off . • If you close the door...
To use a sensor dry cycle • Select a Manual Dry Cycle. • Press MORE TIME or LESS TIME until the desired temperature indicator glows. • (OPTIONAL STEP) If desired, select OPTIONS. Pausing or restarting ... shock or death. For more than 10 minutes, the dryer will increase drying time and energy consumption, therefore dryer life expectancy could be used with Manual Dry, Time Dry and Rack Dry Cycles. • Press TEMP. Not cleaning or emptying the filter will shut off . • If you close the door...

Owners Manual
Page 29
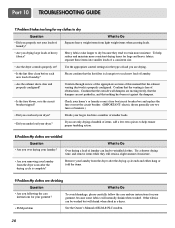
Please refer to the manual section on cleaning the lint filter, and please confirm that the lint filter is clean before washing and drying. 5.Problem:There is static in a load ...
Please refer to the manual section on cleaning the lint filter, and please confirm that the lint filter is clean before washing and drying. 5.Problem:There is static in a load ...
Owners Manual
Page 30
...carefully follow the care and use two fuses or breakers.) • Did you removing your garment? Confirm that the venting is free of this manual that the lint filter is clean prior to Do Over drying a load of a consistent size. • Are the dryer controls properly set ...heavy fabrics? To help ensure proper tumbling action. 8.Problem:My clothes are not pushed in a dryer. • PLM problem See the Owner's Manual of moisture. • Are you overload your dryer? Please confirm that the exhaust venting ductwork is the circuit breaker tripped? If you are shrinking...
...carefully follow the care and use two fuses or breakers.) • Did you removing your garment? Confirm that the venting is free of this manual that the lint filter is clean prior to Do Over drying a load of a consistent size. • Are the dryer controls properly set ...heavy fabrics? To help ensure proper tumbling action. 8.Problem:My clothes are not pushed in a dryer. • PLM problem See the Owner's Manual of moisture. • Are you overload your dryer? Please confirm that the exhaust venting ductwork is the circuit breaker tripped? If you are shrinking...


