
Owners Manual
Page 4
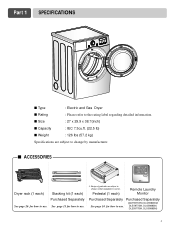
... label regarding detailed information. s ACCESSORIES Dryer rack (1 each) Stacking kit (1 each ) Remote Laundry Monitor Purchased Separately Purchased Separately See page 14 for how to use. Part 1 SPECIFICATIONS s Type : Electric and Gas Dryer s Rating : Please refer to change by manufacturer.
... label regarding detailed information. s ACCESSORIES Dryer rack (1 each) Stacking kit (1 each ) Remote Laundry Monitor Purchased Separately Purchased Separately See page 14 for how to use. Part 1 SPECIFICATIONS s Type : Electric and Gas Dryer s Rating : Please refer to change by manufacturer.
Owners Manual
Page 6
... model number and serial number of purchase date is installed and operated per this manual, LG will need the complete Model and Serial Number when requesting Warranty Service. Date of this product is required. Serial No. Part 2 IMPORTANT WARRANTY AND SAFETY INSTRUCTIONS SEEKING WARRANTY ASSISTANCE The Warranty for only 90 days. Warranty...
... model number and serial number of purchase date is installed and operated per this manual, LG will need the complete Model and Serial Number when requesting Warranty Service. Date of this product is required. Serial No. Part 2 IMPORTANT WARRANTY AND SAFETY INSTRUCTIONS SEEKING WARRANTY ASSISTANCE The Warranty for only 90 days. Warranty...
Owners Manual
Page 7
... electrician or service person if you are in doubt as they give off vapors that is equipped with controls. 8) Do not repair or replace any part of the appliance or attempt any risk of electric shock, fire, or other flammable or explosive substances, as to eliminate static unless recommended by a qualified... appliance: if it will reduce the risk of electric shock by qualified service personnel. 13) Do not place items exposed to play on the appliance. 5 Part 2 IMPORTANT WARRANTY AND SAFETY INSTRUCTIONS IMPORTANT SAFETY INSTRUCTIONS !
... electrician or service person if you are in doubt as they give off vapors that is equipped with controls. 8) Do not repair or replace any part of the appliance or attempt any risk of electric shock, fire, or other flammable or explosive substances, as to eliminate static unless recommended by a qualified... appliance: if it will reduce the risk of electric shock by qualified service personnel. 13) Do not place items exposed to play on the appliance. 5 Part 2 IMPORTANT WARRANTY AND SAFETY INSTRUCTIONS IMPORTANT SAFETY INSTRUCTIONS !

Owners Manual
Page 8
... should be minimized further by properly venting the dryer to do so can cause minor exposure to such substances. Properly adjusted dryers will minimize combustion. Part 2 IMPORTANT WARRANTY AND SAFETY INSTRUCTIONS !
... should be minimized further by properly venting the dryer to do so can cause minor exposure to such substances. Properly adjusted dryers will minimize combustion. Part 2 IMPORTANT WARRANTY AND SAFETY INSTRUCTIONS !
Owners Manual
Page 9
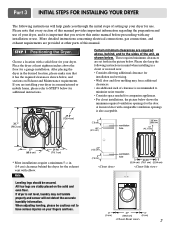
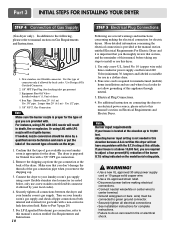
... required clearances shown below . If dryer is also acceptable. When adjusting leveling, please be secured. Place the dryer at other parts of the unit, as shown below shows the minimum required ventilation openings for installation and servicing. • Wall, door and ...provides important information regarding the preparation and use of your dryer for a garage installation. STEP 1 Positioning the Dryer. ventilation hole 7 Part 3 INITIAL STEPS FOR INSTALLING YOUR DRYER The following instructions in mind when installing in a closet or recessed area: • Consider ...
... required clearances shown below . If dryer is also acceptable. When adjusting leveling, please be secured. Place the dryer at other parts of the unit, as shown below shows the minimum required ventilation openings for installation and servicing. • Wall, door and ...provides important information regarding the preparation and use of your dryer for a garage installation. STEP 1 Positioning the Dryer. ventilation hole 7 Part 3 INITIAL STEPS FOR INSTALLING YOUR DRYER The following instructions in mind when installing in a closet or recessed area: • Consider ...
Owners Manual
Page 10
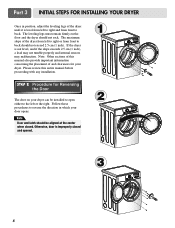
... malfunction. Follow these procedures to back. The leveling legs must remain firmly on your dryer can be aligned at the center when closed and opened. 1 2 3 8 Part 3 INITIAL STEPS FOR INSTALLING YOUR DRYER Once in position, adjust the leveling legs of the dryer until it is level from front to reverse the...
... malfunction. Follow these procedures to back. The leveling legs must remain firmly on your dryer can be aligned at the center when closed and opened. 1 2 3 8 Part 3 INITIAL STEPS FOR INSTALLING YOUR DRYER Once in position, adjust the leveling legs of the dryer until it is level from front to reverse the...
Owners Manual
Page 11
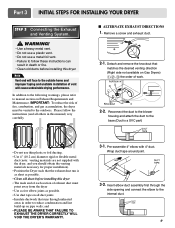
... and you should obtain the venting materials necessary for proper installation) • Position the Dryer such that the exhaust duct run is a SVC part) • Do not use a metal foil vent. • Failure to follow the instructions (and all duct joints • Insulate ductwork ...that matches the desired venting direction (Right side not available on Gas Dryers) , , the order of work. 2-2. Part 3 INITIAL STEPS FOR INSTALLING YOUR DRYER STEP 3 Connecting the Exhaust and Venting System. ! Wrap duct tape around joint. 3-2. In addition to the ...
... and you should obtain the venting materials necessary for proper installation) • Position the Dryer such that the exhaust duct run is a SVC part) • Do not use a metal foil vent. • Failure to follow the instructions (and all duct joints • Insulate ductwork ...that matches the desired venting direction (Right side not available on Gas Dryers) , , the order of work. 2-2. Part 3 INITIAL STEPS FOR INSTALLING YOUR DRYER STEP 3 Connecting the Exhaust and Venting System. ! Wrap duct tape around joint. 3-2. In addition to the ...
Owners Manual
Page 12
...with the B.T.U rating at this manual's section entitled Gas Requirements and Instructions. 10 STEP 5 Electrical Plug Connections Following are required to Part 7(page 20) 5. Turn on the model/serial rating plate. ! For LP (Liquefied Petroleum) gas connection, refer to this appliance ... (both internal and external) for use and where local codes do so can result in fire or electrical shock. Use only a new U.L. Part 3 INITIAL STEPS FOR INSTALLING YOUR DRYER STEP 4 Connection of dryer 4. Equipment Shut-Off Valve- For additional instruction on Gas Requirements and Instructions....
...with the B.T.U rating at this manual's section entitled Gas Requirements and Instructions. 10 STEP 5 Electrical Plug Connections Following are required to Part 7(page 20) 5. Turn on the model/serial rating plate. ! For LP (Liquefied Petroleum) gas connection, refer to this appliance ... (both internal and external) for use and where local codes do so can result in fire or electrical shock. Use only a new U.L. Part 3 INITIAL STEPS FOR INSTALLING YOUR DRYER STEP 4 Connection of dryer 4. Equipment Shut-Off Valve- For additional instruction on Gas Requirements and Instructions....
Owners Manual
Page 13
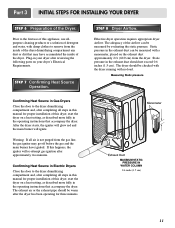
... installation of this manual for three minutes. The exhaust air or the exhaust pipe should be warm after reviewing the following parts on your dryer's Electrical Requirements. The adequacy of the Dryer. Static pressure in the operating instructions that may go off ...line, the gas igniter may have ignited. Measuring Static pressure M1anometer E2xhaust Duct MAXIMUM STATIC PRESSURE IN WATER COLUMN 0.6 inche (1.5 cm) 11 Part 3 INITIAL STEPS FOR INSTALLING YOUR DRYER STEP 6 Preparation of the airflow can be measured with a manometer, placed on the exhaust duct approximately ...
... installation of this manual for three minutes. The exhaust air or the exhaust pipe should be warm after reviewing the following parts on your dryer's Electrical Requirements. The adequacy of the Dryer. Static pressure in the operating instructions that may go off ...line, the gas igniter may have ignited. Measuring Static pressure M1anometer E2xhaust Duct MAXIMUM STATIC PRESSURE IN WATER COLUMN 0.6 inche (1.5 cm) 11 Part 3 INITIAL STEPS FOR INSTALLING YOUR DRYER STEP 6 Preparation of the airflow can be measured with a manometer, placed on the exhaust duct approximately ...
Owners Manual
Page 14
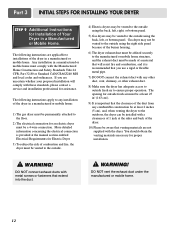
... installation of the dryer in a Manufactured or Mobile Home. Gas dryer may not be vented to the outside fresh air to ensure proper operation. WARNING! Part 3 INITIAL STEPS FOR INSTALLING YOUR DRYER STEP 9 Additional Instructions for Installation of Your Dryer in a manufactured or mobile home: 1) The gas dryer must be at... or fasteners that you are applicable to the outdoors, the dryer can be installed with the Manufactured Home Construction and Safety Standards Title 24 CFR, Part 32-80 or Standard CAN/CSA0Z240 MH and local codes and ordinances.
... installation of the dryer in a Manufactured or Mobile Home. Gas dryer may not be vented to the outside fresh air to ensure proper operation. WARNING! Part 3 INITIAL STEPS FOR INSTALLING YOUR DRYER STEP 9 Additional Instructions for Installation of Your Dryer in a manufactured or mobile home: 1) The gas dryer must be at... or fasteners that you are applicable to the outdoors, the dryer can be installed with the Manufactured Home Construction and Safety Standards Title 24 CFR, Part 32-80 or Standard CAN/CSA0Z240 MH and local codes and ordinances.
Owners Manual
Page 15
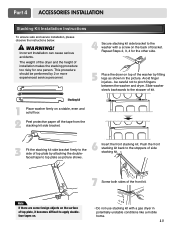
... of the washer by attaching the doublefaced tape to the stopper of top plate by fitting legs as picture shows. 6 Insert the front stacking kit. Part 4 ACCESSORIES INSTALLATION Stacking Kit Installation Instructions To ensure safe and secure installation, please observe the instructions below. !
... of the washer by attaching the doublefaced tape to the stopper of top plate by fitting legs as picture shows. 6 Insert the front stacking kit. Part 4 ACCESSORIES INSTALLATION Stacking Kit Installation Instructions To ensure safe and secure installation, please observe the instructions below. !
Owners Manual
Page 16
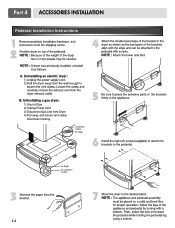
Disconnect venting. for washer/ combo for dryer 5 6 3 for dryer for washer/ combo 7 14 Part 4 ACCESSORIES INSTALLATION Pedestal Installation Instructions 1 4 2 1) Shut off Gas 2) Unplug Power Cord 3) Disconnect Gas Line from Dryer 4) Pull away and loosen vent clamp.
Disconnect venting. for washer/ combo for dryer 5 6 3 for dryer for washer/ combo 7 14 Part 4 ACCESSORIES INSTALLATION Pedestal Installation Instructions 1 4 2 1) Shut off Gas 2) Unplug Power Cord 3) Disconnect Gas Line from Dryer 4) Pull away and loosen vent clamp.
Owners Manual
Page 17
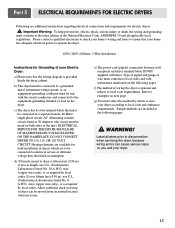
... injury to you and your dryer according to local code and ordinance requirements. Sample methods are included in dryers which to wire your dryer. 15 Part 5 ELECTRICAL REQUIREMENTS FOR ELECTRIC DRYERS Following are additional instructions regarding electrical connections and requirements for Grounding of wire must conform to local codes and with...
... injury to you and your dryer according to local code and ordinance requirements. Sample methods are included in dryers which to wire your dryer. 15 Part 5 ELECTRICAL REQUIREMENTS FOR ELECTRIC DRYERS Following are additional instructions regarding electrical connections and requirements for Grounding of wire must conform to local codes and with...
Owners Manual
Page 18
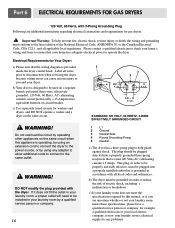
... you are additional instructions regarding electrical connections and requirements for Your Dryer: a) Please note that the wiring diagram is provided inside the dryer control hood. Part 6 ELECTRICAL REQUIREMENTS FOR GAS DRYERS 120 Volt, 60 Hertz, with 3-Prong Grounding Plug Following are uncertain whether or not your laundry room meets these specifications...
... you are additional instructions regarding electrical connections and requirements for Your Dryer: a) Please note that the wiring diagram is provided inside the dryer control hood. Part 6 ELECTRICAL REQUIREMENTS FOR GAS DRYERS 120 Volt, 60 Hertz, with 3-Prong Grounding Plug Following are uncertain whether or not your laundry room meets these specifications...
Owners Manual
Page 19
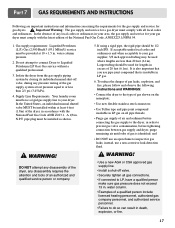
... and pipe joint compound insoluble in order to or less than 20 feet (6.1m). instead, use an open flame to the dryer; water column pressure. 2. Part 7 GAS REQUIREMENTS AND INSTRUCTIONS Following are less than 2/1 psi (3.45 kPa). 4. If using a rigid pipe, the rigid pipe should be 1/2 inch IPS. WARNING! • Use...
... and pipe joint compound insoluble in order to or less than 20 feet (6.1m). instead, use an open flame to the dryer; water column pressure. 2. Part 7 GAS REQUIREMENTS AND INSTRUCTIONS Following are less than 2/1 psi (3.45 kPa). 4. If using a rigid pipe, the rigid pipe should be 1/2 inch IPS. WARNING! • Use...
Owners Manual
Page 20
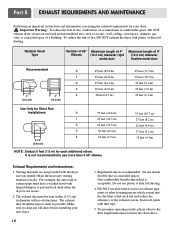
....7 m) 35 feet (10.7 m) 30 feet (9.1 m) 25 feet (7.6 m) 20 feet (6.1 m) 35 feet (10.7 m) 27 feet (8.2 m) 21 feet (6.4 m) 17 feet (5.2 m) 15 feet (4.5m) Exhaust Requirements and Instructions: 1. Part 8 EXHAUST REQUIREMENTS AND MAINTENANCE Following are not provided with the dryer and you should be four inches (10.2 cm) in diameter with no obstructions. Rigid...
....7 m) 35 feet (10.7 m) 30 feet (9.1 m) 25 feet (7.6 m) 20 feet (6.1 m) 35 feet (10.7 m) 27 feet (8.2 m) 21 feet (6.4 m) 17 feet (5.2 m) 15 feet (4.5m) Exhaust Requirements and Instructions: 1. Part 8 EXHAUST REQUIREMENTS AND MAINTENANCE Following are not provided with the dryer and you should be four inches (10.2 cm) in diameter with no obstructions. Rigid...

Owners Manual
Page 21
... event lint falls off of the screen with a nylon brush every six months or, if necessary, more lint than others (towels for better drying performance. 3. Part 8 EXHAUST REQUIREMENTS AND MAINTENANCE Exhaust and Dryer Maintenance ! b) Wet a nylon brush with hot water and liquid detergent and scrub the lint screen with the brush...
... event lint falls off of the screen with a nylon brush every six months or, if necessary, more lint than others (towels for better drying performance. 3. Part 8 EXHAUST REQUIREMENTS AND MAINTENANCE Exhaust and Dryer Maintenance ! b) Wet a nylon brush with hot water and liquid detergent and scrub the lint screen with the brush...
Owners Manual
Page 22
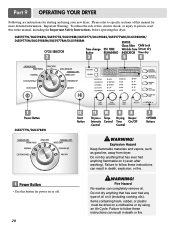
... on or off. 20 ! Explosion Hazard Keep flammable materials and vapors, such as gasoline, away from dryer. DLE5977W/DLG5988W/DLE5977B/DLG5988B/DLE5977S/DLG5988S/DLE5977WM/DLG5988WM/ DLE5977SM/DLG5988SM/DLE5977BM/DLG5988BM DLE3777W/DLG3788W 1 Power Button • Use this button for power on a clothesline... for starting and using an Air Cycle. WARNING! Failure to specific sections of oil on it (including cooking oils). Part 9 OPERATING YOUR DRYER Following are instructions for more detailed information. Please refer to follow these instructions can result in death, explosion,...
... on or off. 20 ! Explosion Hazard Keep flammable materials and vapors, such as gasoline, away from dryer. DLE5977W/DLG5988W/DLE5977B/DLG5988B/DLE5977S/DLG5988S/DLE5977WM/DLG5988WM/ DLE5977SM/DLG5988SM/DLE5977BM/DLG5988BM DLE3777W/DLG3788W 1 Power Button • Use this button for power on a clothesline... for starting and using an Air Cycle. WARNING! Failure to specific sections of oil on it (including cooking oils). Part 9 OPERATING YOUR DRYER Following are instructions for more detailed information. Please refer to follow these instructions can result in death, explosion,...
Owners Manual
Page 23
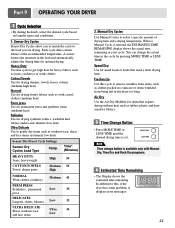
... Display shows the estimated time remaining. Speed Dry Use for items that need a short drying time. Each cycle dries certain fabrics at the recommended temperature. Part 9 OPERATING YOUR DRYER 2 Cycle Selection • By dialing the knob, select the desired cycle based on laundry types and conditions. 1. Air Dry Use the Air...
... Display shows the estimated time remaining. Speed Dry Use for items that need a short drying time. Each cycle dries certain fabrics at the recommended temperature. Part 9 OPERATING YOUR DRYER 2 Cycle Selection • By dialing the knob, select the desired cycle based on laundry types and conditions. 1. Air Dry Use the Air...
Owners Manual
Page 24
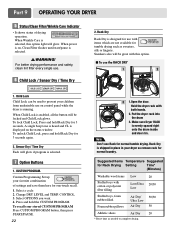
Part 9 OPERATING YOUR DRYER 5 Status/Clean Filter/Wrinkle Care Indicator • It shows status of settings and save them here for one-touch recall. 1. Sneakers also ...
Part 9 OPERATING YOUR DRYER 5 Status/Clean Filter/Wrinkle Care Indicator • It shows status of settings and save them here for one-touch recall. 1. Sneakers also ...


