
Owners Manual
Page 2
Please read your manual carefully, as it provides instructions on safe Installation, Use and Maintenance. Electric and Gas Dryer DLE5977W / DLG5988W DLE5977B / DLG5988B DLE3777W / DLG3788W DLE5977S / DLG5988S DLE5977WM / DLG5988WM DLE5977SM / DLG5988SM DLE5977BM / DLG5988BM Thank you for future reference. Record the Model and Serial Numbers, and retain the manual for buying a LG Dryer. For more information, visit our website at http://us.lge.com P/No.: 3828EL3003B P/No.: 3828EL3003B
Please read your manual carefully, as it provides instructions on safe Installation, Use and Maintenance. Electric and Gas Dryer DLE5977W / DLG5988W DLE5977B / DLG5988B DLE3777W / DLG3788W DLE5977S / DLG5988S DLE5977WM / DLG5988WM DLE5977SM / DLG5988SM DLE5977BM / DLG5988BM Thank you for future reference. Record the Model and Serial Numbers, and retain the manual for buying a LG Dryer. For more information, visit our website at http://us.lge.com P/No.: 3828EL3003B P/No.: 3828EL3003B
Owners Manual
Page 3
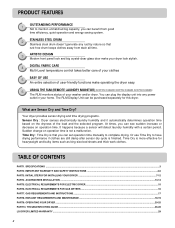
... operation time is finished. It happens because a sensor will detect laundry humidity with a certain period. ELECTRICAL REQUIREMENTS FOR ELECTRIC DRYER...15 PART6. TROUBLESHOOTING GUIDE ...26-28 LG DRYER LIMITED WARRANTY ...29 2 SPECIFICATIONS ...3 PART2. OPERATING YOUR DRYER ...20-25 PART10. Sudden change on operation time. TABLE OF CONTENTS PART1. IMPORTANT WARRANTY AND SAFETY INSTRUCTIONS ...4-6 PART3...
... operation time is finished. It happens because a sensor will detect laundry humidity with a certain period. ELECTRICAL REQUIREMENTS FOR ELECTRIC DRYER...15 PART6. TROUBLESHOOTING GUIDE ...26-28 LG DRYER LIMITED WARRANTY ...29 2 SPECIFICATIONS ...3 PART2. OPERATING YOUR DRYER ...20-25 PART10. Sudden change on operation time. TABLE OF CONTENTS PART1. IMPORTANT WARRANTY AND SAFETY INSTRUCTIONS ...4-6 PART3...
Owners Manual
Page 4
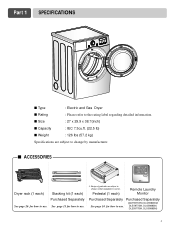
... 26 for how to use . ❊ Design of pedestals are subject to change wichat manafaturers notice. Part 1 SPECIFICATIONS s Type : Electric and Gas Dryer s Rating : Please refer to use . s ACCESSORIES Dryer rack (1 each) Stacking kit (1 each ) Remote Laundry Monitor Purchased Separately Purchased Separately See page 14 for how to the rating label regarding...
... 26 for how to use . ❊ Design of pedestals are subject to change wichat manafaturers notice. Part 1 SPECIFICATIONS s Type : Electric and Gas Dryer s Rating : Please refer to use . s ACCESSORIES Dryer rack (1 each) Stacking kit (1 each ) Remote Laundry Monitor Purchased Separately Purchased Separately See page 14 for how to the rating label regarding...
Owners Manual
Page 5
Record the Model and Serial Numbers, and retain the manual for buying a LG Dryer. Electric and Gas Dryer DLE5977W / DLG5988W DLE5977B / DLG5988B DLE3777W / DLG3788W DLE5977S / DLG5988S DLE5977WM / DLG5988WM DLE5977SM / DLG5988SM DLE5977BM / DLG5988BM DLE5977SM / DLG5988SM DLE5977BM / DLG5988BM Thank you for future reference. Please read your manual carefully, as it provides instructions on safe Installation, Use and Maintenance. For more information, visit our website at http://us.lge.com P/No.: 3828EL3003B P/No.: 3828EL3003B
Record the Model and Serial Numbers, and retain the manual for buying a LG Dryer. Electric and Gas Dryer DLE5977W / DLG5988W DLE5977B / DLG5988B DLE3777W / DLG3788W DLE5977S / DLG5988S DLE5977WM / DLG5988WM DLE5977SM / DLG5988SM DLE5977BM / DLG5988BM DLE5977SM / DLG5988SM DLE5977BM / DLG5988BM Thank you for future reference. Please read your manual carefully, as it provides instructions on safe Installation, Use and Maintenance. For more information, visit our website at http://us.lge.com P/No.: 3828EL3003B P/No.: 3828EL3003B
Owners Manual
Page 6
...available by contacting your safety, the recommendations in material or workmanship throughout the Warranty period, beginning the Date of your Dryer is installed and operated per this manual, LG will need the complete Model and Serial Number when requesting Warranty Service. Warranty Restriction: If the... Warranty Service is required. WARNING! Use the space below to other than private family use, all warranty coverage is effective for your new LG dryer. To reduce the risk of this manual must be followed. If this product is located at the end of fire or explosion, electric ...
...available by contacting your safety, the recommendations in material or workmanship throughout the Warranty period, beginning the Date of your Dryer is installed and operated per this manual, LG will need the complete Model and Serial Number when requesting Warranty Service. Warranty Restriction: If the... Warranty Service is required. WARNING! Use the space below to other than private family use, all warranty coverage is effective for your new LG dryer. To reduce the risk of this manual must be followed. If this product is located at the end of fire or explosion, electric ...
Owners Manual
Page 7
...event of malfunction or breakdown, grounding will be exposed to cooking oils in a risk of the equipmentgrounding conductor can result in your dryer, please exercise care and follow basic safety precautions, including the following: 1) Read all local codes and ordinances. This appliance is ... must be connected to dry articles containing foam rubber or similarly textured rubber-like materials. 10) Clean lint screen before using your dryer. Check with gasoline, dry-cleaning solvents, or other personal or property injury when using the appliance. 2) Do not dry articles that...
...event of malfunction or breakdown, grounding will be exposed to cooking oils in a risk of the equipmentgrounding conductor can result in your dryer, please exercise care and follow basic safety precautions, including the following: 1) Read all local codes and ordinances. This appliance is ... must be connected to dry articles containing foam rubber or similarly textured rubber-like materials. 10) Clean lint screen before using your dryer. Check with gasoline, dry-cleaning solvents, or other personal or property injury when using the appliance. 2) Do not dry articles that...

Owners Manual
Page 8
... use any electrical switches. WARNING! • Keep flammable materials and vapors, such as gasoline, away from a neighbor's phone. Properly adjusted dryers will minimize combustion. Exposure to four of potential exposure to such substances. Follow the gas supplier's instructions carefully. • If you cannot reach... or cigarette, or turn on any gas or electrical appliance. • Do not touch any phone in your gas supplier from dryer. • Place dryer at least 18 inches above the floor for a garage installation. • Failure to do so can be dried on it, ...
... use any electrical switches. WARNING! • Keep flammable materials and vapors, such as gasoline, away from a neighbor's phone. Properly adjusted dryers will minimize combustion. Exposure to four of potential exposure to such substances. Follow the gas supplier's instructions carefully. • If you cannot reach... or cigarette, or turn on any gas or electrical appliance. • Do not touch any phone in your gas supplier from dryer. • Place dryer at least 18 inches above the floor for a garage installation. • Failure to do so can be dried on it, ...
Owners Manual
Page 9
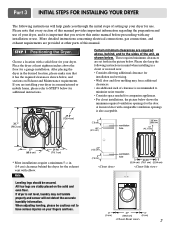
...not to minimize noise transfer . • Consider space needed for companion appliances. • For closet installations, the picture below for your dryer. A louvered door with a solid floor for additional instructions. 38.7" (98.3 cm) 49.8" (126.4 cm) Certain minimum clearances are...clearances. • An additional inch of clearance is important that it is recommended to have serious injuries on Exhaust and Maintenance requirements. Place the dryer at other parts of this manual. ventilation hole 27" (68.6 cm) 29.96" (76.1 cm) * Most installations require a minimum...
...not to minimize noise transfer . • Consider space needed for companion appliances. • For closet installations, the picture below for your dryer. A louvered door with a solid floor for additional instructions. 38.7" (98.3 cm) 49.8" (126.4 cm) Certain minimum clearances are...clearances. • An additional inch of clearance is important that it is recommended to have serious injuries on Exhaust and Maintenance requirements. Place the dryer at other parts of this manual. ventilation hole 27" (68.6 cm) 29.96" (76.1 cm) * Most installations require a minimum...
Owners Manual
Page 10
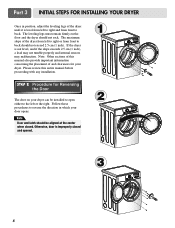
...at the center when closed and opened. 1 2 3 8 Note: Other sections of this entire manual before proceeding with any installation. SSTTEEPP 22: Procedure for your dryer. Follow these procedures to back should not rock. Otherwise, door is not level, and if the slope exceeds 2.5 cm (1 inch), a load may not tumble ... firmly on your door opens: Note Door and latch should be installed to open either to back. If the dryer is improperly closed . The maximum slope of the dryer from left to right or from front to the left to right and from front to reverse the direction in ...
...at the center when closed and opened. 1 2 3 8 Note: Other sections of this entire manual before proceeding with any installation. SSTTEEPP 22: Procedure for your dryer. Follow these procedures to back should not rock. Otherwise, door is not level, and if the slope exceeds 2.5 cm (1 inch), a load may not tumble ... firmly on your door opens: Note Door and latch should be installed to open either to back. If the dryer is improperly closed . The maximum slope of the dryer from left to right or from front to the left to right and from front to reverse the direction in ...
Owners Manual
Page 11
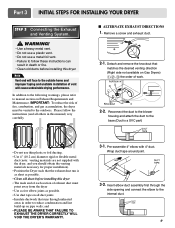
...condensation and lint build-up on Exhaust Requirements and Maintenance. Wrap duct tape around joint. 3-2. Part 3 INITIAL STEPS FOR INSTALLING YOUR DRYER STEP 3 Connecting the Exhaust and Venting System. ! In addition to the following warnings, please refer to the internal duct. 9 ... To reduce the risk of work. 2-2. Remove a screw and exhaust duct. 2-1. and • PLEASE BE AWARE THAT FAILURE TO EXHAUST THE DRYER CORRECTLY WILL VOID THE DRYER'S WARRANTY. 3-1. I ALTERNATE EXHAUST DIRECTIONS 1. WARNING! • Use a heavy metal vent. • Do not use a plastic vent. •...
...condensation and lint build-up on Exhaust Requirements and Maintenance. Wrap duct tape around joint. 3-2. Part 3 INITIAL STEPS FOR INSTALLING YOUR DRYER STEP 3 Connecting the Exhaust and Venting System. ! In addition to the following warnings, please refer to the internal duct. 9 ... To reduce the risk of work. 2-2. Remove a screw and exhaust duct. 2-1. and • PLEASE BE AWARE THAT FAILURE TO EXHAUST THE DRYER CORRECTLY WILL VOID THE DRYER'S WARRANTY. 3-1. I ALTERNATE EXHAUST DIRECTIONS 1. WARNING! • Use a heavy metal vent. • Do not use a plastic vent. •...
Owners Manual
Page 12
... only a new U.L. Equipment Shut-Off Valve- For LP (Liquefied Petroleum) gas connection, refer to manual section on Electrical Requirements and Electric Dryer. listed No. 10 (copper wire only) three conductor power supply cord kit rated 240 Volts (minimum) 30 Amperes and labeled as noted ...altitude. Shorter than 20' (6.1 m) - Confirm that you don't damage the threads of gas available in this elevation because A.G.A certifies this dryer will result in fire or electrical shock. Turn on your house is appropriate for the type of this manual's section entitled Gas Requirements and ...
... only a new U.L. Equipment Shut-Off Valve- For LP (Liquefied Petroleum) gas connection, refer to manual section on Electrical Requirements and Electric Dryer. listed No. 10 (copper wire only) three conductor power supply cord kit rated 240 Volts (minimum) 30 Amperes and labeled as noted ...altitude. Shorter than 20' (6.1 m) - Confirm that you don't damage the threads of gas available in this elevation because A.G.A certifies this dryer will result in fire or electrical shock. Turn on your house is appropriate for the type of this manual's section entitled Gas Requirements and ...
Owners Manual
Page 13
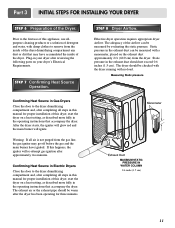
...be measured by evaluating the static pressure. The adequacy of this manual for three minutes. Prior to remove from the dryer. Effective dryer operation requires appropriate dryer airflow. STEP 7 Confirming Heat Source Operation. Plug-in the exhaust duct can be warm after completing all air ...is not purged from the gas line, the gas igniter may have ignited. Static pressure in your dryer's Electrical Requirements. The exhaust air or the exhaust pipe should not exceed 0.6 inches (1.5 cm). If this appliance, use of this...
...be measured by evaluating the static pressure. The adequacy of this manual for three minutes. Prior to remove from the dryer. Effective dryer operation requires appropriate dryer airflow. STEP 7 Confirming Heat Source Operation. Plug-in the exhaust duct can be warm after completing all air ...is not purged from the gas line, the gas igniter may have ignited. Static pressure in your dryer's Electrical Requirements. The exhaust air or the exhaust pipe should not exceed 0.6 inches (1.5 cm). If this appliance, use of this...
Owners Manual
Page 14
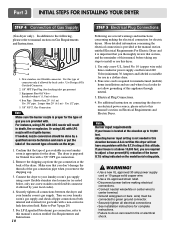
...mobile home must be a 4-wire connection. More detailed information concerning the electrical connection is provided at the sides and back of the dryer. 10) Please be aware that venting materials are uncertain whether your proposed installation will resist fire and combustion, and it is important...163 cm2). 9) It is recommended that you are not supplied with a clearances of 1 inch at the manual section entitled Electrical Requirements for Electric Dryer 3) To reduce the risk of a material that extend into the duct. ! The opening for assistance. If you use a rigid or flexible ...
...mobile home must be a 4-wire connection. More detailed information concerning the electrical connection is provided at the sides and back of the dryer. 10) Please be aware that venting materials are uncertain whether your proposed installation will resist fire and combustion, and it is important...163 cm2). 9) It is recommended that you are not supplied with a clearances of 1 inch at the manual section entitled Electrical Requirements for Electric Dryer 3) To reduce the risk of a material that extend into the duct. ! The opening for assistance. If you use a rigid or flexible ...
Owners Manual
Page 15
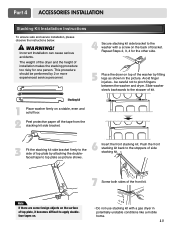
...bracket. Push the front stacking kit back to the side of installation makes the stacking procedure too risky for the other side. 5 Place the dryer on . • Do not use stacking kit with a screw on the surface of kit. Part 4 ACCESSORIES INSTALLATION Stacking Kit Installation Instructions ...conditions like a mobile home. 13 Slide washer slowly backwards to the stopper of top plate, it becomes difficult to the washer with a gas dryer in the picture. be performed by 2 or more experienced service personnel. 4 Secure stacking kit side bracket to apply doubleface tapes on top of...
...bracket. Push the front stacking kit back to the side of installation makes the stacking procedure too risky for the other side. 5 Place the dryer on . • Do not use stacking kit with a screw on the surface of kit. Part 4 ACCESSORIES INSTALLATION Stacking Kit Installation Instructions ...conditions like a mobile home. 13 Slide washer slowly backwards to the stopper of top plate, it becomes difficult to the washer with a gas dryer in the picture. be performed by 2 or more experienced service personnel. 4 Secure stacking kit side bracket to apply doubleface tapes on top of...
Owners Manual
Page 16
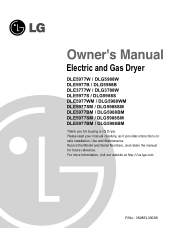
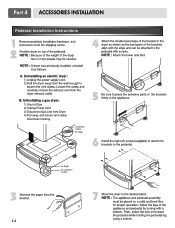
Part 4 ACCESSORIES INSTALLATION Pedestal Installation Instructions 1 4 2 1) Shut off Gas 2) Unplug Power Cord 3) Disconnect Gas Line from Dryer 4) Pull away and loosen vent clamp. Disconnect venting. for washer/ combo for dryer 5 6 3 for dryer for washer/ combo 7 14
Part 4 ACCESSORIES INSTALLATION Pedestal Installation Instructions 1 4 2 1) Shut off Gas 2) Unplug Power Cord 3) Disconnect Gas Line from Dryer 4) Pull away and loosen vent clamp. Disconnect venting. for washer/ combo for dryer 5 6 3 for dryer for washer/ combo 7 14
Owners Manual
Page 17
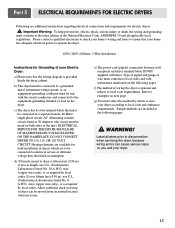
...on both sides of the line). If over fifteen feet (4.50 m), use U.L. (Underwriters Laboratories) listed No. 10 A.W.G. Refer to operate the dryer. 120V/ 240V, 60 Hertz, 3-Wire Installation Instructions for Grounding of different voltage than that must be connected to local code and ordinance requirements. ...Sample methods are included in the following pages. Label all applicable local regulations. DO NOT CONNECT DRYER TO 110, 115, OR 120 VOLT CIRCUIT. wire (copper wire only), or as required by which are to be connected to ...
...on both sides of the line). If over fifteen feet (4.50 m), use U.L. (Underwriters Laboratories) listed No. 10 A.W.G. Refer to operate the dryer. 120V/ 240V, 60 Hertz, 3-Wire Installation Instructions for Grounding of different voltage than that must be connected to local code and ordinance requirements. ...Sample methods are included in the following pages. Label all applicable local regulations. DO NOT CONNECT DRYER TO 110, 115, OR 120 VOLT CIRCUIT. wire (copper wire only), or as required by which are to be connected to ...
Owners Manual
Page 18
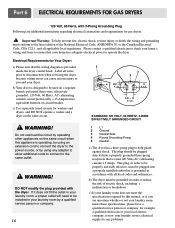
...16 STANDARD 120 VOLT, 60 HERTZ, 3-WIRE EFFECTIVELY GROUNDED CIRCUIT 1 L1 2 Ground 3 Neutral Side 4 Round Grounding Prong 5 Neutral a) The dryer has a three-prong plug to help prevent fire, electric shock, serious injury or death, the wiring and grounding must conform to you are additional... Volts AC (alternating current) 15 Amps. c) Use separately fused circuits for any adapter to allow additional cords to connect to operate the dryer. Do not overload the circuit by operating other appliances on a separate branch, polarized, three-wire, effectively grounded, 120 Volt, 60 Hertz...
...16 STANDARD 120 VOLT, 60 HERTZ, 3-WIRE EFFECTIVELY GROUNDED CIRCUIT 1 L1 2 Ground 3 Neutral Side 4 Round Grounding Prong 5 Neutral a) The dryer has a three-prong plug to help prevent fire, electric shock, serious injury or death, the wiring and grounding must conform to you are additional... Volts AC (alternating current) 15 Amps. c) Use separately fused circuits for any adapter to allow additional cords to connect to operate the dryer. Do not overload the circuit by operating other appliances on a separate branch, polarized, three-wire, effectively grounded, 120 Volt, 60 Hertz...
Owners Manual
Page 19
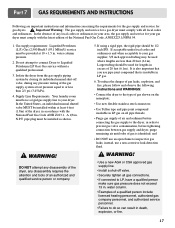
... Following are less than 2/1 psi (3.45 kPa). 4. A 1/8 in LP gas. 6. Important Warning: The gas supply and service for gas dryers. ! Your laundry room must comply with all pipe threads; • Purge gas supply of air and sediment before connecting the gas supply to ...prevent gas valve contamination, before tightening connection between gas supply and dryer, purge remaining air until odor of a qualified person include licensed heating personnel, authorized gas company personnel, and authorized service personnel. &#...
... Following are less than 2/1 psi (3.45 kPa). 4. A 1/8 in LP gas. 6. Important Warning: The gas supply and service for gas dryers. ! Your laundry room must comply with all pipe threads; • Purge gas supply of air and sediment before connecting the gas supply to ...prevent gas valve contamination, before tightening connection between gas supply and dryer, purge remaining air until odor of a qualified person include licensed heating personnel, authorized gas company personnel, and authorized service personnel. &#...
Owners Manual
Page 20
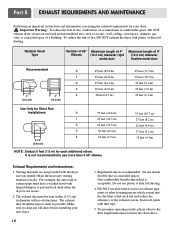
...important instructions and information concerning the exhaust requirements for each additional elbow. Make sure to clean any old ducts before installing your dryer. ! Weather Hood Type Number of 90° Maximum length of 4" Elbows (10.2 cm) diameter rigid metal duct Maximum...16.8 m) 1 47 feet (14.3 m) 2 41 feet (12.5 m) 3 30 feet (9.1 m) 4 22 feet (6.7 m) NOTE : Deduct 6 feet (1.8 m) for your new dryer. 18 3. To maximize operating results, please observe the duct length limitations noted in concealed spaces. Secure all joints with hinged dampers to use sheet metal...
...important instructions and information concerning the exhaust requirements for each additional elbow. Make sure to clean any old ducts before installing your dryer. ! Weather Hood Type Number of 90° Maximum length of 4" Elbows (10.2 cm) diameter rigid metal duct Maximum...16.8 m) 1 47 feet (14.3 m) 2 41 feet (12.5 m) 3 30 feet (9.1 m) 4 22 feet (6.7 m) NOTE : Deduct 6 feet (1.8 m) for your new dryer. 18 3. To maximize operating results, please observe the duct length limitations noted in concealed spaces. Secure all joints with hinged dampers to use sheet metal...

Owners Manual
Page 21
...load, because a clogged lint filter may increase drying times. 2. To clean, pull the lint screen straight up , and help ensure proper operation of your dryer, clean the lint screen with a nylon brush every six months or, if necessary, more lint than others (towels for better drying performance. 3. Push ... screen with hot or warm water. Annually remove the lint filter and attach it is likely blocked if lint falls off of the dryer. 8. Running the dryer with a damp cloth as necessary. In order to rapidly fill. Warning: spray pre-wash products may cause permanent damage to you ...
...load, because a clogged lint filter may increase drying times. 2. To clean, pull the lint screen straight up , and help ensure proper operation of your dryer, clean the lint screen with a nylon brush every six months or, if necessary, more lint than others (towels for better drying performance. 3. Push ... screen with hot or warm water. Annually remove the lint filter and attach it is likely blocked if lint falls off of the dryer. 8. Running the dryer with a damp cloth as necessary. In order to rapidly fill. Warning: spray pre-wash products may cause permanent damage to you ...


