

Owners Manual
Page 2
... the display's cabinet openings. On Safety Use only the power cord supplied with your dealer. If you have in this manual or listed on or apply impact to the product. Call your service technician for its installation, use may result in the specifications of thunder and lightning, never touch the power cord and signal cable because it is not disconnected from the wall outlet. Some internal parts carry...
... the display's cabinet openings. On Safety Use only the power cord supplied with your dealer. If you have in this manual or listed on or apply impact to the product. Call your service technician for its installation, use may result in the specifications of thunder and lightning, never touch the power cord and signal cable because it is not disconnected from the wall outlet. Some internal parts carry...

Owners Manual
Page 3
... cause disturbing reflections from surrounding light and bright surfaces. 2 Do not rub or strike the Active Matrix LCD with glossy bezels the user should consider the placement of the display as this display near or over the power cord, and do not place the display where the power cord is subject to damage. Leaving a fixed image on the screen. For displays with anything to rest...
... cause disturbing reflections from surrounding light and bright surfaces. 2 Do not rub or strike the Active Matrix LCD with glossy bezels the user should consider the placement of the display as this display near or over the power cord, and do not place the display where the power cord is subject to damage. Leaving a fixed image on the screen. For displays with anything to rest...

Owners Manual
Page 6
... shown in the picture. Assemble the Stand Body into the Stand Body in the picture. Once assembled take the monitor up the monitor, ensure that the power to perpendicularity direction. . 5. Important This illustration depicts the general model of connection. Stand Body Stand Body Stand Base 4. Connecting the stand 1. Assemble the Stand Base(Front, Rear) into the product in the correct direction as shown in the correct direction. Make sure you push...
... shown in the picture. Assemble the Stand Body into the Stand Body in the picture. Once assembled take the monitor up the monitor, ensure that the power to perpendicularity direction. . 5. Important This illustration depicts the general model of connection. Stand Body Stand Body Stand Base 4. Connecting the stand 1. Assemble the Stand Base(Front, Rear) into the product in the correct direction as shown in the correct direction. Make sure you push...

Owners Manual
Page 9
... hurt your display -After installation, adjust the angle as shown below. 1. Connecting the Display Before setting up the monitor, ensure that in order to maintain an ergonomic and comfortable viewing position, the forward tilt angle of the monitor should not exceed 5 degrees. 8 Positioning your finger(s). Adjust the position of the panel in between the head of the monitor. ERGONOMIC It is turned off. Tilt Range : -5˚ to the monitor, the...
... hurt your display -After installation, adjust the angle as shown below. 1. Connecting the Display Before setting up the monitor, ensure that in order to maintain an ergonomic and comfortable viewing position, the forward tilt angle of the monitor should not exceed 5 degrees. 8 Positioning your finger(s). Adjust the position of the panel in between the head of the monitor. ERGONOMIC It is turned off. Tilt Range : -5˚ to the monitor, the...

Owners Manual
Page 10
..., screen flicker or tilted screen while using a D-Sub signal input cable connector for Macintosh Mac adapter : For Apple Macintosh use, a separate plug adapter is executed automatically. (Only Analog Mode) Power Button NOTE ' Self Image Setting Function'? Wall-outlet type When using the device or after changing screen resolution, press the AUTO function button to a 15 pin 2 row connector. When monitor power is turned on, the 'Self Image Setting Function' is needed to change the 15 pin high density (3 row) D-sub VGA connector on the supplied cable to improve resolution. 9 Before...
..., screen flicker or tilted screen while using a D-Sub signal input cable connector for Macintosh Mac adapter : For Apple Macintosh use, a separate plug adapter is executed automatically. (Only Analog Mode) Power Button NOTE ' Self Image Setting Function'? Wall-outlet type When using the device or after changing screen resolution, press the AUTO function button to a 15 pin 2 row connector. When monitor power is turned on, the 'Self Image Setting Function' is needed to change the 15 pin high density (3 row) D-sub VGA connector on the supplied cable to improve resolution. 9 Before...

Owners Manual
Page 11
... shown. Connect the signal input cable and tighten it up the monitor, ensure that the power to improve resolution. 10 Power Button NOTE ' Self Image Setting Function'? Connecting the Display E1911S/E2211S Connecting with optimal display settings.When the user connects the monitor for the first time, this function automatically adjusts the display to optimal settings for Macintosh Mac adapter : For Apple Macintosh use, a separate plug adapter is needed to change the 15 pin high density (3 row) D-sub VGA connector on the supplied cable to...
... shown. Connect the signal input cable and tighten it up the monitor, ensure that the power to improve resolution. 10 Power Button NOTE ' Self Image Setting Function'? Connecting the Display E1911S/E2211S Connecting with optimal display settings.When the user connects the monitor for the first time, this function automatically adjusts the display to optimal settings for Macintosh Mac adapter : For Apple Macintosh use, a separate plug adapter is needed to change the 15 pin high density (3 row) D-sub VGA connector on the supplied cable to...

Owners Manual
Page 14
... input signal (D-SUB/DVI) you want. Control Panel Functions SUPER ENERGY Use this button to turn the display on the MONITOR SETUP OSD. (Only Analog Mode) This will automatically adjust your display settings, always press the AUTO button on or off. The power indicator stays white if the display is D-Sub. (Only E1911T/E2211T/E2411T ) EXIT Button Exit the OSD(On Screen Display). The default setting is running properly (On Mode). When only one signal is connected, it is automatically detected. AUTO Button AUTO IMAGE ADJUSTMENT When adjusting...
... input signal (D-SUB/DVI) you want. Control Panel Functions SUPER ENERGY Use this button to turn the display on the MONITOR SETUP OSD. (Only Analog Mode) This will automatically adjust your display settings, always press the AUTO button on or off. The power indicator stays white if the display is D-Sub. (Only E1911T/E2211T/E2411T ) EXIT Button Exit the OSD(On Screen Display). The default setting is running properly (On Mode). When only one signal is connected, it is automatically detected. AUTO Button AUTO IMAGE ADJUSTMENT When adjusting...
Owners Manual
Page 16
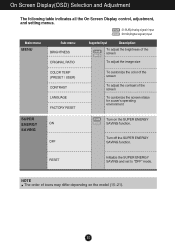
...(Analog signal) input DVI-D : DVI-D(Digital signal) input Main menu MENU Sub-menu BRIGHTNESS ORIGINAL RATIO Supported input Description DSUB DVI-D To adjust the brightness of the screen To adjust the image size COLOR TEMP (PRESET / USER) CONTRAST LANGUAGE FACTORY RESET To customize the color of the screen To adjust the contrast of icons may differ depending on the SUPER ENERGY SAVING function. NOTE The order of the screen To customize the screen status for a user's operating environment SUPER ENERGY ON SAVING OFF DSUB DVI-D Turn on the model...
...(Analog signal) input DVI-D : DVI-D(Digital signal) input Main menu MENU Sub-menu BRIGHTNESS ORIGINAL RATIO Supported input Description DSUB DVI-D To adjust the brightness of the screen To adjust the image size COLOR TEMP (PRESET / USER) CONTRAST LANGUAGE FACTORY RESET To customize the color of the screen To adjust the contrast of icons may differ depending on the SUPER ENERGY SAVING function. NOTE The order of the screen To customize the screen status for a user's operating environment SUPER ENERGY ON SAVING OFF DSUB DVI-D Turn on the model...
Owners Manual
Page 18
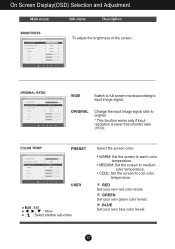
... . • MEDIUM: Set the screen to medium color temperature. • COOL: Set the screen to original. * This function works only if input resolution is lower than monitor ratio (16:9). GREEN Set your own red color levels. RED Set your own green color levels. On Screen Display(OSD) Selection and Adjustment Main menu Sub menu Description To adjust the brightness of the screen. ORIGINAL Change the input image signal ratio to cool color temperature. BLUE Set your own blue color levels. 17 WIDE Switch to full screen mode according to input image signal.
... . • MEDIUM: Set the screen to medium color temperature. • COOL: Set the screen to original. * This function works only if input resolution is lower than monitor ratio (16:9). GREEN Set your own red color levels. RED Set your own green color levels. On Screen Display(OSD) Selection and Adjustment Main menu Sub menu Description To adjust the brightness of the screen. ORIGINAL Change the input image signal ratio to cool color temperature. BLUE Set your own blue color levels. 17 WIDE Switch to full screen mode according to input image signal.

Owners Manual
Page 19
To choose the language in which the control names are displayed. Exit : Exit , , : Move : Select another sub-menu 18 On Screen Display(OSD) Selection and Adjustment Main menu Description To adjust the contrast of the screen. Press the , buttons to reset immediately. Restore all factory default settings except "LANGUAGE."
To choose the language in which the control names are displayed. Exit : Exit , , : Move : Select another sub-menu 18 On Screen Display(OSD) Selection and Adjustment Main menu Description To adjust the contrast of the screen. Press the , buttons to reset immediately. Restore all factory default settings except "LANGUAGE."

Owners Manual
Page 21
... TOTAL POWER REDUCTION : How much power is gray. RESET Clear the TOTAL POWER REDUCTION and TOTAL CO2 REDUCTION values. OFF Turn off the SUPER ENERGY SAVING function.Now the monitor is green. When current setting value is ON,the SUPER SAVING color is LED SAVING function. TOTAL CO2 REDUCTION : Change the TOTAL POWER REDUCTION to CO2. 20 On Screen Display(OSD) Selection and Adjustment Main menu Sub menu Description ON Turn on...
... TOTAL POWER REDUCTION : How much power is gray. RESET Clear the TOTAL POWER REDUCTION and TOTAL CO2 REDUCTION values. OFF Turn off the SUPER ENERGY SAVING function.Now the monitor is green. When current setting value is ON,the SUPER SAVING color is LED SAVING function. TOTAL CO2 REDUCTION : Change the TOTAL POWER REDUCTION to CO2. 20 On Screen Display(OSD) Selection and Adjustment Main menu Sub menu Description ON Turn on...

Owners Manual
Page 23
.... light on PC (video card) is in power saving mode, try again. Do you see an "OUT OF • This message appears when the signal from the RANGE" message on ? Check the signal cable and try moving the mouse or pressing any time by pushing the MENU button for service. Troubleshooting Check the following before calling for several seconds: the message "OSD UNLOCKED" will appear. 22 frequency range of horizontal or vertical...
.... light on PC (video card) is in power saving mode, try again. Do you see an "OUT OF • This message appears when the signal from the RANGE" message on ? Check the signal cable and try moving the mouse or pressing any time by pushing the MENU button for service. Troubleshooting Check the following before calling for several seconds: the message "OSD UNLOCKED" will appear. 22 frequency range of horizontal or vertical...

Owners Manual
Page 24
... by the video card performance. G Any horizontal noise appearing in any image or characters are visible. • Press the AUTO button to automatically adjust your display image to the ideal setting. • Check Control Panel --> Display --> Settings and adjust the display to the recommended resolution or adjust the display image to the ideal setting. Set the color setting higher than 24 bits (true color). IMPORTANT Check Control Panel --> Display --> Settings and see if the frequency or the resolution were changed. Troubleshooting Display image is incorrect G Display Position is...
... by the video card performance. G Any horizontal noise appearing in any image or characters are visible. • Press the AUTO button to automatically adjust your display image to the ideal setting. • Check Control Panel --> Display --> Settings and adjust the display to the recommended resolution or adjust the display image to the ideal setting. Set the color setting higher than 24 bits (true color). IMPORTANT Check Control Panel --> Display --> Settings and see if the frequency or the resolution were changed. Troubleshooting Display image is incorrect G Display Position is...

Owners Manual
Page 25
Settings. Troubleshooting Display image is incorrect G The screen color is mono or abnormal. • Check if the signal cable is properly connected and use a screwdriver to install the display driver from our web site: http://www.lg.com. • Make sure to the recommend resolution. Do you can also download the driver from the display driver CD (or diskette) that comes with your display. G Have you installed the display driver? • Be sure to fasten if...
Settings. Troubleshooting Display image is incorrect G The screen color is mono or abnormal. • Check if the signal cable is properly connected and use a screwdriver to install the display driver from our web site: http://www.lg.com. • Make sure to the recommend resolution. Do you can also download the driver from the display driver CD (or diskette) that comes with your display. G Have you installed the display driver? • Be sure to fasten if...

Owners Manual
Page 26
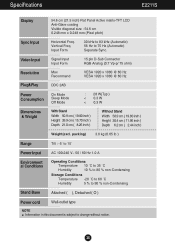
Digital Video Input Signal Input Input Form 15 pin D-Sub Connector DVI-D Connector (Digital) RGB Analog (0.7 Vp-p/ 75 ohm), Digital Resolution Plug&Play Max Recommend VESA 1366 x 768 @ 60 Hz VESA 1366 x 768 @ 60 Hz DDC 2B(Digital),DDC 2AB(Analog) Power Consumption On Mode Sleep Mode Off Mode : 18 W(Typ.) < 0.3 W < 0.3 W Dimensions & Weight With Stand Width 44.2 cm ( 17.42 inch ) Height 35.8 cm ( 14.09 inch ) Depth 17.0 cm ( 6.69 inch ) Without Stand Width 44.2 cm ( 17.42 inch ) Height 26.7 cm...
Digital Video Input Signal Input Input Form 15 pin D-Sub Connector DVI-D Connector (Digital) RGB Analog (0.7 Vp-p/ 75 ohm), Digital Resolution Plug&Play Max Recommend VESA 1366 x 768 @ 60 Hz VESA 1366 x 768 @ 60 Hz DDC 2B(Digital),DDC 2AB(Analog) Power Consumption On Mode Sleep Mode Off Mode : 18 W(Typ.) < 0.3 W < 0.3 W Dimensions & Weight With Stand Width 44.2 cm ( 17.42 inch ) Height 35.8 cm ( 14.09 inch ) Depth 17.0 cm ( 6.69 inch ) Without Stand Width 44.2 cm ( 17.42 inch ) Height 26.7 cm...

Owners Manual
Page 27
... change without notice. 26 Video Input Signal Input Input Form 15 pin D-Sub Connector RGB Analog (0.7 Vp-p/ 75 ohm) Resolution Max Recommend VESA 1366 x 768 @ 60 Hz VESA 1366 x 768 @ 60 Hz Plug&Play DDC 2AB Power Consumption On Mode Sleep Mode Off Mode : 18 W(Typ.) < 0.3 W < 0.3 W Dimensions & Weight With Stand Width 44.2 cm ( 17.42 inch ) Height 35.8 cm ( 14.09 inch ) Depth 17.0 cm ( 6.69 inch ) Without Stand Width 44.2 cm ( 17.42 inch ) Height...
... change without notice. 26 Video Input Signal Input Input Form 15 pin D-Sub Connector RGB Analog (0.7 Vp-p/ 75 ohm) Resolution Max Recommend VESA 1366 x 768 @ 60 Hz VESA 1366 x 768 @ 60 Hz Plug&Play DDC 2AB Power Consumption On Mode Sleep Mode Off Mode : 18 W(Typ.) < 0.3 W < 0.3 W Dimensions & Weight With Stand Width 44.2 cm ( 17.42 inch ) Height 35.8 cm ( 14.09 inch ) Depth 17.0 cm ( 6.69 inch ) Without Stand Width 44.2 cm ( 17.42 inch ) Height...

Owners Manual
Page 28
... Sync. Vertical Freq. Digital Video Input Signal Input Input Form 15 pin D-Sub Connector DVI-D Connector (Digital) RGB Analog (0.7 Vp-p/ 75 ohm), Digital Resolution Plug&Play Max Recommend VESA 1920 x 1080 @ 60 Hz VESA 1920 x 1080 @ 60 Hz DDC 2B(Digital),DDC 2AB(Analog) Power Consumption On Mode Sleep Mode Off Mode : 28 W(Typ.) < 0.3 W < 0.3 W Dimensions & Weight With Stand Width 50.9 cm ( 19.80 inch ) Height 39.9 cm ( 15.70 inch ) Depth 21.0 cm ( 8.26 inch ) Without Stand Width 50.9 cm ( 19.80 inch ) Height...
... Sync. Vertical Freq. Digital Video Input Signal Input Input Form 15 pin D-Sub Connector DVI-D Connector (Digital) RGB Analog (0.7 Vp-p/ 75 ohm), Digital Resolution Plug&Play Max Recommend VESA 1920 x 1080 @ 60 Hz VESA 1920 x 1080 @ 60 Hz DDC 2B(Digital),DDC 2AB(Analog) Power Consumption On Mode Sleep Mode Off Mode : 28 W(Typ.) < 0.3 W < 0.3 W Dimensions & Weight With Stand Width 50.9 cm ( 19.80 inch ) Height 39.9 cm ( 15.70 inch ) Depth 21.0 cm ( 8.26 inch ) Without Stand Width 50.9 cm ( 19.80 inch ) Height...
Owners Manual
Page 29
...-Condensing Stand Base Attached ( ), Detached ( O ) Power cord Wall-outlet type NOTE Information in this document is subject to 75 Hz (Automatic) Separate Sync. Video Input Signal Input Input Form 15 pin D-Sub Connector RGB Analog (0.7 Vp-p/ 75 ohm) Resolution Plug&Play Max Recommend DDC 2AB VESA 1920 x 1080 @ 60 Hz VESA 1920 x 1080 @ 60 Hz Power Consumption On Mode Sleep Mode Off Mode : 28 W(Typ.) < 0.3 W < 0.3 W Dimensions & Weight With Stand Width 50.9 cm ( 19.80 inch ) Height...
...-Condensing Stand Base Attached ( ), Detached ( O ) Power cord Wall-outlet type NOTE Information in this document is subject to 75 Hz (Automatic) Separate Sync. Video Input Signal Input Input Form 15 pin D-Sub Connector RGB Analog (0.7 Vp-p/ 75 ohm) Resolution Plug&Play Max Recommend DDC 2AB VESA 1920 x 1080 @ 60 Hz VESA 1920 x 1080 @ 60 Hz Power Consumption On Mode Sleep Mode Off Mode : 28 W(Typ.) < 0.3 W < 0.3 W Dimensions & Weight With Stand Width 50.9 cm ( 19.80 inch ) Height...

Owners Manual
Page 30
... Hz to change without notice. 29 Digital Video Input Signal Input Input Form 15 pin D-Sub Connector DVI-D Connector (Digital) RGB Analog (0.7 Vp-p/ 75 ohm), Digital Resolution Plug&Play Max Recommend VESA 1920 x 1080 @ 60 Hz VESA 1920 x 1080 @ 60 Hz DDC 2B(Digital),DDC 2AB(Analog) Power Consumption On Mode Sleep Mode Off Mode : 28 W(Typ.) < 0.3 W < 0.3 W Dimensions & Weight With Stand Width 56.9 cm ( 22.40 inch ) Height 43.3 cm ( 17.04 inch ) Depth 21.0 cm ( 8.26 inch ) Without Stand Width...
... Hz to change without notice. 29 Digital Video Input Signal Input Input Form 15 pin D-Sub Connector DVI-D Connector (Digital) RGB Analog (0.7 Vp-p/ 75 ohm), Digital Resolution Plug&Play Max Recommend VESA 1920 x 1080 @ 60 Hz VESA 1920 x 1080 @ 60 Hz DDC 2B(Digital),DDC 2AB(Analog) Power Consumption On Mode Sleep Mode Off Mode : 28 W(Typ.) < 0.3 W < 0.3 W Dimensions & Weight With Stand Width 56.9 cm ( 22.40 inch ) Height 43.3 cm ( 17.04 inch ) Depth 21.0 cm ( 8.26 inch ) Without Stand Width...

Owners Manual
Page 31
Specifications Preset Modes (Resolution) E1911T/E1911S *If you can't select 1366 x 768 in display property timing option, please update your video card driver from your video card vendor. Display Modes (Resolution) Horizontal Freq. (kHz) Vertical Freq. (Hz) Polarity(H/V) 1 720 x 400 2 640 x 480 3 640 x 480 4 800 x 600 5 800 x... 79.976 65.290 67.500 Vertical Freq. (Hz) Polarity(H/V) 70 -/+ 60 -/- 75 -/- 60 +/+ 75 +/+ 60 -/- 75 +/+ 75 +/+ 60 +/+ 75 +/+ 60 -/+ 60 +/+ *Recommend Mode Indicator MODE On Mode Sleep Mode Off Mode LED Color White White Blinking Off 30
Specifications Preset Modes (Resolution) E1911T/E1911S *If you can't select 1366 x 768 in display property timing option, please update your video card driver from your video card vendor. Display Modes (Resolution) Horizontal Freq. (kHz) Vertical Freq. (Hz) Polarity(H/V) 1 720 x 400 2 640 x 480 3 640 x 480 4 800 x 600 5 800 x... 79.976 65.290 67.500 Vertical Freq. (Hz) Polarity(H/V) 70 -/+ 60 -/- 75 -/- 60 +/+ 75 +/+ 60 -/- 75 +/+ 75 +/+ 60 +/+ 75 +/+ 60 -/+ 60 +/+ *Recommend Mode Indicator MODE On Mode Sleep Mode Off Mode LED Color White White Blinking Off 30


