User Guide
Page 2
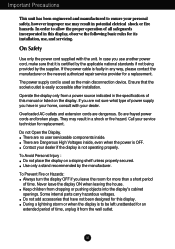
...parts carry hazardous voltages. The power supply cord is OFF. During a lightning storm or when the display is to be left unattended for replacement. If the power cable is not operating properly. There are Dangerous High Voltages inside . Keep children from a power source indicated in the specifications of time, unplug it is easily accessible after installation... that it from the wall outlet. Do not Open the Display. Use only a stand recommended by the supplier. If you are no user serviceable components inside , even when the power is used as the main disconnection ...
...parts carry hazardous voltages. The power supply cord is OFF. During a lightning storm or when the display is to be left unattended for replacement. If the power cable is not operating properly. There are Dangerous High Voltages inside . Keep children from a power source indicated in the specifications of time, unplug it is easily accessible after installation... that it from the wall outlet. Do not Open the Display. Use only a stand recommended by the supplier. If you are no user serviceable components inside , even when the power is used as the main disconnection ...
User Guide
Page 5
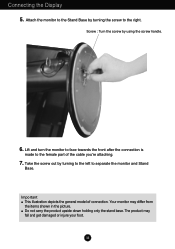
... picture. Connecting the Display 5. Take the screw out by turning to the left to the female part of connection. Do not carry the product upside down holding only the stand base. Important This illustration depicts the general model of the cable you're attaching. 7. A4 Lift and turn the monitor to face towards the front after the connection is made to separate the monitor and Stand Base. Screw : Turn...
... picture. Connecting the Display 5. Take the screw out by turning to the left to the female part of connection. Do not carry the product upside down holding only the stand base. Important This illustration depicts the general model of the cable you're attaching. 7. A4 Lift and turn the monitor to face towards the front after the connection is made to separate the monitor and Stand Base. Screw : Turn...
User Guide
Page 6
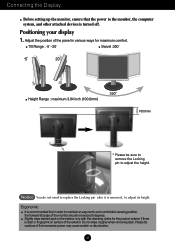
... You do not need to replace the Locking pin after it is recommended that in various ways for the product exterior if there is turned off. Ergonomic It is removed, to maintain an ergonomic and comfortable viewing position, the forward tilt angle of the panel in order to adjust its height. Connecting the Display Before setting up the monitor, ensure that the power to adjust the height. Positioning your display 1.
... You do not need to replace the Locking pin after it is recommended that in various ways for the product exterior if there is turned off. Ergonomic It is removed, to maintain an ergonomic and comfortable viewing position, the forward tilt angle of the panel in order to adjust its height. Connecting the Display Before setting up the monitor, ensure that the power to adjust the height. Positioning your display 1.

User Guide
Page 8
.... Connect the audio cable to its highest height. 1 AUDIO OUT 2 1 * Make sure the panel does not touch the floor when rotating. L245WPM Connecting the speaker 1. After connecting the speaker, connect the Audio DC-IN cable to the DC-OUT socket on the back of the speaker in the picture, after lifting the monitor to the AUDIO-OUT terminal. When using HDMI, you hear the clicking sound. 3. D-SUB PR P B COMPONENT Y DC-OUT HDMI/DVI OUT AUDIO...
.... Connect the audio cable to its highest height. 1 AUDIO OUT 2 1 * Make sure the panel does not touch the floor when rotating. L245WPM Connecting the speaker 1. After connecting the speaker, connect the Audio DC-IN cable to the DC-OUT socket on the back of the speaker in the picture, after lifting the monitor to the AUDIO-OUT terminal. When using HDMI, you hear the clicking sound. 3. D-SUB PR P B COMPONENT Y DC-OUT HDMI/DVI OUT AUDIO...

User Guide
Page 9
... the Parts Rear View 9 8 OUT AUDIO 2 1 COMPONENT AC-IN DC-OUT HDMI/DVI Y PB PR D-SUB 7 6 1 23 4 5 1 AC-IN Connector : Connect the Power Cord 2 DC-OUT Jack 3 HDMI/DVI Signal Connector 4 COMPONENT Input Terminal 5 D-SUB Analogue Signal Connector 6 Kensington Security Slot 7 USB UP stream Port(1EA) 8 USB DOWN stream Port(2EA) 9 Audio out Jack(Headset/Earphone/connecting terminal of the Speaker) : You can use the AUDIO-OUT Jack by connecting earphones or a headset when using the HDMI configuration.. *AUDIO...
... the Parts Rear View 9 8 OUT AUDIO 2 1 COMPONENT AC-IN DC-OUT HDMI/DVI Y PB PR D-SUB 7 6 1 23 4 5 1 AC-IN Connector : Connect the Power Cord 2 DC-OUT Jack 3 HDMI/DVI Signal Connector 4 COMPONENT Input Terminal 5 D-SUB Analogue Signal Connector 6 Kensington Security Slot 7 USB UP stream Port(1EA) 8 USB DOWN stream Port(2EA) 9 Audio out Jack(Headset/Earphone/connecting terminal of the Speaker) : You can use the AUDIO-OUT Jack by connecting earphones or a headset when using the HDMI configuration.. *AUDIO...

User Guide
Page 10
Connect the signal cable. Wall-outlet type PC Mac adapter For Apple Macintosh use, a separate plug adapter is a simplified representation OUT AUDIO 2 1 DC-OUT HDMI/DVI COMPONENT Y PB PR D-SUB 2 Power Cord 1 Signal Cable of the rear view. Press the INPUT button at the front side of the monitor. To adjust height of your PC 1. Press button on the front switch panel to two computers. This rear view represents a general model; INPUT RGB HDMI Component Note How to connect to turn the power on...
Connect the signal cable. Wall-outlet type PC Mac adapter For Apple Macintosh use, a separate plug adapter is a simplified representation OUT AUDIO 2 1 DC-OUT HDMI/DVI COMPONENT Y PB PR D-SUB 2 Power Cord 1 Signal Cable of the rear view. Press the INPUT button at the front side of the monitor. To adjust height of your PC 1. Press button on the front switch panel to two computers. This rear view represents a general model; INPUT RGB HDMI Component Note How to connect to turn the power on...
User Guide
Page 11
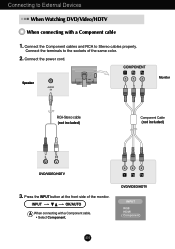
... the monitor. Speaker AUDIO IN DC-OUT HDMI/DVI COMPONENT Y PB PR D-SUB 1 2 AUDIO OUT PB PR PB PR Monitor RCA-Stereo cable (not included) Component Cable (not included) DVD/VIDEO/HDTV 3. INPUT OK/AUTO A When connecting with a Component cable 1. Connect the power cord. Connect the Component cables and RCA to Stereo cables properly. Press the INPUT button at the front side of the same color. 2. PB PR PB PR DVD/VIDEO/HDTV INPUT RGB HDMI Component...
... the monitor. Speaker AUDIO IN DC-OUT HDMI/DVI COMPONENT Y PB PR D-SUB 1 2 AUDIO OUT PB PR PB PR Monitor RCA-Stereo cable (not included) Component Cable (not included) DVD/VIDEO/HDTV 3. INPUT OK/AUTO A When connecting with a Component cable 1. Connect the power cord. Connect the Component cables and RCA to Stereo cables properly. Press the INPUT button at the front side of the same color. 2. PB PR PB PR DVD/VIDEO/HDTV INPUT RGB HDMI Component...
User Guide
Page 12
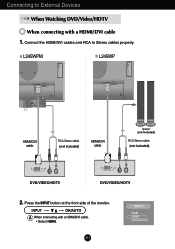
INPUT OK/AUTO A When connecting with a HDMI/DVI cable 1. Connecting to Stereo cables properly. Connect the HDMI/DVI cables and RCA to External Devices When Watching DVD/Video/HDTV When connecting with a HDMI/DVI cable. • Select HDMI. A11 INPUT RGB HDMI Component Press the INPUT button at the front side of the monitor. L245WPM L245WP OUT AUDIO OUT AUDIO 2 2 1 1 COMPONENT DC-OUT HDMI/DVI Y PB PR D-SUB AUDIO IN COMPONENT DC-OUT HDMI/DVI Y PB PR D-SUB HDMI/DVI cable RCA-Stereo cable (not included) HDMI/DVI cable Speaker (not...
INPUT OK/AUTO A When connecting with a HDMI/DVI cable 1. Connecting to Stereo cables properly. Connect the HDMI/DVI cables and RCA to External Devices When Watching DVD/Video/HDTV When connecting with a HDMI/DVI cable. • Select HDMI. A11 INPUT RGB HDMI Component Press the INPUT button at the front side of the monitor. L245WPM L245WP OUT AUDIO OUT AUDIO 2 2 1 1 COMPONENT DC-OUT HDMI/DVI Y PB PR D-SUB AUDIO IN COMPONENT DC-OUT HDMI/DVI Y PB PR D-SUB HDMI/DVI cable RCA-Stereo cable (not included) HDMI/DVI cable Speaker (not...
User Guide
Page 14
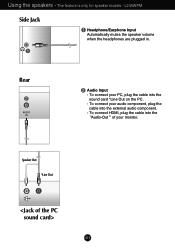
Speaker Out *Line Out A13 To connect your monitor. To connect HDMI, plug the cable into the Audio-Out of your audio component, plug the cable into the sound card *Line Out on the PC. - Using the speakers - The feature is only for speaker models - Rear AUDIO IN Audio Input - To connect your PC, plug the cable into the external audio component. - L245WPM Side Jack Headphone/Earphone Input Automatically mutes the speaker volume when the headphones are plugged in.
Speaker Out *Line Out A13 To connect your monitor. To connect HDMI, plug the cable into the Audio-Out of your audio component, plug the cable into the sound card *Line Out on the PC. - Using the speakers - The feature is only for speaker models - Rear AUDIO IN Audio Input - To connect your PC, plug the cable into the external audio component. - L245WPM Side Jack Headphone/Earphone Input Automatically mutes the speaker volume when the headphones are plugged in.
User Guide
Page 15
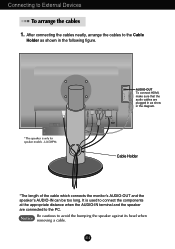
... speaker are plugged in as shown in the diagram. L245WPM DC-OUT HDMI/DVI COMPONENT Y PB PR D-SUB 1 2 OUT AUDIO-OUT To connect HDMI, make sure that the audio cables are connected to the Cable Holder as show in the following figure. After connecting the cables neatly, arrange the cables to the PC. It is only for speaker models - Connecting to avoid the bumping the speaker against its head when removing a cable...
... speaker are plugged in as shown in the diagram. L245WPM DC-OUT HDMI/DVI COMPONENT Y PB PR D-SUB 1 2 OUT AUDIO-OUT To connect HDMI, make sure that the audio cables are connected to the Cable Holder as show in the following figure. After connecting the cables neatly, arrange the cables to the PC. It is only for speaker models - Connecting to avoid the bumping the speaker against its head when removing a cable...
User Guide
Page 16
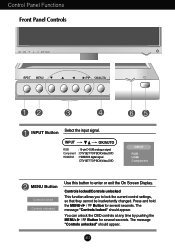
... or exit the On Screen Display. You can unlock the OSD controls at any time by pushing the MENU+ Button for several seconds. Control Panel Functions Front Panel Controls INPUT Button Select the input signal. INPUT OK/AUTO RGB Component HDMI/DVI : 15-pin D-SUB analogue signal : DTV SET-TOP BOX,Video,DVD : HDMI/DVI digital signal DTV SET-TOP BOX,Video,DVD INPUT RGB HDMI Component MENU Button Controls locked Controls unlocked Use this button to lock the current control settings, so that they cannot be inadvertently changed. The message "Controls unlocked" should appear. The...
... or exit the On Screen Display. You can unlock the OSD controls at any time by pushing the MENU+ Button for several seconds. Control Panel Functions Front Panel Controls INPUT Button Select the input signal. INPUT OK/AUTO RGB Component HDMI/DVI : 15-pin D-SUB analogue signal : DTV SET-TOP BOX,Video,DVD : HDMI/DVI digital signal DTV SET-TOP BOX,Video,DVD INPUT RGB HDMI Component MENU Button Controls locked Controls unlocked Use this button to lock the current control settings, so that they cannot be inadvertently changed. The message "Controls unlocked" should appear. The...
User Guide
Page 17
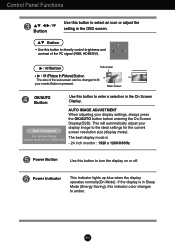
... the OSD screen. If the display is - 24 inch monitor : 1920 x 1200@60Hz Power Button Use this button to amber. Control Panel Functions Button Use this button to enter a selection in the On Screen Display. Button • Use this button to fit your needs Button is pressed. Button Sub screen • (Picture In Picture) Button The size of the sub-screen can be changed to directly control brightness and contrast of the PC signal (RGB, HDMI/DVI). Power Indicator This Indicator lights up blue when the display operates normally(On Mode).
... the OSD screen. If the display is - 24 inch monitor : 1920 x 1200@60Hz Power Button Use this button to amber. Control Panel Functions Button Use this button to enter a selection in the On Screen Display. Button • Use this button to fit your needs Button is pressed. Button Sub screen • (Picture In Picture) Button The size of the sub-screen can be changed to directly control brightness and contrast of the PC signal (RGB, HDMI/DVI). Power Indicator This Indicator lights up blue when the display operates normally(On Mode).
User Guide
Page 20
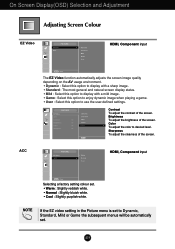
... adjust the clearness of the screen. HDMI, Component input Selecting a factory setting colour set . Color To adjust the color to use the user-defined settings. Brightness To adjust the brightness of the screen. On Screen Display(OSD) Selection and Adjustment Adjusting Screen Colour EZ Video HDMI, Component input ACC The EZ Video function automatically adjusts the screen image quality depending on the AV usage environment. • Dynamic : Select this option to display with a sharp image. • Standard : The most general and natural screen display...
... adjust the clearness of the screen. HDMI, Component input Selecting a factory setting colour set . Color To adjust the color to use the user-defined settings. Brightness To adjust the brightness of the screen. On Screen Display(OSD) Selection and Adjustment Adjusting Screen Colour EZ Video HDMI, Component input ACC The EZ Video function automatically adjusts the screen image quality depending on the AV usage environment. • Dynamic : Select this option to display with a sharp image. • Standard : The most general and natural screen display...
User Guide
Page 22
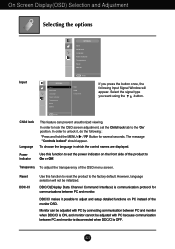
... On or Off. A21 On Screen Display(OSD) Selection and Adjustment Selecting the options Input Input Child Lock Language Power Indicator Transparency Reset DDC-CI Input Child Lock Language Power Indicator Transparency Reset DDC-CI If you want using the button. In order to unlock it possible to the 'On' position. Use this function to reset the product to lock the OSD screen adjustment, set the power indicator on PC instead of the monitor OSD. In order to the factory default.
... On or Off. A21 On Screen Display(OSD) Selection and Adjustment Selecting the options Input Input Child Lock Language Power Indicator Transparency Reset DDC-CI Input Child Lock Language Power Indicator Transparency Reset DDC-CI If you want using the button. In order to unlock it possible to the 'On' position. Use this function to reset the product to lock the OSD screen adjustment, set the power indicator on PC instead of the monitor OSD. In order to the factory default.

User Guide
Page 25
... PC (video card) is connected display connected? Troubleshooting Check the following before calling for several seconds: the message "Controls unlocked" will appear. power indicator blue or green? See the 'Specifications' section of the • Check and see if the power cord is out of the diplay's horizontal or vertical frequency range. Do you push MENU button? • You can unlock the OSD controls at any key on the screen? • This message appears when the signal cable between...
... PC (video card) is connected display connected? Troubleshooting Check the following before calling for several seconds: the message "Controls unlocked" will appear. power indicator blue or green? See the 'Specifications' section of the • Check and see if the power cord is out of the diplay's horizontal or vertical frequency range. Do you push MENU button? • You can unlock the OSD controls at any key on the screen? • This message appears when the signal cable between...
User Guide
Page 26
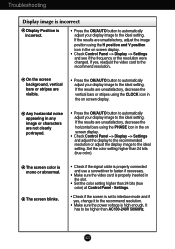
... on screen display. • Check Control Panel --> Display --> Settings and see if the frequency or the resolution were changed. Set the color setting higher than AC100-240V 50/60Hz. Settings. • Check if the screen is set to interlace mode and if yes, change it to the recommend resolution. • Make sure the power voltage is incorrect. • Press the OK/AUTO button to automatically adjust your display image to the ideal setting. A25 On the screen background, vertical bars...
... on screen display. • Check Control Panel --> Display --> Settings and see if the frequency or the resolution were changed. Set the color setting higher than AC100-240V 50/60Hz. Settings. • Check if the screen is set to interlace mode and if yes, change it to the recommend resolution. • Make sure the power voltage is incorrect. • Press the OK/AUTO button to automatically adjust your display image to the ideal setting. A25 On the screen background, vertical bars...
User Guide
Page 27
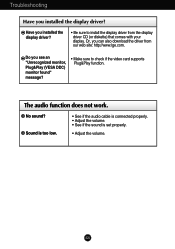
.... Troubleshooting Have you can also download the driver from the display driver CD (or diskette) that comes with your display. Sound is too low. • See if the audio cable is connected properly. • Adjust the volume. • See if the sound is set properly. • Adjust the volume. Do you installed the display driver? • Be sure to check if the video card supports Plug&Play function. A26 No sound? The audio function does not work...
.... Troubleshooting Have you can also download the driver from the display driver CD (or diskette) that comes with your display. Sound is too low. • See if the audio cable is connected properly. • Adjust the volume. • See if the sound is set properly. • Adjust the volume. Do you installed the display driver? • Be sure to check if the video card supports Plug&Play function. A26 No sound? The audio function does not work...

User Guide
Page 28
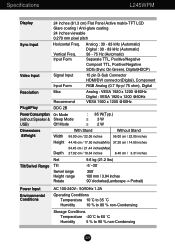
... TTL, Positive/Negative Composit TTL, Positive/Negative SOG (Sync On Green), Digital(HDCP) 15 pin D-Sub Connector HDMI/DVI connector(Digital), Component RGB Analog (0.7 Vp-p/ 75 ohm), Digital Resolution Plug&Play Max Recommend DDC 2B Analog : VESA 1920 x 1200 @60Hz Digital : VESA 1920 x 1200 @60Hz VESA 1920 x 1200 @60Hz PowerConsumption 0n Mode (without USB) Sleep Mode Off Mode : 85 W(Typ.) ≤ 3W ≤ 2W Dimensions &Weight Width Height With Stand 56.00 cm / 22.05 inches 44.45...
... TTL, Positive/Negative Composit TTL, Positive/Negative SOG (Sync On Green), Digital(HDCP) 15 pin D-Sub Connector HDMI/DVI connector(Digital), Component RGB Analog (0.7 Vp-p/ 75 ohm), Digital Resolution Plug&Play Max Recommend DDC 2B Analog : VESA 1920 x 1200 @60Hz Digital : VESA 1920 x 1200 @60Hz VESA 1920 x 1200 @60Hz PowerConsumption 0n Mode (without USB) Sleep Mode Off Mode : 85 W(Typ.) ≤ 3W ≤ 2W Dimensions &Weight Width Height With Stand 56.00 cm / 22.05 inches 44.45...
User Guide
Page 30
Vertical Freq. Specifications L245WPM Display 24 inches (61.3 cm) Flat Panel Active matrix-TFT LCD Glare coating / Anti-glare coating 24 inches viewable 0.270 mm pixel pitch Sync Input Horizontal Freq. Input Form Analog : 30 - 83 kHz (Automatic) Digital : 30 - 83 kHz (Automatic) 56 - 75 Hz (Automatic) Separate TTL, Positive/Negative Composit TTL, Positive/Negative SOG (Sync On Green), Digital(HDCP) Video Input Signal Input Input Form 15 pin D-Sub Connector HDMI/DVI connector(Digital), Component RGB Analog (0.7 Vp-p/ 75 ohm), Digital Resolution Plug&Play Max Recommend...
Vertical Freq. Specifications L245WPM Display 24 inches (61.3 cm) Flat Panel Active matrix-TFT LCD Glare coating / Anti-glare coating 24 inches viewable 0.270 mm pixel pitch Sync Input Horizontal Freq. Input Form Analog : 30 - 83 kHz (Automatic) Digital : 30 - 83 kHz (Automatic) 56 - 75 Hz (Automatic) Separate TTL, Positive/Negative Composit TTL, Positive/Negative SOG (Sync On Green), Digital(HDCP) Video Input Signal Input Input Form 15 pin D-Sub Connector HDMI/DVI connector(Digital), Component RGB Analog (0.7 Vp-p/ 75 ohm), Digital Resolution Plug&Play Max Recommend...
User Guide
Page 34
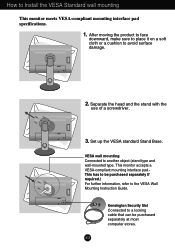
... 3. Set up the VESA standard Stand Base. A33 How to a locking cable that can be purchased separately if required.) For further information, refer to another object (stand type and wall-mounted type. Kensington Security Slot Connected to Install the VESA Standard wall mounting This monitor meets VESA-compliant mounting interface pad specifications. 1. VESA wall mounting Connected to the VESA Wall Mounting Instruction Guide. OUT AUDIO 2 1 DC-OUT HDMI/DVI COMPONENT Y PB PR D-SUB 2. Separate the head and the stand with the use...
... 3. Set up the VESA standard Stand Base. A33 How to a locking cable that can be purchased separately if required.) For further information, refer to another object (stand type and wall-mounted type. Kensington Security Slot Connected to Install the VESA Standard wall mounting This monitor meets VESA-compliant mounting interface pad specifications. 1. VESA wall mounting Connected to the VESA Wall Mounting Instruction Guide. OUT AUDIO 2 1 DC-OUT HDMI/DVI COMPONENT Y PB PR D-SUB 2. Separate the head and the stand with the use...


