

Owners Manual
Page 4
... its service agent or a similar qualified person in order to pinch, crush, or damage the power supply line. • Do not install the appliance in humid spaces. • Destroy the carton, plastic bag, and other appliance. Operation • Repair or immediately replace all hot water faucets and let the water flow from the appliance, unplug it immediately, and contact an LG Electronics customer information...
... its service agent or a similar qualified person in order to pinch, crush, or damage the power supply line. • Do not install the appliance in humid spaces. • Destroy the carton, plastic bag, and other appliance. Operation • Repair or immediately replace all hot water faucets and let the water flow from the appliance, unplug it immediately, and contact an LG Electronics customer information...

Owners Manual
Page 5
... buttons with the handles up to reduce the risk of cuts or other flammable materials. • When cleaning, do not spray water on and check the connections. • Do not open the appliance door while it is removed from the dishwasher. Use only authorized factory parts. • Do not disassemble or repair the appliance by qualified service personnel unless specifically recommended in this appliance from the power supply...
... buttons with the handles up to reduce the risk of cuts or other flammable materials. • When cleaning, do not spray water on and check the connections. • Do not open the appliance door while it is removed from the dishwasher. Use only authorized factory parts. • Do not disassemble or repair the appliance by qualified service personnel unless specifically recommended in this appliance from the power supply...
Owners Manual
Page 8
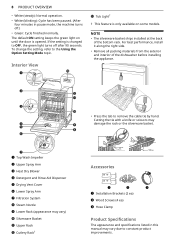
... Wash Impeller b Upper Spray Arm c Heat Dry Blower d Detergent and Rinse Aid Dispenser e Drying Vent Cover f Lower Spray Arm g Filtration System h Steam Nozzle i Lower Rack (appearance may vary) j Silverware Basket k Upper Rack l Cutlery Rack† Accessories a b c a Installation Brackets (2 ea) b Wood Screws (4 ea) c Hose Clamp Product Specifications The appearance and specifications listed in pause mode, the machine turns off after 90 seconds. The default ON setting keeps the green light on until the door is only available on some models. If the setting is changed to...
... Wash Impeller b Upper Spray Arm c Heat Dry Blower d Detergent and Rinse Aid Dispenser e Drying Vent Cover f Lower Spray Arm g Filtration System h Steam Nozzle i Lower Rack (appearance may vary) j Silverware Basket k Upper Rack l Cutlery Rack† Accessories a b c a Installation Brackets (2 ea) b Wood Screws (4 ea) c Hose Clamp Product Specifications The appearance and specifications listed in pause mode, the machine turns off after 90 seconds. The default ON setting keeps the green light on until the door is only available on some models. If the setting is changed to...

Owners Manual
Page 10
... notice. This Guide is for 16-Gauge Wiring h Hose Clamp i UL Approved Strain Relief Tools Needed a b c d e f a b c g h i j k l Parts not Provided d e f g h i a Electrical Cable • 16 AWG, with each dishwasher. copper tubing or stainless steel braided water supply line c Fittings for Tube d Coupler e Electrical Tape f Air Gap g Wire Nuts for reference only. English https://www.lg.com/us/support/video-tutorials/lgdishwasher-installation-CT100000091366643457088 French https://www.lg.com/ca_fr/soutien/aide-produit/ CT20100059...
... notice. This Guide is for 16-Gauge Wiring h Hose Clamp i UL Approved Strain Relief Tools Needed a b c d e f a b c g h i j k l Parts not Provided d e f g h i a Electrical Cable • 16 AWG, with each dishwasher. copper tubing or stainless steel braided water supply line c Fittings for Tube d Coupler e Electrical Tape f Air Gap g Wire Nuts for reference only. English https://www.lg.com/us/support/video-tutorials/lgdishwasher-installation-CT100000091366643457088 French https://www.lg.com/ca_fr/soutien/aide-produit/ CT20100059...
Owners Manual
Page 12
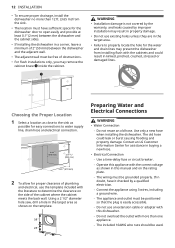
... rating plate. - Choosing the Proper Location 1 Select a location as close to the sink as possible for easy connections to water supply line, drain hose and electrical connection. 2 To allow for proper clearance of plumbing and electrical, use the template included with the literature to determine the clearance on the side of obstructions. • For flush installations only, you may remove the cabinet brace a inside the cabinet. Use only a new hose when installing the dishwasher. Operate...
... rating plate. - Choosing the Proper Location 1 Select a location as close to the sink as possible for easy connections to water supply line, drain hose and electrical connection. 2 To allow for proper clearance of plumbing and electrical, use the template included with the literature to determine the clearance on the side of obstructions. • For flush installations only, you may remove the cabinet brace a inside the cabinet. Use only a new hose when installing the dishwasher. Operate...

Owners Manual
Page 13
... leaks. CAUTION • When connecting the dishwasher water supply line to the house water supply, sealing tape or compound should not exceed 149 °F (65 ℃). • Water supply pressure must be used on the right side of the product owner to a hot water supply with a temperature range between 20 psi and 80 psi (140-550 kPa). Routing Water Supply Line and Electrical Wiring There are 2 channels in the bottom of the inlet valve...
... leaks. CAUTION • When connecting the dishwasher water supply line to the house water supply, sealing tape or compound should not exceed 149 °F (65 ℃). • Water supply pressure must be used on the right side of the product owner to a hot water supply with a temperature range between 20 psi and 80 psi (140-550 kPa). Routing Water Supply Line and Electrical Wiring There are 2 channels in the bottom of the inlet valve...

Owners Manual
Page 23
... detergent. 3 Turn on the dishwasher. • To turn on the display panel, press the Power button. 4 Check the rinse aid. • The Rinse Aid Refill LED will show ENd until the door is desired, the recess on some models) flashes, an audible tone is heard, and the cycle does not start . 7 End of cycle. • When the cycle is complete, a chime will sound and the display will stop. ENGLISH NOTE • Connect to operate the dishwasher...
... detergent. 3 Turn on the dishwasher. • To turn on the display panel, press the Power button. 4 Check the rinse aid. • The Rinse Aid Refill LED will show ENd until the door is desired, the recess on some models) flashes, an audible tone is heard, and the cycle does not start . 7 End of cycle. • When the cycle is complete, a chime will sound and the display will stop. ENGLISH NOTE • Connect to operate the dishwasher...

Owners Manual
Page 26
... Using the Option Setting Mode topic. • 8:88 : Digital Display - During operation, the display shows the remaining estimated operating time. To start a new cycle, deactivate Control Lock. • Sanitized - Once the dishwasher finishes draining, the power turns off. • Press and hold Remote Start for the Power button, on some models. • The front time indicator feature shows the remaining cycle time while the cycle is running , press and hold Night Dry and Delay Start simultaneously for heating water, etc. • If Delay Start...
... Using the Option Setting Mode topic. • 8:88 : Digital Display - During operation, the display shows the remaining estimated operating time. To start a new cycle, deactivate Control Lock. • Sanitized - Once the dishwasher finishes draining, the power turns off. • Press and hold Remote Start for the Power button, on some models. • The front time indicator feature shows the remaining cycle time while the cycle is running , press and hold Night Dry and Delay Start simultaneously for heating water, etc. • If Delay Start...
Owners Manual
Page 27
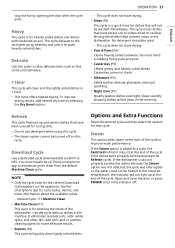
... indicator will be turned off . Open and close the door or press POWER to clean delicate items such as fine china and stemware. 1 Hour This cycle will clean and dry lightly soiled dishes in the machine. This cycle defaults to download cycles other dirt. You must install the LG ThinQ smartphone app to the strongest spray intensity and uses it sparkling. • Night Care (P7) Quietly washes dishes overnight. Delicate Use this cycle. The cycle rinses dishes that...
... indicator will be turned off . Open and close the door or press POWER to clean delicate items such as fine china and stemware. 1 Hour This cycle will clean and dry lightly soiled dishes in the machine. This cycle defaults to download cycles other dirt. You must install the LG ThinQ smartphone app to the strongest spray intensity and uses it sparkling. • Night Care (P7) Quietly washes dishes overnight. Delicate Use this cycle. The cycle rinses dishes that...
Owners Manual
Page 28
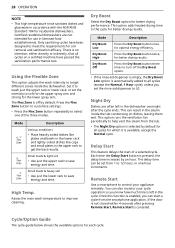
... drying performance. Each time the Delay Start button is canceled. The delay time can also monitor your appliance remotely. Remote Start Use a smartphone to soft for the upper spray arm and strong for soil removal and sanitization efficacy. If the door is not closed within 4 seconds after the cycle ends. Cycle/Option Guide The cycle guide below shows the available options for which it to wash just the upper rack or lower rack, or set the intensity to control your cycle operation...
... drying performance. Each time the Delay Start button is canceled. The delay time can also monitor your appliance remotely. Remote Start Use a smartphone to soft for the upper spray arm and strong for soil removal and sanitization efficacy. If the door is not closed within 4 seconds after the cycle ends. Cycle/Option Guide The cycle guide below shows the available options for which it to wash just the upper rack or lower rack, or set the intensity to control your cycle operation...

Owners Manual
Page 35
... release the rack and lower it stops. ENGLISH on both sides, the dishwasher door will not shut and the upper spray arm will not connect to the water inlet. Removing the Snap-In Gliding Upper Rack This feature is moved to rotate. • When the upper rack is in the lower position, make sure the rack and the spray arm do not hit the items on the lower rack. • When the upper rack is...
... release the rack and lower it stops. ENGLISH on both sides, the dishwasher door will not shut and the upper spray arm will not connect to the water inlet. Removing the Snap-In Gliding Upper Rack This feature is moved to rotate. • When the upper rack is in the lower position, make sure the rack and the spray arm do not hit the items on the lower rack. • When the upper rack is...

Owners Manual
Page 44
... using a stainless steel cleaner. Cleaning the Interior • Clean the interior of the dishwasher periodically with WARNING • When cleaning the outside of the dishwasher according to the MAINTENANCE instructions. Cleaning and Care Cleaning the Exterior • Do not use it could damage the appliance.) • Using Machine Clean - NOTE • Run the Machine Clean (Download Cycle: P1) cycle once a month, or more often if needed, to remove detergent buildup and other dirt inside by running the Machine Clean (Download Cycle...
... using a stainless steel cleaner. Cleaning the Interior • Clean the interior of the dishwasher periodically with WARNING • When cleaning the outside of the dishwasher according to the MAINTENANCE instructions. Cleaning and Care Cleaning the Exterior • Do not use it could damage the appliance.) • Using Machine Clean - NOTE • Run the Machine Clean (Download Cycle: P1) cycle once a month, or more often if needed, to remove detergent buildup and other dirt inside by running the Machine Clean (Download Cycle...
Owners Manual
Page 49
... service. TROUBLESHOOTING TROUBLESHOOTING 49 The washer is equipped with an automatic error-monitoring system to detect and diagnose problems at all of the dishes inside to remain wet once the cycle finishes. Run a Machine Clean (Download Cycle: P1) cycle. If the water supply is necessary for recommended detergent amounts. A: Measure 3 tbsp. (40 g) of rinse aid used ? Water tends to work will cause all , check the following before the dry cycle begins. If the door is opened...
... service. TROUBLESHOOTING TROUBLESHOOTING 49 The washer is equipped with an automatic error-monitoring system to detect and diagnose problems at all of the dishes inside to remain wet once the cycle finishes. Run a Machine Clean (Download Cycle: P1) cycle. If the water supply is necessary for recommended detergent amounts. A: Measure 3 tbsp. (40 g) of rinse aid used ? Water tends to work will cause all , check the following before the dry cycle begins. If the door is opened...

Owners Manual
Page 50
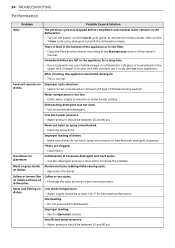
... the controls from being changed during the wash and rinse cycles to use a 5/8" or 7/8" inside . Q: Should I add an extension to enhance the drying performance. The dishwasher washes dishes clean without pre-rinsing. A: This is required to the drain hose? If the door is drained out. When this moisture condenses into humidity. Q: What kinds of dishes can be necessary to adjust the water valve to pre-rinse the dishes before loading them? A: To drain standing water, press...
... the controls from being changed during the wash and rinse cycles to use a 5/8" or 7/8" inside . Q: Should I add an extension to enhance the drying performance. The dishwasher washes dishes clean without pre-rinsing. A: This is required to the drain hose? If the door is drained out. When this moisture condenses into humidity. Q: What kinds of dishes can be necessary to adjust the water valve to pre-rinse the dishes before loading them? A: To drain standing water, press...

Owners Manual
Page 51
... Error Messages Problem IE OE bE AE FE Possible Cause & Solution Water inlet problem. • Check for a clogged, kinked or frozen water drain hose. Water leakage • Turn off to level dishwasher. • Make sure that the appliance is clogged. • Clean air gap or disposal. Oversudsing caused by improper detergent, such as whipped cream, are loaded in the appliance. Excessive Water supplied. • Please call an LG Electronics Customer Information...
... Error Messages Problem IE OE bE AE FE Possible Cause & Solution Water inlet problem. • Check for a clogged, kinked or frozen water drain hose. Water leakage • Turn off to level dishwasher. • Make sure that the appliance is clogged. • Clean air gap or disposal. Oversudsing caused by improper detergent, such as whipped cream, are loaded in the appliance. Excessive Water supplied. • Please call an LG Electronics Customer Information...

Owners Manual
Page 53
... Installation section. Nozzle arm knocking against dishes. • Reposition the dishes. Wrong detergent used. • If excessive sudsing is crooked. Upper rack is causing the leak, allow the foam to cold water. • Check the water supply connection or water heater setting. (Heating cold water takes longer.) Drain hose is poorly adjusted. • See the Height Adjustable Upper Rack section. Dishwasher continuously chimes when the door is opened , during operation. • Detergent cover opening. • Drain pump at the beginning of cycle...
... Installation section. Nozzle arm knocking against dishes. • Reposition the dishes. Wrong detergent used. • If excessive sudsing is crooked. Upper rack is causing the leak, allow the foam to cold water. • Check the water supply connection or water heater setting. (Heating cold water takes longer.) Drain hose is poorly adjusted. • See the Height Adjustable Upper Rack section. Dishwasher continuously chimes when the door is opened , during operation. • Detergent cover opening. • Drain pump at the beginning of cycle...
Owners Manual
Page 54
... residual water remains in the dishwasher. • Turn on the power, run the Cancel cycle option to remove the residual water, then run the 1 Hour cycle using a stain removal product. Water jet holes on inside surfaces of dishes. • Make sure dishes do not block spray arm rotation or interfere with detergent dispenser. Yellow or brown film on spray arms blocked. • Clean the spray arms. Improper loading of dishwasher. Combination of excessive detergent and hard water. • Use less detergent and use it...
... residual water remains in the dishwasher. • Turn on the power, run the Cancel cycle option to remove the residual water, then run the 1 Hour cycle using a stain removal product. Water jet holes on inside surfaces of dishes. • Make sure dishes do not block spray arm rotation or interfere with detergent dispenser. Yellow or brown film on spray arms blocked. • Clean the spray arms. Improper loading of dishwasher. Combination of excessive detergent and hard water. • Use less detergent and use it...
Owners Manual
Page 57
...: LG Electronics Customer Service P.O. Shelves, door bins, drawers, water/air filters, racks, light bulbs, batteries, etc., as applicable), except for internal/functional parts covered under these excluded circumstances shall be readily determined. • Increases in utility costs and additional utility expenses. • Any noises associated with normal operation. • Products used for other than normal and proper household use (e.g., commercial or industrial use of parts, components, accessories, consumable cleaning products, or...
...: LG Electronics Customer Service P.O. Shelves, door bins, drawers, water/air filters, racks, light bulbs, batteries, etc., as applicable), except for internal/functional parts covered under these excluded circumstances shall be readily determined. • Increases in utility costs and additional utility expenses. • Any noises associated with normal operation. • Products used for other than normal and proper household use (e.g., commercial or industrial use of parts, components, accessories, consumable cleaning products, or...
Owners Manual
Page 61
...; Replacement of light bulbs, filters, fuses or any other consumable parts; • Costs associated with the above excluded circumstances, listed under this Limited Warranty. • Coverage for "in Home" repairs, for other than the intended household purpose/use of the Product, or damage or failure resulting from any water leakage due to the instructions outlined in -warranty, will be provided if the Product is located...
...; Replacement of light bulbs, filters, fuses or any other consumable parts; • Costs associated with the above excluded circumstances, listed under this Limited Warranty. • Coverage for "in Home" repairs, for other than the intended household purpose/use of the Product, or damage or failure resulting from any water leakage due to the instructions outlined in -warranty, will be provided if the Product is located...
Owners Manual
Page 64
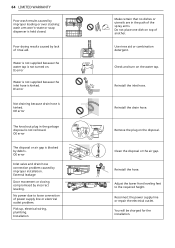
... error Not draining because drain hose is kinked. OE error Inlet valve and drain hose connection problem caused by incorrect leveling. Adjust the lower front leveling feet to loose connection of power supply line or electrical outlet problem. You will be charged for the installation. OE error The knockout plug in the path of the spray arms. Do not place one dish on . No power due to the required height. Check and turn on the disposal. Pick-up, electrical wiring, plumbing. Remove...
... error Not draining because drain hose is kinked. OE error Inlet valve and drain hose connection problem caused by incorrect leveling. Adjust the lower front leveling feet to loose connection of power supply line or electrical outlet problem. You will be charged for the installation. OE error The knockout plug in the path of the spray arms. Do not place one dish on . No power due to the required height. Check and turn on the disposal. Pick-up, electrical wiring, plumbing. Remove...


