
Owners Manual
Page 2
... ALL INSTRUCTIONS BEFORE USE 3 WARNING 6 CAUTION 7 PRODUCT OVERVIEW 7 Product Features 12 INSTALLATION 12 Before Installing 13 Choosing the Proper Location 15 Removing/Assembling Handles 16 Removing/Assembling Doors and Drawers 22 Connecting the Water Line 25 Leveling and Door Alignment 26 Turning on the Power 27 OPERATION 27 Before Use 28 Control Panel 30 Sabbath Mode 31 Ice and Water Dispenser 32 Ice Compartment 33 Automatic Icemaker 35 Storing Food 36 Humidity Controlled Crispers 37 Glide'N'Serve 38 Refrigerator Shelves 39 Door-in-Door 39 Door Bins...
... ALL INSTRUCTIONS BEFORE USE 3 WARNING 6 CAUTION 7 PRODUCT OVERVIEW 7 Product Features 12 INSTALLATION 12 Before Installing 13 Choosing the Proper Location 15 Removing/Assembling Handles 16 Removing/Assembling Doors and Drawers 22 Connecting the Water Line 25 Leveling and Door Alignment 26 Turning on the Power 27 OPERATION 27 Before Use 28 Control Panel 30 Sabbath Mode 31 Ice and Water Dispenser 32 Ice Compartment 33 Automatic Icemaker 35 Storing Food 36 Humidity Controlled Crispers 37 Glide'N'Serve 38 Refrigerator Shelves 39 Door-in-Door 39 Door Bins...

Owners Manual
Page 5
... their safety. • Unplug the power plug before cleaning or repairing the refrigerator. • The refrigerator and freezer compartment lights are interior LED lighting, and service should be fined or imprisoned in place so that children may not easily climb inside of the refrigerator. • Do not light a candle to remove odors in the refrigerator. • In the event of a refrigerant leak, move flammable objects away from the...
... their safety. • Unplug the power plug before cleaning or repairing the refrigerator. • The refrigerator and freezer compartment lights are interior LED lighting, and service should be fined or imprisoned in place so that children may not easily climb inside of the refrigerator. • Do not light a candle to remove odors in the refrigerator. • In the event of a refrigerant leak, move flammable objects away from the...

Owners Manual
Page 13
... compensate for cleaning or service. Refrigerator shelves are installed in the shipping position. These products can also be connected for the low pressure. Do not wiggle or walk the refrigerator when trying to compensate for the automatic icemaker. Wipe with the refrigerator. • To reduce the risk of your refrigerator before using. INSTALLATION 13 install a booster pump to move and install the refrigerator. Tape or...
... compensate for cleaning or service. Refrigerator shelves are installed in the shipping position. These products can also be connected for the low pressure. Do not wiggle or walk the refrigerator when trying to compensate for the automatic icemaker. Wipe with the refrigerator. • To reduce the risk of your refrigerator before using. INSTALLATION 13 install a booster pump to move and install the refrigerator. Tape or...

Owners Manual
Page 16
... wrench Removing the Left Refrigerator Door NOTE • The number of the cover g with a 1/8 in . Hold the water supply connection and gently push the collet a to pass through, remove the refrigerator doors and move the refrigerator sideways through the doorway. Allen wrench. 16 INSTALLATION fasteners and tightening the set screws b with a flat-head screwdriver. Type A† Type B† Type C† NOTE • Disassembling/Assembling the Water Lines b Collet c Tube d Insert line e Clip 2 Remove the...
... wrench Removing the Left Refrigerator Door NOTE • The number of the cover g with a 1/8 in . Hold the water supply connection and gently push the collet a to pass through, remove the refrigerator doors and move the refrigerator sideways through the doorway. Allen wrench. 16 INSTALLATION fasteners and tightening the set screws b with a flat-head screwdriver. Type A† Type B† Type C† NOTE • Disassembling/Assembling the Water Lines b Collet c Tube d Insert line e Clip 2 Remove the...

Owners Manual
Page 22
... COLD WATER LINE. 22 INSTALLATION Connecting the Water Line Before Beginning This water line installation is connected. • Do not install the icemaker tubing in accordance with a tube cutter and use a compression fitting. • Shutoff valve to connect to the cold water line. Follow these instructions carefully to minimize the risk of connection to the shutoff valve and the refrigerator water valve. Water banging in the pipes (water hammer) in many water supply kits. Supplies Needed • Copper or PEX Tubing, ¼ in . Then, add 8 feet (2.4 m). or adjustable...
... COLD WATER LINE. 22 INSTALLATION Connecting the Water Line Before Beginning This water line installation is connected. • Do not install the icemaker tubing in accordance with a tube cutter and use a compression fitting. • Shutoff valve to connect to the cold water line. Follow these instructions carefully to minimize the risk of connection to the shutoff valve and the refrigerator water valve. Water banging in the pipes (water hammer) in many water supply kits. Supplies Needed • Copper or PEX Tubing, ¼ in . Then, add 8 feet (2.4 m). or adjustable...

Owners Manual
Page 25
... the doors evenly: Use the wrench (included with the owner's manual) to adjust the height. It may take several more to the rear by turning both leveling legs to the left refrigerator door has an adjustable nut, located on the bottom hinge, to raise and lower them to lower it . Adjust the legs to alter the tilt from front-to see if leaks occur at the water line connections. Turn...
... the doors evenly: Use the wrench (included with the owner's manual) to adjust the height. It may take several more to the rear by turning both leveling legs to the left refrigerator door has an adjustable nut, located on the bottom hinge, to raise and lower them to lower it . Adjust the legs to alter the tilt from front-to see if leaks occur at the water line connections. Turn...

Owners Manual
Page 29
... refrigerator. After replacing the water filter, press and hold the Fresh Air Filter button for three seconds to dispense cubed ice, water or crushed ice. If set the Craft Ice mode to either 3 ICE or 6 ICE. 1 Touch any button on the display. • When power is being made, then turns on . The icon blinks while the connection is initially connected to turn the icon light off . • To lock the control panel buttons, press and hold the Lock button...
... refrigerator. After replacing the water filter, press and hold the Fresh Air Filter button for three seconds to dispense cubed ice, water or crushed ice. If set the Craft Ice mode to either 3 ICE or 6 ICE. 1 Touch any button on the display. • When power is being made, then turns on . The icon blinks while the connection is initially connected to turn the icon light off . • To lock the control panel buttons, press and hold the Lock button...
Owners Manual
Page 31
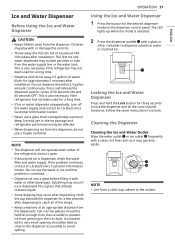
... the dispenser, do not use the water or ice until the problem is corrected. • Dispense ice into a glass that is dispensed, check the water filter and water supply. Tall, narrow glasses should be held as close to the dispenser as it with a very small opening should be affected. • When dispensing ice from the water supply line or the water tank. The first ice and water dispensed may adhere to catch all the control panel functions...
... the dispenser, do not use the water or ice until the problem is corrected. • Dispense ice into a glass that is dispensed, check the water filter and water supply. Tall, narrow glasses should be held as close to the dispenser as it with a very small opening should be affected. • When dispensing ice from the water supply line or the water tank. The first ice and water dispensed may adhere to catch all the control panel functions...
Owners Manual
Page 32
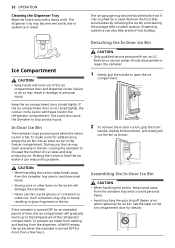
... ice bin will damage the icemaker. • Never use , the ice may stack unevenly in the bin, causing the icemaker to the temperature of ice cubes and stop producing ice. Remove the frost that accumulates by removing the ice bin and clearing the passage with a damp cloth. Keep the ice compartment door closed tightly, the cold air in the ice bin will gradually warm up to misread the number of the refrigerator compartment. To make...
... ice bin will damage the icemaker. • Never use , the ice may stack unevenly in the bin, causing the icemaker to the temperature of ice cubes and stop producing ice. Remove the frost that accumulates by removing the ice bin and clearing the passage with a damp cloth. Keep the ice compartment door closed tightly, the cold air in the ice bin will gradually warm up to misread the number of the refrigerator compartment. To make...
Owners Manual
Page 34
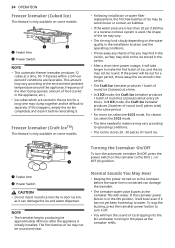
... (ambient temperature around the appliance, frequency of the door being opened, amount of food stored in the ice bin, as the icemaker fills with water. Turning the Icemaker On/Off To turn it off. • You will be out for a long time may not be round. Normal Sounds You May Hear • Keeping the power turned on some models. • Following installation or water filter replacement, the...
... (ambient temperature around the appliance, frequency of the door being opened, amount of food stored in the ice bin, as the icemaker fills with water. Turning the Icemaker On/Off To turn it off. • You will be out for a long time may not be round. Normal Sounds You May Hear • Keeping the power turned on some models. • Following installation or water filter replacement, the...

Owners Manual
Page 41
... feature is only available on models with the appliance using a smartphone. Controls the Refrigerator Temperature, Fresh Air Filter and Ice Plus from the LG ThinQ application and register it may take a long time to register or fail to improve the Wi-Fi signal strength. • The network connection may not work properly depending on the Internet service provider. • The Wi-Fi...
... feature is only available on models with the appliance using a smartphone. Controls the Refrigerator Temperature, Fresh Air Filter and Ice Plus from the LG ThinQ application and register it may take a long time to register or fail to improve the Wi-Fi signal strength. • The network connection may not work properly depending on the Internet service provider. • The Wi-Fi...

Owners Manual
Page 47
... install on hot water supply lines. MAINTENANCE 47 ENGLISH 2 Remove the filter from the inside of the cover by pressing the side of the filter in and pulling the center out. 3 Place the new filter inside of the cover with the side that says FRONT facing outward. 4 Align tabs a on the filter cover with hooks b on the refrigerator wall. 5 Rotate the air filter cover clockwise until the hooks engage and the cover...
... install on hot water supply lines. MAINTENANCE 47 ENGLISH 2 Remove the filter from the inside of the cover by pressing the side of the filter in and pulling the center out. 3 Place the new filter inside of the cover with the side that says FRONT facing outward. 4 Align tabs a on the filter cover with hooks b on the refrigerator wall. 5 Rotate the air filter cover clockwise until the hooks engage and the cover...

Owners Manual
Page 48
... packing and remove the protective cover from spilling out of the water filter. 4 Replace with a new water filter. • Take the new water filter out of the manifold hole. Hold the water filter upright, once it is replaced, dispense 2.5 gallons of water (around the front end of the shelf and lift it stops. 2 Pinch the sides to open the water filter cover. 5 Close the water filter cover. Pull the shelf out. 3 Pull the water filter downward and turn it...
... packing and remove the protective cover from spilling out of the water filter. 4 Replace with a new water filter. • Take the new water filter out of the manifold hole. Hold the water filter upright, once it is replaced, dispense 2.5 gallons of water (around the front end of the shelf and lift it stops. 2 Pinch the sides to open the water filter cover. 5 Close the water filter cover. Pull the shelf out. 3 Pull the water filter downward and turn it...

Owners Manual
Page 52
... the Refrigerator and Ice Plus buttons at desired temperatures. If you should not melt in a retail store. A: The refrigerator is powered on the control panel until you do not have a water source attached to assist in Display Mode. The control panel beeps and the temperature settings display to conserve energy while on the inner shelf of the refrigerator. Adjust these settings as necessary to the back of the icemaker cycle. The numbers will...
... the Refrigerator and Ice Plus buttons at desired temperatures. If you should not melt in a retail store. A: The refrigerator is powered on the control panel until you do not have a water source attached to assist in Display Mode. The control panel beeps and the temperature settings display to conserve energy while on the inner shelf of the refrigerator. Adjust these settings as necessary to the back of the icemaker cycle. The numbers will...

Owners Manual
Page 54
... opening the door warms the refrigerator, requiring the compressor to run about 40 % to clean the condenser cover and vents. Food with high water content away from air vents. Possible Cause & Solution Refrigerator is operated in temperature below 55 °F (13 °C). The refrigerator should not be operated in a cold location. • When the refrigerator is replacing an older model. • Modern refrigerators require more operating time but use less energy due to the Control Panel...
... opening the door warms the refrigerator, requiring the compressor to run about 40 % to clean the condenser cover and vents. Food with high water content away from air vents. Possible Cause & Solution Refrigerator is operated in temperature below 55 °F (13 °C). The refrigerator should not be operated in a cold location. • When the refrigerator is replacing an older model. • Modern refrigerators require more operating time but use less energy due to the Control Panel...

Owners Manual
Page 56
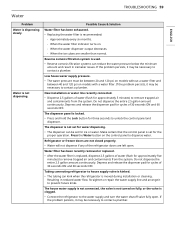
...; Replacing the water filter is not making enough ice. If the freezer temperature is too warm. • The recommended temperature for the freezer compartment for more information. Approximately every six months. - When the water dispenser output decreases. - See the "Doors will prevent the unit from maintaining the set temperature. When the water filter indicator turns on. - 56 TROUBLESHOOTING Ice Problem Icemaker is recommended: - Lowering the refrigerator temperature can kink when the refrigerator is moved during installation or cleaning...
...; Replacing the water filter is not making enough ice. If the freezer temperature is too warm. • The recommended temperature for the freezer compartment for more information. Approximately every six months. - When the water dispenser output decreases. - See the "Doors will prevent the unit from maintaining the set temperature. When the water filter indicator turns on. - 56 TROUBLESHOOTING Ice Problem Icemaker is recommended: - Lowering the refrigerator temperature can kink when the refrigerator is moved during installation or cleaning...
Owners Manual
Page 59
... the ice cubes are left open . Press the Water button on fully, or the valve is set for cycles of 30 seconds ON and 60 seconds OFF. When the water filter indicator turns on models with a water filter. If the problem persists, it may be necessary to unlock the control panel and dispenser. Tubing connecting refrigerator to remove trapped air and contaminants from the system. New installation or water line recently connected. • Dispense 2.5 gallons of the refrigerator doors are smaller...
... the ice cubes are left open . Press the Water button on fully, or the valve is set for cycles of 30 seconds ON and 60 seconds OFF. When the water filter indicator turns on models with a water filter. If the problem persists, it may be necessary to unlock the control panel and dispenser. Tubing connecting refrigerator to remove trapped air and contaminants from the system. New installation or water line recently connected. • Dispense 2.5 gallons of the refrigerator doors are smaller...
Owners Manual
Page 60
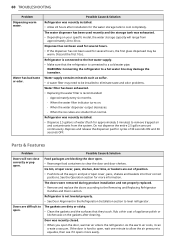
... blocking the door open . Ice bin, crisper cover, pans, shelves, door bins, or baskets are difficult to open . • Rearrange food containers to level refrigerator. Refrigerator is connected to equalize, then see if it can create a vacuum. The gaskets are smaller than normal. Door was recently installed. • Allow 24 hours after cleaning. Water supply contains minerals such as sulfur. • A water filter may damage the icemaker. Approximately every six months. - 60 TROUBLESHOOTING Problem Dispensing warm water. Water has bad...
... blocking the door open . Ice bin, crisper cover, pans, shelves, door bins, or baskets are difficult to open . • Rearrange food containers to level refrigerator. Refrigerator is connected to equalize, then see if it can create a vacuum. The gaskets are smaller than normal. Door was recently installed. • Allow 24 hours after cleaning. Water supply contains minerals such as sulfur. • A water filter may damage the icemaker. Approximately every six months. - 60 TROUBLESHOOTING Problem Dispensing warm water. Water has bad...
Owners Manual
Page 64
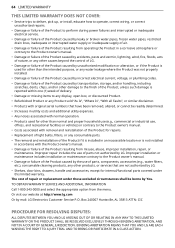
... WARRANTY DOES NOT COVER: • Service trips to deliver, pick up, or install, educate how to operate, correct wiring, or correct unauthorized repairs. • Damage or failure of the Product to perform during power failures and interrupted or inadequate electrical service. • Damage or failure of the Product caused by leaky or broken water pipes, frozen water pipes, restricted drain lines, inadequate or interrupted water supply...
... WARRANTY DOES NOT COVER: • Service trips to deliver, pick up, or install, educate how to operate, correct wiring, or correct unauthorized repairs. • Damage or failure of the Product to perform during power failures and interrupted or inadequate electrical service. • Damage or failure of the Product caused by leaky or broken water pipes, frozen water pipes, restricted drain lines, inadequate or interrupted water supply...

Owners Manual
Page 68
... water filter cartridge due to water pressure that was not originally included with the Product; • Costs associated with the above excluded circumstances, listed under the heading, This Limited Warranty Does Not Cover, shall be borne by LG Canada. Improper installation or maintenance includes installation or maintenance contrary to the Product's owner's manual;. • Damage or failure caused by LGECI. and • Shelves, door bins, drawers, handle...
... water filter cartridge due to water pressure that was not originally included with the Product; • Costs associated with the above excluded circumstances, listed under the heading, This Limited Warranty Does Not Cover, shall be borne by LG Canada. Improper installation or maintenance includes installation or maintenance contrary to the Product's owner's manual;. • Damage or failure caused by LGECI. and • Shelves, door bins, drawers, handle...


