Owner's Manual
Page 1
LRE3012ST LRE3012SB LRE3012SW P/No.: MFL57206006 www.lg.com ENGLISH ESPAÑOL OWNER'S MANUAL & COOKING GUIDE ELECTRIC RANGE Please read this owner's manual thoroughly before operating.
LRE3012ST LRE3012SB LRE3012SW P/No.: MFL57206006 www.lg.com ENGLISH ESPAÑOL OWNER'S MANUAL & COOKING GUIDE ELECTRIC RANGE Please read this owner's manual thoroughly before operating.
Owner's Manual
Page 2
... model number and serial number of this unit. Important safety instructions 3-7 SURFACE CONTROLS COOKING 8-11 - Operating the warming zone 10 - Parts and features 13 - Setting the timer on /off 15 - Options 16-17 • Changing hour mode on clock (12hr, 24hr) • Setting temperature unit ("F" or "C") • Setting beeper volume • Setting preheating alarm light on/off oven door ......29 TROUBLESHOOTING 30-33 - Setting bake 18 - Setting timed bake 19 - Setting delayed timed bake 20 - Setting broil 20 - Recommended broiling guide 21 - Setting...
... model number and serial number of this unit. Important safety instructions 3-7 SURFACE CONTROLS COOKING 8-11 - Operating the warming zone 10 - Parts and features 13 - Setting the timer on /off 15 - Options 16-17 • Changing hour mode on clock (12hr, 24hr) • Setting temperature unit ("F" or "C") • Setting beeper volume • Setting preheating alarm light on/off oven door ......29 TROUBLESHOOTING 30-33 - Setting bake 18 - Setting timed bake 19 - Setting delayed timed bake 20 - Setting broil 20 - Recommended broiling guide 21 - Setting...
Owner's Manual
Page 3
... the anti-tip bracket. • Refer to the installation manual for range-top service without breaking due to cover the surface unit heating element. Install the Anti-Tip Bracket packed with one or more surface units of clothing. The range could be tipped and injury might result from the wall for cleaning, service, or any part of glass, glass/ceramic, ceramic, earthenware, or other servicing should be positioned so that it forward. SURFACE COOKING UNITS • Use Proper Pan Sizes. To...
... the anti-tip bracket. • Refer to the installation manual for range-top service without breaking due to cover the surface unit heating element. Install the Anti-Tip Bracket packed with one or more surface units of clothing. The range could be tipped and injury might result from the wall for cleaning, service, or any part of glass, glass/ceramic, ceramic, earthenware, or other servicing should be positioned so that it forward. SURFACE COOKING UNITS • Use Proper Pan Sizes. To...
Owner's Manual
Page 4
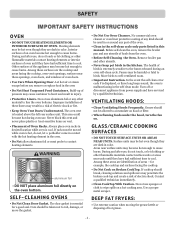
...; When flaming foods under the hood, turn the fan on the oven bottom. Turn off or disconnect appliance from the oven. • Before Self-Cleaning the Oven. Before self-clean the oven, remove the broiler pan and any part of oven doors. • Use Care When Opening Door. Move birds to cool. Never block this manual. Heating elements may be harmful or fatal to contact heating elements. WARNING aluminium foil • DO NOT place aluminum foil directly on . Surface units...
...; When flaming foods under the hood, turn the fan on the oven bottom. Turn off or disconnect appliance from the oven. • Before Self-Cleaning the Oven. Before self-clean the oven, remove the broiler pan and any part of oven doors. • Use Care When Opening Door. Move birds to cool. Never block this manual. Heating elements may be harmful or fatal to contact heating elements. WARNING aluminium foil • DO NOT place aluminum foil directly on . Surface units...
Owner's Manual
Page 5
... the range itself. - ENGLISH SAFETY IMPORTANT SAFETY INSTRUCTIONS WARNING • DO NOT step or sit on hot surfaces may become hot when the grill is in use your oven light bulb, DISCONNECT the electrical power to the range at the main fuse or circuit breaker panel. - The range could melt plastics or ignite flammable items. • Make sure you are cool. • Children should not be tipped and...
... the range itself. - ENGLISH SAFETY IMPORTANT SAFETY INSTRUCTIONS WARNING • DO NOT step or sit on hot surfaces may become hot when the grill is in use your oven light bulb, DISCONNECT the electrical power to the range at the main fuse or circuit breaker panel. - The range could melt plastics or ignite flammable items. • Make sure you are cool. • Children should not be tipped and...

Owner's Manual
Page 7
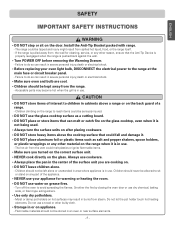
... your glass cooktop surface. • Cookware with the TIMED BAKE or DELAYED TIMED BAKE features. Use the automatic timer when cooking cured or frozen meats and most fruits and vegetables. Even when chilled, they can become very hot to escape. Use care when opening the door to allow hot air or steam to touch. • DO NOT line the oven walls, racks, bottom or any other part of the oven when opening the oven door after cleaning. -7- Eating...
... your glass cooktop surface. • Cookware with the TIMED BAKE or DELAYED TIMED BAKE features. Use the automatic timer when cooking cured or frozen meats and most fruits and vegetables. Even when chilled, they can become very hot to escape. Use care when opening the door to allow hot air or steam to touch. • DO NOT line the oven walls, racks, bottom or any other part of the oven when opening the oven door after cleaning. -7- Eating...
Owner's Manual
Page 10
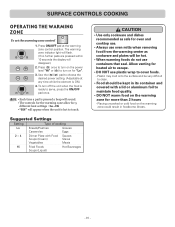
... use oven mitts when removing food from the warming center as safe for "Lo". 3. SURFACE CONTROLS COOKING OPERATING THE WARMING ZONE To set the warming zone control 1. Note: • Each time a pad is ON.) 4. Suggested Settings Setting Type of cooking Lo Breads/Pastries Casseroles Gravies Eggs 2 - 4 Dinner Plate with a lid or aluminum foil to turn off the unit when the food is hot to choose the desired power setting. (Adjustable at...
... use oven mitts when removing food from the warming center as safe for "Lo". 3. SURFACE CONTROLS COOKING OPERATING THE WARMING ZONE To set the warming zone control 1. Note: • Each time a pad is ON.) 4. Suggested Settings Setting Type of cooking Lo Breads/Pastries Casseroles Gravies Eggs 2 - 4 Dinner Plate with a lid or aluminum foil to turn off the unit when the food is hot to choose the desired power setting. (Adjustable at...
Owner's Manual
Page 14
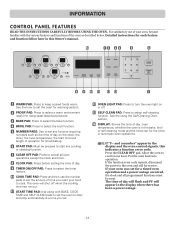
..., oven temperature, whether the oven is in this indicates a function error code. DISPLAY: Shows the time of day on or off when the cooking time has run out. BAKE PAD: Press to select the timer feature. If your oven, become familiar with BAKE, COOK TIME and SELF CLEAN pads to set the oven to start any function requiring numbers such as described below. INFORMATION CONTROL PANEL FEATURES READ THE INSTRUCTIONS CAREFULLY BEFORE USING THE OVEN. For satisfactory use the number pads to cook. NUMBER PADS: Use to select self-cleaning function. TIMER...
..., oven temperature, whether the oven is in this indicates a function error code. DISPLAY: Shows the time of day on or off when the cooking time has run out. BAKE PAD: Press to select the timer feature. If your oven, become familiar with BAKE, COOK TIME and SELF CLEAN pads to set the oven to start any function requiring numbers such as described below. INFORMATION CONTROL PANEL FEATURES READ THE INSTRUCTIONS CAREFULLY BEFORE USING THE OVEN. For satisfactory use the number pads to cook. NUMBER PADS: Use to select self-cleaning function. TIMER...
Owner's Manual
Page 16
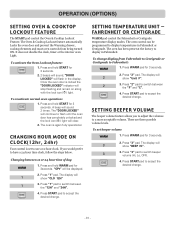
... oven door has completely unlocked and the lock icon( ) light will be programmed to display in Fahrenheit or Centigrade. SETTING TEMPERATURE UNIT - The oven control can be displayed. 2. The display will sound 2 times. Press and hold START for 3seconds. The oven is again fully operational. The Oven & Cooktop Lockout feature automatically Locks the oven door and prevent the Warming drawer, cooktop elements and most oven controls from Fahrenheit to Centigrade or Centigrade to accept the desired change display from being turned...
... oven door has completely unlocked and the lock icon( ) light will be programmed to display in Fahrenheit or Centigrade. SETTING TEMPERATURE UNIT - The oven control can be displayed. 2. The display will sound 2 times. Press and hold START for 3seconds. The oven is again fully operational. The Oven & Cooktop Lockout feature automatically Locks the oven door and prevent the Warming drawer, cooktop elements and most oven controls from Fahrenheit to Centigrade or Centigrade to accept the desired change display from being turned...
Owner's Manual
Page 17
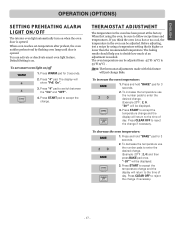
.... 2. The oven temperature can activate or deactivate smart oven light feature. When oven reaches set smart oven light on . "20°" will be adjusted. ENGLISH OPERATION (OPTIONS) SETTING PREHEATING ALARM LIGHT ON/OFF The interior oven light automatically turn on when the oven door is opened . Press "4" pad. To increase the oven temperature: 1. When first using a temperature setting that is higher or lower than the recommended temperature. To increase the temperature use the number pads to reject the change if...
.... 2. The oven temperature can activate or deactivate smart oven light feature. When oven reaches set smart oven light on . "20°" will be adjusted. ENGLISH OPERATION (OPTIONS) SETTING PREHEATING ALARM LIGHT ON/OFF The interior oven light automatically turn on when the oven door is opened . Press "4" pad. To increase the oven temperature: 1. When first using a temperature setting that is higher or lower than the recommended temperature. To increase the temperature use the number pads to reject the change if...
Owner's Manual
Page 20
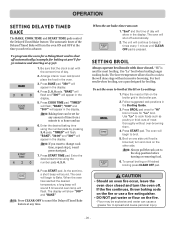
.... - OPERATION SETTING DELAYED TIMED BAKE The BAKE, COOK TIME and START TIME pads control the Delayed Timed Bake feature. Be sure that the clock is pressed. "350°" will appear in advance. "BAKE" will flash and "300°" will appear in the display. "TIMED" will begin to cook foods such as poultry or thick cuts of day. 2. Enter the desired baking time using the number pads 4, 3, 0. 8. Press START pad. When the oven has reached the desired temperature, a long...
.... - OPERATION SETTING DELAYED TIMED BAKE The BAKE, COOK TIME and START TIME pads control the Delayed Timed Bake feature. Be sure that the clock is pressed. "350°" will appear in advance. "BAKE" will flash and "300°" will appear in the display. "TIMED" will begin to cook foods such as poultry or thick cuts of day. 2. Enter the desired baking time using the number pads 4, 3, 0. 8. Press START pad. When the oven has reached the desired temperature, a long...
Owner's Manual
Page 23
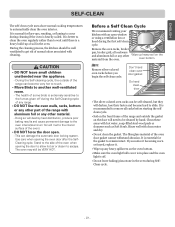
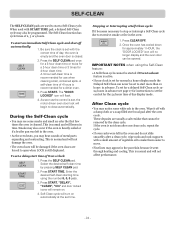
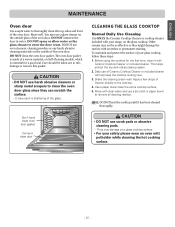
... during the Self-Cleaning cycle of any range. • DO NOT line the oven walls, racks, bottom or any other material. - Clean these areas with clean water and dry. • Do not clean the gasket. ENGLISH SELF-CLEAN The self-clean cycle uses above normal cooking temperatures to remain intact. Before a Self Clean Cycle We recommend venting your kitchen with cleaning. This can damage the automatic door locking system. Rinse well with hot water...
... during the Self-Cleaning cycle of any range. • DO NOT line the oven walls, racks, bottom or any other material. - Clean these areas with clean water and dry. • Do not clean the gasket. ENGLISH SELF-CLEAN The self-clean cycle uses above normal cooking temperatures to remain intact. Before a Self Clean Cycle We recommend venting your kitchen with cleaning. This can damage the automatic door locking system. Rinse well with hot water...
Owner's Manual
Page 24
... display mode the Delayed Self-Clean can be started if Oven Lockout feature is active. • If your clock is closed. 2. Stopping or Interrupting a Self-Clean cycle: If it went through heating and cooling. This is cleaned. These deposits are usually a salt residue that cannot be set time. To set the control for 4-hour clean time. "DELAY", "CLEAN", "Cln" and door locked icons will lessen in time. The "DOOR LOCKED" icon will no longer display and the oven door...
... display mode the Delayed Self-Clean can be started if Oven Lockout feature is active. • If your clock is closed. 2. Stopping or Interrupting a Self-Clean cycle: If it went through heating and cooling. This is cleaned. These deposits are usually a salt residue that cannot be set time. To set the control for 4-hour clean time. "DELAY", "CLEAN", "Cln" and door locked icons will lessen in time. The "DOOR LOCKED" icon will no longer display and the oven door...
Owner's Manual
Page 26
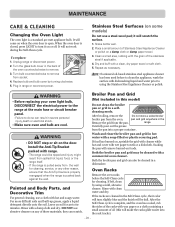
... replacing your oven light bulb, DISCONNECT the electrical power to using a mild, abrasive cleaner. Turn the glass bulb cover in severe personal injury,death or electrical shock. • Make sure oven and bulb are cleaned in a selfcleaning mode. Place a small amount of these materials; Carefully pour out the grease from the wall for cleaning. After broiling, remove the Do not store a soiled broiler broiler pan from spilled hot liquid, food, or the range itself. - Oven Racks Remove the oven racks...
... replacing your oven light bulb, DISCONNECT the electrical power to using a mild, abrasive cleaner. Turn the glass bulb cover in severe personal injury,death or electrical shock. • Make sure oven and bulb are cleaned in a selfcleaning mode. Place a small amount of these materials; Carefully pour out the grease from the wall for cleaning. After broiling, remove the Do not store a soiled broiler broiler pan from spilled hot liquid, food, or the range itself. - Oven Racks Remove the oven racks...
Owner's Manual
Page 27
... surface with your glass cooktop, follow these steps: 1. Daily use harsh abrasive cleaners or sharp metal scrapers to remove all cleaning residue. Use a paper towel clean the entire cooktop surface. 5. Rinse well. To maintain and protect the surface of the oven door. Apply a few drops of Cleaner directly to thoroughly clean the top, sides and front of your range, on Self-Cleaning models, which is essential for the first time, clean...
... surface with your glass cooktop, follow these steps: 1. Daily use harsh abrasive cleaners or sharp metal scrapers to remove all cleaning residue. Use a paper towel clean the entire cooktop surface. 5. Rinse well. To maintain and protect the surface of the oven door. Apply a few drops of Cleaner directly to thoroughly clean the top, sides and front of your range, on Self-Cleaning models, which is essential for the first time, clean...
Owner's Manual
Page 30
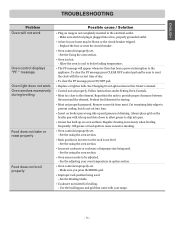
... with range. The element will disappear as the glass cools. • This is hot. Oven control beeps and displays any F code error. • Poor installation. Place oven rack in center of surface units • Improper cookware being used. - Press CLEAR OFF to maintain the heat setting. - 30 - Replace the fuse or reset the circuit breaker. • Cooktop controls improperly set for service. See the Cleaning the glass cooktop section. • Hot surface on a model with a lid until the oven rack is level. •...
... with range. The element will disappear as the glass cools. • This is hot. Oven control beeps and displays any F code error. • Poor installation. Place oven rack in center of surface units • Improper cookware being used. - Press CLEAR OFF to maintain the heat setting. - 30 - Replace the fuse or reset the circuit breaker. • Cooktop controls improperly set for service. See the Cleaning the glass cooktop section. • Hot surface on a model with a lid until the oven rack is level. •...
Owner's Manual
Page 31
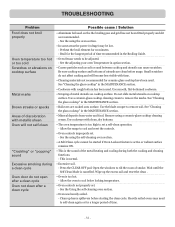
... bulb. See the Broiling Guide. • Cookware not suited for searing. • Meat not properly prepared. Allow the oven to cool to below locking temperature. • The PF message will not work . See Changing Oven Light section in this Owner's manual. • Control not set . - Remove excess fat from meat. Follow instructions under Setting Oven Controls. • Meat too close to provide proper clearance between the meat and the element. Cut...
... bulb. See the Broiling Guide. • Cookware not suited for searing. • Meat not properly prepared. Allow the oven to cool to below locking temperature. • The PF message will not work . See Changing Oven Light section in this Owner's manual. • Control not set . - Remove excess fat from meat. Follow instructions under Setting Oven Controls. • Meat too close to provide proper clearance between the meat and the element. Cut...
Owner's Manual
Page 32
... of the metal heating and cooling during a clean cycle Oven door do not affect cooking and will not self-clean "Crackling" or "popping" sound Excessive smoking during both the cooking and cleaning functions. - Clean up the excess soil and reset the clean . • Oven is normal. • Excessive soil. - Broil for 10 minutes. - Use a ceramic-glass cooktop cleaning cream to remove soil. Remove using the self-cleaning oven section. • A Self-Clean cycle cannot be adjusted. - Wipe up heavy...
... of the metal heating and cooling during a clean cycle Oven door do not affect cooking and will not self-clean "Crackling" or "popping" sound Excessive smoking during both the cooking and cleaning functions. - Clean up the excess soil and reset the clean . • Oven is normal. • Excessive soil. - Broil for 10 minutes. - Use a ceramic-glass cooktop cleaning cream to remove soil. Remove using the self-cleaning oven section. • A Self-Clean cycle cannot be adjusted. - Wipe up heavy...
Owner's Manual
Page 34
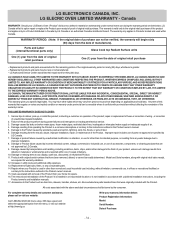
... ARISING DIRECTLY OR INDIRECTLY FROM ANY CONTRACTUAL BREACH, FUNDAMENTAL OR OTHERWISE, OR FROM ANY ACTS OR OMISSIONS, TORT, OR OTHERWISE. Damage or missing items to the Product such as door bins, drawers, handles, shelves, etc. LG ELECTRONICS CANADA, INC. LG ELECRIC OVEN LIMITED WARRANTY - WARRANTY PERIOD: (Note: If the original date of manufacture). Parts and Labor (internal/functional parts only) Glass Cook top Radiant Surface units...
... ARISING DIRECTLY OR INDIRECTLY FROM ANY CONTRACTUAL BREACH, FUNDAMENTAL OR OTHERWISE, OR FROM ANY ACTS OR OMISSIONS, TORT, OR OTHERWISE. Damage or missing items to the Product such as door bins, drawers, handles, shelves, etc. LG ELECTRONICS CANADA, INC. LG ELECRIC OVEN LIMITED WARRANTY - WARRANTY PERIOD: (Note: If the original date of manufacture). Parts and Labor (internal/functional parts only) Glass Cook top Radiant Surface units...
Specification
Page 2
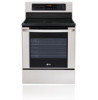
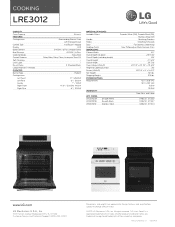
... Bake, Broil Delay Bake, Delay Clean, Automatic Shut-Off • • 2 Standard Racks • Radiant 9" / 2500W 6" / 1200W 7" / 100W 9", 6" / 3000W, 1400W 6" / 1200W MATERIALS/FINISHES Available Colors Handle Knobs Door Cooktop Finish DIMENSIONS Cabinet Width Overall Depth (to door) Overall Depth (including handle) Overall Height Overall Width Oven Interior (WxHxD) Height to change without notice. © 2011 LG Electronics USA, Inc. Design, features and specifications subject to Cooking Surface Drawer (WxHxD) Net Weight Shipping Weight POWER/RATINGS Requirements WARRANTY UPC CODES...
... Bake, Broil Delay Bake, Delay Clean, Automatic Shut-Off • • 2 Standard Racks • Radiant 9" / 2500W 6" / 1200W 7" / 100W 9", 6" / 3000W, 1400W 6" / 1200W MATERIALS/FINISHES Available Colors Handle Knobs Door Cooktop Finish DIMENSIONS Cabinet Width Overall Depth (to door) Overall Depth (including handle) Overall Height Overall Width Oven Interior (WxHxD) Height to change without notice. © 2011 LG Electronics USA, Inc. Design, features and specifications subject to Cooking Surface Drawer (WxHxD) Net Weight Shipping Weight POWER/RATINGS Requirements WARRANTY UPC CODES...


