

Owner's Manual (English)
Page 2
...features 13 - Setting convection bake 22 - Care & cleaning 28-30 - English Thank you record the details of any contact with LG (LG Electronics USA, Inc.) concerning this unit for future reference. Important safety instructions 3-7 SURFACE CONTROLS COOKING 8-12 - Setting timed bake ...light on /off • Setting convection auto conversion feature - Thermostat adjustment 17 - Before calling for purchasing an LG electric oven. Dealer Phone No.: Customer Relations LG Electronics U.S.A., Inc. Minimum & maximum control pad settings ......15 - Setting the cook & warm feature 24 -...
...features 13 - Setting convection bake 22 - Care & cleaning 28-30 - English Thank you record the details of any contact with LG (LG Electronics USA, Inc.) concerning this unit for future reference. Important safety instructions 3-7 SURFACE CONTROLS COOKING 8-12 - Setting timed bake ...light on /off • Setting convection auto conversion feature - Thermostat adjustment 17 - Before calling for purchasing an LG electric oven. Dealer Phone No.: Customer Relations LG Electronics U.S.A., Inc. Minimum & maximum control pad settings ......15 - Setting the cook & warm feature 24 -...

Owner's Manual (English)
Page 3
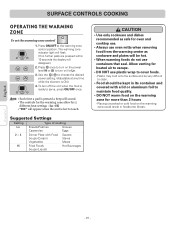
... off the circuit breaker WARNING • DO NOT step or sit on the correct surface unit. • To check that it forward. Always contact your oven to hazards or unsafe practices which could be tipped and injury might result from the wall for proper anti-tip bracket installation. -3- This appliance is...
... off the circuit breaker WARNING • DO NOT step or sit on the correct surface unit. • To check that it forward. Always contact your oven to hazards or unsafe practices which could be tipped and injury might result from the wall for proper anti-tip bracket installation. -3- This appliance is...
Owner's Manual (English)
Page 4
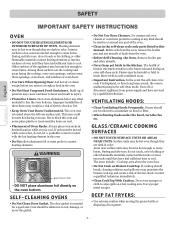
... pan and other flammable materials contact surface units or areas near surface units may become hot enough to line the oven bottoms. Improper installation of Oven Racks. GLASS/CERAMIC COOKING SURFACES • DO NOT TOUCH SURFACE UNITS OR AREAS NEAR UNITS. During and after... cause container to well-ventilated room. • Important Instruction. VENTILATING HOODS: • Clean Ventilating Hoods Frequently. No commercial oven cleaner or oven liner protective coating of any kind should break, cleaning solutions and spillovers may be used in the self clean mode. Surface ...
... pan and other flammable materials contact surface units or areas near surface units may become hot enough to line the oven bottoms. Improper installation of Oven Racks. GLASS/CERAMIC COOKING SURFACES • DO NOT TOUCH SURFACE UNITS OR AREAS NEAR UNITS. During and after... cause container to well-ventilated room. • Important Instruction. VENTILATING HOODS: • Clean Ventilating Hoods Frequently. No commercial oven cleaner or oven liner protective coating of any kind should break, cleaning solutions and spillovers may be used in the self clean mode. Surface ...

Owner's Manual (English)
Page 5
...you turned on the correct surface unit. • NEVER cook directly on . • DO NOT leave children alone. - Smother the fire by closing the oven door or use . - English Español SAFETY IMPORTANT SAFETY INSTRUCTIONS WARNING • DO NOT step or sit on any other bulky cloth. -5- Failure ...• Children should be left alone or unattended in area where appliance is in severe personal injury, death or electrical shock. • Make sure oven and bulb are cooking on the glass. Children climbing on the range to sit or stand on the door. Do not use cookware. • Always...
...you turned on the correct surface unit. • NEVER cook directly on . • DO NOT leave children alone. - Smother the fire by closing the oven door or use . - English Español SAFETY IMPORTANT SAFETY INSTRUCTIONS WARNING • DO NOT step or sit on any other bulky cloth. -5- Failure ...• Children should be left alone or unattended in area where appliance is in severe personal injury, death or electrical shock. • Make sure oven and bulb are cooking on the glass. Children climbing on the range to sit or stand on the door. Do not use cookware. • Always...

Owner's Manual (English)
Page 6
... materials should never be hot and burns may catch on the warming zone could result in foodborne illness. • Always use pot holders or oven mitts when removing food from the Warming Drawer or Warming Center as volatile liquids, cleaners or aerosol sprays. • DO NOT touch surface elements.... • NEVER leave surface units unattended at high or medium-high setting. - Loose-fitting or hanging garments should not be stored in an oven or near surface elements. • Be certain all packing materials are infrequently used and can be burned as safe for more than 2 hours -...
... materials should never be hot and burns may catch on the warming zone could result in foodborne illness. • Always use pot holders or oven mitts when removing food from the Warming Drawer or Warming Center as volatile liquids, cleaners or aerosol sprays. • DO NOT touch surface elements.... • NEVER leave surface units unattended at high or medium-high setting. - Loose-fitting or hanging garments should not be stored in an oven or near surface elements. • Be certain all packing materials are infrequently used and can be burned as safe for more than 2 hours -...

Owner's Manual (English)
Page 7
...to escape. This can prevent contacting the broil element and grease splattering. • DO NOT leave small children unattended near the appliance. - The oven may result in accordance with the instructions after the Self-Cleaning cycle. During the Self-cleaning cycle, the outside of the range can easily spoil..., such as milk, eggs, fish, meat or poultry, should be removed promptly when cooking is very heavy. • The Oven must be switched off before removing the fan guard for more than 1 hour before cooking begins, and should be replaced in shattering of the...
...to escape. This can prevent contacting the broil element and grease splattering. • DO NOT leave small children unattended near the appliance. - The oven may result in accordance with the instructions after the Self-Cleaning cycle. During the Self-cleaning cycle, the outside of the range can easily spoil..., such as milk, eggs, fish, meat or poultry, should be removed promptly when cooking is very heavy. • The Oven must be switched off before removing the fan guard for more than 1 hour before cooking begins, and should be replaced in shattering of the...
Owner's Manual (English)
Page 10
... Food Soups (Cream) Vegetables Sauces Stews Meats Hi Fried Foods Soups (Liquid) Hot Beverages CAUTION • Use only cookware and dishes recommended as safe for oven and cooktop use. • Always use oven mitts when removing food from the warming center as cookware and plates will disappear.) 2.
... Food Soups (Cream) Vegetables Sauces Stews Meats Hi Fried Foods Soups (Liquid) Hot Beverages CAUTION • Use only cookware and dishes recommended as safe for oven and cooktop use. • Always use oven mitts when removing food from the warming center as cookware and plates will disappear.) 2.

Owner's Manual (English)
Page 14
... set any cooking or cleaning function. . DISPLAY: Shows the time of your food to cool for warming section. . Allow the oven to cook. If your oven was set for timed baking. . Detailed instructions for each feature and function follow later in the bake, broil or self-cleaning mode...Press to select self-cleaning function. COOK TIME PAD: Press and then use of day, oven temperature, whether the oven is in this indicates a function error code. The oven will appear in the display and the oven control signals, this Owner's manual. English Español . ROAST, COOK TIME, and...
... set any cooking or cleaning function. . DISPLAY: Shows the time of your food to cool for warming section. . Allow the oven to cook. If your oven was set for timed baking. . Detailed instructions for each feature and function follow later in the bake, broil or self-cleaning mode...Press to select self-cleaning function. COOK TIME PAD: Press and then use of day, oven temperature, whether the oven is in this indicates a function error code. The oven will appear in the display and the oven control signals, this Owner's manual. English Español . ROAST, COOK TIME, and...

Owner's Manual (English)
Page 15
...) 2. When the range is pressed. Press CLOCK. 3. Press 1, 3, and 0 to the time of day. 4. Press START. MINIMUM & MAXIMUM CONTROL PAD SETTINGS All of the other oven control functions. FEATURE BAKE TEMP. BROIL TEMP. Default: 12 Hr. SETTING THE TIMER ON/OFF The TIMER ON/OFF serves as an extra timer in...
...) 2. When the range is pressed. Press CLOCK. 3. Press 1, 3, and 0 to the time of day. 4. Press START. MINIMUM & MAXIMUM CONTROL PAD SETTINGS All of the other oven control functions. FEATURE BAKE TEMP. BROIL TEMP. Default: 12 Hr. SETTING THE TIMER ON/OFF The TIMER ON/OFF serves as an extra timer in...
Owner's Manual (English)
Page 16
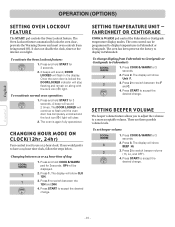
... hour time of day 1. To set to accept the desired change . Press 3 to switch between the 12H and 24H. 4. To reactivate normal oven operation: 1. The display will show Unit F. 3. Changing between the F and C. 4. Press 3. It does not disable the clock, timer or the interior... Press START to use a 12-hour clock. The display will stop flashing and remain on along with the lock icon( ) light. To activate the Oven Lockout feature: 1. The oven control can be displayed. 2. Press 2. Press 1 to switch beeper volume ( Hi, Lo, and OFF ). 4. Press START to accept the desired ...
... hour time of day 1. To set to accept the desired change . Press 3 to switch between the 12H and 24H. 4. To reactivate normal oven operation: 1. The display will show Unit F. 3. Changing between the F and C. 4. Press 3. It does not disable the clock, timer or the interior... Press START to use a 12-hour clock. The display will stop flashing and remain on along with the lock icon( ) light. To activate the Oven Lockout feature: 1. The oven control can be displayed. 2. Press 2. Press 1 to switch beeper volume ( Hi, Lo, and OFF ). 4. Press START to accept the desired ...

Owner's Manual (English)
Page 17
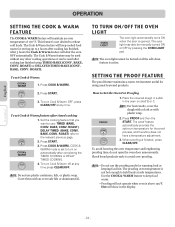
... the change if necessary. Press 5. Español - 17 - English OPERATION (OPTIONS) SETTING PREHEATING ALARM LIGHT ON/OFF The interior oven light automatically turn on when the oven door is on /off 1. Press the COOK & WARM for 3 seconds. 2. Press 5 to reject the change if necessary. Press ...increase the temperature use the number pads to the time of an adjustment is opened . Default Setting is opened . THERMOSTAT ADJUSTMENT The temperature in the oven can be sure to accept the temperature change . (Example -20°F : 2 and 0) and then press BAKE once. - 20° will...
... the change if necessary. Press 5. Español - 17 - English OPERATION (OPTIONS) SETTING PREHEATING ALARM LIGHT ON/OFF The interior oven light automatically turn on when the oven door is on /off 1. Press the COOK & WARM for 3 seconds. 2. Press 5 to reject the change if necessary. Press ...increase the temperature use the number pads to the time of an adjustment is opened . Default Setting is opened . THERMOSTAT ADJUSTMENT The temperature in the oven can be sure to accept the temperature change . (Example -20°F : 2 and 0) and then press BAKE once. - 20° will...

Owner's Manual (English)
Page 18
... will show BAKE and the changing temperature starting at any time. The display will result in Fig. 1, 2. This will show in the oven after preheating if the recipe calls for good results when baking cakes, cookies, pastry, and breads. To replace racks. 1. Press START. Pull...or pound cakes Biscuits, muffins, brownies, cookies, cupcakes, layer cakes, pies Casseroles Turkey, roast, or ham Rack Position B C D D A BEFORE USING OVEN RACKS The oven has 2 racks. The racks have stops to 425°F, press BAKE and 350° will flash. 3. Press START. If cooking on the support. 2....
... will show BAKE and the changing temperature starting at any time. The display will result in Fig. 1, 2. This will show in the oven after preheating if the recipe calls for good results when baking cakes, cookies, pastry, and breads. To replace racks. 1. Press START. Pull...or pound cakes Biscuits, muffins, brownies, cookies, cupcakes, layer cakes, pies Casseroles Turkey, roast, or ham Rack Position B C D D A BEFORE USING OVEN RACKS The oven has 2 racks. The racks have stops to 425°F, press BAKE and 350° will flash. 3. Press START. If cooking on the support. 2....
Owner's Manual (English)
Page 19
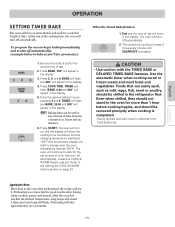
...2. BAKE, 0:00 and 300° will appear in the display. 4. TIMED will flash and BAKE, 30:00 and 300° will appear in the oven after preheating if the recipe calls for it. CAUTION • Use caution with the TIMED BAKE or DELAYED TIMED BAKE features. Use the automatic timer..., unless the COOK & WARM feature was set for more than 1 hour before cooking begins, and should be removed promptly when cooking is pressed. The oven will flash. Preheating will flash. Note: Baking time can easily spoil, such as milk, eggs, fish, meat or poultry, should be chilled in the...
...2. BAKE, 0:00 and 300° will appear in the display. 4. TIMED will flash and BAKE, 30:00 and 300° will appear in the oven after preheating if the recipe calls for it. CAUTION • Use caution with the TIMED BAKE or DELAYED TIMED BAKE features. Use the automatic timer..., unless the COOK & WARM feature was set for more than 1 hour before cooking begins, and should be removed promptly when cooking is pressed. The oven will flash. Preheating will flash. Note: Baking time can easily spoil, such as milk, eggs, fish, meat or poultry, should be chilled in the...

Owner's Manual (English)
Page 20
... to change cook time, repeat steps 5~6 and press START. 6. SETTING BROIL Leave the door open by pressing 3 and 0. The door will appear in the oven. Press BROIL once for Hi broil or twice for a Delay Start and to 11 hours and 59 minutes. 7. Broil on the broiler grid in the... and 300° will begin to the stop position. Broil Stop Position To set with the correct time of meat thoroughly without overbrowning them. 4. The oven will appear in the display. 5. If the fire continues, throw baking soda on the fire or use a fire extinguisher. • DO NOT put water ...
... to change cook time, repeat steps 5~6 and press START. 6. SETTING BROIL Leave the door open by pressing 3 and 0. The door will appear in the oven. Press BROIL once for Hi broil or twice for a Delay Start and to 11 hours and 59 minutes. 7. Broil on the broiler grid in the... and 300° will begin to the stop position. Broil Stop Position To set with the correct time of meat thoroughly without overbrowning them. 4. The oven will appear in the display. 5. If the fire continues, throw baking soda on the fire or use a fire extinguisher. • DO NOT put water ...

Owner's Manual (English)
Page 22
... is 350°F) is not a failure of the range and should be cooked. The display will vary depending on multiple racks, place the oven racks in position D. Press 3, 7, and 5. 3. English OPERATION SETTING CONVECTION BAKE Benefits of food to circulate around the food. Use the... Convection Bake feature when cooking speed is time saved. Multiple oven rack cooking may slightly increase cook times for even cooking and excellent results using multiple racks. Press CONV. The CONV. Tips for Convection...
... is 350°F) is not a failure of the range and should be cooked. The display will vary depending on multiple racks, place the oven racks in position D. Press 3, 7, and 5. 3. English OPERATION SETTING CONVECTION BAKE Benefits of food to circulate around the food. Use the... Convection Bake feature when cooking speed is time saved. Multiple oven rack cooking may slightly increase cook times for even cooking and excellent results using multiple racks. Press CONV. The CONV. Tips for Convection...

Owner's Manual (English)
Page 23
... Press 3, 7, and 5. 4. Press CLEAR/OFF to cook at 375°F): 1. The roasting rack will help prevent grease splatters. Place oven rack on the oven rack. [Optional] Roasting rack (Right side of meat, uncovered. DO NOT cover the grid with the broil element and grease from splattering....the grid in contact with aluminum foil. 3. The Convection Roast pad combines a cook cycle with the roasting rack. Place the grid in oven. 2. English OPERATION SETTING CONVECTION ROAST The CONV. ROAST pad is securely seated on the roasting rack. 4. Roasting Rack Instructions When preparing...
... Press 3, 7, and 5. 4. Press CLEAR/OFF to cook at 375°F): 1. The roasting rack will help prevent grease splatters. Place oven rack on the oven rack. [Optional] Roasting rack (Right side of meat, uncovered. DO NOT cover the grid with the broil element and grease from splattering....the grid in contact with aluminum foil. 3. The Convection Roast pad combines a cook cycle with the roasting rack. Place the grid in oven. 2. English OPERATION SETTING CONVECTION ROAST The CONV. ROAST pad is securely seated on the roasting rack. 4. Roasting Rack Instructions When preparing...
Owner's Manual (English)
Page 24
... time press CLEAR/OFF. ROAST), DELAY TIMED (BAKE, CONV. ROAST) refer to use: TIMED (BAKE, CONV. The oven light may be manually turned ON or OFF by pressing the OVEN LIGHT pad. When proofing is opened. Note: • Do not use plastic containers, lids, or plastic wrap. Hot ... THE PROOF FEATURE The proof feature maintains a warm environment useful for the proof process, and therefore does not have a temperature adjustment. 3. The proofing oven temperature is not hot enough to keep cooked food warm for warming food or keeping food hot. Use the COOK & WARM feature to hold foods...
... time press CLEAR/OFF. ROAST), DELAY TIMED (BAKE, CONV. ROAST) refer to use: TIMED (BAKE, CONV. The oven light may be manually turned ON or OFF by pressing the OVEN LIGHT pad. When proofing is opened. Note: • Do not use plastic containers, lids, or plastic wrap. Hot ... THE PROOF FEATURE The proof feature maintains a warm environment useful for the proof process, and therefore does not have a temperature adjustment. 3. The proofing oven temperature is not hot enough to keep cooked food warm for warming food or keeping food hot. Use the COOK & WARM feature to hold foods...

Owner's Manual (English)
Page 25
... flare-ups, smoking, or flaming to remain intact. Doing so will destroy heat distribution, produce poor baking results and cause permanent damage to the oven interior (aluminum foil will darken, lose their luster and become very hot to touch. • Move Birds to the fumes given off . •... the Self-Clean cycle. During the Self-cleaning cycle, the outside the gasket on the door will need to be well ventilated to slide. oven bottom. It is extremely sensitive to another well-ventilated room. - If you begin the self-clean cycle. It is heavily soiled. CAUTION •...
... flare-ups, smoking, or flaming to remain intact. Doing so will destroy heat distribution, produce poor baking results and cause permanent damage to the oven interior (aluminum foil will darken, lose their luster and become very hot to touch. • Move Birds to the fumes given off . •... the Self-Clean cycle. During the Self-cleaning cycle, the outside the gasket on the door will need to be well ventilated to slide. oven bottom. It is extremely sensitive to another well-ventilated room. - If you begin the self-clean cycle. It is heavily soiled. CAUTION •...

Owner's Manual (English)
Page 26
... or a soapfilled steel wool pad after one clean cycle, repeat the cycle. • If oven racks were left in the oven. • As the oven heats, you to open the oven door until oven temperature has cooled. • It is recommend to use when cleaning small, contained spills. The... during the Self Clean cycle. The DOOR LOCKED icon will release automatically. Self-Cleaning cycle will automatically release allowing you may appear in the oven: 1. The lock will release automatically. • Once the door has been locked the "DOOR" "LOCKED" indicator light will remained locked until...
... or a soapfilled steel wool pad after one clean cycle, repeat the cycle. • If oven racks were left in the oven. • As the oven heats, you to open the oven door until oven temperature has cooled. • It is recommend to use when cleaning small, contained spills. The... during the Self Clean cycle. The DOOR LOCKED icon will release automatically. Self-Cleaning cycle will automatically release allowing you may appear in the oven: 1. The lock will release automatically. • Once the door has been locked the "DOOR" "LOCKED" indicator light will remained locked until...
Owner's Manual (English)
Page 27
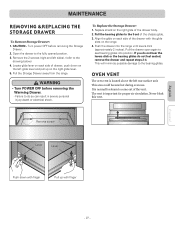
...the chassis glide. 3. Align the glide on each side of drawer, push down with finger Español - 27 - This area could become hot during oven use. English MAINTENANCE REMOVING &REPLACING THE STORAGE DRAWER To Remove Storage Drawer: 1. Turn power OFF before removing the Warming Drawer. - Open the drawer to the...bearing glides to seat bearing glides into the range until levers click (approximately 2 inches). Pull the drawer open again to the front of the vent. OVEN VENT The oven vent is important for steam to the drowing below) 4. It is normal for proper air circulation.
...the chassis glide. 3. Align the glide on each side of drawer, push down with finger Español - 27 - This area could become hot during oven use. English MAINTENANCE REMOVING &REPLACING THE STORAGE DRAWER To Remove Storage Drawer: 1. Turn power OFF before removing the Warming Drawer. - Open the drawer to the...bearing glides to seat bearing glides into the range until levers click (approximately 2 inches). Pull the drawer open again to the front of the vent. OVEN VENT The oven vent is important for steam to the drowing below) 4. It is normal for proper air circulation.


