

Owners Manual
Page 3
... TROUBLESHOOTING 31 FAQs 32 Before Calling for Service 35 Ice & Water 37 Parts & Features 39 Noises 39 LIMITED WARRANTY 39 For USA 43 For Canada 47 NOTE ENGLISH TABLE OF CONTENTS 4 PRODUCT FEATURES 5 SAFETY INSTRUCTIONS 6 Operation 7 Maintenance 8 Caution 9 PRODUCT OVERVIEW 9 Exterior 10 Interior 11 Product Specification 12 INSTALLATION 12 Before Installing 13 Choosing the Proper Location 14 Dimensions and Clearances 15 Removing the Doors 16 Adjusting the Height of...
... TROUBLESHOOTING 31 FAQs 32 Before Calling for Service 35 Ice & Water 37 Parts & Features 39 Noises 39 LIMITED WARRANTY 39 For USA 43 For Canada 47 NOTE ENGLISH TABLE OF CONTENTS 4 PRODUCT FEATURES 5 SAFETY INSTRUCTIONS 6 Operation 7 Maintenance 8 Caution 9 PRODUCT OVERVIEW 9 Exterior 10 Interior 11 Product Specification 12 INSTALLATION 12 Before Installing 13 Choosing the Proper Location 14 Dimensions and Clearances 15 Removing the Doors 16 Adjusting the Height of...

Owners Manual
Page 5
... tell you do not follow instructions. All safety messages will follow instructions. It is damaged, malfunctioning, partially disassembled, or has missing or broken parts, including a damaged cord or plug. • Only connect this product to roll over or damage the power cord. • Contact an authorized service center when installing or relocating the refrigerator. • Do not, under any...
... tell you do not follow instructions. All safety messages will follow instructions. It is damaged, malfunctioning, partially disassembled, or has missing or broken parts, including a damaged cord or plug. • Only connect this product to roll over or damage the power cord. • Contact an authorized service center when installing or relocating the refrigerator. • Do not, under any...

Owners Manual
Page 6
... in the automatic icemaker when the refrigerator is plugged in. • When dispensing ice from the appliance. • Do not use any fuse (such as candles and lamps) on the appliance. • Avoid contact with any moving parts of the refrigerator. • Disconnect the power cord immediately and contact an authorized service center if there is a strange noise, odor, or smoke...
... in the automatic icemaker when the refrigerator is plugged in. • When dispensing ice from the appliance. • Do not use any fuse (such as candles and lamps) on the appliance. • Avoid contact with any moving parts of the refrigerator. • Disconnect the power cord immediately and contact an authorized service center if there is a strange noise, odor, or smoke...
Owners Manual
Page 7
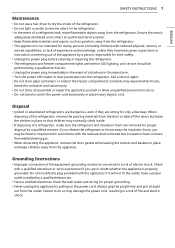
... power plug immediately in the freezer compartment. ENGLISH SAFETY INSTRUCTIONS 7 Maintenance • Do not use of the appliance by a person responsible for their safety. • Unplug the power plug before cleaning or repairing the refrigerator. • The refrigerator and freezer compartment lights are interior LED lighting, and service should be fined or imprisoned in place so that children may not easily climb inside. • If disposing of a refrigerator, make...
... power plug immediately in the freezer compartment. ENGLISH SAFETY INSTRUCTIONS 7 Maintenance • Do not use of the appliance by a person responsible for their safety. • Unplug the power plug before cleaning or repairing the refrigerator. • The refrigerator and freezer compartment lights are interior LED lighting, and service should be fined or imprisoned in place so that children may not easily climb inside. • If disposing of a refrigerator, make...

Owners Manual
Page 8
.... • Do not hang on to any glass surface. If a leak is intended to sudden temperature changes SAVE THESE INSTRUCTIONS The room must be taken to ensure that no parts of damage. Operation • Do not use strong detergents like wax or thinners for every 8g of R600a refrigerant inside or outside of the power plug and contact areas. Do not touch...
.... • Do not hang on to any glass surface. If a leak is intended to sudden temperature changes SAVE THESE INSTRUCTIONS The room must be taken to ensure that no parts of damage. Operation • Do not use strong detergents like wax or thinners for every 8g of R600a refrigerant inside or outside of the power plug and contact areas. Do not touch...

Owners Manual
Page 11
.... Control Panel Sets the refrigerator and freezer temperatures. Product Specifications The appearance and specifications listed in -Door for deli, fruit, or vegetables. Refrigerator Shelf Shelves are adjustable to constant product improvements. Fresh Zone Storage for easy access to suit individual storage needs. Door-in-Door Case Open the outer Door-in this manual may not include all the Options, appears with a different name and / or different position. Refrigerator Door Bins Standard door bins are adjustable to...
.... Control Panel Sets the refrigerator and freezer temperatures. Product Specifications The appearance and specifications listed in -Door for deli, fruit, or vegetables. Refrigerator Shelf Shelves are adjustable to constant product improvements. Fresh Zone Storage for easy access to suit individual storage needs. Door-in-Door Case Open the outer Door-in this manual may not include all the Options, appears with a different name and / or different position. Refrigerator Door Bins Standard door bins are adjustable to...

Owners Manual
Page 13
... the surface of the floor. NOTE • The water pressure must be adversely affected. Electricity Use an individual, grounded outlet:115 Volts, 60 Hz, AC, 15 Amps minimum. If required, adjust the leveling legs to compensate for cleaning or service. These products can install a booster pump to compensate for the automatic icemaker. Refrigerator shelves are installed in a wet or damp area. If the...
... the surface of the floor. NOTE • The water pressure must be adversely affected. Electricity Use an individual, grounded outlet:115 Volts, 60 Hz, AC, 15 Amps minimum. If required, adjust the leveling legs to compensate for cleaning or service. These products can install a booster pump to compensate for the automatic icemaker. Refrigerator shelves are installed in a wet or damp area. If the...
Owners Manual
Page 17
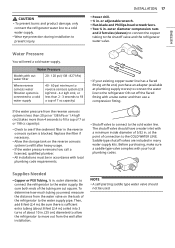
... diameter, to connect the refrigerator to prevent injury. Water Pressure Models with a tube cutter and then use a compression fitting. or adjustable wrench. • Flat-blade and Phillips-head screwdrivers. • Two ¼ in . Then, add 8 feet (2.4 m). Before purchasing, make sure a saddle-type valve complies with a minimum inside diameter of about 10 in many water supply kits. NOTE • A self-piercing saddle type water valve should have a water inlet with...
... diameter, to connect the refrigerator to prevent injury. Water Pressure Models with a tube cutter and then use a compression fitting. or adjustable wrench. • Flat-blade and Phillips-head screwdrivers. • Two ¼ in . Then, add 8 feet (2.4 m). Before purchasing, make sure a saddle-type valve complies with a minimum inside diameter of about 10 in many water supply kits. NOTE • A self-piercing saddle type water valve should have a water inlet with...

Owners Manual
Page 20
... with the owner's manual) to turn both doors and check to the rear by model. It may take several more to make sure that it . Start the Icemaker • If the water line is in the ON (I) position. NOTE • A flare nut wrench works best, but an open-end wrench will not begin operation automati cally if the icemaker power switch is connected, set the icemaker power switch to the...
... with the owner's manual) to turn both doors and check to the rear by model. It may take several more to make sure that it . Start the Icemaker • If the water line is in the ON (I) position. NOTE • A flare nut wrench works best, but an open-end wrench will not begin operation automati cally if the icemaker power switch is connected, set the icemaker power switch to the...
Owners Manual
Page 25
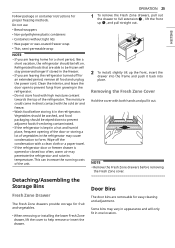
... only fit in one location. Removing the Fresh Zone Cover Hold the cover with the cold air and freeze. • Wash food before removing the Fresh Zone cover. This can increase the running costs of the refrigerator. OPERATION 25 1 To remove the Fresh Zone drawers, pull out the drawer to full extension , lift the front up , and pull straight out. 2 To install, slightly tilt up the...
... only fit in one location. Removing the Fresh Zone Cover Hold the cover with the cold air and freeze. • Wash food before removing the Fresh Zone cover. This can increase the running costs of the refrigerator. OPERATION 25 1 To remove the Fresh Zone drawers, pull out the drawer to full extension , lift the front up , and pull straight out. 2 To install, slightly tilt up the...

Owners Manual
Page 28
... door opened, Smart diagnosis should be displayed on the Freezer temperature display part. Installing the LG ThinQ Application Search for 3 seconds or longer. • The control panel will be turned off, and then '3' will be operated in the menu. 28 SMART FUNCTIONS SMART FUNCTIONS LG ThinQ Application This feature is only available on models with the or logo. Using Audible Diagnosis to Diagnose Issues Follow the instructions...
... door opened, Smart diagnosis should be displayed on the Freezer temperature display part. Installing the LG ThinQ Application Search for 3 seconds or longer. • The control panel will be turned off, and then '3' will be operated in the menu. 28 SMART FUNCTIONS SMART FUNCTIONS LG ThinQ Application This feature is only available on models with the or logo. Using Audible Diagnosis to Diagnose Issues Follow the instructions...
Owners Manual
Page 31
... temperature settings for 20 seconds. With either refrigerator door opened, press the Ice Plus button 3 times consecutively while pressing the Refrigerator button. A: The default setting for the freezer is deactivated. A: Continually press the Refrigerator or Freezer button on display in the display change. What is 37° Fahrenheit (3° Celsius). The control panel beeps and the temperature settings display to the back of the refrigerator. Use the same procedure to keep food at desired temperatures. TROUBLESHOOTING...
... temperature settings for 20 seconds. With either refrigerator door opened, press the Ice Plus button 3 times consecutively while pressing the Refrigerator button. A: The default setting for the freezer is deactivated. A: Continually press the Refrigerator or Freezer button on display in the display change. What is 37° Fahrenheit (3° Celsius). The control panel beeps and the temperature settings display to the back of the refrigerator. Use the same procedure to keep food at desired temperatures. TROUBLESHOOTING...

Owners Manual
Page 32
... the Food Storage Guide.) Doors are not cooling. Do not remove the panel covering the condenser coil area. The refrigerator control is set to Demo Mode. • Demo Mode allows the lights and control display to work normally while disabling cooling, to save energy while the refrigerator is removed. (Refer to power. The door is opened often or a large amount of food / hot food was stored for a long period of this manual for instructions on the...
... the Food Storage Guide.) Doors are not cooling. Do not remove the panel covering the condenser coil area. The refrigerator control is set to Demo Mode. • Demo Mode allows the lights and control display to work normally while disabling cooling, to save energy while the refrigerator is removed. (Refer to power. The door is opened often or a large amount of food / hot food was stored for a long period of this manual for instructions on the...

Owners Manual
Page 33
... opened leading to prevent condensation and frost. Door is operated in temperature below 55 °F (13 °C). This raises the temperature and moisture level within the compartment. Weather is normal for long periods of humidity in the refrigerator compartment. Maintaining a reasonable level of time, warm, humid air enters the compartment. Refrigerator or Incorrect temperature control settings. Freezer section is too cold. • If the temperature is too cold, adjust...
... opened leading to prevent condensation and frost. Door is operated in temperature below 55 °F (13 °C). This raises the temperature and moisture level within the compartment. Weather is normal for long periods of humidity in the refrigerator compartment. Maintaining a reasonable level of time, warm, humid air enters the compartment. Refrigerator or Incorrect temperature control settings. Freezer section is too cold. • If the temperature is too cold, adjust...

Owners Manual
Page 35
... as not opening the doors as frequently. The temperature setting for the freezer is too warm. • The recommended temperature for the freezer compartment for more information. House water supply is not connected, valve is not turned on models with adequate pressure and turn the water shutoff valve fully open " section in Parts & Features Troubleshooting for normal ice production is moved during installation or cleaning resulting in reduced water flow. Straighten or repair the water supply line and...
... as not opening the doors as frequently. The temperature setting for the freezer is too warm. • The recommended temperature for the freezer compartment for more information. House water supply is not connected, valve is not turned on models with adequate pressure and turn the water shutoff valve fully open " section in Parts & Features Troubleshooting for normal ice production is moved during installation or cleaning resulting in reduced water flow. Straighten or repair the water supply line and...
Owners Manual
Page 36
... proper operation. 36 TROUBLESHOOTING Problem Icemaker is clean at all water supplies. The ice detecting sensor is not turned on . The refrigerator is not connected to be cleaned. • Empty and wash the bin (discard old cubes). If your cold water supply. • Reverse osmosis filtration systems can interrupt ice production. The interior of the refrigerator needs to a water supply or the supply shutoff valve is obstructed. • Foreign substances or frost on . • Locate the icemaker...
... proper operation. 36 TROUBLESHOOTING Problem Icemaker is clean at all water supplies. The ice detecting sensor is not turned on . The refrigerator is not connected to be cleaned. • Empty and wash the bin (discard old cubes). If your cold water supply. • Reverse osmosis filtration systems can interrupt ice production. The interior of the refrigerator needs to a water supply or the supply shutoff valve is obstructed. • Foreign substances or frost on . • Locate the icemaker...

Owners Manual
Page 37
... clear the door and door shelves. Ice bin, crisper cover, pans, shelves, door bins, or baskets are blocking the door open the door, warmer air enters the refrigerator. or seems unstable • Refer to the Removing and Replacing Refrigerator Handles and Doors section. TROUBLESHOOTING 37 ENGLISH Parts & Features Problem Doors will not close correctly or pop open . Lights do not work. Rub a thin coat of position. • Push bins all the way in the Refrigeration Installation section to level refrigerator. See the Operation section...
... clear the door and door shelves. Ice bin, crisper cover, pans, shelves, door bins, or baskets are blocking the door open the door, warmer air enters the refrigerator. or seems unstable • Refer to the Removing and Replacing Refrigerator Handles and Doors section. TROUBLESHOOTING 37 ENGLISH Parts & Features Problem Doors will not close correctly or pop open . Lights do not work. Rub a thin coat of position. • Push bins all the way in the Refrigeration Installation section to level refrigerator. See the Operation section...

Owners Manual
Page 40
... LG The cost of repair or replacement under this limited warranty. commercial or industrial use, offices, and recreational facilities or vehicles) or contrary to the instructions outlined in the Product's owner's manual. • Costs associated with normal operation. • Use of accessories (e.g., water filters, etc.), components, or consumable cleaning products that have been removed, altered, or cannot be borne by the consumer. TO OBTAIN WARRANTY SERVICE...
... LG The cost of repair or replacement under this limited warranty. commercial or industrial use, offices, and recreational facilities or vehicles) or contrary to the instructions outlined in the Product's owner's manual. • Costs associated with normal operation. • Use of accessories (e.g., water filters, etc.), components, or consumable cleaning products that have been removed, altered, or cannot be borne by the consumer. TO OBTAIN WARRANTY SERVICE...

Owners Manual
Page 43
...) days, whichever is greater. • Replacement products and parts may be new, reconditioned, refurbished, or otherwise factory remanufactured, all at its option, repair or replace the Product upon receipt of proof of purchase is required to obtain warranty service under this Limited Warranty that vary from province to a Product distributed, purchased and used within Canada, as determined at the...
...) days, whichever is greater. • Replacement products and parts may be new, reconditioned, refurbished, or otherwise factory remanufactured, all at its option, repair or replace the Product upon receipt of proof of purchase is required to obtain warranty service under this Limited Warranty that vary from province to a Product distributed, purchased and used within Canada, as determined at the...

Owners Manual
Page 44
... Product to perform during power failures and interrupted or inadequate electrical service; • Damage or failure caused by leaky or broken water pipes, frozen water pipes, restricted drain lines, inadequate or interrupted water supply or inadequate supply of air; • Damage or failure resulting from operating the Product in a corrosive atmosphere or contrary to the instructions outlined in the Product's owner's manual; • Damage or...
... Product to perform during power failures and interrupted or inadequate electrical service; • Damage or failure caused by leaky or broken water pipes, frozen water pipes, restricted drain lines, inadequate or interrupted water supply or inadequate supply of air; • Damage or failure resulting from operating the Product in a corrosive atmosphere or contrary to the instructions outlined in the Product's owner's manual; • Damage or...


