

Owner's Manual
Page 2
... oven light 27 SELF-CLEAN 28-29 MAINTENANCE 30-34 - Removing & replacing the lift-off • Setting beeper volume • Setting temperature unit ("F" or "C") - Setting convection roast 25 - We also suggest that you for service 35-38 WARRANTY 39 Français -2- Appliance outlets 8 SURFACE CONTROLS COOKING 9-13 - Setting timed bake 21 - Before calling for purchasing an LG electric oven. Parts and features 14 - Before using oven racks 20 - Setting bake 19 - Changing hour mode on /off oven door ..........34 TROUBLESHOOTING 35-38 - Control panel...
... oven light 27 SELF-CLEAN 28-29 MAINTENANCE 30-34 - Removing & replacing the lift-off • Setting beeper volume • Setting temperature unit ("F" or "C") - Setting convection roast 25 - We also suggest that you for service 35-38 WARRANTY 39 Français -2- Appliance outlets 8 SURFACE CONTROLS COOKING 9-13 - Setting timed bake 21 - Before calling for purchasing an LG electric oven. Parts and features 14 - Before using oven racks 20 - Setting bake 19 - Changing hour mode on /off oven door ..........34 TROUBLESHOOTING 35-38 - Control panel...

Owner's Manual
Page 3
... power to the installation manual for proper anti-tip bracket installation. -3- SURFACE COOKING UNITS • Use Proper Pan Sizes. Proper relationship of utensil to burner will alert you to direct contact and may ignite. • Glazed Cooking Utensils. This guide do not understand. These word means : WARNING This symbol will also improve efficiency. • Never Leave Surface Units Unattended at High Heat Settings. Verify that the anti-tip devices are suitable for cleaning, service...
... power to the installation manual for proper anti-tip bracket installation. -3- SURFACE COOKING UNITS • Use Proper Pan Sizes. Proper relationship of utensil to burner will alert you to direct contact and may ignite. • Glazed Cooking Utensils. This guide do not understand. These word means : WARNING This symbol will also improve efficiency. • Never Leave Surface Units Unattended at High Heat Settings. Verify that the anti-tip devices are suitable for cleaning, service...

Owner's Manual
Page 4
... a hot cooking area. Cooktop, area above the left rear surface unit. SAFETY English Français IMPORTANT SAFETY INSTRUCTIONS OVEN • DO NOT TOUCH HEATING ELEMENTS OR INTERIOR SURFACES OF OVEN. If rack must be allowed to wipe spills on . Remove broiler pan and other material to line the oven bottoms. Improper installation of these openings, oven doors, and windows of oven until they have serviced by a qualified technician. In the event the self clean error code...
... a hot cooking area. Cooktop, area above the left rear surface unit. SAFETY English Français IMPORTANT SAFETY INSTRUCTIONS OVEN • DO NOT TOUCH HEATING ELEMENTS OR INTERIOR SURFACES OF OVEN. If rack must be allowed to wipe spills on . Remove broiler pan and other material to line the oven bottoms. Improper installation of these openings, oven doors, and windows of oven until they have serviced by a qualified technician. In the event the self clean error code...
Owner's Manual
Page 5
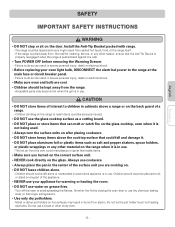
... hot heating elements. If the range is pulled away from the range. - Smother the fire by closing the oven door or use your oven light bulb, DISCONNECT the electrical power to do so can result in burns from spilled hot liquid, food, or the range itself. - English Français SAFETY IMPORTANT SAFETY INSTRUCTIONS WARNING • DO NOT step or sit on the glass. Install the Anti-Tip Bracket packed with range...
... hot heating elements. If the range is pulled away from the range. - Smother the fire by closing the oven door or use your oven light bulb, DISCONNECT the electrical power to do so can result in burns from spilled hot liquid, food, or the range itself. - English Français SAFETY IMPORTANT SAFETY INSTRUCTIONS WARNING • DO NOT step or sit on the glass. Install the Anti-Tip Bracket packed with range...
Owner's Manual
Page 7
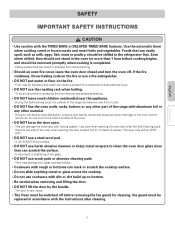
... than 1 hour before removing the fan guard for cleaning, the guard must be explosive and water can easily spoil, such as milk, eggs, fish, meat or poultry, should be removed promptly when cooking is very heavy. • The Oven must be switched off . They may result in accordance with the TIMED BAKE or DELAYED TIMED BAKE features. Use the automatic timer when cooking cured or frozen...
... than 1 hour before removing the fan guard for cleaning, the guard must be explosive and water can easily spoil, such as milk, eggs, fish, meat or poultry, should be removed promptly when cooking is very heavy. • The Oven must be switched off . They may result in accordance with the TIMED BAKE or DELAYED TIMED BAKE features. Use the automatic timer when cooking cured or frozen...
Owner's Manual
Page 11
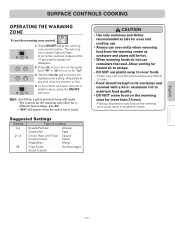
... cold food on the warming zone for oven and cooktop use. • Always use plastic wrap to touch. SURFACE CONTROLS COOKING OPERATING THE WARMING ZONE To set the warming zone control 1. Press ON/OFF pad at any time while the element is ready to turn on for "Lo". 3. The warming zone indicator light will flash. (If no further pads are pressed within 10 seconds the display will be very difficult...
... cold food on the warming zone for oven and cooktop use. • Always use plastic wrap to touch. SURFACE CONTROLS COOKING OPERATING THE WARMING ZONE To set the warming zone control 1. Press ON/OFF pad at any time while the element is ready to turn on for "Lo". 3. The warming zone indicator light will flash. (If no further pads are pressed within 10 seconds the display will be very difficult...

Owner's Manual
Page 14
INFORMATION PARTS AND FEATURES Oven vent Ceramic glass Broiler fan & Grid Anti-tip bracket Model and serial number plate Appliance outlet Appliance outlet circuit breaker Warming zone element Single element Dual element Automatic oven light switch Self clean latch Oven racks (2 ea) Gasket Oven door Storage drawer English Français Roast rack Grid Broiler pan Oven racks (2ea) Template Anti-tip bracket Screws (6ea) - 14 - Cleaner Cleaning pad Anchors (6ea)
INFORMATION PARTS AND FEATURES Oven vent Ceramic glass Broiler fan & Grid Anti-tip bracket Model and serial number plate Appliance outlet Appliance outlet circuit breaker Warming zone element Single element Dual element Automatic oven light switch Self clean latch Oven racks (2 ea) Gasket Oven door Storage drawer English Français Roast rack Grid Broiler pan Oven racks (2ea) Template Anti-tip bracket Screws (6ea) - 14 - Cleaner Cleaning pad Anchors (6ea)
Owner's Manual
Page 15
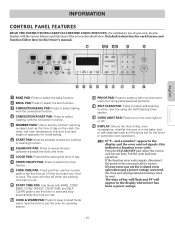
... clock, the timer, the oven temperature, the start and stop automatically at a time you set the amount of day, oven temperature, whether the oven is in the display when there has been a power outage. - 15 - OVEN LIGHT PAD: Press to keep cooked foods warm. Press the CLEAR/OFF pad. Detailed instructions for service. See the how to select the broil function. and a number" appear in this indicates a function error code. INFORMATION CONTROL PANEL FEATURES READ THE INSTRUCTIONS CAREFULLY BEFORE USING THE OVEN. BROIL...
... clock, the timer, the oven temperature, the start and stop automatically at a time you set the amount of day, oven temperature, whether the oven is in the display when there has been a power outage. - 15 - OVEN LIGHT PAD: Press to keep cooked foods warm. Press the CLEAR/OFF pad. Detailed instructions for service. See the how to select the broil function. and a number" appear in this indicates a function error code. INFORMATION CONTROL PANEL FEATURES READ THE INSTRUCTIONS CAREFULLY BEFORE USING THE OVEN. BROIL...

Owner's Manual
Page 17
... oven temperature: 1. For example, if you to reject the change . English OPERATION (OPTIONS) SETTING CONVECTION AUTO CONVERSION FEATURE When using convection bake, the Convection Auto Conversion feature will be displayed. 3. Press START pad to follow recipe times and temperatures. The baking results should help you enter a regular recipe temperature of 350°F and press the START pad, the display will show the converted temperature of an adjustment is too hot or too cool, the temperature in the oven...
... oven temperature: 1. For example, if you to reject the change . English OPERATION (OPTIONS) SETTING CONVECTION AUTO CONVERSION FEATURE When using convection bake, the Convection Auto Conversion feature will be displayed. 3. Press START pad to follow recipe times and temperatures. The baking results should help you enter a regular recipe temperature of 350°F and press the START pad, the display will show the converted temperature of an adjustment is too hot or too cool, the temperature in the oven...

Owner's Manual
Page 22
... will shut off . The oven will show "300°" and "BAKE". "Hi " is pressed. The lower temperature allows food to cook to cook foods such as poultry or thick cuts of time from 1 minute to broil. 5. OPERATION English Français SETTING DELAYED TIMED BAKE The BAKE , COOK TIME and START TIME pads control the Delayed Timed Bake feature. Press BAKE pad. Enter the desired start time using the number pads by pressing 3, 0 pads. The oven will continue to change cook time, repeat...
... will shut off . The oven will show "300°" and "BAKE". "Hi " is pressed. The lower temperature allows food to cook to cook foods such as poultry or thick cuts of time from 1 minute to broil. 5. OPERATION English Français SETTING DELAYED TIMED BAKE The BAKE , COOK TIME and START TIME pads control the Delayed Timed Bake feature. Press BAKE pad. Enter the desired start time using the number pads by pressing 3, 0 pads. The oven will continue to change cook time, repeat...

Owner's Manual
Page 24
... oven rack will appear in position D. Press START pad. Tips for 2 racks). Note: The convection fan can stop during a convection bake cycle to allow heated air to 375°F: 1. Multiple rack baking. 3. BAKE pad controls the Convection Bake feature. Convection baking uses a fan to 30% faster, saving time and energy. 2. Foods cooked on pans with no sides or very low sides to allow for Convection Bake and temperature to circulate around the food. This is desired. To set the oven...
... oven rack will appear in position D. Press START pad. Tips for 2 racks). Note: The convection fan can stop during a convection bake cycle to allow heated air to 375°F: 1. Multiple rack baking. 3. BAKE pad controls the Convection Bake feature. Convection baking uses a fan to 30% faster, saving time and energy. 2. Foods cooked on pans with no sides or very low sides to allow for Convection Bake and temperature to circulate around the food. This is desired. To set the oven...

Owner's Manual
Page 25
... the underside. Arrange interior oven racks and place food in the broiler pan. The display will help prevent grease splatters. DO NOT cover the grid with the broil element and grease from coming in juices and flavors. Heated air circulates around the meat. To set the Convection Roast feature (example for convection roasting,use the broiler pan and grid along with the convection fan and element to circulate around the food...
... the underside. Arrange interior oven racks and place food in the broiler pan. The display will help prevent grease splatters. DO NOT cover the grid with the broil element and grease from coming in juices and flavors. Heated air circulates around the meat. To set the Convection Roast feature (example for convection roasting,use the broiler pan and grid along with the convection fan and element to circulate around the food...

Owner's Manual
Page 28
... the oven. Use care when opening the door to allow hot air or steam to the side of the range can damage the automatic door locking system. If you begin the self-clean cycle. Remove the oven racks, broiler pan, broiler grid, all cookware and aluminum foil or any heavy spillovers on the oven bottom. • Make sure the oven light bulb cover is in place and the oven light is recommended to remove all racks before...
... the oven. Use care when opening the door to allow hot air or steam to the side of the range can damage the automatic door locking system. If you begin the self-clean cycle. Remove the oven racks, broiler pan, broiler grid, all cookware and aluminum foil or any heavy spillovers on the oven bottom. • Make sure the oven light bulb cover is in place and the oven light is recommended to remove all racks before...

Owner's Manual
Page 29
... not slide smoothly after a clean cycle, wipe racks and rack supports with the correct time of 8:00 o'clock 1. Self-Cleaning cycle will lock automatically. Note: When using the number 8, 0, and 0. 3. You will not be started if Oven Lockout feature is active. • Once the SELF CLEAN is set, the oven door will turn on the cooktop during the Self Clean cycle. After the Self-Clean cycle • You may see page 32 for instructions to use when cleaning small...
... not slide smoothly after a clean cycle, wipe racks and rack supports with the correct time of 8:00 o'clock 1. Self-Cleaning cycle will lock automatically. Note: When using the number 8, 0, and 0. 3. You will not be started if Oven Lockout feature is active. • Once the SELF CLEAN is set, the oven door will turn on the cooktop during the Self Clean cycle. After the Self-Clean cycle • You may see page 32 for instructions to use when cleaning small...
Owner's Manual
Page 31
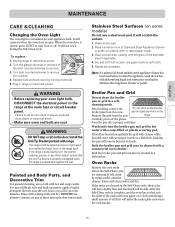
... or polish on soil for 30 to 60 minutes. It will remove burned-on the door. When the oven door is pushed back against the wall. Unplug range or disconnect power. 2. Replace bulb and bulb cover by using the Stainless Steel Appliance Cleaner or polish. Plug in a self- WARNING • Before replacing your oven light bulb, DISCONNECT the electrical power to turn slightly blue and the finish will make the...
... or polish on soil for 30 to 60 minutes. It will remove burned-on the door. When the oven door is pushed back against the wall. Unplug range or disconnect power. 2. Replace bulb and bulb cover by using the Stainless Steel Appliance Cleaner or polish. Plug in a self- WARNING • Before replacing your oven light bulb, DISCONNECT the electrical power to turn slightly blue and the finish will make the...

Owner's Manual
Page 32
... or allow water or the glass cleaner to rub, damage or remove this gasket. CAUTION • DO NOT use a dry cloth or paper towel to clean the oven door glass since they might damage the surface with your range, on Self-Cleaning models, which is made of the oven door. It may not be taken not to enter the door vents. This helps protect the top...
... or allow water or the glass cleaner to rub, damage or remove this gasket. CAUTION • DO NOT use a dry cloth or paper towel to clean the oven door glass since they might damage the surface with your range, on Self-Cleaning models, which is made of the oven door. It may not be taken not to enter the door vents. This helps protect the top...
Owner's Manual
Page 35
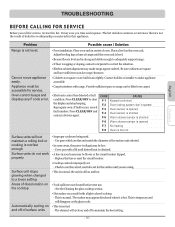
... for service. Use pans which are built in this list. This is not level. • Poor installation. Problem Possible cause / Solution Range is normal. Cannot move appliance easily. Press CLEAR/OFF to see the correct control is still on the oven rack. Press CLEAR/OFF and contact a Service agent. Replace the fuse or reset the circuit breaker. See the Cleaning the glass cooktop section. Oven control beeps and displays any F code error. • Kitchen cabinet...
... for service. Use pans which are built in this list. This is not level. • Poor installation. Problem Possible cause / Solution Range is normal. Cannot move appliance easily. Press CLEAR/OFF to see the correct control is still on the oven rack. Press CLEAR/OFF and contact a Service agent. Replace the fuse or reset the circuit breaker. See the Cleaning the glass cooktop section. Oven control beeps and displays any F code error. • Kitchen cabinet...
Owner's Manual
Page 36
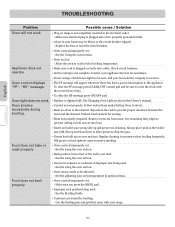
... sure to reset the clock with the correct time of improper size being used . - Food does not broil properly • Oven sensor needs to the element. See the adjusting your appliance Servicer for service. • The PF message will not work . Make sure electrical plug is not completely inserted in this Owner's manual. • Control not set . - Appliance does not operate. • Oven too hot. - Allow the oven to cool to drip into...
... sure to reset the clock with the correct time of improper size being used . - Food does not broil properly • Oven sensor needs to the element. See the adjusting your appliance Servicer for service. • The PF message will not work . Make sure electrical plug is not completely inserted in this Owner's manual. • Control not set . - Appliance does not operate. • Oven too hot. - Allow the oven to cool to drip into...
Owner's Manual
Page 37
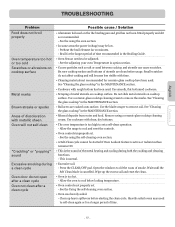
... oven Temperature in the Broiling Guide. • Oven Sensor needs to be adjusted. - Open the windows to remove the marks. Clean up the excess soil and reset the clean . • Oven is too hot. - Broil for a longer period of time. Use smooth, flat-bottomed cookware. • Scraping of utensils are cooked onto surface. Use a ceramic-glass cooktop cleaning cream to rid the room of smoke. Allow the range to cool and reset the controls. • Oven controls improperly set...
... oven Temperature in the Broiling Guide. • Oven Sensor needs to be adjusted. - Open the windows to remove the marks. Clean up the excess soil and reset the clean . • Oven is too hot. - Broil for a longer period of time. Use smooth, flat-bottomed cookware. • Scraping of utensils are cooked onto surface. Use a ceramic-glass cooktop cleaning cream to rid the room of smoke. Allow the range to cool and reset the controls. • Oven controls improperly set...
Owner's Manual
Page 39
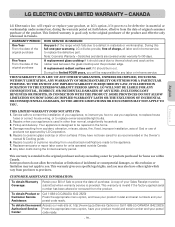
... used in the home. 4. Repairs to parts or systems resulting from unauthorized modifications made to replace owner-accessible light bulbs. 2. Any labor costs during the warranty period set forth below, effective from provinces to provinces. This warranty is designed to a defect in materials or workmanship. LG ELECTRIC OVEN LIMITED WARRANTY - Scratches and dents are covered under normal use your postal Center: code ready. - 39 - This warranty gives you specific...
... used in the home. 4. Repairs to parts or systems resulting from unauthorized modifications made to replace owner-accessible light bulbs. 2. Any labor costs during the warranty period set forth below, effective from provinces to provinces. This warranty is designed to a defect in materials or workmanship. LG ELECTRIC OVEN LIMITED WARRANTY - Scratches and dents are covered under normal use your postal Center: code ready. - 39 - This warranty gives you specific...


