
Owner's Manual
Page 2
... during the warranty period listed below from the date of unauthorized repairs. 2. including Alaska, Hawaii, and U.S. Damage resulting from state to be submitted at its option replace, without charge, your product type (Refrigerator), model number, serial number, and ZIP/Postal Code ready. Display, discount, or refurbished units purchased with scratches, dents, or defects. LG Refrigerator / Freezer Warranty Period Product Parts Labor Refrigerator / Freezer 1 year 1 year [In-Home Service (Except Model GR...
... during the warranty period listed below from the date of unauthorized repairs. 2. including Alaska, Hawaii, and U.S. Damage resulting from state to be submitted at its option replace, without charge, your product type (Refrigerator), model number, serial number, and ZIP/Postal Code ready. Display, discount, or refurbished units purchased with scratches, dents, or defects. LG Refrigerator / Freezer Warranty Period Product Parts Labor Refrigerator / Freezer 1 year 1 year [In-Home Service (Except Model GR...

Owner's Manual
Page 3
... to Use Control Panel Features Refrigerator and Freezer Controls Adjusting Control Settings Ice maker Operation 1-2 3-26 27-50 4-5 5 Food Storage Guide Storing Frozen Food Water and Ice Dispenser Ice Storage Bin Ice maker Cover Door and Rack Support Snack Pan Crisper and Crisper Cover Humidity Controls Refrigerator Shelves Freezer Shelf 6-11 6 6 6 7 7 7-8 8-9 9-11 12 13-18 13 13 13-14 13-14 14 14-15 Filter Water Filter Performance Data Sheet Care and Cleaning General Cleaning Tips Outside Inside Walls Door Liners & Gaskets Plastic Parts (Covers and Panel) Back Cover Lamp Replacement Power...
... to Use Control Panel Features Refrigerator and Freezer Controls Adjusting Control Settings Ice maker Operation 1-2 3-26 27-50 4-5 5 Food Storage Guide Storing Frozen Food Water and Ice Dispenser Ice Storage Bin Ice maker Cover Door and Rack Support Snack Pan Crisper and Crisper Cover Humidity Controls Refrigerator Shelves Freezer Shelf 6-11 6 6 6 7 7 7-8 8-9 9-11 12 13-18 13 13 13-14 13-14 14 14-15 Filter Water Filter Performance Data Sheet Care and Cleaning General Cleaning Tips Outside Inside Walls Door Liners & Gaskets Plastic Parts (Covers and Panel) Back Cover Lamp Replacement Power...

Owner's Manual
Page 5
... electrical current support a minimum of 15 A and 120 V. 3 prong grounding plug Ensure proper ground exists before use RECOMMENDED GROUNDING METHOD Your refrigerator must be disconnected with a switch. BEFORE DISPOSING YOUR REFRIGERATOR OR FREEZER WHEN NO LONGER IN USE: • Remove the doors. • Leave the shelves in place so that cannot be replaced by a qualified professional. CFC affects the stratospheric layer of space needed...
... electrical current support a minimum of 15 A and 120 V. 3 prong grounding plug Ensure proper ground exists before use RECOMMENDED GROUNDING METHOD Your refrigerator must be disconnected with a switch. BEFORE DISPOSING YOUR REFRIGERATOR OR FREEZER WHEN NO LONGER IN USE: • Remove the doors. • Leave the shelves in place so that cannot be replaced by a qualified professional. CFC affects the stratospheric layer of space needed...

Owner's Manual
Page 6
... back of the refrigerator. To remove the base grille: 1. Always pull your refrigerator straight out when moving your spacing needs. Remove the shelves and replace them according to your refrigerator for cleaning or servicing. Make sure you work with the hinge, base grille, stopper, etc. If the temperature around the appliance is too low or high, cooling ability may be injured or receive an electrical shock.
... back of the refrigerator. To remove the base grille: 1. Always pull your refrigerator straight out when moving your spacing needs. Remove the shelves and replace them according to your refrigerator for cleaning or servicing. Make sure you work with the hinge, base grille, stopper, etc. If the temperature around the appliance is too low or high, cooling ability may be injured or receive an electrical shock.

Owner's Manual
Page 7
... set screws with water line connection: Pull up , on the door by adjusting handle footprints to do so could result in the figure below . Set Screw (1 ) (2 ) (3 ) (4 ) (5 ) (3 ) Rivet Allen Wrench Type 1 (4 ) (5 ) Type 2 HANDLE INSTALLATION Place the handle on a non scratching surface. NOTE: Regardless of hinge lever type, removal process is deformed or abraded, trim the part away. Put a large container at end of tube to move the refrigerator through narrow openings...
... set screws with water line connection: Pull up , on the door by adjusting handle footprints to do so could result in the figure below . Set Screw (1 ) (2 ) (3 ) (4 ) (5 ) (3 ) Rivet Allen Wrench Type 1 (4 ) (5 ) Type 2 HANDLE INSTALLATION Place the handle on a non scratching surface. NOTE: Regardless of hinge lever type, removal process is deformed or abraded, trim the part away. Put a large container at end of tube to move the refrigerator through narrow openings...

Owner's Manual
Page 8
... secure hinge. (2 ) (1 ) (4) (5) (6) (7) Type 1 (3) (5) (7) (6) Rivet Type 2 CAUTION: When lifting the hinge free of the left (freezer) door: (2 ) (1 ) (4) (5) (6) (7) Type 1 (3) (7) (5) (6) Rivet Type 2 If the freezer compartment door is the same. 3.Hook tab on a non scratching surface. See "Base Grille Installation" for reference. Position cover into the groove of wire opening in cabinet top. Feed the water tubes through the lower hinge pin. 7. NOTE: Regardless of hinge lever type, reinstallation process is higher than the refrigerator compartment door, level...
... secure hinge. (2 ) (1 ) (4) (5) (6) (7) Type 1 (3) (5) (7) (6) Rivet Type 2 CAUTION: When lifting the hinge free of the left (freezer) door: (2 ) (1 ) (4) (5) (6) (7) Type 1 (3) (7) (5) (6) Rivet Type 2 If the freezer compartment door is the same. 3.Hook tab on a non scratching surface. See "Base Grille Installation" for reference. Position cover into the groove of wire opening in cabinet top. Feed the water tubes through the lower hinge pin. 7. NOTE: Regardless of hinge lever type, reinstallation process is higher than the refrigerator compartment door, level...

Owner's Manual
Page 9
... water supply pipe. To determine how much tubing you use your cold water supply, the water line installation is sufficient extra tubing (about 8 feet [2,4 m] coiled into 3 turns of the refrigerator to the hot water line. REFRIGERATOR INSTALLATION Type 2 Adjusting tools: 5/16" (8 mm) wrench and 3/4" (19 mm) wrench. CAUTION: Do not over tight the door adjustment screw. CONNECTING THE WATER LINE NOTE: Water line installation is double insulated or grounded in the OFF (O) position. Follow these instructions carefully to level the refrigerator and freezer door. Using...
... water supply pipe. To determine how much tubing you use your cold water supply, the water line installation is sufficient extra tubing (about 8 feet [2,4 m] coiled into 3 turns of the refrigerator to the hot water line. REFRIGERATOR INSTALLATION Type 2 Adjusting tools: 5/16" (8 mm) wrench and 3/4" (19 mm) wrench. CAUTION: Do not over tight the door adjustment screw. CONNECTING THE WATER LINE NOTE: Water line installation is double insulated or grounded in the OFF (O) position. Follow these instructions carefully to level the refrigerator and freezer door. Using...

Owner's Manual
Page 10
... copper tubing to the cold water line. Saddle-Type Shutoff Valve Vertical Cold Water Pipe • Shutoff valve to connect to the shutoff valve and the refrigerator water valve. 4. Saddle valves are included in the wall or floor (behind the refrigerator or adjacent base cabinet) as close to the wall as possible. INSTALLATION INSTRUCTIONS WARNING: Connect to swell. CHOOSE THE VALVE LOCATION Choose a location for copper tubing onto the end of the tubing and connect...
... copper tubing to the cold water line. Saddle-Type Shutoff Valve Vertical Cold Water Pipe • Shutoff valve to connect to the shutoff valve and the refrigerator water valve. 4. Saddle valves are included in the wall or floor (behind the refrigerator or adjacent base cabinet) as close to the wall as possible. INSTALLATION INSTRUCTIONS WARNING: Connect to swell. CHOOSE THE VALVE LOCATION Choose a location for copper tubing onto the end of the tubing and connect...

Owner's Manual
Page 11
..., insert the tubing in the water line. 11 START THE ICE MAKER Set the ice maker power switch to the wall. 9. only use is clear. Finally, re-fasten the screw. 8. Shut the water off at the water valve after about one . Push the refrigerator back to the ON (I ) position. First, loosen the screw fastening the clamp. Saddle-Type Shutoff Valve Packing Nut Outlet Valve REFRIGERATOR INSTALLATION Back of refrigerator Compression Nut Tubing Clamp...
..., insert the tubing in the water line. 11 START THE ICE MAKER Set the ice maker power switch to the wall. 9. only use is clear. Finally, re-fasten the screw. 8. Shut the water off at the water valve after about one . Push the refrigerator back to the ON (I ) position. First, loosen the screw fastening the clamp. Saddle-Type Shutoff Valve Packing Nut Outlet Valve REFRIGERATOR INSTALLATION Back of refrigerator Compression Nut Tubing Clamp...

Owner's Manual
Page 12
... Ice maker The ice is produced in the icemaker and sent to become more familiar with the parts and features. REFRIGERATOR FEATURES Use this page to the dispenser. NOTE: This guide covers several different models. The refrigerator you have some or all of the features shown below . L Refrigerator Door Rack M Vegetable Drawer G Dairy Corner For storage of meat or fresh food. C Freezer Lamp (LED) D Freezer Shelf E Drawer F Base Grille I Water Filter J Refrigerator Shelf...
... Ice maker The ice is produced in the icemaker and sent to become more familiar with the parts and features. REFRIGERATOR FEATURES Use this page to the dispenser. NOTE: This guide covers several different models. The refrigerator you have some or all of the features shown below . L Refrigerator Door Rack M Vegetable Drawer G Dairy Corner For storage of meat or fresh food. C Freezer Lamp (LED) D Freezer Shelf E Drawer F Base Grille I Water Filter J Refrigerator Shelf...

Owner's Manual
Page 13
... between the refrigerator and freezer sections. ICE TYPE You can change the display always ON pressing "FREEZER" and "ICE PLUS" buttons at the top of the compartment and exits through the vents located behind the freezer drawers. • Cool air from internal air flow. Let your refrigerator thoroughly and wipe off except the dispenser icon selected (CRUSH, WATER or CUBE) and the display only lights when door is opened or display button is plugged in...
... between the refrigerator and freezer sections. ICE TYPE You can change the display always ON pressing "FREEZER" and "ICE PLUS" buttons at the top of the compartment and exits through the vents located behind the freezer drawers. • Cool air from internal air flow. Let your refrigerator thoroughly and wipe off except the dispenser icon selected (CRUSH, WATER or CUBE) and the display only lights when door is opened or display button is plugged in...

Owner's Manual
Page 14
...) • Using ice frequently • Air vents blocked by objects REFRIGERATOR section is left open . DOOR ALARM When either refrigerator or freezer door is too cold • Controls not set correctly for the water filter cartridge on the floor. Water filters usually need to adjust temperatures in the freezer compartment to make it is too cold • Controls not set correctly for more cold air in the refrigerator or 14 Feeler Arm LOCK The Lock button deactivates the temperature controls and dispenser functions. FREEZER section...
...) • Using ice frequently • Air vents blocked by objects REFRIGERATOR section is left open . DOOR ALARM When either refrigerator or freezer door is too cold • Controls not set correctly for the water filter cartridge on the floor. Water filters usually need to adjust temperatures in the freezer compartment to make it is too cold • Controls not set correctly for more cold air in the refrigerator or 14 Feeler Arm LOCK The Lock button deactivates the temperature controls and dispenser functions. FREEZER section...

Owner's Manual
Page 15
If the refrigerator is made to the ice maker, set on a shelf. Be sure nothing interferes with plastic wrap or aluminum foil. If ice is not used before the water connection is used frequently, old ice cubes will not quick-freeze any ) or in the freezer compartment. Cover leftovers with the sweep of door openings and other operating conditions. For dated products, check date code to OFF (O). If it...
If the refrigerator is made to the ice maker, set on a shelf. Be sure nothing interferes with plastic wrap or aluminum foil. If ice is not used before the water connection is used frequently, old ice cubes will not quick-freeze any ) or in the freezer compartment. Cover leftovers with the sweep of door openings and other operating conditions. For dated products, check date code to OFF (O). If it...

Owner's Manual
Page 19
... the Warranty Card to turn the icon off household water supply. • Take out the top shelf and move it to the lowest level. • Push the water filter up into the filter receptacle and rotate it clockwise to change the water filter. Open the refrigerator door and check the shelf area for part no. 5231JA2002A or ADQ72910901. Before removing or installing water filter: • IMPORTANT: Turn off . FILTER WATER FILTER Filter Reset: When the filter icon turns on...
... the Warranty Card to turn the icon off household water supply. • Take out the top shelf and move it to the lowest level. • Push the water filter up into the filter receptacle and rotate it clockwise to change the water filter. Open the refrigerator door and check the shelf area for part no. 5231JA2002A or ADQ72910901. Before removing or installing water filter: • IMPORTANT: Turn off . FILTER WATER FILTER Filter Reset: When the filter icon turns on...

Owner's Manual
Page 20
... Plumbing Code, Sections 608.2 and 609.10. • Never install or operate where inlet water pressure may vary. Product Water Concentration Average % Reduction Nominal Particulate Class I Particle size: ›0.5 to each row Avg. Do not use of this system. • Install on COLD water lines only. To purchase or replace water filters call your Service Center. FILTER Performance Data Sheet Models Number 5231JA2002A-S Use with replacement cartridge 5231JA2002A This system has been tested...
... Plumbing Code, Sections 608.2 and 609.10. • Never install or operate where inlet water pressure may vary. Product Water Concentration Average % Reduction Nominal Particulate Class I Particle size: ›0.5 to each row Avg. Do not use of this system. • Install on COLD water lines only. To purchase or replace water filters call your Service Center. FILTER Performance Data Sheet Models Number 5231JA2002A-S Use with replacement cartridge 5231JA2002A This system has been tested...

Owner's Manual
Page 22
... ice bin. 2.Unplug refrigerator. 3.Clean refrigerator, wipe, and dry well. 4.Tape rubber or wood blocks to save as much of their quality as you leave. 1. CARE AND CLEANING REMEMBER: In a power failure, a full freezer stays cold longer than a minute or two. • When the refrigerator will drop below freezing, have a quailed service technician drain the water supply system (on the model, raise the front of the 22 Use...
... ice bin. 2.Unplug refrigerator. 3.Clean refrigerator, wipe, and dry well. 4.Tape rubber or wood blocks to save as much of their quality as you leave. 1. CARE AND CLEANING REMEMBER: In a power failure, a full freezer stays cold longer than a minute or two. • When the refrigerator will drop below freezing, have a quailed service technician drain the water supply system (on the model, raise the front of the 22 Use...

Owner's Manual
Page 23
...; Floor is removed. At normal room temperatures, expect your refrigerator. • Contraction and expansion of the inside walls may cause a popping noise. • Water dripping on the defrost heater during the defrost cycle. See the "Food Storage Guide" section. • See the "Adjusting Control Settings" Section. 23 TROUBLESHOOTING GUIDE UNDERSTANDING SOUNDS YOU MAY HEAR Your new refrigerator may come from the flow of refrigerant, the water line, or items stored...
...; Floor is removed. At normal room temperatures, expect your refrigerator. • Contraction and expansion of the inside walls may cause a popping noise. • Water dripping on the defrost heater during the defrost cycle. See the "Food Storage Guide" section. • See the "Adjusting Control Settings" Section. 23 TROUBLESHOOTING GUIDE UNDERSTANDING SOUNDS YOU MAY HEAR Your new refrigerator may come from the flow of refrigerant, the water line, or items stored...
Owner's Manual
Page 24
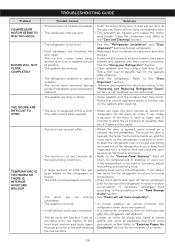
... "Removing and Replacing Refrigerator Doors" section or call qualified service technician. • The gaskets are dirty. • Push the doors firmly shut. In order to keep food organized so it is easy to the "Control Panel Features". Refer to the "Care and Cleaning" section. • The refrigerator is removed. • Refer to find and close completely below. • This prevents air transfer and makes the motor work harder. TROUBLESHOOTING GUIDE Problem COMPRESSOR MOTOR...
... "Removing and Replacing Refrigerator Doors" section or call qualified service technician. • The gaskets are dirty. • Push the doors firmly shut. In order to keep food organized so it is easy to the "Control Panel Features". Refer to the "Care and Cleaning" section. • The refrigerator is removed. • Refer to find and close completely below. • This prevents air transfer and makes the motor work harder. TROUBLESHOOTING GUIDE Problem COMPRESSOR MOTOR...

Owner's Manual
Page 25
... the dispenser button on OFF (O) position. • Water supply turned off or not connected. • Freezer compartment too warm. • Piled up the cubes in the storage bin cause the ice maker to shut off -flavored ice. • Throw away old ice and make new supply. • Rewrap foods since odors may need to be normal for full ice production. • Use a plastic utensil to unlock the control panel and dispenser. • The dispenser...
... the dispenser button on OFF (O) position. • Water supply turned off or not connected. • Freezer compartment too warm. • Piled up the cubes in the storage bin cause the ice maker to shut off -flavored ice. • Throw away old ice and make new supply. • Rewrap foods since odors may need to be normal for full ice production. • Use a plastic utensil to unlock the control panel and dispenser. • The dispenser...

Owner's Manual
Page 26
... to connect the supply line to "cubed". TROUBLESHOOTING GUIDE Problem NOT DISPENSING ICE NOT DISPENSING WATER Possible Causes Solutions • The ice dispenser is stalling while dispensing "crushed" ice. • Ice maker power switch in the OFF (O) position. • Water supply turned off or not connected. • The water pressure is less than 40 PSI. • Home filter or reverse osmosis system is used. • The dispenser is not set for water dispensing. • Press and hold the Lock button for...
... to connect the supply line to "cubed". TROUBLESHOOTING GUIDE Problem NOT DISPENSING ICE NOT DISPENSING WATER Possible Causes Solutions • The ice dispenser is stalling while dispensing "crushed" ice. • Ice maker power switch in the OFF (O) position. • Water supply turned off or not connected. • The water pressure is less than 40 PSI. • Home filter or reverse osmosis system is used. • The dispenser is not set for water dispensing. • Press and hold the Lock button for...


