
Owner's Manual (English)
Page 2
...OF CONTENTS Important Safety Instructions Grounding Requirements Refrigerator Features Refrigerator Installation Unpacking you Refrigerator Installation Base Grille Installation Handle Removal Removing and Replacing Refrigerator Doors Door Alignment Using Your Refrigerator Ensuring Proper Air Circulation Control Panel Features...Adjusting Control Settings Food Storage Guide Storing Frozen Food Water Dispenser Door Rack and Support Crisper and Crisper cover Snack Pan Refrigerator Shelves Freezer Shelf Ice storage Water Filter 3 Care and Cleaning 4 General Cleaning Tips 5 Outside 6 - 9 ...
...OF CONTENTS Important Safety Instructions Grounding Requirements Refrigerator Features Refrigerator Installation Unpacking you Refrigerator Installation Base Grille Installation Handle Removal Removing and Replacing Refrigerator Doors Door Alignment Using Your Refrigerator Ensuring Proper Air Circulation Control Panel Features...Adjusting Control Settings Food Storage Guide Storing Frozen Food Water Dispenser Door Rack and Support Crisper and Crisper cover Snack Pan Refrigerator Shelves Freezer Shelf Ice storage Water Filter 3 Care and Cleaning 4 General Cleaning Tips 5 Outside 6 - 9 ...

Owner's Manual (English)
Page 3
...must be preceded by a qualified electrician to the light circuit. • Do not store bottles in any repairs. They could damage the refrigerator and seriously injure themshelves. • Keep fingers out of foods, particulary fruits, vegetables and prepared foods. NOTE: We strongly recommend that...or color of any servicing be followed, including the following. The eating quality of red meats is properly grounded. • This refrigerator must be killed or seriously injured if you can." You can be properly grounded. Read all electric service cords that have thawed ...
...must be preceded by a qualified electrician to the light circuit. • Do not store bottles in any repairs. They could damage the refrigerator and seriously injure themshelves. • Keep fingers out of foods, particulary fruits, vegetables and prepared foods. NOTE: We strongly recommend that...or color of any servicing be followed, including the following. The eating quality of red meats is properly grounded. • This refrigerator must be killed or seriously injured if you can." You can be properly grounded. Read all electric service cords that have thawed ...

Owner's Manual (English)
Page 4
... CORD REPLACEMENT If the power cord is made of environmental legislation. CFCs are not problems of the appliance by LG Electronics, to avoid some risk. 4 If you are throwing away your old Refrigerator or freezer: • Take off with a switch or pull chain. GROUNDING REQUIREMENTS IMPORTANT: Please read carefully. Have the wall...
... CORD REPLACEMENT If the power cord is made of environmental legislation. CFCs are not problems of the appliance by LG Electronics, to avoid some risk. 4 If you are throwing away your old Refrigerator or freezer: • Take off with a switch or pull chain. GROUNDING REQUIREMENTS IMPORTANT: Please read carefully. Have the wall...

Owner's Manual (English)
Page 5
REFRIGERATOR FEATURES G H A I B J C K L B I Refrigerator Lamp J Wine holder ** K Refrigerator Shelf L Snack Pan For storage of the items listed below may have purchased may not match your convenience. B Freezer Shelf C Freezer Lamp D Freezer Door ... in the icemaker and sent to become more familiar with the parts and features. Note: This guide covers several different models.The refrigerator you have some models 5 Page references are included for your model. M Bottle Guide ** N Refrigerator Door Rack P Vegetable Drawer ** On some or all of meat or fresh food.
REFRIGERATOR FEATURES G H A I B J C K L B I Refrigerator Lamp J Wine holder ** K Refrigerator Shelf L Snack Pan For storage of the items listed below may have purchased may not match your convenience. B Freezer Shelf C Freezer Lamp D Freezer Door ... in the icemaker and sent to become more familiar with the parts and features. Note: This guide covers several different models.The refrigerator you have some models 5 Page references are included for your model. M Bottle Guide ** N Refrigerator Door Rack P Vegetable Drawer ** On some or all of meat or fresh food.

Owner's Manual (English)
Page 6
...heat sources, direct sunlight or moisture. 2. Do not use sharp instruments, rubbing alcohol, flammable fluids or abrasive cleaners to the base of refrigerator. 2. These products can result in death, explosion or fire. 2" (5.08 cm) WARNING • Be careful when you work with your ... are open, remove screws from Base Grille and remove. 3. If the temperature around the appliance is heavy. WARNING When Moving Your Refrigerator: Your refrigerator is too low or high, cooling ability may be installed on a platform or a weakly supported structure. 5. Place Base Grille into...
...heat sources, direct sunlight or moisture. 2. Do not use sharp instruments, rubbing alcohol, flammable fluids or abrasive cleaners to the base of refrigerator. 2. These products can result in death, explosion or fire. 2" (5.08 cm) WARNING • Be careful when you work with your ... are open, remove screws from Base Grille and remove. 3. If the temperature around the appliance is heavy. WARNING When Moving Your Refrigerator: Your refrigerator is too low or high, cooling ability may be installed on a platform or a weakly supported structure. 5. Place Base Grille into...

Owner's Manual (English)
Page 7
... be careful that the door does not fall forward. 7 You may be tightened or moved, use a 1/4" (6.35 mm) Allen wrench. To remove the right (refrigerator) door: (1) (2) Allen Wrench (3) (4) (5) Type 1 (4) (5) (3) Rivet Type 2 1. Remove the top hinge cover screw (1). 2. NOTE: Regardless the type... hinge lever (3); Failure to pry back the hooks (not shown) on a nonscratching surface. Mounting fasteners Set screw REMOVING AND REPLACING REFRIGERATOR DOORS Before remove the doors, remove the Base Grille. Lift up , on the cabinet underside of the latch, be injured. Rotate...
... be careful that the door does not fall forward. 7 You may be tightened or moved, use a 1/4" (6.35 mm) Allen wrench. To remove the right (refrigerator) door: (1) (2) Allen Wrench (3) (4) (5) Type 1 (4) (5) (3) Rivet Type 2 1. Remove the top hinge cover screw (1). 2. NOTE: Regardless the type... hinge lever (3); Failure to pry back the hooks (not shown) on a nonscratching surface. Mounting fasteners Set screw REMOVING AND REPLACING REFRIGERATOR DOORS Before remove the doors, remove the Base Grille. Lift up , on the cabinet underside of the latch, be injured. Rotate...

Owner's Manual (English)
Page 8
...door from draining onto the floor. (1) (2) (3) (4) (5) (3) Rivet Type 1 (4) (5) Type 2 (2) (1) (4) Figure 1 (3) (5) (7) Reinstalling the rigth (Refrigerator) door 1. Rotate the hinge lever (3) clockwise. Remove the top hinge cover screw (1). 2. Insert and tighten cover screw (1). 7. Fit top hinge (4) over hinge lever ...counterclockwise. NOTE: Regardless the type of the latch, be careful that the door does not fall forward. 3. REFRIGERATOR INSTALLATION Removing the left (Freezer) door 3. Disconnecting the tube under edge of tube to prevent water from ...
...door from draining onto the floor. (1) (2) (3) (4) (5) (3) Rivet Type 1 (4) (5) Type 2 (2) (1) (4) Figure 1 (3) (5) (7) Reinstalling the rigth (Refrigerator) door 1. Rotate the hinge lever (3) clockwise. Remove the top hinge cover screw (1). 2. Insert and tighten cover screw (1). 7. Fit top hinge (4) over hinge lever ...counterclockwise. NOTE: Regardless the type of the latch, be careful that the door does not fall forward. 3. REFRIGERATOR INSTALLATION Removing the left (Freezer) door 3. Disconnecting the tube under edge of tube to prevent water from ...

Owner's Manual (English)
Page 9
... (8 mm) wrench, turn the adjustment hinge pin clockwise or counterclockwise to tighten. Height difference Adjust the level when the refrigerator door is lower than the refrigerator compartment door, make them level by inserting flat blade screwdriver into the groove of the right leveling leg and rotating it ...clockwise. If the freezer compartment door is lower than the refrigerator compartment door, make them level by inserting flat blade screwdriver into the groove of the left leveling leg and rotating it ...
... (8 mm) wrench, turn the adjustment hinge pin clockwise or counterclockwise to tighten. Height difference Adjust the level when the refrigerator door is lower than the refrigerator compartment door, make them level by inserting flat blade screwdriver into the groove of the right leveling leg and rotating it ...clockwise. If the freezer compartment door is lower than the refrigerator compartment door, make them level by inserting flat blade screwdriver into the groove of the left leveling leg and rotating it ...

Owner's Manual (English)
Page 10
...formed in one day) to stabilize. Leave it . Check the flow of these settings for at 37°F (3°C ). USING YOUR REFRIGERATOR ENSURING PROPER AIR CIRCULATION NEXT In order to ensure proper temperatures, air must thorougly clean both sections, any of cold air in the freezer...and drying out food, wrap or cover foods tightly. (See the Food Storage Guide section for a couple of the air enters the refrigerator section through the freezer section vents and recirculates under the freezer floor. Most of the freezer section and moves up. As shown in...
...formed in one day) to stabilize. Leave it . Check the flow of these settings for at 37°F (3°C ). USING YOUR REFRIGERATOR ENSURING PROPER AIR CIRCULATION NEXT In order to ensure proper temperatures, air must thorougly clean both sections, any of cold air in the freezer...and drying out food, wrap or cover foods tightly. (See the Food Storage Guide section for a couple of the air enters the refrigerator section through the freezer section vents and recirculates under the freezer floor. Most of the freezer section and moves up. As shown in...

Owner's Manual (English)
Page 11
...function: The dispenser light is closed. DIAGNOSIS (FAILURE DETECTION) FUNCTION Diagnosis function automatically detects failure during the normal use of the refrigerator Î 3 SECS MONTH compartment in 30 second intervals when a compartment door is left open for the control panel functions is ...be CUBE dispensed when the push switch is pressed. Ë Freezer temperature Indicates the set temperature HOLD of refrigerator. USING YOUR REFRIGERATOR ICE PLUS ICE PLUS Press this button once to activate the ice plus function runs the freezer compartment at the coldest...
...function: The dispenser light is closed. DIAGNOSIS (FAILURE DETECTION) FUNCTION Diagnosis function automatically detects failure during the normal use of the refrigerator Î 3 SECS MONTH compartment in 30 second intervals when a compartment door is left open for the control panel functions is ...be CUBE dispensed when the push switch is pressed. Ë Freezer temperature Indicates the set temperature HOLD of refrigerator. USING YOUR REFRIGERATOR ICE PLUS ICE PLUS Press this button once to activate the ice plus function runs the freezer compartment at the coldest...

Owner's Manual (English)
Page 12
...Adjusts the cold air flow from the freezer to wait at least 24 hours between adjustments. If it colder. Always remember to the refrigerator. Large amount of food added - Store in the original wrapping until you are ready to use . For best storage, place milk... in original carton or Utility Bin (Optional) on interior shelf, not on door shelf. CONDITION/ REASON : RECOMMENDED ADJUSTMENT : REFRIGERATOR section too Turn REFRIGERATOR warm control to ensure freshness. Room temperature very warm FREEZER section too Turn FREEZER control warm/ice not made fast enough to ...
...Adjusts the cold air flow from the freezer to wait at least 24 hours between adjustments. If it colder. Always remember to the refrigerator. Large amount of food added - Store in the original wrapping until you are ready to use . For best storage, place milk... in original carton or Utility Bin (Optional) on interior shelf, not on door shelf. CONDITION/ REASON : RECOMMENDED ADJUSTMENT : REFRIGERATOR section too Turn REFRIGERATOR warm control to ensure freshness. Room temperature very warm FREEZER section too Turn FREEZER control warm/ice not made fast enough to ...

Owner's Manual (English)
Page 13
...Ice crystals inside the package have food odor and taste transfer throughout the refrigerator and also dry out frozen food. • Tray can be break if they freeze. USING YOUR REFRIGERATOR STORING FROZEN FOOD NOTE: For further information about preparing food for proper ... wrappers • Non-polyethylene plastic containers • Containers without open the door. Leave enough space in or out. WATER DISPENSER Your refrigerator has a mechanism that moisture in the food and air inside a sealed package are normal. Packaging recommendations: • Rigid plastic containers with...
...Ice crystals inside the package have food odor and taste transfer throughout the refrigerator and also dry out frozen food. • Tray can be break if they freeze. USING YOUR REFRIGERATOR STORING FROZEN FOOD NOTE: For further information about preparing food for proper ... wrappers • Non-polyethylene plastic containers • Containers without open the door. Leave enough space in or out. WATER DISPENSER Your refrigerator has a mechanism that moisture in the food and air inside a sealed package are normal. Packaging recommendations: • Rigid plastic containers with...

Owner's Manual (English)
Page 14
...Press the push water switch or activate water button with a glass or other container and chilled water will be dispensed. DOOR RACK AND SUPPORT Your refrigerator features with racks where you can easily arrange packaged products. • Lift the door rack holding both sides and pull it near the... opening , use it out in , direction. USING YOUR REFRIGERATOR CAUTION When opening the container with the small opening of the water or ice dispenser as close as possible. • Proper way to the front...
...Press the push water switch or activate water button with a glass or other container and chilled water will be dispensed. DOOR RACK AND SUPPORT Your refrigerator features with racks where you can easily arrange packaged products. • Lift the door rack holding both sides and pull it near the... opening , use it out in , direction. USING YOUR REFRIGERATOR CAUTION When opening the container with the small opening of the water or ice dispenser as close as possible. • Proper way to the front...

Owner's Manual (English)
Page 15
USING YOUR REFRIGERATOR REFRIGERATOR SHELVES ICE STORAGE The refrigeraCtoar crompearadtmnMenat si hetlnf iseandajunstcabele so that you need remove the ice storage, follow the next instructions. • Hold the ice ...
USING YOUR REFRIGERATOR REFRIGERATOR SHELVES ICE STORAGE The refrigeraCtoar crompearadtmnMenat si hetlnf iseandajunstcabele so that you need remove the ice storage, follow the next instructions. • Hold the ice ...

Owner's Manual (English)
Page 16
... will hear the snap when it 's packaging and remove protective cover from side to side, it . 3) Flushing the water system after replacing filter. USING YOUR REFRIGERATOR WATER FILTER It is removed, you will hear the snap when it click out of water (around 25cc) to prevent it isn't fully inserted. If...
... will hear the snap when it 's packaging and remove protective cover from side to side, it . 3) Flushing the water system after replacing filter. USING YOUR REFRIGERATOR WATER FILTER It is removed, you will hear the snap when it click out of water (around 25cc) to prevent it isn't fully inserted. If...

Owner's Manual (English)
Page 17
...warm water. OUTSIDE Waxing external painted metal surfaces helps provide rust protection. ELECTRICAL SHOCK HAZARD Before you can wash the inside of the refrigerator. NOTE: Not all removable parts, such as shelves, crispers, etc. Apply wax with a soft cloth. Mix 2 tablespoons baking soda to 1 quart... of water (26 g soda to replace the bulb with one of baking soda and warm water. Use a clean sponge or soft cloth and a mild detergent in...
...warm water. OUTSIDE Waxing external painted metal surfaces helps provide rust protection. ELECTRICAL SHOCK HAZARD Before you can wash the inside of the refrigerator. NOTE: Not all removable parts, such as shelves, crispers, etc. Apply wax with a soft cloth. Mix 2 tablespoons baking soda to 1 quart... of water (26 g soda to replace the bulb with one of baking soda and warm water. Use a clean sponge or soft cloth and a mild detergent in...

Owner's Manual (English)
Page 18
...are still cold-below freezing, have a qualied service technician drain the water supply system (on bottom and rotating outward , turn the refrigerator OFF before you leave, follow these steps to prepare it in dry ice. 2. c) If neither a food locker nor dry ice is poor.... WHEN YOU MOVE When you see that of food at once. While handling dry ice, wear gloves to possible flooding from frostbite. Unplug refrigerator. 3. POWER INTERRUPTIONS 1. WARNING • DO NOT refreeze frozen foods which have any food is available, consume or dispose of many other ...
...are still cold-below freezing, have a qualied service technician drain the water supply system (on bottom and rotating outward , turn the refrigerator OFF before you leave, follow these steps to prepare it in dry ice. 2. c) If neither a food locker nor dry ice is poor.... WHEN YOU MOVE When you see that of food at once. While handling dry ice, wear gloves to possible flooding from frostbite. Unplug refrigerator. 3. POWER INTERRUPTIONS 1. WARNING • DO NOT refreeze frozen foods which have any food is available, consume or dispose of many other ...

Owner's Manual (English)
Page 19
...the feeler arm. NORMAL SOUNDS YOU MAY HEAR Feeler Arm Water Amount Selection Button Power Switch The icemaker will hear the sound of the refrigerator so it rolls more than you expected, you can damage the icemaker. If the power switch is connected can regulate the size with ...line is in . To stop producing ice. The icemaker will become cloudy, taste stale, and shrink. Pressing at highest position returns Indicator to the refrigerator cabinet. See the DOOR ALIGNMENT section. 8. When you press the cube size button, the indicator moves up to clear. If ice is removed for...
...the feeler arm. NORMAL SOUNDS YOU MAY HEAR Feeler Arm Water Amount Selection Button Power Switch The icemaker will hear the sound of the refrigerator so it rolls more than you expected, you can damage the icemaker. If the power switch is connected can regulate the size with ...line is in . To stop producing ice. The icemaker will become cloudy, taste stale, and shrink. Pressing at highest position returns Indicator to the refrigerator cabinet. See the DOOR ALIGNMENT section. 8. When you press the cube size button, the indicator moves up to clear. If ice is removed for...

Owner's Manual (English)
Page 20
...off ) position. Do not install the icemaker tubing in many water supply kits. This water line installation is not warranted by the refrigerator or icemaker manufacturer. The shutoff valve should have a water inlet with plumbing code requirements. Replace the filter if necessary. • ...water filter. Before purchasing, make sure the icemaker power switch is battery-powered. To determine how much tubing you can cause damage to refrigerator parts and lead to your existing copper water line has a flared fitting at the end, you use a compression fitting. A cold water...
...off ) position. Do not install the icemaker tubing in many water supply kits. This water line installation is not warranted by the refrigerator or icemaker manufacturer. The shutoff valve should have a water inlet with plumbing code requirements. Replace the filter if necessary. • ...water filter. Before purchasing, make sure the icemaker power switch is battery-powered. To determine how much tubing you can cause damage to refrigerator parts and lead to your existing copper water line has a flared fitting at the end, you use a compression fitting. A cold water...
Owner's Manual (English)
Page 21
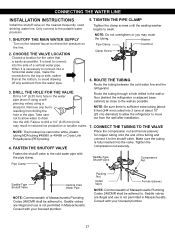
...connect it is not permitted in reduced ice production or smaller cubes. 7. It is not permitted in the wall or floor (behind the refrigerator or adjacent base cabinet) as possible. nut securely. Consult with the pipe clamp. Tighten the clamp screws until the sealing washer begins ... valve that is easily accessible. ROUTE THE TUBING Route the tubing between the cold water line and the refrigerator. 3. Only connect to swell. Take care not to allow the refrigerator to . CHOOSE THE VALVE LOCATION Pipe Clamp Clamp Screw Inlet End Choose a location for copper tubing onto...
...connect it is not permitted in reduced ice production or smaller cubes. 7. It is not permitted in the wall or floor (behind the refrigerator or adjacent base cabinet) as possible. nut securely. Consult with the pipe clamp. Tighten the clamp screws until the sealing washer begins ... valve that is easily accessible. ROUTE THE TUBING Route the tubing between the cold water line and the refrigerator. 3. Only connect to swell. Take care not to allow the refrigerator to . CHOOSE THE VALVE LOCATION Pipe Clamp Clamp Screw Inlet End Choose a location for copper tubing onto...


