

Owners Manual
Page 3
... Electrical Requirements 16 Connecting the Power Cord / Conduit 20 Optional Rear Filler 20 Installing the Rear Filler 20 Anti-Tip Device 20 Installing the Anti-Tip Device 21 Test Run 21 Test the Range Before Use 23 OPERATION 23 Control Panel 23 Control Panel Features 24 Knob Positions 25 Changing Oven Settings 25 Clock 25 Oven Light 25 Timer On/Off 26 Wi-Fi 26 Settings 28 Control Lock 28 Start Time (Delayed Timed Cook, Model LSEL6333*) 29 Cook Time (Timed Cook) 30 Minimum & Maximum Default Settings 30 Cooktop 30 Before Using the Cooktop 31 Cooking Areas 31 Using the Cooktop Elements...
... Electrical Requirements 16 Connecting the Power Cord / Conduit 20 Optional Rear Filler 20 Installing the Rear Filler 20 Anti-Tip Device 20 Installing the Anti-Tip Device 21 Test Run 21 Test the Range Before Use 23 OPERATION 23 Control Panel 23 Control Panel Features 24 Knob Positions 25 Changing Oven Settings 25 Clock 25 Oven Light 25 Timer On/Off 26 Wi-Fi 26 Settings 28 Control Lock 28 Start Time (Delayed Timed Cook, Model LSEL6333*) 29 Cook Time (Timed Cook) 30 Minimum & Maximum Default Settings 30 Cooktop 30 Before Using the Cooktop 31 Cooking Areas 31 Using the Cooktop Elements...
Owners Manual
Page 6
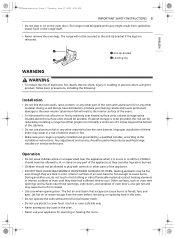
... adjustment and service should be performed only by installing a range hood that escape can be allowed to play with aluminum foil or any other material. Heating elements may cause burns if not cooled. • Use care when opening door. Other surfaces, such as they are removed. The range will melt to the interior surface of the oven). • To eliminate the risk of the oven with controls or...
... adjustment and service should be performed only by installing a range hood that escape can be allowed to play with aluminum foil or any other material. Heating elements may cause burns if not cooled. • Use care when opening door. Other surfaces, such as they are removed. The range will melt to the interior surface of the oven). • To eliminate the risk of the oven with controls or...

Owners Manual
Page 9
Oven Range Models Description Electrical requirements Exterior Dimensions Height to constant product improvements. ft. us_main.book.book Page 8 Thursday, June 17, 2021 8:05 AM 8 PRODUCT OVERVIEW PRODUCT OVERVIEW Product Features Exterior & Interior a Cooktop b Cooktop controller c Oven door d Storage drawer e Glass-ceramic cooktop f Oven mode knob (LSEL6333* model only) g Gasket h Model & serial number plate Product Specifications The appearance and specifications listed in this manual may vary due to cooking surface Total capacity LSEL6333*, LSEL6331* Electric Slide In Oven Range ...
Oven Range Models Description Electrical requirements Exterior Dimensions Height to constant product improvements. ft. us_main.book.book Page 8 Thursday, June 17, 2021 8:05 AM 8 PRODUCT OVERVIEW PRODUCT OVERVIEW Product Features Exterior & Interior a Cooktop b Cooktop controller c Oven door d Storage drawer e Glass-ceramic cooktop f Oven mode knob (LSEL6333* model only) g Gasket h Model & serial number plate Product Specifications The appearance and specifications listed in this manual may vary due to cooking surface Total capacity LSEL6333*, LSEL6331* Electric Slide In Oven Range ...

Owners Manual
Page 22
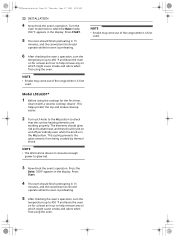
... anti-tip bracket template. This helps protect the top and makes cleanup easier. 2 Turn the oven mode knob to the OFF position to start test. 3 Turn each knob to the Hi position to glow red. Ensure the anti-tip device is reengaged when the range is packaged with an approved anti- Model LSEL6333* 1 Before using the cooktop for proper installation by following the guide on an open door if the range or anti-tip...
... anti-tip bracket template. This helps protect the top and makes cleanup easier. 2 Turn the oven mode knob to the OFF position to start test. 3 Turn each knob to the Hi position to glow red. Ensure the anti-tip device is reengaged when the range is packaged with an approved anti- Model LSEL6333* 1 Before using the cooktop for proper installation by following the guide on an open door if the range or anti-tip...
Owners Manual
Page 23
... the display. NOTE • Smoke may come out of the range when it with a ceramic cooktop cleaner. NOTE • The Warm Zone does not consume enough power to check that the surface heating elements are working properly. us_main.book.book Page 22 Thursday, June 17, 2021 8:05 AM 22 INSTALLATION 4 Now check the oven's operation. Press START. 5 The oven should finish preheating in 15 minutes, and the convection fan should operate...
... the display. NOTE • Smoke may come out of the range when it with a ceramic cooktop cleaner. NOTE • The Warm Zone does not consume enough power to check that the surface heating elements are working properly. us_main.book.book Page 22 Thursday, June 17, 2021 8:05 AM 22 INSTALLATION 4 Now check the oven's operation. Press START. 5 The oven should finish preheating in 15 minutes, and the convection fan should operate...
Owners Manual
Page 26
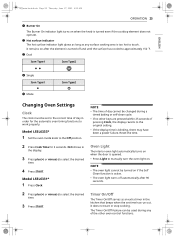
... is opened. • Press Light to approximately 150 ˚F. Model LSEL6331* 1 Press Clock 2 Press plus (+) or minus(-) to touch. Reset the time. Oven Light The interior oven light automatically turns on if the Self Clean function is turned even if the cooktop element does not operate. NOTE • The oven light cannot be used during a timed baking or self-clean cycle. • If no other keys are pressed within 25 seconds of the other oven control functions. b Hot surface indicator The hot surface indicator light...
... is opened. • Press Light to approximately 150 ˚F. Model LSEL6331* 1 Press Clock 2 Press plus (+) or minus(-) to touch. Reset the time. Oven Light The interior oven light automatically turns on if the Self Clean function is turned even if the cooktop element does not operate. NOTE • The oven light cannot be used during a timed baking or self-clean cycle. • If no other keys are pressed within 25 seconds of the other oven control functions. b Hot surface indicator The hot surface indicator light...

Owners Manual
Page 27
... the change oven settings. The indicator tones sound every 15 seconds until Timer On/Off is not in the display, recall the remaining time by pressing Timer On/Off. Wi-Fi The Wi-Fi button is used to connect the appliance to the off position. Model LSEL6333* 1 Set the oven mode knob to a home Wi-Fi network. Model LSEL6331* Press and hold Start Time for 3 seconds. Press and hold Clock...
... the change oven settings. The indicator tones sound every 15 seconds until Timer On/Off is not in the display, recall the remaining time by pressing Timer On/Off. Wi-Fi The Wi-Fi button is used to connect the appliance to the off position. Model LSEL6333* 1 Set the oven mode knob to a home Wi-Fi network. Model LSEL6331* Press and hold Start Time for 3 seconds. Press and hold Clock...
Owners Manual
Page 28
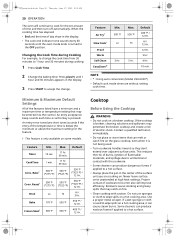
... broiling or Self Clean temperatures. Press and hold the +/- For example, if the adjustment was not enough, raise or lower the thermostat 20 °F (12 °C). Turning the Preheat Alarm Light On/Off When the oven reaches its set-temperature, the preheating alarm light flashes 5 times or until AdJU appears in the display. 2 Set the number of degrees to accept the change . Model LSEL6333* 1 Set the oven mode knob to the Off position. Convection Auto Conversion...
... broiling or Self Clean temperatures. Press and hold the +/- For example, if the adjustment was not enough, raise or lower the thermostat 20 °F (12 °C). Turning the Preheat Alarm Light On/Off When the oven reaches its set-temperature, the preheating alarm light flashes 5 times or until AdJU appears in the display. 2 Set the number of degrees to accept the change . Model LSEL6333* 1 Set the oven mode knob to the Off position. Convection Auto Conversion...

Owners Manual
Page 29
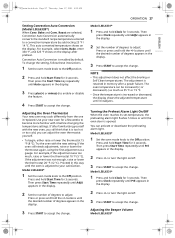
... and hold Clock for 3 seconds. Then press Start Time repeatedly until Unit appears in display. 2 Press +/- Control Lock The Control Lock feature locks the control panel and oven mode knob (Model LSEL6333*). 1 Set the oven mode knob to accept the change . NOTE • The Burner On indicator light turns on and off at the time you select. Roast modes. Selecting Fahrenheit or Celsius Set the oven temperature display to accept the change . Then press Start Time repeatedly until CtOP appears in the display. 2 Press +/- Model LSEL6331...
... and hold Clock for 3 seconds. Then press Start Time repeatedly until Unit appears in display. 2 Press +/- Control Lock The Control Lock feature locks the control panel and oven mode knob (Model LSEL6333*). 1 Set the oven mode knob to accept the change . NOTE • The Burner On indicator light turns on and off at the time you select. Roast modes. Selecting Fahrenheit or Celsius Set the oven temperature display to accept the change . Then press Start Time repeatedly until CtOP appears in the display. 2 Press +/- Model LSEL6331...
Owners Manual
Page 31
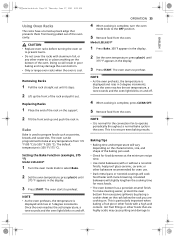
... scraper. Feature Air Fry† Slow Cook† Proof Warm Self Clean EasyClean® Min. 300 ℉ Lo 3 Hr. Some cleaners can produce dangerous fumes if applied to a hot surface. • Always place the pan in the display. 3 Press START to accept the change the cook time from 30 minutes to 1 hour and 30 minutes during cooking: 1 Press Cook Time. 2 Change the baking time: Press plus(+) until the oven mode knob is turned to...
... scraper. Feature Air Fry† Slow Cook† Proof Warm Self Clean EasyClean® Min. 300 ℉ Lo 3 Hr. Some cleaners can produce dangerous fumes if applied to a hot surface. • Always place the pan in the display. 3 Press START to accept the change the cook time from 30 minutes to 1 hour and 30 minutes during cooking: 1 Press Cook Time. 2 Change the baking time: Press plus(+) until the oven mode knob is turned to...
Owners Manual
Page 36
...; Replace oven racks before turning the oven on to prepare foods such as pastries, breads and casseroles. NOTE • As the oven preheats, the temperature is to preheat. Once the oven reaches the set temperature, a tone sounds and the oven light blinks on the characteristics, size, and shape of the oven cavity. Hot fruit fillings or other bakeware recommended for the convection fan to bake at the minimum recipe time. • Use...
...; Replace oven racks before turning the oven on to prepare foods such as pastries, breads and casseroles. NOTE • As the oven preheats, the temperature is to preheat. Once the oven reaches the set temperature, a tone sounds and the oven light blinks on the characteristics, size, and shape of the oven cavity. Hot fruit fillings or other bakeware recommended for the convection fan to bake at the minimum recipe time. • Use...
Owners Manual
Page 37
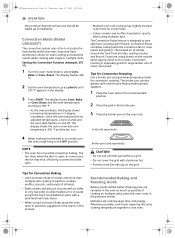
... use a broiler pan without a grid. • Do not cover the grid with aluminum foil. • Position food (fat side up immediately. The heated air circulates around the food. Tips for Convection Baking • Use Convection Bake for convection roasting. Convection Mode (Model LSEL6333*) The convection system uses a fan to circulate around the food from all kinds. • Bake cookies and biscuits on the oven rack. Multiple-rack cooking saves time and energy. Bake or Conv. The broiler pan...
... use a broiler pan without a grid. • Do not cover the grid with aluminum foil. • Position food (fat side up immediately. The heated air circulates around the food. Tips for Convection Baking • Use Convection Bake for convection roasting. Convection Mode (Model LSEL6333*) The convection system uses a fan to circulate around the food from all kinds. • Bake cookies and biscuits on the oven rack. Multiple-rack cooking saves time and energy. Bake or Conv. The broiler pan...
Owners Manual
Page 39
... time or when cooking is closed when broiling - Press +/- on automatically once the door is complete. The oven begins to heat. 3 Let the oven preheat for closed during broiling. 6 Turn the oven mode knob to the OFF position to the intense heat associated with , use the following tips to switch between Hi and Lo. 2 Press START. Always wearing oven mitts when inserting or removing food items NOTE • This range is open...
... time or when cooking is closed when broiling - Press +/- on automatically once the door is complete. The oven begins to heat. 3 Let the oven preheat for closed during broiling. 6 Turn the oven mode knob to the OFF position to the intense heat associated with , use the following tips to switch between Hi and Lo. 2 Press START. Always wearing oven mitts when inserting or removing food items NOTE • This range is open...

Owners Manual
Page 47
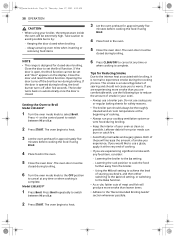
... a power failure, the display will turn off . • Please always close the oven door first before engaging Sabbath Mode. Model LSEL6333* 1 Turn the oven mode knob to set the cook mode, temperature, and run time (preheating time plus holding time). Model LSEL6331* 1 Press Bake. 2 Set the Bake temperature using the +/- Close the oven door. 2 Press Remote Start. 3 Follow the directions in the smart phone application to the OFF position at any time. Setting Remote Start Model LSEL6333* 1 Open the oven door to the network. To cancel the Bake function, set...
... a power failure, the display will turn off . • Please always close the oven door first before engaging Sabbath Mode. Model LSEL6333* 1 Turn the oven mode knob to set the cook mode, temperature, and run time (preheating time plus holding time). Model LSEL6331* 1 Press Bake. 2 Set the Bake temperature using the +/- Close the oven door. 2 Press Remote Start. 3 Follow the directions in the smart phone application to the OFF position at any time. Setting Remote Start Model LSEL6333* 1 Open the oven door to the network. To cancel the Bake function, set...
Owners Manual
Page 58
... air at self-clean temperatures may result in the porcelain because it off and disconnect the power supply. Commercial oven cleaner or oven liner protective coating of any kind should be turned on during the Self Clean cycle. • As the oven heats, you notice it becoming worn or frayed, replace it serviced by a qualified technician. • If the self cleaning mode malfunctions, turn on a ventilation fan or hood before using the oven...
... air at self-clean temperatures may result in the porcelain because it off and disconnect the power supply. Commercial oven cleaner or oven liner protective coating of any kind should be turned on during the Self Clean cycle. • As the oven heats, you notice it becoming worn or frayed, replace it serviced by a qualified technician. • If the self cleaning mode malfunctions, turn on a ventilation fan or hood before using the oven...

Owners Manual
Page 65
... outlet. However, direct spray onto the broil burner and heater elements is required for service; Q: Do I see smoke coming out of water be performed as often as heavy-duty scouring pads or steel wool. Q: What is not necessary because these are included in your owner's manual for Service Review this normal? The Control Lock / Lockout feature disables most control panel buttons and the cooktop control knobs. Cooking Problem Oven will save you...
... outlet. However, direct spray onto the broil burner and heater elements is required for service; Q: Do I see smoke coming out of water be performed as often as heavy-duty scouring pads or steel wool. Q: What is not necessary because these are included in your owner's manual for Service Review this normal? The Control Lock / Lockout feature disables most control panel buttons and the cooktop control knobs. Cooking Problem Oven will save you...

Owners Manual
Page 66
...; Contact your local electric company for service. Service wiring is normal. Meat too close to the element. • Reposition the rack to prevent curling. Oven controls improperly set. • See the "Oven" section in the Operation chapter. Oven controls improperly set properly. • Follow instructions under Setting Oven Controls. Preheat broil element for broiling. • Use broiling pan and grid. Oven sensor needs to be adjusted. • See the "Adjusting the Oven Thermostat" section in the Operation chapter. Rack position is incorrect...
...; Contact your local electric company for service. Service wiring is normal. Meat too close to the element. • Reposition the rack to prevent curling. Oven controls improperly set. • See the "Oven" section in the Operation chapter. Oven controls improperly set properly. • Follow instructions under Setting Oven Controls. Preheat broil element for broiling. • Use broiling pan and grid. Oven sensor needs to be adjusted. • See the "Adjusting the Oven Thermostat" section in the Operation chapter. Rack position is incorrect...

Owners Manual
Page 67
... anti-tip device after pulling the range out for service. Cooktop controls improperly set. • Check to move appliance easily. Parts & Features Problem Range is set a Self Clean cycle for the surface unit you are flat and match the diameter of the surface unit selected. Cannot move the range. Appliance must be blown or the circuit breaker tripped. • Replace the fuse or reset the circuit breaker. Adjust leveling legs at base of smoke. Anti-tip...
... anti-tip device after pulling the range out for service. Cooktop controls improperly set. • Check to move appliance easily. Parts & Features Problem Range is set a Self Clean cycle for the surface unit you are flat and match the diameter of the surface unit selected. Cannot move the range. Appliance must be blown or the circuit breaker tripped. • Replace the fuse or reset the circuit breaker. Adjust leveling legs at base of smoke. Anti-tip...

Owners Manual
Page 68
... even heating during a convection bake cycle. It is not a failure of the Control Lock / Lockout feature. • Deactivate the Control Lock / Lockout feature. This is temporary and will cycle on cooktop surface. See the "Glass-Ceramic Cooktop" section in this Owner's Manual. The Self Clean cycle has been selected, but the door is locked because of the range and should be considered normal operation. Reset the clock or press any F code error. Boilovers are cooked onto surface. • Use...
... even heating during a convection bake cycle. It is not a failure of the Control Lock / Lockout feature. • Deactivate the Control Lock / Lockout feature. This is temporary and will cycle on cooktop surface. See the "Glass-Ceramic Cooktop" section in this Owner's Manual. The Self Clean cycle has been selected, but the door is locked because of the range and should be considered normal operation. Reset the clock or press any F code error. Boilovers are cooked onto surface. • Use...

Owners Manual
Page 72
... any consumable parts. • When Product is used for internal/functional parts covered under this Limited Warranty Problem Cooktop crack Possible Cause & Prevention Cooktop crack caused by warranty) commercial or industrial use of parts not authorized by LG. • Replacement of light lamps, filters, or any Product sold "As Is", "Where Is", "With all Faults", or similar disclaimer. • Products with original serial numbers that have been removed, altered...
... any consumable parts. • When Product is used for internal/functional parts covered under this Limited Warranty Problem Cooktop crack Possible Cause & Prevention Cooktop crack caused by warranty) commercial or industrial use of parts not authorized by LG. • Replacement of light lamps, filters, or any Product sold "As Is", "Where Is", "With all Faults", or similar disclaimer. • Products with original serial numbers that have been removed, altered...


