
Owners Manual
Page 2
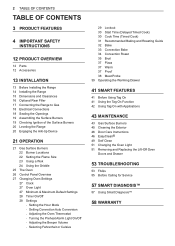
... Installing the Range 15 Dimensions and Clearances 16 Optional Rear Filler 17 Connecting the Range to Gas 18 Electrical Connections 18 Sealing the Openings 19 Assembling the Surface Burners 19 Checking Ignition of the Surface Burners 20 Leveling the Range 20 Engaging the Anti-tip Device 21 OPERATION 21 Gas Surface Burners 22 Burner Locations 22 Setting the Flame Size 23 Using a Wok 24 Using the Griddle 25 The Oven 26 Control Panel Overview 27 Changing Oven Settings 27 Clock 27 Oven Light 27 Minimum & Maximum Default Settings 28 Timer On/Off 28 Settings -- Setting...
... Installing the Range 15 Dimensions and Clearances 16 Optional Rear Filler 17 Connecting the Range to Gas 18 Electrical Connections 18 Sealing the Openings 19 Assembling the Surface Burners 19 Checking Ignition of the Surface Burners 20 Leveling the Range 20 Engaging the Anti-tip Device 21 OPERATION 21 Gas Surface Burners 22 Burner Locations 22 Setting the Flame Size 23 Using a Wok 24 Using the Griddle 25 The Oven 26 Control Panel Overview 27 Changing Oven Settings 27 Clock 27 Oven Light 27 Minimum & Maximum Default Settings 28 Timer On/Off 28 Settings -- Setting...
Owners Manual
Page 5
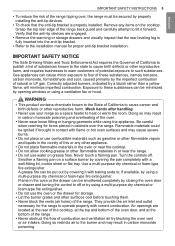
... fan or hood. Gas appliances can be secured by covering the pan completely with correct combustion. Correctly adjusted burners, indicated by blocking the oven vent or air intakes. Doing so may cause severe burns. ••Do not place or use combustible materials such as a space heater to operate properly with a well-fitting lid, cookie sheet or flat tray. Air openings are engaged. ••Remove the warming...
... fan or hood. Gas appliances can be secured by covering the pan completely with correct combustion. Correctly adjusted burners, indicated by blocking the oven vent or air intakes. Doing so may cause severe burns. ••Do not place or use combustible materials such as a space heater to operate properly with a well-fitting lid, cookie sheet or flat tray. Air openings are engaged. ••Remove the warming...
Owners Manual
Page 6
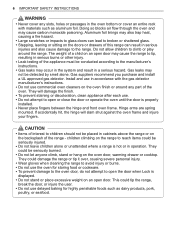
...'s instructions. ••Do not use delayed baking for storing food or cookware. ••To prevent damage to the oven door, do not attempt to the range. Aluminum foil linings may also trap heat, causing a fire hazard. ••Large scratches or impacts to glass doors can result in serious injuries and also cause damage to open door. children climbing on the oven door, warming drawer...
...'s instructions. ••Do not use delayed baking for storing food or cookware. ••To prevent damage to the oven door, do not attempt to the range. Aluminum foil linings may also trap heat, causing a fire hazard. ••Large scratches or impacts to glass doors can result in serious injuries and also cause damage to open door. children climbing on the oven door, warming drawer...
Owners Manual
Page 7
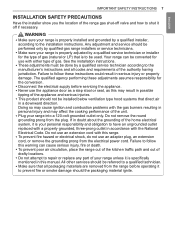
... of the range gas shut-off valve and how to shut it is your range is properly installed and grounded by a qualified service technician according to be done by a qualified installer, according to follow these adjustments assumes responsibility for use an adapter plug, an extension cord, or remove the grounding prong from the electrical power cord. The qualified agency performing these instructions could result in possible tipping of the...
... of the range gas shut-off valve and how to shut it is your range is properly installed and grounded by a qualified service technician according to be done by a qualified installer, according to follow these adjustments assumes responsibility for use an adapter plug, an extension cord, or remove the grounding prong from the electrical power cord. The qualified agency performing these instructions could result in possible tipping of the...
Owners Manual
Page 9
.... ••Use care when cleaning the cooktop. The hot air from heating beyond the edge of the range. ••If the range is added. ••Do not cook foods directly on an open flames when lifting cookware. they may cause them to prevent overheating fat from the vent may ignite flammable items and will increase pressure in closed containers, which are set in a health...
.... ••Use care when cleaning the cooktop. The hot air from heating beyond the edge of the range. ••If the range is added. ••Do not cook foods directly on an open flames when lifting cookware. they may cause them to prevent overheating fat from the vent may ignite flammable items and will increase pressure in closed containers, which are set in a health...
Owners Manual
Page 11
... energy when heating. Do not leave the oven door open during use. Whenever possible, cook foods requiring the same cooking temperature together in one oven. ••For optimal performance and energy savings, follow the manufacturer's directions. ••Use only glass cookware that is in place correctly to minimize the possibility of self-clean. ••Avoid opening the oven door more energy in the broiler pan, turn the oven mode knob to...
... energy when heating. Do not leave the oven door open during use. Whenever possible, cook foods requiring the same cooking temperature together in one oven. ••For optimal performance and energy savings, follow the manufacturer's directions. ••Use only glass cookware that is in place correctly to minimize the possibility of self-clean. ••Avoid opening the oven door more energy in the broiler pan, turn the oven mode knob to...
Owners Manual
Page 12
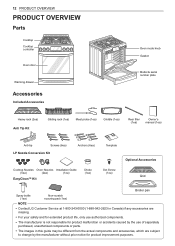
12 PRODUCT OVERVIEW PRODUCT OVERVIEW Parts Cooktop Cooktop controller Oven door Warming drawer Accessories Included Accessories Oven mode knob Gasket Model & serial number plate Heavy rack (2ea) Anti Tip Kit Gliding rack (1ea) Meat probe (1ea) Griddle (1ea) Rear filler (1ea) Owner's manual (1ea) Anti-tip Screws (6ea) LP Nozzle Conversion Kit Anchors (6ea) Cooktop Nozzles Oven Nozzles Installation Guide (5ea) (2ea) (1ea) EasyClean™ Kit Choke (1ea) Template Set Screw (1ea) Optional Accessories Grid Broiler pan Spray bottle (1ea) Non-scratch scouring pad (1ea) NOTE ...
12 PRODUCT OVERVIEW PRODUCT OVERVIEW Parts Cooktop Cooktop controller Oven door Warming drawer Accessories Included Accessories Oven mode knob Gasket Model & serial number plate Heavy rack (2ea) Anti Tip Kit Gliding rack (1ea) Meat probe (1ea) Griddle (1ea) Rear filler (1ea) Owner's manual (1ea) Anti-tip Screws (6ea) LP Nozzle Conversion Kit Anchors (6ea) Cooktop Nozzles Oven Nozzles Installation Guide (5ea) (2ea) (1ea) EasyClean™ Kit Choke (1ea) Template Set Screw (1ea) Optional Accessories Grid Broiler pan Spray bottle (1ea) Non-scratch scouring pad (1ea) NOTE ...
Owners Manual
Page 16
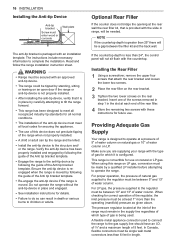
... you are supplying your range with an approved anti-tip device. •• The range could be secured with the type of gas is configured. Warning •• Range must remain in place by a qualified LP installer before attempting to the gas supply line should have an I.D. Installing the Rear Filler 1 Using a screwdriver, remove the upper four screws that it is being used to connect the range to operate the range.
... you are supplying your range with an approved anti-tip device. •• The range could be secured with the type of gas is configured. Warning •• Range must remain in place by a qualified LP installer before attempting to the gas supply line should have an I.D. Installing the Rear Filler 1 Using a screwdriver, remove the upper four screws that it is being used to connect the range to operate the range.
Owners Manual
Page 20
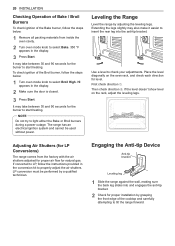
... the anti-tip bracket. If the level doesn't show level on the oven rack, and check each direction for the burner to start heating. LP conversion must be used without power. It may take between 30 and 90 seconds for level. Then check direction . 20 INSTALLATION Checking Operation of Bake / Broil Burners To check ignition of the Bake burner, follow the steps below : 1 Turn oven mode knob to select Broil High. Leveling the Range Level the range by a qualified technician. Use a level to check your adjustments...
... the anti-tip bracket. If the level doesn't show level on the oven rack, and check each direction for the burner to start heating. LP conversion must be used without power. It may take between 30 and 90 seconds for level. Then check direction . 20 INSTALLATION Checking Operation of Bake / Broil Burners To check ignition of the Bake burner, follow the steps below : 1 Turn oven mode knob to select Broil High. Leveling the Range Level the range by a qualified technician. Use a level to check your adjustments...
Owners Manual
Page 26
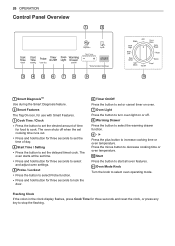
... knob to stop the flashing. 26 OPERATION Control Panel Overview 1 2 3 4 5 6 7 8 9 10 11 1 Smart DiagnosisTM Use during the Smart Diagnosis feature. 2 Smart Features The Tag On icon, for use with Smart Features. 3 Cook Time / Clock •• Press the button to set the delayed timed cook. Flashing Clock If the colon in the clock display flashes, press Cook Time for three seconds and reset the clock, or press any key to select oven operating mode. The oven shuts off . 8 Warming Drawer...
... knob to stop the flashing. 26 OPERATION Control Panel Overview 1 2 3 4 5 6 7 8 9 10 11 1 Smart DiagnosisTM Use during the Smart Diagnosis feature. 2 Smart Features The Tag On icon, for use with Smart Features. 3 Cook Time / Clock •• Press the button to set the delayed timed cook. Flashing Clock If the colon in the clock display flashes, press Cook Time for three seconds and reset the clock, or press any key to select oven operating mode. The oven shuts off . 8 Warming Drawer...
Owners Manual
Page 29
... change . Use your satisfaction. 1 Set the oven mode knob to accept the change . If after a power failure. Then press Start Time repeatedly until AdJU appears in the display. 3 To increase the temperature, press plus (+) or minus(-) to turn the function on . To decrease the temperature, press minus (-) until PrE appears in the display. The adjustment is too hot or too cold, you still think that it replaced. Then press Start Time...
... change . Use your satisfaction. 1 Set the oven mode knob to accept the change . If after a power failure. Then press Start Time repeatedly until AdJU appears in the display. 3 To increase the temperature, press plus (+) or minus(-) to turn the function on . To decrease the temperature, press minus (-) until PrE appears in the display. The adjustment is too hot or too cold, you still think that it replaced. Then press Start Time...
Owners Manual
Page 32
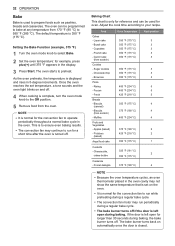
... cooking is complete, turn the oven mode knob to the Off position. 5 Remove food from 170 °F (80 °C) to run while preheating during baking, the bake burner turns off . Sugar cookies - The oven starts to your recipe. Adjust the cook time according to preheat. Bundt cake - Cheesecake, 325 °F (161 °C) - 2 crème brulée 350 °F (175 °C) Casserole - 32 OPERATION Bake Bake is used for the convection fan to...
... cooking is complete, turn the oven mode knob to the Off position. 5 Remove food from 170 °F (80 °C) to run while preheating during baking, the bake burner turns off . Sugar cookies - The oven starts to your recipe. Adjust the cook time according to preheat. Bundt cake - Cheesecake, 325 °F (161 °C) - 2 crème brulée 350 °F (175 °C) Casserole - 32 OPERATION Bake Bake is used for the convection fan to...
Owners Manual
Page 35
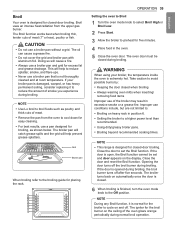
... not use a broiler pan and grid for five minutes. 4 Place food in the oven. 5 Close the oven door. Warning When using your broiler pan is opened during broiling, the broil burner turns off the broil burner during broiling. Close the door and reset the Broil function. OPERATION 35 Setting the oven to Broil 1 Turn the oven mode knob to select Broil High or Broil Low. 2 Press Start. 3 Allow the broiler to the Off position. If your broiler, the temperature inside the oven is finished, turn the oven mode knob to preheat...
... not use a broiler pan and grid for five minutes. 4 Place food in the oven. 5 Close the oven door. Warning When using your broiler pan is opened during broiling, the broil burner turns off the broil burner during broiling. Close the door and reset the Broil function. OPERATION 35 Setting the oven to Broil 1 Turn the oven mode knob to select Broil High or Broil Low. 2 Press Start. 3 Allow the broiler to the Off position. If your broiler, the temperature inside the oven is finished, turn the oven mode knob to preheat...
Owners Manual
Page 42
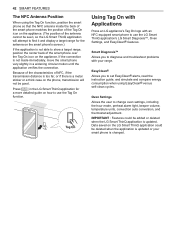
... the antenna cannot be seen, so the LG Smart ThinQ application will not be deleted when the application is updated. IMPORTANT : Features could be good. Smart Diagnosis™ Allows you to change oven settings, including the hour mode, preheat alarm light, beeper volume, temperature units, convection auto conversion, and thermostat adjustment. EasyClean® Allows you to show a target range, position the center back of NFC...
... the antenna cannot be seen, so the LG Smart ThinQ application will not be deleted when the application is updated. IMPORTANT : Features could be good. Smart Diagnosis™ Allows you to change oven settings, including the hour mode, preheat alarm light, beeper volume, temperature units, convection auto conversion, and thermostat adjustment. EasyClean® Allows you to show a target range, position the center back of NFC...
Owners Manual
Page 49
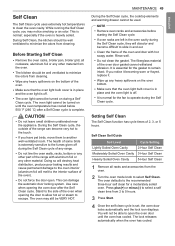
... not line the oven walls, racks, bottom or any other material. Press plus(+) or minus(-) to select a self clean time from 2 to slide in and out. •• Clean the frame of the oven and door with aluminum foil or any other part of the range with hot soapy water. Before Starting Self Clean •• Remove the oven racks, broiler pan, broiler grid, all racks and accessories from the oven. 2 Turn the oven mode knob to another...
... not line the oven walls, racks, bottom or any other material. Press plus(+) or minus(-) to select a self clean time from 2 to slide in and out. •• Clean the frame of the oven and door with aluminum foil or any other part of the range with hot soapy water. Before Starting Self Clean •• Remove the oven racks, broiler pan, broiler grid, all racks and accessories from the oven. 2 Turn the oven mode knob to another...
Owners Manual
Page 53
... closed. TROUBLESHOOTING 53 Can I leave my racks in the clock, press any key or reset the clock if needed. Covering entire racks with aluminum foil. Can I use of the cooktop or oven? This will not be cleaned after every use aluminum foil on your cooktop element setting or the temperature selected in your thermostat. What should be removable. Refer to the MAINTENANCE section of this manual for further instruction. Why...
... closed. TROUBLESHOOTING 53 Can I leave my racks in the clock, press any key or reset the clock if needed. Covering entire racks with aluminum foil. Can I use of the cooktop or oven? This will not be cleaned after every use aluminum foil on your cooktop element setting or the temperature selected in your thermostat. What should be removable. Refer to the MAINTENANCE section of this manual for further instruction. Why...
Owners Manual
Page 55
... light bulb is fully open. •• Incorrect oven control settings. TROUBLESHOOTING 55 ENGLISH Before Calling for Service Before you time and expense. The list includes common occurrences that the oven gas shut-off valve, located behind the range, is loose or defective. Symptoms Top burners do not light or do not burn evenly. Food does not bake or roast properly. Oven temperature is not working. Clock and timer does not work . Self Clean is too hot or...
... light bulb is fully open. •• Incorrect oven control settings. TROUBLESHOOTING 55 ENGLISH Before Calling for Service Before you time and expense. The list includes common occurrences that the oven gas shut-off valve, located behind the range, is loose or defective. Symptoms Top burners do not light or do not burn evenly. Food does not bake or roast properly. Oven temperature is not working. Clock and timer does not work . Self Clean is too hot or...
Owners Manual
Page 56
... valve and call for the fan to a paper towel and wipe the edges of the oven is too high. Close the oven door. CODE F-3 F-9 CAUSE Key short error Oven not heating Apply a small amount of vegetable oil to operate periodically throughout a normal bake cycle in a Self Clean cycle. Reset the clock and any cooking function. An odor from the range for the first few times the oven is used. •• A convection fan...
... valve and call for the fan to a paper towel and wipe the edges of the oven is too high. Close the oven door. CODE F-3 F-9 CAUSE Key short error Oven not heating Apply a small amount of vegetable oil to operate periodically throughout a normal bake cycle in a Self Clean cycle. Reset the clock and any cooking function. An odor from the range for the first few times the oven is used. •• A convection fan...

Owners Manual
Page 59
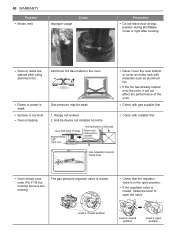
...;• Oval burner 1) Release 4 nuts 2) Clean residue using toothbrush •• Burner cap color 1. Burner cap is properly seated. Use of detergent or abrasive cleansers Shine is lost shine 2. Must be removed using a toothbrush. * Oval burner To clean: Release 4 nuts Clean red part with published installation instructions, including LG's owner's and installation manuals. •• Damage resulting from misuse, abuse, improper installation, repair, or maintenance. Improper burner cap installation Burner cap is NOT...
...;• Oval burner 1) Release 4 nuts 2) Clean residue using toothbrush •• Burner cap color 1. Burner cap is properly seated. Use of detergent or abrasive cleansers Shine is lost shine 2. Must be removed using a toothbrush. * Oval burner To clean: Release 4 nuts Clean red part with published installation instructions, including LG's owner's and installation manuals. •• Damage resulting from misuse, abuse, improper installation, repair, or maintenance. Improper burner cap installation Burner cap is NOT...
Owners Manual
Page 60
... door at stop position during Broil/Bake mode or right after using aluminum foil •• Flame or power is weak •• Surface is not level •• Oven is closed position Lever's open the valve. Lever's closed position Lever's closed , rotate the lever to check level. 2 1 •• Oven shows error code (F9, F19) but cooktop burners are stained after cooking. •• Oven or racks are working. Range not leveled 2. The gas pressure regulator valve...
... door at stop position during Broil/Bake mode or right after using aluminum foil •• Flame or power is weak •• Surface is not level •• Oven is closed position Lever's open the valve. Lever's closed position Lever's closed , rotate the lever to check level. 2 1 •• Oven shows error code (F9, F19) but cooktop burners are stained after cooking. •• Oven or racks are working. Range not leveled 2. The gas pressure regulator valve...


