
Owner's Manual
Page 1
MONITOR TV MODELS M2262D M2362D M2762D www.lge.com ENGLISH OWNER'S MANUAL MONITOR TV Please read this manual carefully before operating your set and retain it for future reference.
MONITOR TV MODELS M2262D M2362D M2762D www.lge.com ENGLISH OWNER'S MANUAL MONITOR TV Please read this manual carefully before operating your set and retain it for future reference.
Owner's Manual
Page 6
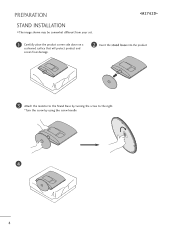
PREPARATION STAND INSTALLATION I The image shown may be somewhat different from your set. 1 Carefully place the product screen side down on a cushioned surface that will protect product and screen from damage. 2 Insert the stand base into the product 3 Attach the monitor to the Stand Base by turning the screw to the right. *Turn the screw by using the screw handle 4 4
PREPARATION STAND INSTALLATION I The image shown may be somewhat different from your set. 1 Carefully place the product screen side down on a cushioned surface that will protect product and screen from damage. 2 Insert the stand base into the product 3 Attach the monitor to the Stand Base by turning the screw to the right. *Turn the screw by using the screw handle 4 4
Owner's Manual
Page 7
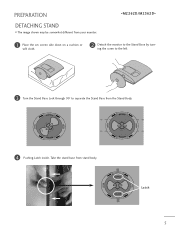
OPEN OPEN Latch 5 OPEN OPEN OPEN OPEN 4 Pushing Latch inside, Take the stand base from the Stand Body. PREPARATION DETACHING STAND I The image shown may be somewhat different from your monitor. 1 Place the set screen side down on a cushion or soft cloth. 2 Detach the monitor to the Stand Base by turning the screw to the left. 3 Turn the Stand Base Lock through 90° to separate the Stand Base from stand body.
OPEN OPEN Latch 5 OPEN OPEN OPEN OPEN 4 Pushing Latch inside, Take the stand base from the Stand Body. PREPARATION DETACHING STAND I The image shown may be somewhat different from your monitor. 1 Place the set screen side down on a cushion or soft cloth. 2 Detach the monitor to the Stand Base by turning the screw to the left. 3 Turn the Stand Base Lock through 90° to separate the Stand Base from stand body.
Owner's Manual
Page 8
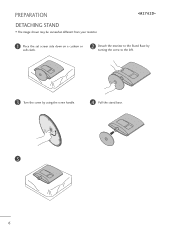
PREPARATION DETACHING STAND I The image shown may be somewhat different from your monitor. 1 Place the set screen side down on a cushion or soft cloth. 2 Detach the monitor to the Stand Base by turning the screw to the left. 3 Turn the screw by using the screw handle. 4 Pull the stand base. 5 6
PREPARATION DETACHING STAND I The image shown may be somewhat different from your monitor. 1 Place the set screen side down on a cushion or soft cloth. 2 Detach the monitor to the Stand Base by turning the screw to the left. 3 Turn the screw by using the screw handle. 4 Pull the stand base. 5 6
Owner's Manual
Page 11
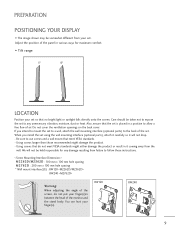
... the wall mounting interface (optional parts) to follow these instructions. < Screw Mounting Interface Dimension > M2262D/M2362D : 100 mm x 100 mm hole spacing M2762D : 200 mm x 100 mm hole spacing * Wall mount interface(LG) : RW120 RW240 Warning: When adjusting the angle of the screen, do not meet VESA standards... RW120 RW240 9 PREPARATION POSITIONING YOUR DISPLAY I The image shown may be somewhat different from your finger(s)in between the head of the monitor and the stand body. Care should be taken not to expose the set to any damage resulting from failure to the back of the...
... the wall mounting interface (optional parts) to follow these instructions. < Screw Mounting Interface Dimension > M2262D/M2362D : 100 mm x 100 mm hole spacing M2762D : 200 mm x 100 mm hole spacing * Wall mount interface(LG) : RW120 RW240 Warning: When adjusting the angle of the screen, do not meet VESA standards... RW120 RW240 9 PREPARATION POSITIONING YOUR DISPLAY I The image shown may be somewhat different from your finger(s)in between the head of the monitor and the stand body. Care should be taken not to expose the set to any damage resulting from failure to the back of the...

Owner's Manual
Page 14
... provided with the Kensington Security System. Some minute dot defects may be visible on the back panel. This is normal, there is turned on the monitor's performance. NOTES a. c. Connect the Kensington Security System cable as notebook PCs and LCD projectors. The product is an optional accessory available at most electronics stores...
... provided with the Kensington Security System. Some minute dot defects may be visible on the back panel. This is normal, there is turned on the monitor's performance. NOTES a. c. Connect the Kensington Security System cable as notebook PCs and LCD projectors. The product is an optional accessory available at most electronics stores...
Owner's Manual
Page 22
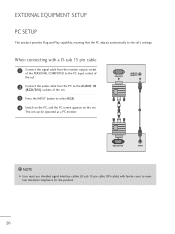
... . NOTE G User must use shielded signal interface cables (D sub 15 pin cable, DVI cable) with a D-sub 15 pin cable 1 Connect the signal cable from the monitor output socket of the PERSONAL COMPUTER to the PC input socket of the set. 2 Connect the audio cable from the PC to the AUDIO IN... the set. 3 Press the INPUT button to select R G B. 4 Switch on the PC, and the PC screen appears on the set can be operated as a PC monitor. When connecting with ferrite cores to the set's settings. RGB IN (PC) AUDIO IN (RGB/DVI) 1 2 RGB OUTPUT AUDIO ! EXTERNAL EQUIPMENT SETUP PC SETUP This...
... . NOTE G User must use shielded signal interface cables (D sub 15 pin cable, DVI cable) with a D-sub 15 pin cable 1 Connect the signal cable from the monitor output socket of the PERSONAL COMPUTER to the PC input socket of the set. 2 Connect the audio cable from the PC to the AUDIO IN... the set. 3 Press the INPUT button to select R G B. 4 Switch on the PC, and the PC screen appears on the set can be operated as a PC monitor. When connecting with ferrite cores to the set's settings. RGB IN (PC) AUDIO IN (RGB/DVI) 1 2 RGB OUTPUT AUDIO ! EXTERNAL EQUIPMENT SETUP PC SETUP This...

Owner's Manual
Page 23
... a fixed image on the set's screen for your finger for a long time as this will have no impact or effect on the monitor performance. If used with your LCD monitor. The fixed image may appear on the screen, like Red, Green or Blue spots. DVI-D IN (PC) AUDIO IN (RGB/DVI) 2 1 DVI...
... a fixed image on the set's screen for your finger for a long time as this will have no impact or effect on the monitor performance. If used with your LCD monitor. The fixed image may appear on the screen, like Red, Green or Blue spots. DVI-D IN (PC) AUDIO IN (RGB/DVI) 2 1 DVI...

Owner's Manual
Page 33
... CHANNEL. Select Manual Tuning. I A password is required to gain access to the Manual Tuning menu if the Lock System is turned on -screen signal strength monitor to the previous menu screen. 31 CHANNEL Auto tuning MMaannuuaall ttuunniinngg Channel Edit Move Enter CHANNEL Auto tuning MMaannuuaall ttuunniinngg Channel Edit Move Enter F DTV...
... CHANNEL. Select Manual Tuning. I A password is required to gain access to the Manual Tuning menu if the Lock System is turned on -screen signal strength monitor to the previous menu screen. 31 CHANNEL Auto tuning MMaannuuaall ttuunniinngg Channel Edit Move Enter CHANNEL Auto tuning MMaannuuaall ttuunniinngg Channel Edit Move Enter F DTV...
Owner's Manual
Page 71
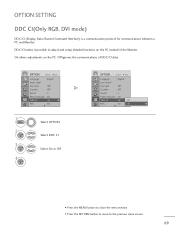
...previous menu screen. 69 On allows adjustments on the PC instead of DDC/CI data. Select On or Off. Off ignores the communications of the Monitor. OPTION Move Enter Language : English Input Label Key Lock : Off Caption : Off Set ID : 1 Power Indicator : On DDDC-CCII ::...OPTION SETTING DDC CI(Only RGB, DVI mode) DDC/CI (Display Data Channel Command Interface) is a communication protocol for communications between a PC and Monitor. OPTION Move Enter Language : English Input Label Key Lock : Off Caption : Off Set ID : 1 Power Indicator : On DDDC-CCII ::...
...previous menu screen. 69 On allows adjustments on the PC instead of DDC/CI data. Select On or Off. Off ignores the communications of the Monitor. OPTION Move Enter Language : English Input Label Key Lock : Off Caption : Off Set ID : 1 Power Indicator : On DDDC-CCII ::...OPTION SETTING DDC CI(Only RGB, DVI mode) DDC/CI (Display Data Channel Command Interface) is a communication protocol for communications between a PC and Monitor. OPTION Move Enter Language : English Input Label Key Lock : Off Caption : Off Set ID : 1 Power Indicator : On DDDC-CCII ::...
Owner's Manual
Page 83
... Mode The screen image looks abnormal. Horizontal noise appears or the characters look blurred. Is the picture offset? If the frequency is provided with the monitor. A Adjust the Phase menu in OSD. olution (16_colors). Do thin lines appear on the screen. from the web site. (http://www.lge.com) A The Video...
... Mode The screen image looks abnormal. Horizontal noise appears or the characters look blurred. Is the picture offset? If the frequency is provided with the monitor. A Adjust the Phase menu in OSD. olution (16_colors). Do thin lines appear on the screen. from the web site. (http://www.lge.com) A The Video...
Specification
Page 1
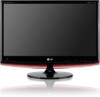
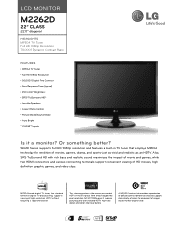
..., supports viewing of HD movies, high definition graphic games, and video clips. With almost double the pixel resolution, Full HD 1080p gives it a monitor? Or something better? LCD MONITOR M2262D 22" Class 22.0" diagonal HIGHLIGHTS MPEG4 TV Tuner Full HD 1080p Resolution 70,000:1 Dynamic Contrast Ratio FEATURES • MPEG4 TV Tuner •...
..., supports viewing of HD movies, high definition graphic games, and video clips. With almost double the pixel resolution, Full HD 1080p gives it a monitor? Or something better? LCD MONITOR M2262D 22" Class 22.0" diagonal HIGHLIGHTS MPEG4 TV Tuner Full HD 1080p Resolution 70,000:1 Dynamic Contrast Ratio FEATURES • MPEG4 TV Tuner •...

Specification
Page 2
All other product and brand names are subject to change without notice. LCD MONITOR M2262D LCD PANEL SPECIFICATION Screen Size 22" Class (21.5" diagonal) Resolution 1920 x 1080p Brightness (cd/m2) 300 (Typical...x 15.7" x 8.7" Shipping Dimensions (WxHxD) 23.0" x 17.8" x 5.5" Monitor Without Stand Weight 9.7 lbs Monitor With Stand Weight 10.1 lbs Shipping Weight 13.7 lbs WARRANTY/UPC Limited Warranty 3 Year Parts & Labor UPC 719192186361 LGusa.com LG Electronics U.S.A., Inc. 1000 Sylvan Avenue Englewood Cliffs, NJ 07632 Customer Service and ...
All other product and brand names are subject to change without notice. LCD MONITOR M2262D LCD PANEL SPECIFICATION Screen Size 22" Class (21.5" diagonal) Resolution 1920 x 1080p Brightness (cd/m2) 300 (Typical...x 15.7" x 8.7" Shipping Dimensions (WxHxD) 23.0" x 17.8" x 5.5" Monitor Without Stand Weight 9.7 lbs Monitor With Stand Weight 10.1 lbs Shipping Weight 13.7 lbs WARRANTY/UPC Limited Warranty 3 Year Parts & Labor UPC 719192186361 LGusa.com LG Electronics U.S.A., Inc. 1000 Sylvan Avenue Englewood Cliffs, NJ 07632 Customer Service and ...


