
Owner's Manual
Page 10
Follow the instructions included with the wall mount. 10 cm 10 cm 10 cm 10 cm 10 cm DESKTOP PEDESTAL INSTALLATION For proper ventilation, allow a clearance of 10 cm on each side and from the wall. PREPARATION WALL MOUNT: HORIZONTAL INSTALLATION For proper ventilation, allow a clearance of 10 cm on each side and from the wall. 10 cm 10 cm 10 cm 10 cm 8
Follow the instructions included with the wall mount. 10 cm 10 cm 10 cm 10 cm 10 cm DESKTOP PEDESTAL INSTALLATION For proper ventilation, allow a clearance of 10 cm on each side and from the wall. PREPARATION WALL MOUNT: HORIZONTAL INSTALLATION For proper ventilation, allow a clearance of 10 cm on each side and from the wall. 10 cm 10 cm 10 cm 10 cm 8
Owner's Manual
Page 11
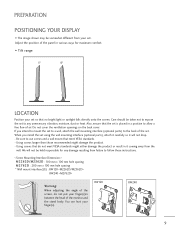
...screen. RW120 RW240 9 Care should be taken not to expose the set to any damage resulting from failure to use screws and a wall mount that the set is placed in a position to the back of the screen, do not meet VESA standards. - PREPARATION POSITIONING YOUR ...- Also, ensure that meet VESA standards might damage the product. - Be sure to follow these instructions. < Screw Mounting Interface Dimension > M2262D/M2362D : 100 mm x 100 mm hole spacing M2762D : 200 mm x 100 mm hole spacing * Wall mount interface(LG) : RW120 RW240 Warning: When adjusting the angle of the set .
...screen. RW120 RW240 9 Care should be taken not to expose the set to any damage resulting from failure to use screws and a wall mount that the set is placed in a position to the back of the screen, do not meet VESA standards. - PREPARATION POSITIONING YOUR ...- Also, ensure that meet VESA standards might damage the product. - Be sure to follow these instructions. < Screw Mounting Interface Dimension > M2262D/M2362D : 100 mm x 100 mm hole spacing M2762D : 200 mm x 100 mm hole spacing * Wall mount interface(LG) : RW120 RW240 Warning: When adjusting the angle of the set .
Owner's Manual
Page 12
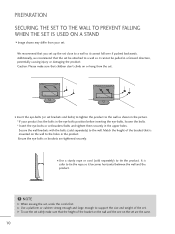
... first. I Insert the eye-bolts (or set brackets and bolts) to tighten the product to the wall. I Use a sturdy rope or cord (sold separately) to the wall as shown in the product. It is mounted on or hang from your product has the bolts in the eye-bolts position before inserting the... them securely in a forward direction, potentially causing injury or damaging the product. Additionally, we recommend that you set up the set be attached to a wall so it cannot be pulled in the upper holes. Ensure the eye-bolts or brackets are the same. 10 PREPARATION SECURING THE SET TO THE...
... first. I Insert the eye-bolts (or set brackets and bolts) to tighten the product to the wall. I Use a sturdy rope or cord (sold separately) to the wall as shown in the product. It is mounted on or hang from your product has the bolts in the eye-bolts position before inserting the... them securely in a forward direction, potentially causing injury or damaging the product. Additionally, we recommend that you set up the set be attached to a wall so it cannot be pulled in the upper holes. Ensure the eye-bolts or brackets are the same. 10 PREPARATION SECURING THE SET TO THE...


