Owners Manual
Page 3
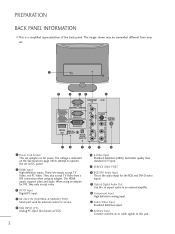
...-D Input Digital PC input. 4 RS-232C IN (CONTROL & SERVICE) PORT Serial port used for the RGB and DVI-D video inputs. 9 Optical Digital Audio Out Use this jack. 2 These two inputs accept TV Video, not PC Video. They also accept TV Video from your set. 1 AC IN AC ... AV 1 AV 2 (CONTROL & SERVICE) 1 HDMI IN 2 RGB IN (PC) PB S-VIDEO VIDEO ANTENNA/ PR CABLE IN AUDIO DVI-D IN (PC) L SERVICE AUDIO IN ONLY (RGB/DVI) OPTICAL R DIGITAL AUDIO OUT VIDEO (MONO) L AUDIO R 7 8 9 10 11 12 1 Power Cord Socket This set on the Specifications page. Also known as VGA. 6 S-Video...
...-D Input Digital PC input. 4 RS-232C IN (CONTROL & SERVICE) PORT Serial port used for the RGB and DVI-D video inputs. 9 Optical Digital Audio Out Use this jack. 2 These two inputs accept TV Video, not PC Video. They also accept TV Video from your set. 1 AC IN AC ... AV 1 AV 2 (CONTROL & SERVICE) 1 HDMI IN 2 RGB IN (PC) PB S-VIDEO VIDEO ANTENNA/ PR CABLE IN AUDIO DVI-D IN (PC) L SERVICE AUDIO IN ONLY (RGB/DVI) OPTICAL R DIGITAL AUDIO OUT VIDEO (MONO) L AUDIO R 7 8 9 10 11 12 1 Power Cord Socket This set on the Specifications page. Also known as VGA. 6 S-Video...
Owners Manual
Page 16
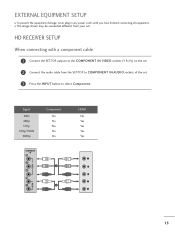
Signal 480i 480p 576p 720p/1080i 1080p Component Yes Yes No Yes Yes COMPONENT IN Y VIDEO PB 1 PR L R 2 HDMI No Yes Yes Yes Yes AUDIO 15 HD RECEIVER SETUP When connecting with a component cable 1 Connect the SET-TOP outputs to the COMPONENT IN VIDEO sockets (Y PB PR) on the set. ...2 Connect the audio cable from your set . 3 Press the INPUT button to select Component. I To prevent the equipment damage, never plug in any power cords until you have...
Signal 480i 480p 576p 720p/1080i 1080p Component Yes Yes No Yes Yes COMPONENT IN Y VIDEO PB 1 PR L R 2 HDMI No Yes Yes Yes Yes AUDIO 15 HD RECEIVER SETUP When connecting with a component cable 1 Connect the SET-TOP outputs to the COMPONENT IN VIDEO sockets (Y PB PR) on the set. ...2 Connect the audio cable from your set . 3 Press the INPUT button to select Component. I To prevent the equipment damage, never plug in any power cords until you have...

Owners Manual
Page 17
... connecting with a HDMI to DVI cable 1 Connect the digital set-top box to HDMI IN jack on the set. 2 Connect the audio output of the digital set-top box to the AUDIO IN (RGB/DVI) jack on the set. 3 Turn on the digital set-top box. (Refer to the owner's manual for...
... connecting with a HDMI to DVI cable 1 Connect the digital set-top box to HDMI IN jack on the set. 2 Connect the audio output of the digital set-top box to the AUDIO IN (RGB/DVI) jack on the set. 3 Turn on the digital set-top box. (Refer to the owner's manual for...
Owners Manual
Page 18
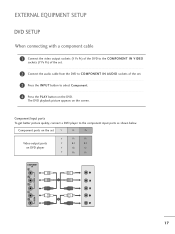
... the video output sockets (Y PB PR) of the DVD to the COMPONENT IN VIDEO sockets (Y PB PR) of the set. 2 Connect the audio cable from the DVD to COMPONENT IN AUDIO sockets of the set Y PB PR Video output ports on DVD player Y PB PR Y B-Y R-Y Y Cb Cr Y Pb Pr COMPONENT IN Y VIDEO...
... the video output sockets (Y PB PR) of the DVD to the COMPONENT IN VIDEO sockets (Y PB PR) of the set. 2 Connect the audio cable from the DVD to COMPONENT IN AUDIO sockets of the set Y PB PR Video output ports on DVD player Y PB PR Y B-Y R-Y Y Cb Cr Y Pb Pr COMPONENT IN Y VIDEO...
Owners Manual
Page 19
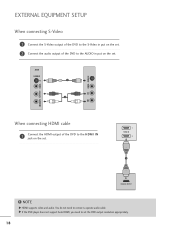
G If the DVD player does not support Auto HDMI, you need to connect a sperate audio cable. NOTE G HDMI supports video and audio. AV-IN S-VIDEO 1 2 S-VIDEO VIDEO L VIDEO (MONO) L AUDIO R R When connecting HDMI cable 1 Connect the HDMI output of the DVD to the AUDIO in put on the set the DVD output resolution appropriately. 18 You do not need to set . 1 HDMI IN 2 1 ! EXTERNAL EQUIPMENT SETUP When connecting S-Video 1 Connect the S-Video output of the DVD to the S-Video in put on the set. 2 Connect the audio output of the DVD to the HDMI IN jack on the set.
G If the DVD player does not support Auto HDMI, you need to connect a sperate audio cable. NOTE G HDMI supports video and audio. AV-IN S-VIDEO 1 2 S-VIDEO VIDEO L VIDEO (MONO) L AUDIO R R When connecting HDMI cable 1 Connect the HDMI output of the DVD to the AUDIO in put on the set the DVD output resolution appropriately. 18 You do not need to set . 1 HDMI IN 2 1 ! EXTERNAL EQUIPMENT SETUP When connecting S-Video 1 Connect the S-Video output of the DVD to the S-Video in put on the set. 2 Connect the audio output of the DVD to the HDMI IN jack on the set.
Owners Manual
Page 21
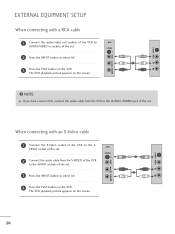
... the VCR to select AV. 4 Press the PLAY button on the VCR. S-VIDEO VIDEO L R EXTERNAL EQUIPMENT SETUP When connecting with an S-Video cable VIDEO (MONO) L AUDIO R 1 Connect the S-Video socket of the VCR to select AV. 1 3 Press the PLAY button on the VCR. The VCR playback picture appears on the screen.... ! AV-IN VIDEO socket of the set. 2 3 Press the INPUT button to the AUDIO sockets of the set. The VCR playback picture appears on the screen. S-VIDEO VIDEO L R 20 S-VIDEO 1 2 Connect the...
... the VCR to select AV. 4 Press the PLAY button on the VCR. S-VIDEO VIDEO L R EXTERNAL EQUIPMENT SETUP When connecting with an S-Video cable VIDEO (MONO) L AUDIO R 1 Connect the S-Video socket of the VCR to select AV. 1 3 Press the PLAY button on the VCR. The VCR playback picture appears on the screen.... ! AV-IN VIDEO socket of the set. 2 3 Press the INPUT button to the AUDIO sockets of the set. The VCR playback picture appears on the screen. S-VIDEO VIDEO L R 20 S-VIDEO 1 2 Connect the...
Owners Manual
Page 22
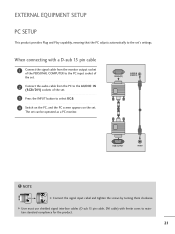
... the signal cable from the monitor output socket of the PERSONAL COMPUTER to the PC input socket of the set. 2 Connect the audio cable from the PC to the AUDIO IN (RGB/DVI) sockets of the set. 3 Press the INPUT button to select R G B. 4 Switch on the PC, and the PC screen appears... SETUP This product provides Plug and Play capability, meaning that the PC adjusts automatically to maintain standard compliance for the product. 21 RGB IN (PC) AUDIO IN (RGB/DVI) 1 2 RGB OUTPUT AUDIO ! When connecting with ferrite cores to the set can be operated as a PC monitor.
... the signal cable from the monitor output socket of the PERSONAL COMPUTER to the PC input socket of the set. 2 Connect the audio cable from the PC to the AUDIO IN (RGB/DVI) sockets of the set. 3 Press the INPUT button to select R G B. 4 Switch on the PC, and the PC screen appears... SETUP This product provides Plug and Play capability, meaning that the PC adjusts automatically to maintain standard compliance for the product. 21 RGB IN (PC) AUDIO IN (RGB/DVI) 1 2 RGB OUTPUT AUDIO ! When connecting with ferrite cores to the set can be operated as a PC monitor.
Owners Manual
Page 23
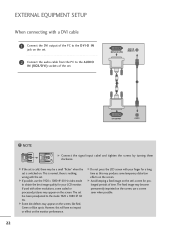
... by turning them clockwise. If used with your finger for your LCD monitor. G Some dot defects may become permanently imprinted on the set. 2 Connect the audio cable from the PC to the mode 1920 x 1080 @ 60 Hz. EXTERNAL EQUIPMENT SETUP When connecting with the set. G If the set is nothing wrong... output of the set. G Do not press the LCD screen with other resolutions, some temporary distortion effects on the set has been preadjusted to the AUDIO IN (RGB/DVI) sockets of the PC to the DVI-D IN jack on the screen; G Avoid keeping a fixed image on the screen.
... by turning them clockwise. If used with your finger for your LCD monitor. G Some dot defects may become permanently imprinted on the set. 2 Connect the audio cable from the PC to the mode 1920 x 1080 @ 60 Hz. EXTERNAL EQUIPMENT SETUP When connecting with the set. G If the set is nothing wrong... output of the set. G Do not press the LCD screen with other resolutions, some temporary distortion effects on the set has been preadjusted to the AUDIO IN (RGB/DVI) sockets of the PC to the DVI-D IN jack on the screen; G Avoid keeping a fixed image on the screen.
Owners Manual
Page 26
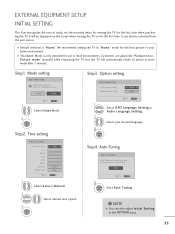
... Setting F English G English Enter RETURN Exit 1 Select OSD Language Setting or Audio Language Setting. 2 Select your home environment. Step1. Mode setting Step1. In Store Home Enter RETURN Exit 1 Select H o me Mode. 2 ENTER Step2. Time setting Step2. OSD ...
... Setting F English G English Enter RETURN Exit 1 Select OSD Language Setting or Audio Language Setting. 2 Select your home environment. Step1. Mode setting Step1. In Store Home Enter RETURN Exit 1 Select H o me Mode. 2 ENTER Step2. Time setting Step2. OSD ...
Owners Manual
Page 27
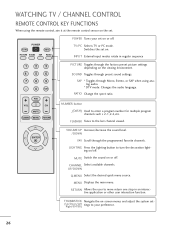
... the spect ratio. UP/DOWN Q.MENU Select the desired quick menu source. WATCHING TV / CHANNEL CONTROL REMOTE CONTROL KEY FUNCTIONS When using analog audio. * DTV mode: Changes the audio language. TV/PC Selects TV or PC mode. FLASHBK Tunes to your set - (Up/Down/Left Right/ENTER) tings to the last channel...
... the spect ratio. UP/DOWN Q.MENU Select the desired quick menu source. WATCHING TV / CHANNEL CONTROL REMOTE CONTROL KEY FUNCTIONS When using analog audio. * DTV mode: Changes the audio language. TV/PC Selects TV or PC mode. FLASHBK Tunes to your set - (Up/Down/Left Right/ENTER) tings to the last channel...
Owners Manual
Page 30
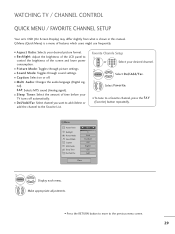
...format. Favorite Channle Setup 1 CH 123 or 4 5 6 Select your TV turns off . Q.Menu Aspect Ratio Backlight Picture Mode Sound Mode Caption Multi Audio Sleep Timer CH Del/Add/Fav F 16:9 G 3 Vivid Standard Off English Off Add Close 1 Q.MENU 2 Display each menu. WATCHING TV / ... the channel to a favorite channel, press the F A V (Favorite) button repeatedly. Q.Menu (Quick Menu) is shown in this manual. I Multi Audio: Changes the audio language (Digital signal). I Sleep Timer: Select the amount of time before your desired channel. 789 0 2 Q.MENU Select Del/Add/Fav. 3 Select ...
...format. Favorite Channle Setup 1 CH 123 or 4 5 6 Select your TV turns off . Q.Menu Aspect Ratio Backlight Picture Mode Sound Mode Caption Multi Audio Sleep Timer CH Del/Add/Fav F 16:9 G 3 Vivid Standard Off English Off Add Close 1 Q.MENU 2 Display each menu. WATCHING TV / ... the channel to a favorite channel, press the F A V (Favorite) button repeatedly. Q.Menu (Quick Menu) is shown in this manual. I Multi Audio: Changes the audio language (Digital signal). I Sleep Timer: Select the amount of time before your desired channel. 789 0 2 Q.MENU Select Del/Add/Fav. 3 Select ...
Owners Manual
Page 31
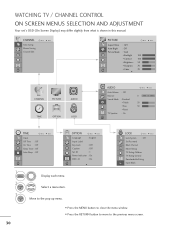
...:9 Auto Bright : Off Picture Mode : Vivid • Backlight 100 • Contrast 100 • Brightness 50 • Sharpness 70 • Color 70 E CHANNEL PICTURE AUDIO TIME OPTION LOCK AUDIO Auto Volume : Off Balance Sound Mode : Standard • Treble • Bass • Reset TV Speaker : On Move Enter 0L R 50 50 TIME Move Enter...
...:9 Auto Bright : Off Picture Mode : Vivid • Backlight 100 • Contrast 100 • Brightness 50 • Sharpness 70 • Color 70 E CHANNEL PICTURE AUDIO TIME OPTION LOCK AUDIO Auto Volume : Off Balance Sound Mode : Standard • Treble • Bass • Reset TV Speaker : On Move Enter 0L R 50 50 TIME Move Enter...
Owners Manual
Page 35
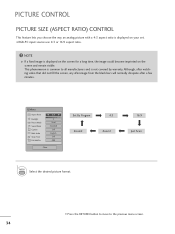
... will normally dissipate after a few minutes. I RGB-PC input source use 4:3 or 16:9 aspect ratio. ! Q.Menu Aspect Ratio Backlight Picture Mode Sound Mode Caption Multi Audio Sleep Timer CH Del/Add/Fav F 16:9 G 3 Vivid Standard Off English Off Add Close Set By Program 4:3 Zoom2 Zoom1 16:9 Just Scan 1 RATIO Select the...
... will normally dissipate after a few minutes. I RGB-PC input source use 4:3 or 16:9 aspect ratio. ! Q.Menu Aspect Ratio Backlight Picture Mode Sound Mode Caption Multi Audio Sleep Timer CH Del/Add/Fav F 16:9 G 3 Vivid Standard Off English Off Add Close Set By Program 4:3 Zoom2 Zoom1 16:9 Just Scan 1 RATIO Select the...

Owners Manual
Page 37
... move to the previous menu screen. 36 You can use a preset, change each setting manually. Q.Menu Aspect Ratio Backlight Picture Mode Sound Mode Caption Multi Audio Sleep Timer CH Del/Add/Fav 16:9 3 F Vivid G Standard Off English Off Add Close Vivid Game Standard Cinema Sport 1 PICTURE Select Vivid, Standard, Cinema, Sport...
... move to the previous menu screen. 36 You can use a preset, change each setting manually. Q.Menu Aspect Ratio Backlight Picture Mode Sound Mode Caption Multi Audio Sleep Timer CH Del/Add/Fav 16:9 3 F Vivid G Standard Off English Off Add Close Vivid Game Standard Cinema Sport 1 PICTURE Select Vivid, Standard, Cinema, Sport...
Owners Manual
Page 51
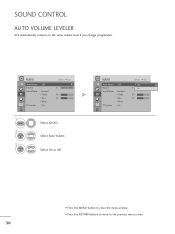
Select On or Off. AUDIO AAuuttooVVoolulummee ::OOfff Balance Sound Mode : Standard • Treble • Bass • Reset TV Speaker : On Move Enter OOffff 0 OL n R 50 50 • Press the MENU ... the previous menu screen. 50 SOUND CONTROL AUTO VOLUME LEVELER AVL automatically remains on the same volume level if you change programmes. Select Auto Volume. AUDIO AAuuttoo VVoolluummee :: OOffff Balance Sound Mode : Standard • Treble • Bass • Reset TV Speaker : On Move Enter 0L R 50 50 1 MENU 2 ENTER 3 ENTER Select...
Select On or Off. AUDIO AAuuttooVVoolulummee ::OOfff Balance Sound Mode : Standard • Treble • Bass • Reset TV Speaker : On Move Enter OOffff 0 OL n R 50 50 • Press the MENU ... the previous menu screen. 50 SOUND CONTROL AUTO VOLUME LEVELER AVL automatically remains on the same volume level if you change programmes. Select Auto Volume. AUDIO AAuuttoo VVoolluummee :: OOffff Balance Sound Mode : Standard • Treble • Bass • Reset TV Speaker : On Move Enter 0L R 50 50 1 MENU 2 ENTER 3 ENTER Select...
Owners Manual
Page 52
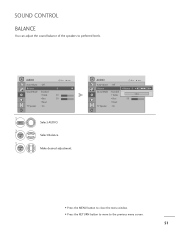
AUDIO Move Enter Auto Volume : Off BBaalalannccee • Bala0n0ce L0 F L R RG Sound Mode : Standard • Treble 50 Close • Bass 50 • Reset TV Speaker : On &#... preferred levels. Select Balance. SOUND CONTROL BALANCE You can adjust the sound balance of the speakers to the previous menu screen. 51 Make desired adjustment. AUDIO Auto Volume : Off BBaalalannccee Sound Mode : Standard • Treble • Bass • Reset TV Speaker : On Move Enter 00 L R 50 50 1 MENU 2 ENTER 3 ENTER Select...
AUDIO Move Enter Auto Volume : Off BBaalalannccee • Bala0n0ce L0 F L R RG Sound Mode : Standard • Treble 50 Close • Bass 50 • Reset TV Speaker : On &#... preferred levels. Select Balance. SOUND CONTROL BALANCE You can adjust the sound balance of the speakers to the previous menu screen. 51 Make desired adjustment. AUDIO Auto Volume : Off BBaalalannccee Sound Mode : Standard • Treble • Bass • Reset TV Speaker : On Move Enter 00 L R 50 50 1 MENU 2 ENTER 3 ENTER Select...
Owners Manual
Page 53
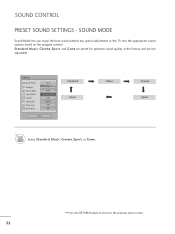
... special adjustment as the TV sets the appropriate sound options based on the program content. Q.Menu Aspect Ratio Backlight Picture Mode Sound Mode Caption Multi Audio Sleep Timer CH Del/Add/Fav 16:9 3 Vivid F Standard G Off English Off Add Close Standard Game Music 1 SOUND Select Standard, Music, Cinema, Sport, or Ga...
... special adjustment as the TV sets the appropriate sound options based on the program content. Q.Menu Aspect Ratio Backlight Picture Mode Sound Mode Caption Multi Audio Sleep Timer CH Del/Add/Fav 16:9 3 Vivid F Standard G Off English Off Add Close Standard Game Music 1 SOUND Select Standard, Music, Cinema, Sport, or Ga...
Owners Manual
Page 54
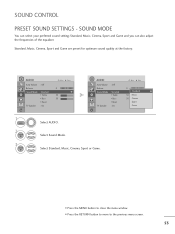
AUDIO Auto Volume : Off Balance SSoouunndd MMooddee :: SSttaannddaarrdd • Treble • Bass • Reset TV Speaker : On Move Enter 0L R 50 50 AUDIO Auto Volume : Off Balance SSoouunndd MMooddee :: SSttaannddaarrdd • Treble • Bass • Reset TV Speaker : On Move Enter... 0L R SSttaannddaarrdd 50 Music 50 Cinema Sport Game 1 MENU 2 ENTER 3 ENTER Select AUDIO. Standard, Music, Cinema, Sport and Game are preset for optimum sound quality at the factory. SOUND MODE You can also adjust the frequencies of ...
AUDIO Auto Volume : Off Balance SSoouunndd MMooddee :: SSttaannddaarrdd • Treble • Bass • Reset TV Speaker : On Move Enter 0L R 50 50 AUDIO Auto Volume : Off Balance SSoouunndd MMooddee :: SSttaannddaarrdd • Treble • Bass • Reset TV Speaker : On Move Enter... 0L R SSttaannddaarrdd 50 Music 50 Cinema Sport Game 1 MENU 2 ENTER 3 ENTER Select AUDIO. Standard, Music, Cinema, Sport and Game are preset for optimum sound quality at the factory. SOUND MODE You can also adjust the frequencies of ...
Owners Manual
Page 55
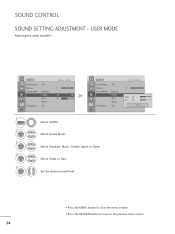
... : Off Balance Sound Mode : Standard • Treble • Bass • Reset TV Speaker : On Move Enter 0L R 5500 50 AUDIO Auto Volume : Off Balance Sound Mode : Standard • Treble • Bass • Reset TV Speaker : On Move Enter 0L R 5500 Treble 50 50 Bass 50 ...Close 1 MENU 2 ENTER 3 ENTER 4 ENTER 5 ENTER Select AUDIO. Set the desired sound level. • Press the MENU button to close the menu window. • Press the RETURN button to move to the previous...
... : Off Balance Sound Mode : Standard • Treble • Bass • Reset TV Speaker : On Move Enter 0L R 5500 50 AUDIO Auto Volume : Off Balance Sound Mode : Standard • Treble • Bass • Reset TV Speaker : On Move Enter 0L R 5500 Treble 50 50 Bass 50 ...Close 1 MENU 2 ENTER 3 ENTER 4 ENTER 5 ENTER Select AUDIO. Set the desired sound level. • Press the MENU button to close the menu window. • Press the RETURN button to move to the previous...
Owners Manual
Page 56
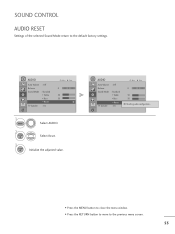
... : On Move Enter 0L R 50 50 1 MENU 2 ENTER Select AUDIO. SOUND CONTROL AUDIO RESET Settings of the selected Sound Mode return to the previous menu screen. 55 Select Reset. 3 ENTER Initialize the adjusted value. AUDIO Auto Volume Balance Sound Mode TV Speaker : Off : Standard •... Treble • Bass ••RReesseett : On Move Enter 0L R 50 50 i Resetting audio configuration... • Press the MENU button to close the menu...
... : On Move Enter 0L R 50 50 1 MENU 2 ENTER Select AUDIO. SOUND CONTROL AUDIO RESET Settings of the selected Sound Mode return to the previous menu screen. 55 Select Reset. 3 ENTER Initialize the adjusted value. AUDIO Auto Volume Balance Sound Mode TV Speaker : Off : Standard •... Treble • Bass ••RReesseett : On Move Enter 0L R 50 50 i Resetting audio configuration... • Press the MENU button to close the menu...


