Owners Manual
Page 3
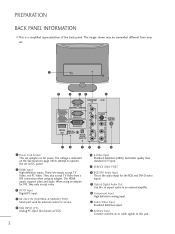
... IN AC IN 2 3 45 6 COMPONENT AV-IN IN RS-232C IN Y AV 1 AV 2 (CONTROL & SERVICE) 1 HDMI IN 2 RGB IN (PC) PB S-VIDEO VIDEO ANTENNA/ PR CABLE IN AUDIO DVI-D IN (PC) L SERVICE AUDIO IN ONLY (RGB/DVI) OPTICAL R DIGITAL AUDIO OUT VIDEO (MONO) L AUDIO R 7 8 9 10 11 12 1 Power Cord Socket .... The image shown may be somewhat different from a DVI connection when using an adapter for DVI, they only accept video. 3 DVI-D Input Digital PC input. 4 RS-232C IN (CONTROL & SERVICE) PORT Serial port used for the RGB and DVI-D video inputs. 9 Optical Digital Audio Out Use this...
... IN AC IN 2 3 45 6 COMPONENT AV-IN IN RS-232C IN Y AV 1 AV 2 (CONTROL & SERVICE) 1 HDMI IN 2 RGB IN (PC) PB S-VIDEO VIDEO ANTENNA/ PR CABLE IN AUDIO DVI-D IN (PC) L SERVICE AUDIO IN ONLY (RGB/DVI) OPTICAL R DIGITAL AUDIO OUT VIDEO (MONO) L AUDIO R 7 8 9 10 11 12 1 Power Cord Socket .... The image shown may be somewhat different from a DVI connection when using an adapter for DVI, they only accept video. 3 DVI-D Input Digital PC input. 4 RS-232C IN (CONTROL & SERVICE) PORT Serial port used for the RGB and DVI-D video inputs. 9 Optical Digital Audio Out Use this...
Owners Manual
Page 14
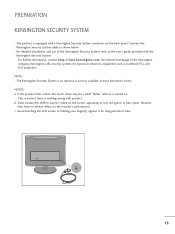
Connect the Kensington Security System cable as notebook PCs and LCD projectors. If the product feels cold to the user's guide provided with the Kensington Security System. Some minute dot defects may be visible ...
Connect the Kensington Security System cable as notebook PCs and LCD projectors. If the product feels cold to the user's guide provided with the Kensington Security System. Some minute dot defects may be visible ...

Owners Manual
Page 17
NOTE G HDMI Input does not support PC mode. EXTERNAL EQUIPMENT SETUP When connecting with a HDMI 1 Connect the HDMI output of the digital set-top box to the HDMI IN jack on the ... box. (Refer to the owner's manual for the digital set-top box.) 1 HDMI IN 2 AUDIO IN (RGB/DVI) 2 1 DVI OUTPUT AUDIO L R ! If it is connected PC, the screen may not display properly. 16
NOTE G HDMI Input does not support PC mode. EXTERNAL EQUIPMENT SETUP When connecting with a HDMI 1 Connect the HDMI output of the digital set-top box to the HDMI IN jack on the ... box. (Refer to the owner's manual for the digital set-top box.) 1 HDMI IN 2 AUDIO IN (RGB/DVI) 2 1 DVI OUTPUT AUDIO L R ! If it is connected PC, the screen may not display properly. 16
Owners Manual
Page 22
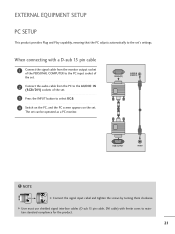
...) with a D-sub 15 pin cable 1 Connect the signal cable from the monitor output socket of the PERSONAL COMPUTER to the PC input socket of the set. 2 Connect the audio cable from the PC to the AUDIO IN (RGB/DVI) sockets of the set. 3 Press the INPUT button to select R G B. 4 Switch on ...the PC, and the PC screen appears on the set can be operated as a PC monitor. The set . NOTE G Connect the signal input cabel and tighten the screws by turning them clockwise. When connecting with ferrite...
...) with a D-sub 15 pin cable 1 Connect the signal cable from the monitor output socket of the PERSONAL COMPUTER to the PC input socket of the set. 2 Connect the audio cable from the PC to the AUDIO IN (RGB/DVI) sockets of the set. 3 Press the INPUT button to select R G B. 4 Switch on ...the PC, and the PC screen appears on the set can be operated as a PC monitor. The set . NOTE G Connect the signal input cabel and tighten the screws by turning them clockwise. When connecting with ferrite...
Owners Manual
Page 23
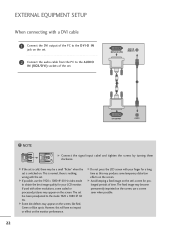
... the set. The set 's screen for a long time as this will have no impact or effect on the set. 2 Connect the audio cable from the PC to the AUDIO IN (RGB/DVI) sockets of time. However, this may produce some scaled or processed pictures may appear on the screen; use the... keeping a fixed image on the screen. G If the set is nothing wrong with a DVI cable 1 Connect the DVI output of the PC to the mode 1920 x 1080 @ 60 Hz. DVI-D IN (PC) AUDIO IN (RGB/DVI) 2 1 DVI OUTPUT AUDIO ! If used with your LCD monitor. G Do not press the LCD screen with...
... the set. The set 's screen for a long time as this will have no impact or effect on the set. 2 Connect the audio cable from the PC to the AUDIO IN (RGB/DVI) sockets of time. However, this may produce some scaled or processed pictures may appear on the screen; use the... keeping a fixed image on the screen. G If the set is nothing wrong with a DVI cable 1 Connect the DVI output of the PC to the mode 1920 x 1080 @ 60 Hz. DVI-D IN (PC) AUDIO IN (RGB/DVI) 2 1 DVI OUTPUT AUDIO ! If used with your LCD monitor. G Do not press the LCD screen with...
Owners Manual
Page 27
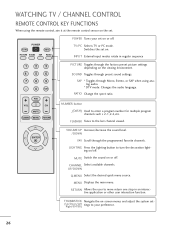
... decoration lighting on or off. MUTE Switch the sound on /off. UP/DOWN Q.MENU Select the desired quick menu source. TV/PC Selects TV or PC mode. WATCHING TV / CHANNEL CONTROL REMOTE CONTROL KEY FUNCTIONS When using analog audio. * DTV mode: Changes the audio language. POWER TV.../PC INPUT PICTURE SOUND SAP RATIO POWER Turns your preference. 26 SOUND Toggles through the factory preset picture settings depending on . THUMBSTICK Navigate...
... decoration lighting on or off. MUTE Switch the sound on /off. UP/DOWN Q.MENU Select the desired quick menu source. TV/PC Selects TV or PC mode. WATCHING TV / CHANNEL CONTROL REMOTE CONTROL KEY FUNCTIONS When using analog audio. * DTV mode: Changes the audio language. POWER TV.../PC INPUT PICTURE SOUND SAP RATIO POWER Turns your preference. 26 SOUND Toggles through the factory preset picture settings depending on . THUMBSTICK Navigate...
Owners Manual
Page 28
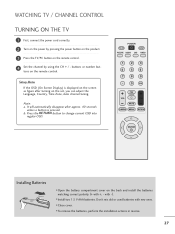
...Open the battery compartment cover on the remote control. 4 Set the channel by pressing the power button on the product. 3 Press the TV/PC button on the back and install the batteries matching correct polarity (+ with +, - Don't mix old or used batteries with -). buttons or ...number but- POWER TV/PC INPUT PICTURE SOUND SAP RATIO 1 2 3 4 56 7 8 9 - 0 FLASHBK FAV LIGHTING VOL CH MUTE Q.MENU MENU RETURN ENTER Installing Batteries I Install ...
...Open the battery compartment cover on the remote control. 4 Set the channel by pressing the power button on the product. 3 Press the TV/PC button on the back and install the batteries matching correct polarity (+ with +, - Don't mix old or used batteries with -). buttons or ...number but- POWER TV/PC INPUT PICTURE SOUND SAP RATIO 1 2 3 4 56 7 8 9 - 0 FLASHBK FAV LIGHTING VOL CH MUTE Q.MENU MENU RETURN ENTER Installing Batteries I Install ...
Owners Manual
Page 29
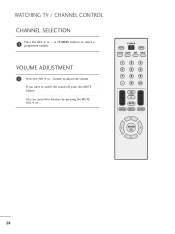
VOLUME ADJUSTMENT 1 Press the VOL + or - POWER TV/PC INPUT PICTURE SOUND SAP RATIO 123 4 56 789 - 0 FLASHBK FAV LIGHTING VOL CH MUTE Q.MENU MENU RETURN ENTER 28 If you want to select a programme number. You can cancel this function by pressing the MUTE, VOL + or -. or NUMBER buttons to switch the sound off, press the MUTE button. WATCHING TV / CHANNEL CONTROL CHANNEL SELECTION 1 Press the CH + or - button to adjust the volume.
VOLUME ADJUSTMENT 1 Press the VOL + or - POWER TV/PC INPUT PICTURE SOUND SAP RATIO 123 4 56 789 - 0 FLASHBK FAV LIGHTING VOL CH MUTE Q.MENU MENU RETURN ENTER 28 If you want to select a programme number. You can cancel this function by pressing the MUTE, VOL + or -. or NUMBER buttons to switch the sound off, press the MUTE button. WATCHING TV / CHANNEL CONTROL CHANNEL SELECTION 1 Press the CH + or - button to adjust the volume.
Owners Manual
Page 35
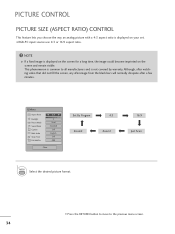
... RETURN button to move to all manufacturers and is displayed on the screen for a long time, the image could become imprinted on your set. I RGB-PC input source use 4:3 or 16:9 aspect ratio. ! This phenomenon is common to the previous menu screen. 34
... RETURN button to move to all manufacturers and is displayed on the screen for a long time, the image could become imprinted on your set. I RGB-PC input source use 4:3 or 16:9 aspect ratio. ! This phenomenon is common to the previous menu screen. 34
Owners Manual
Page 47
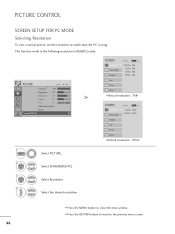
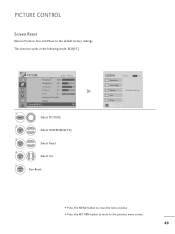
... x 1050 1680 x 1050 Position Size Phase Reset 1 MENU 2 ENTER Select PICTURE. Select SCREEN(RGB-PC). 3 ENTER 4 Select Resolution. Resolution G Auto Config. PICTURE CONTROL SCREEN SETUP FOR PC MODE Selecting Resolution To view a normal picture, set the resolution to the previous menu screen. 46 This... function works in the following resolution in RGB[PC] mode. Position 1024 x 768 1280 x 768 1360 x 768 1366 x 768 Size Phase Reset SCREEN Resolution G Auto Config. Select the...
... x 1050 1680 x 1050 Position Size Phase Reset 1 MENU 2 ENTER Select PICTURE. Select SCREEN(RGB-PC). 3 ENTER 4 Select Resolution. Resolution G Auto Config. PICTURE CONTROL SCREEN SETUP FOR PC MODE Selecting Resolution To view a normal picture, set the resolution to the previous menu screen. 46 This... function works in the following resolution in RGB[PC] mode. Position 1024 x 768 1280 x 768 1360 x 768 1366 x 768 Size Phase Reset SCREEN Resolution G Auto Config. Select the...
Owners Manual
Page 48
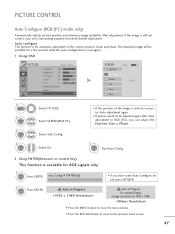
...Move : 100 • Brightness : 50 • Sharpness : 70 • Colour : 50 • Tint :0 R • Advanced Control • Reset Screen(RGB-PC) Enter G SCREEN Resolution Move MENU Prev. Auto Config. G ENTER( ) • If you can adjust the Position, Size or Phase. 5 ENTER Run Auto Config. 2....menu window. • Press the RETURN button to move to the previous menu screen. 47 Select Auto Config. Auto Config. Select SCREEN(RGB-PC). G Position Size To Set Phase Reset 1 MENU 2 ENTER 3 ENTER 4 ENTER Select PICTURE. Using ENTER(Remocon or control key) This...
...Move : 100 • Brightness : 50 • Sharpness : 70 • Colour : 50 • Tint :0 R • Advanced Control • Reset Screen(RGB-PC) Enter G SCREEN Resolution Move MENU Prev. Auto Config. G ENTER( ) • If you can adjust the Position, Size or Phase. 5 ENTER Run Auto Config. 2....menu window. • Press the RETURN button to move to the previous menu screen. 47 Select Auto Config. Auto Config. Select SCREEN(RGB-PC). G Position Size To Set Phase Reset 1 MENU 2 ENTER 3 ENTER 4 ENTER Select PICTURE. Using ENTER(Remocon or control key) This...
Owners Manual
Page 49
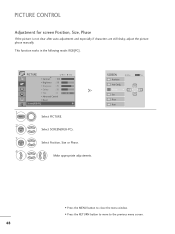
...the menu window. • Press the RETURN button to move to the previous menu screen. 48 This function works in the following mode: RGB[PC]. Resolution Auto Config. PICTURE D • Contrast Move : 100 • Brightness : 50 • Sharpness : 70 • Colour :... 50 • Tint :0 R • Advanced Control • Reset Screen(RGB-PC) Enter G 1 MENU Select PICTURE. 2 ENTER Select SCREEN(RGB-PC). 3 ENTER Select Position, Size or Phase. 4 Make appropriate adjustments. PICTURE CONTROL Adjustment for screen Position, Size, Phase ...
...the menu window. • Press the RETURN button to move to the previous menu screen. 48 This function works in the following mode: RGB[PC]. Resolution Auto Config. PICTURE D • Contrast Move : 100 • Brightness : 50 • Sharpness : 70 • Colour :... 50 • Tint :0 R • Advanced Control • Reset Screen(RGB-PC) Enter G 1 MENU Select PICTURE. 2 ENTER Select SCREEN(RGB-PC). 3 ENTER Select Position, Size or Phase. 4 Make appropriate adjustments. PICTURE CONTROL Adjustment for screen Position, Size, Phase ...
Owners Manual
Page 50
... : 50 • Sharpness : 70 • Colour : 50 • Tint :0 R • Advanced Control • Reset Screen(RGB-PC) Enter G 1 MENU 2 ENTER Select PICTURE. SCREEN Resolution Move MENU Prev. This function works in the following mode: RGB[PC]. Select Yes. 5 ENTER Run Reset. Auto Config. Size Phase Reset G • Press the MENU button to...
... : 50 • Sharpness : 70 • Colour : 50 • Tint :0 R • Advanced Control • Reset Screen(RGB-PC) Enter G 1 MENU 2 ENTER Select PICTURE. SCREEN Resolution Move MENU Prev. This function works in the following mode: RGB[PC]. Select Yes. 5 ENTER Run Reset. Auto Config. Size Phase Reset G • Press the MENU button to...
Owners Manual
Page 61
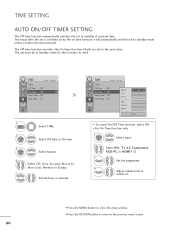
... TV2-0 30 Close • To cancel On/Off Time function, select Off. • For On Time function only 1 ENTER Select Input. 2 Select DVI, T V, A V, Component, RGB-PC, or HDMI1-2. 3 Set the programme. 4 Adjust volume level at a preset time. The Off time function overrides the On timer function if both are set to...
... TV2-0 30 Close • To cancel On/Off Time function, select Off. • For On Time function only 1 ENTER Select Input. 2 Select DVI, T V, A V, Component, RGB-PC, or HDMI1-2. 3 Set the programme. 4 Adjust volume level at a preset time. The Off time function overrides the On timer function if both are set to...

Owners Manual
Page 65
OPTION Move Enter Language : English IInnput LLaabbeell Key Lock : Off Caption : Off Set ID : 1 Power Indicator : On DDC-CI : On AV Component RGB-PC HDMI 1 HDMI 2 DVI Close E • Press the MENU button to close the menu window. • Press the RETURN button to move to the previous menu ...
OPTION Move Enter Language : English IInnput LLaabbeell Key Lock : Off Caption : Off Set ID : 1 Power Indicator : On DDC-CI : On AV Component RGB-PC HDMI 1 HDMI 2 DVI Close E • Press the MENU button to close the menu window. • Press the RETURN button to move to the previous menu ...
Owners Manual
Page 71
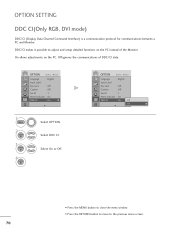
... E • Press the MENU button to close the menu window. • Press the RETURN button to move to adjust and setup detailed functions on the PC. OPTION SETTING DDC CI(Only RGB, DVI mode) DDC/CI (Display Data Channel Command Interface) is a communication protocol for communications between...
... E • Press the MENU button to close the menu window. • Press the RETURN button to move to adjust and setup detailed functions on the PC. OPTION SETTING DDC CI(Only RGB, DVI mode) DDC/CI (Display Data Channel Command Interface) is a communication protocol for communications between...
Owners Manual
Page 79
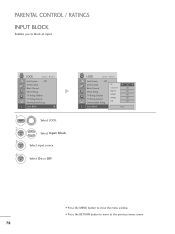
... Block. 3 ENTER Select input source. 4 ENTER Select O n or O f f. LOCK Move Enter Lock System : Off Set Password AV F Off G Block Channel Component Off Movie Rating RGB-PC Off TV Rating-Children HDMI1 Off TV Rating-General HDMI2 Off DVI Downloadable Rating Off IInnppuutt BBlloocckk Close • Press the MENU button to close...
... Block. 3 ENTER Select input source. 4 ENTER Select O n or O f f. LOCK Move Enter Lock System : Off Set Password AV F Off G Block Channel Component Off Movie Rating RGB-PC Off TV Rating-Children HDMI1 Off TV Rating-General HDMI2 Off DVI Downloadable Rating Off IInnppuutt BBlloocckk Close • Press the MENU button to close...
Owners Manual
Page 81
...the input source setting. 80 A If the product is out of the vertical or horizontal frequency range of range' message appear? A The signal from the PC (Video card) is in menu option. Check the signal cable. Press MUTE button. A Are the audio cables installed properly? A Adjust brightness and contrast again...but no sound No output from inside the product A A change in an unusual noise when the product is not connected. A The signal cable between PC and product is turned on or off and does not indicate a problem with the broadcast. A Try another channel. Adjust the video settings on ,...
...the input source setting. 80 A If the product is out of the vertical or horizontal frequency range of range' message appear? A The signal from the PC (Video card) is in menu option. Check the signal cable. Press MUTE button. A Are the audio cables installed properly? A Adjust brightness and contrast again...but no sound No output from inside the product A A change in an unusual noise when the product is not connected. A The signal cable between PC and product is turned on or off and does not indicate a problem with the broadcast. A Try another channel. Adjust the video settings on ,...

Owners Manual
Page 82
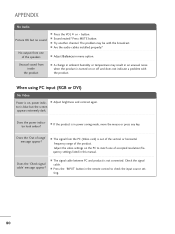
... the connection status of the LCD. RGB PC Mode The screen image looks abnormal. A See if the video card resolution and frequency are supported by the product. APPENDIX 'Unknown Product' message appears when the product is abnormal. from the web site. (http://www.lg.com) A The Video card in OSD... appears when A The pixels may appear on the screen, which is not a malfunction of the signal cable. Do thin lines appear on the PC. Try installing the latest drivers for the product is out of the LCD panel. Use a screen saver. settings on the background screen? A Adjust...
... the connection status of the LCD. RGB PC Mode The screen image looks abnormal. A See if the video card resolution and frequency are supported by the product. APPENDIX 'Unknown Product' message appears when the product is abnormal. from the web site. (http://www.lg.com) A The Video card in OSD... appears when A The pixels may appear on the screen, which is not a malfunction of the signal cable. Do thin lines appear on the PC. Try installing the latest drivers for the product is out of the LCD panel. Use a screen saver. settings on the background screen? A Adjust...
Owners Manual
Page 84
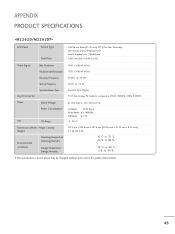
... Hz Horizontal Frequency 30 kHz to 83 kHz Vertical Frequency 56 Hz to 75 Hz Input Connector Synchronization Type Separate Sync, Digital TV, D-Sub Analog, PC Audio In, component, DVI-D, HDMI*2, CVBS, S-VIDEO Power Rated Voltage AC 100-240 V~ 50 / 60 Hz 0.9A Power Consumption On Mode : 50 W (typ.) Sleep Mode...
... Hz Horizontal Frequency 30 kHz to 83 kHz Vertical Frequency 56 Hz to 75 Hz Input Connector Synchronization Type Separate Sync, Digital TV, D-Sub Analog, PC Audio In, component, DVI-D, HDMI*2, CVBS, S-VIDEO Power Rated Voltage AC 100-240 V~ 50 / 60 Hz 0.9A Power Consumption On Mode : 50 W (typ.) Sleep Mode...


