
Owners Manual
Page 1
MONITOR TV MODELS M2262D M2262DP M2362D M2362DP M2762D M2762DP www.lg.com ENGLISH OWNER'S MANUAL MONITOR TV Please read this manual carefully before operating your set and retain it for future reference.
MONITOR TV MODELS M2262D M2262DP M2362D M2362DP M2762D M2762DP www.lg.com ENGLISH OWNER'S MANUAL MONITOR TV Please read this manual carefully before operating your set and retain it for future reference.

Owners Manual
Page 10
PREPARATION SWIVEL STAND(Only M2762D/M2762DP) I The image shown may be somewhat different from your set . After installing the set, you can adjust the set manually to the left or right direction by 179 degrees to suit your viewing position. 179° 179° POSITIONING YOUR DISPLAY I The image shown may be somewhat different from your set . Adjust the position of the panel in various ways for maximum comfort. • Tilt range -5° 15° 9
PREPARATION SWIVEL STAND(Only M2762D/M2762DP) I The image shown may be somewhat different from your set . After installing the set, you can adjust the set manually to the left or right direction by 179 degrees to suit your viewing position. 179° 179° POSITIONING YOUR DISPLAY I The image shown may be somewhat different from your set . Adjust the position of the panel in various ways for maximum comfort. • Tilt range -5° 15° 9

Owners Manual
Page 17
... digital set-top box to the AUDIO IN (RGB/DVI) jack on the set. 3 Turn on the digital set-top box. (Refer to the owner's manual for the digital set-top box.) 1 HDMI IN 2 AUDIO IN (RGB/DVI) 2 1 DVI OUTPUT AUDIO L R ! If it is connected PC, the screen may not display...
... digital set-top box to the AUDIO IN (RGB/DVI) jack on the set. 3 Turn on the digital set-top box. (Refer to the owner's manual for the digital set-top box.) 1 HDMI IN 2 AUDIO IN (RGB/DVI) 2 1 DVI OUTPUT AUDIO L R ! If it is connected PC, the screen may not display...
Owners Manual
Page 20
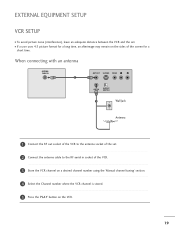
... 4:3 picture format for a long time, an afterimage may remain on the VCR. 19 AV 1 AV 2 3 Store the VCR channel on a desired channel number using the 'Manual channel tuning' section. 4 Select the Channel number where the VCR channel is stored. 5 Press the PLAY button on the sides of the screen for a short...
... 4:3 picture format for a long time, an afterimage may remain on the VCR. 19 AV 1 AV 2 3 Store the VCR channel on a desired channel number using the 'Manual channel tuning' section. 4 Select the Channel number where the VCR channel is stored. 5 Press the PLAY button on the sides of the screen for a short...
Owners Manual
Page 26
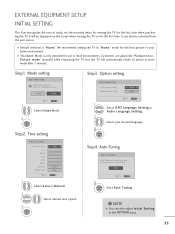
...screen when turning the TV on for use in your desired language. 3 ENTER Step4. Mode setting Step1. Eastern Auto Enter RETURN Exit 1 Select Auto or Manual. 2 3 ENTER Select desired time option. Auto Tuning Step4. Do you want to easily set the essential items for viewing the TV for the best ...picture in retail environments. NOTE G You can adjust the "Picture menu Picture mode" manually while inspecting the TV, but the TV will be activated from the user menus. We recommend setting the TV to preset in the OPTION menu...
...screen when turning the TV on for use in your desired language. 3 ENTER Step4. Mode setting Step1. Eastern Auto Enter RETURN Exit 1 Select Auto or Manual. 2 3 ENTER Select desired time option. Auto Tuning Step4. Do you want to easily set the essential items for viewing the TV for the best ...picture in retail environments. NOTE G You can adjust the "Picture menu Picture mode" manually while inspecting the TV, but the TV will be activated from the user menus. We recommend setting the TV to preset in the OPTION menu...
Owners Manual
Page 30
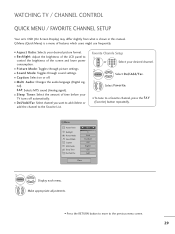
... Sleep Timer CH Del/Add/Fav F 16:9 G 3 Vivid Standard Off English Off Add Close 1 Q.MENU 2 Display each menu. Q.Menu (Quick Menu) is shown in this manual. I Sleep Timer: Select the amount of time before your desired channel. 789 0 2 Q.MENU Select Del/Add/Fav. 3 Select Favorite.
... Sleep Timer CH Del/Add/Fav F 16:9 G 3 Vivid Standard Off English Off Add Close 1 Q.MENU 2 Display each menu. Q.Menu (Quick Menu) is shown in this manual. I Sleep Timer: Select the amount of time before your desired channel. 789 0 2 Q.MENU Select Del/Add/Fav. 3 Select Favorite.
Owners Manual
Page 31
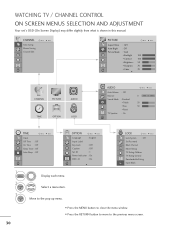
... SCREEN MENUS SELECTION AND ADJUSTMENT Your set's OSD (On Screen Display) may differ slightly from what is shown in this manual. Move to the previous menu screen. 30 CHANNEL Auto tuning Manual tuning Channel Edit Move Enter PICTURE Move Enter Aspect Ratio : 16:9 Auto Bright : Off Picture Mode : Vivid • Backlight 100...
... SCREEN MENUS SELECTION AND ADJUSTMENT Your set's OSD (On Screen Display) may differ slightly from what is shown in this manual. Move to the previous menu screen. 30 CHANNEL Auto tuning Manual tuning Channel Edit Move Enter PICTURE Move Enter Aspect Ratio : 16:9 Auto Bright : Off Picture Mode : Vivid • Backlight 100...
Owners Manual
Page 32
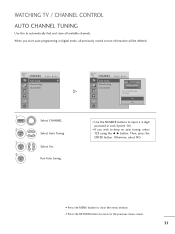
...CHANNEL CONTROL AUTO CHANNEL TUNING Use this to the previous menu screen. 31 Select Auto Tuning. Then, press the ENTER button. CHANNEL AAuuttoo ttuunniinngg Manual tuning Channel Edit Move Enter 1 MENU 2 ENTER 3 ENTER 4 ENTER Select CHANNEL. Run Auto tuning. Yes No • Use the ...NUMBER buttons to begin auto tuning. CHANNEL AAuuttoo ttuunniinngg Manual tuning Channel Edit Move Enter Press 'Yes' button to input a 4-digit password in Lock System 'On'. • If you start auto programming ...
...CHANNEL CONTROL AUTO CHANNEL TUNING Use this to the previous menu screen. 31 Select Auto Tuning. Then, press the ENTER button. CHANNEL AAuuttoo ttuunniinngg Manual tuning Channel Edit Move Enter 1 MENU 2 ENTER 3 ENTER 4 ENTER Select CHANNEL. Run Auto tuning. Yes No • Use the ...NUMBER buttons to begin auto tuning. CHANNEL AAuuttoo ttuunniinngg Manual tuning Channel Edit Move Enter Press 'Yes' button to input a 4-digit password in Lock System 'On'. • If you start auto programming ...
Owners Manual
Page 33
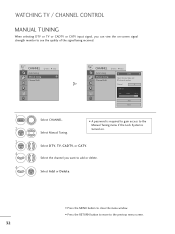
...2 ENTER Select CHANNEL. I A password is turned on -screen signal strength monitor to see the quality of the signal being received. WATCHING TV / CHANNEL CONTROL MANUAL TUNING When selecting DTV or TV or CADTV or CATV input signal, you want to add or delete. 4 ENTER Select A d d or Delete. •...; Press the MENU button to close the menu window. • Press the RETURN button to move to the Manual Tuning menu if the Lock System is required to gain access to the previous menu screen. 32 CHANNEL Auto tuning MMaannuuaall ttuunniinngg Channel Edit Move...
...2 ENTER Select CHANNEL. I A password is turned on -screen signal strength monitor to see the quality of the signal being received. WATCHING TV / CHANNEL CONTROL MANUAL TUNING When selecting DTV or TV or CADTV or CATV input signal, you want to add or delete. 4 ENTER Select A d d or Delete. •...; Press the MENU button to close the menu window. • Press the RETURN button to move to the Manual Tuning menu if the Lock System is required to gain access to the previous menu screen. 32 CHANNEL Auto tuning MMaannuuaall ttuunniinngg Channel Edit Move...
Owners Manual
Page 34
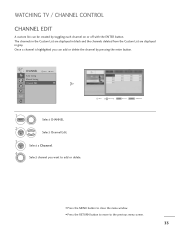
.... The channels in the Custom List are displayed in black and the channels deleted from the Custom List are displayed in gray. CHANNEL Auto tuning Manual tuning CChhaannnneell EEddiitt Move Enter 1 MENU Select CHANNEL. 2 ENTER Select Channel Edit. 3 ENTER 4 Select a Channel. Move CH Move Page RETURN Previous Q.MENU Add/Delete •...
.... The channels in the Custom List are displayed in black and the channels deleted from the Custom List are displayed in gray. CHANNEL Auto tuning Manual tuning CChhaannnneell EEddiitt Move Enter 1 MENU Select CHANNEL. 2 ENTER Select Channel Edit. 3 ENTER 4 Select a Channel. Move CH Move Page RETURN Previous Q.MENU Add/Delete •...

Owners Manual
Page 37
... the optimum picture quality at the factory and are preset for picture settings available in the user menus. You can use a preset, change each setting manually. Q.Menu Aspect Ratio Backlight Picture Mode Sound Mode Caption Multi Audio Sleep Timer CH Del/Add/Fav 16:9 3 F Vivid G Standard Off English Off Add Close...
... the optimum picture quality at the factory and are preset for picture settings available in the user menus. You can use a preset, change each setting manually. Q.Menu Aspect Ratio Backlight Picture Mode Sound Mode Caption Multi Audio Sleep Timer CH Del/Add/Fav 16:9 3 F Vivid G Standard Off English Off Add Close...
Owners Manual
Page 42
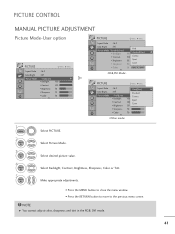
... Picture Mode. 3 ENTER 4 ENTER 5 ENTER Select desired picture value. NOTE G You cannot adjust color, sharpness and tint in the RGB, DVI mode. 41 PICTURE CONTROL MANUAL PICTURE ADJUSTMENT Picture Mode-User option PICTURE Move Enter Aspect Ratio : 16:9 Auto Bright : Off PPicicttuurreeMMooddee ::VVivividid(User) • Backlight 100 • Contrast 100 •...
... Picture Mode. 3 ENTER 4 ENTER 5 ENTER Select desired picture value. NOTE G You cannot adjust color, sharpness and tint in the RGB, DVI mode. 41 PICTURE CONTROL MANUAL PICTURE ADJUSTMENT Picture Mode-User option PICTURE Move Enter Aspect Ratio : 16:9 Auto Bright : Off PPicicttuurreeMMooddee ::VVivividid(User) • Backlight 100 • Contrast 100 •...
Owners Manual
Page 49
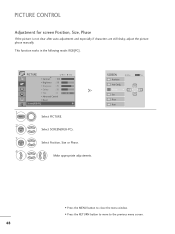
... for screen Position, Size, Phase If the picture is not clear after auto adjustment and especially if characters are still shaky, adjust the picture phase manually.
... for screen Position, Size, Phase If the picture is not clear after auto adjustment and especially if characters are still shaky, adjust the picture phase manually.
Owners Manual
Page 59
...; Press the MENU button to close the menu window. • Press the RETURN button to move to the previous menu screen. 58 Set the clock manually if the current time is set incorrectly by the broadcasting station. Select Auto, O f f, or O n (depending on whether or not your viewing area time zone. •...
...; Press the MENU button to close the menu window. • Press the RETURN button to move to the previous menu screen. 58 Set the clock manually if the current time is set incorrectly by the broadcasting station. Select Auto, O f f, or O n (depending on whether or not your viewing area time zone. •...

Owners Manual
Page 60
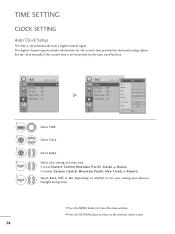
... : Off Auto Sleep : On TIME Move CClloocckk Off Time : Off On Time : Off Sleep Timer : Off Auto Sleep : On Enter F Year Month Date Hour Minute Manual G 2008 2 21 2 AM 10 Time Zone Daylight Saving Eastern Auto Close 1 MENU Select TIME. 2 ENTER Select Clock. 3 ENTER Select A u t o. 4 Select the Year, Month, Date, Hour.... • Press the MENU button to close the menu window. • Press the RETURN button to move to the previous menu screen. 59 TIME SETTING Manual Clock Setup If the current time setting is wrong, reset the clock...
... : Off Auto Sleep : On TIME Move CClloocckk Off Time : Off On Time : Off Sleep Timer : Off Auto Sleep : On Enter F Year Month Date Hour Minute Manual G 2008 2 21 2 AM 10 Time Zone Daylight Saving Eastern Auto Close 1 MENU Select TIME. 2 ENTER Select Clock. 3 ENTER Select A u t o. 4 Select the Year, Month, Date, Hour.... • Press the MENU button to close the menu window. • Press the RETURN button to move to the previous menu screen. 59 TIME SETTING Manual Clock Setup If the current time setting is wrong, reset the clock...
Owners Manual
Page 78
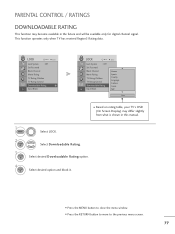
... Block Enter Humor Sports Cruelty Language Sadness Genre Age E Close E I Based on rating table, your TV's OSD (On Screen Display) may become available in this manual. 1 MENU Select LOCK. 2 ENTER Select Downloadable Rating. 3 ENTER Select desired Downloadable Rating option. 4 ENTER Select desired option and block it. • Press the MENU button...
... Block Enter Humor Sports Cruelty Language Sadness Genre Age E Close E I Based on rating table, your TV's OSD (On Screen Display) may become available in this manual. 1 MENU Select LOCK. 2 ENTER Select Downloadable Rating. 3 ENTER Select desired Downloadable Rating option. 4 ENTER Select desired option and block it. • Press the MENU button...
Owners Manual
Page 81
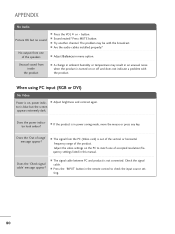
.... A Adjust brightness and contrast again. Check the signal cable. button. tor is blue but no sound No output from inside the product A A change in this manual. A The signal from the PC (Video card) is in the remote control to match one of range' message appear? A Press the 'INPUT' button in power...
.... A Adjust brightness and contrast again. Check the signal cable. button. tor is blue but no sound No output from inside the product A A change in this manual. A The signal from the PC (Video card) is in the remote control to match one of range' message appear? A Press the 'INPUT' button in power...

Owners Manual
Page 95
Record it below should you ever need service. Keep the Owner's Manual(CD) in an accessible place for future reference. The model and serial number of the SET is located on the back and one side of the SET. MODEL SERIAL Make sure to read the Safety Precautions before using the product.
Record it below should you ever need service. Keep the Owner's Manual(CD) in an accessible place for future reference. The model and serial number of the SET is located on the back and one side of the SET. MODEL SERIAL Make sure to read the Safety Precautions before using the product.


