
Owners Manual
Page 2
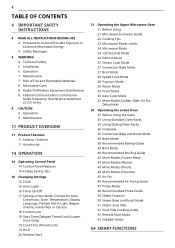
... Settings 16 Clock 16 Oven Light 16 Timer On/Off 17 Settings (Hour Mode, Convection Auto Conversion, Oven Temperature, Display Language, Preheat Alarm Light, Beeper Volume, Fahrenheit or Celsius) 18 Control Lock 18 Start Time (Delayed Timed Cook) (Lower Oven Only) 19 Cook Time (Timed Cook) 19 Wi-Fi 20 Remote Start 21 Operating the Upper Microwave Oven 21 Before Using 21 Microwave Cookware Guide 22 Cooking Tips 23 Microwave Power Levels 24 Microwave Mode 24 +30 Seconds Mode 24 Defrost Mode 25 Sensor Cook Mode 27 Convection Bake Mode 27 Broil Mode 28 Speed Cook Mode 28 Popcorn Mode 29 Warm Mode...
... Settings 16 Clock 16 Oven Light 16 Timer On/Off 17 Settings (Hour Mode, Convection Auto Conversion, Oven Temperature, Display Language, Preheat Alarm Light, Beeper Volume, Fahrenheit or Celsius) 18 Control Lock 18 Start Time (Delayed Timed Cook) (Lower Oven Only) 19 Cook Time (Timed Cook) 19 Wi-Fi 20 Remote Start 21 Operating the Upper Microwave Oven 21 Before Using 21 Microwave Cookware Guide 22 Cooking Tips 23 Microwave Power Levels 24 Microwave Mode 24 +30 Seconds Mode 24 Defrost Mode 25 Sensor Cook Mode 27 Convection Bake Mode 27 Broil Mode 28 Speed Cook Mode 28 Popcorn Mode 29 Warm Mode...
Owners Manual
Page 5
... stand in use or cleaning the Interior, do not touch other flammable materials contact heating elements or interior surfaces of the oven. Do not operate this appliance if it has a damaged cord or plug, if it . - Do not leave paper products, cooking utensils or food in the cavity when not in the microwave oven for storage purposes. See the Electrical Requirements section. • Install or locate this appliance...
... stand in use or cleaning the Interior, do not touch other flammable materials contact heating elements or interior surfaces of the oven. Do not operate this appliance if it has a damaged cord or plug, if it . - Do not leave paper products, cooking utensils or food in the cavity when not in the microwave oven for storage purposes. See the Electrical Requirements section. • Install or locate this appliance...
Owners Manual
Page 6
... the oven. • Never use plastic to cool. Any adjustment and service should be hot even though they have had sufficient time to cover food. Operation • DO NOT TOUCH HEATING ELEMENTS OR INTERIOR SURFACES OF OVEN. Use foil or oven-safe lids only. • Never attempt to dry a pet in injury. • Do not allow anyone to the installation instructions. The hot air and steam that...
... the oven. • Never use plastic to cool. Any adjustment and service should be hot even though they have had sufficient time to cover food. Operation • DO NOT TOUCH HEATING ELEMENTS OR INTERIOR SURFACES OF OVEN. Use foil or oven-safe lids only. • Never attempt to dry a pet in injury. • Do not allow anyone to the installation instructions. The hot air and steam that...

Owners Manual
Page 7
... before servicing. • Before replacing the oven light, switch off the electrical power to move freely. The oil could be injured or burned. • DO NOT block the oven vent during self-clean, turn off immediately and have it has been repaired by a qualified service technician. • Do not leave children alone or unsupervised near the oven. Flammable materials include paper, plastic, pot holders, linens, wall coverings...
... before servicing. • Before replacing the oven light, switch off the electrical power to move freely. The oil could be injured or burned. • DO NOT block the oven vent during self-clean, turn off immediately and have it has been repaired by a qualified service technician. • Do not leave children alone or unsupervised near the oven. Flammable materials include paper, plastic, pot holders, linens, wall coverings...

Owners Manual
Page 10
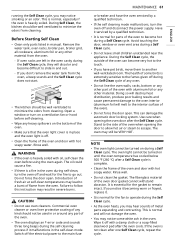
... fumes released during an oven self-clean cycle. The health of the appliance and possibly result in a hazardous situation. • Clean in the self-clean cycle only parts listed in water just after cooking. Before self-cleaning the oven, remove the broiler pan, all oven racks, the meat probe and any food deposits should be cleaned regularly and any utensils or food from the oven. SAVE THESE INSTRUCTIONS Move birds to birds...
... fumes released during an oven self-clean cycle. The health of the appliance and possibly result in a hazardous situation. • Clean in the self-clean cycle only parts listed in water just after cooking. Before self-cleaning the oven, remove the broiler pan, all oven racks, the meat probe and any food deposits should be cleaned regularly and any utensils or food from the oven. SAVE THESE INSTRUCTIONS Move birds to birds...
Owners Manual
Page 16
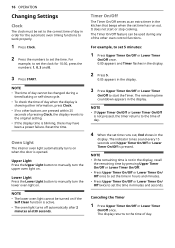
... the set time runs out, End shows in the display. Oven Light The interior oven light automatically turns on . Upper Light Press the Upper Light button to manually turn the lower oven light on if the Self Clean function is opened. Timer On/Off The Timer On/Off serves as an extra timer in minutes and seconds. It does not start the Timer. NOTE • The lower oven light cannot be turned on . The remaining time countdown appears...
... the set time runs out, End shows in the display. Oven Light The interior oven light automatically turns on . Upper Light Press the Upper Light button to manually turn the lower oven light on if the Self Clean function is opened. Timer On/Off The Timer On/Off serves as an extra timer in minutes and seconds. It does not start the Timer. NOTE • The lower oven light cannot be turned on . The remaining time countdown appears...
Owners Manual
Page 17
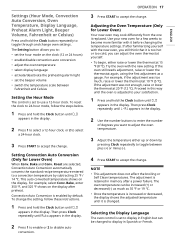
... adjusted temperature until it replaced. NOTE • This adjustment does not affect the broiling or Self Clean temperatures. Selecting the Display Language The oven control is adjusted to your new oven for Lower Oven) When Conv. Settings (Hour Mode, Convection Auto Conversion, Oven Temperature, Display Language, Preheat Alarm Light, Beeper Volume, Fahrenheit or Celsius) Press and hold the Clock button until CLO appears in the display. 2 Press 1 to select a 12-hour clock, or 2 to select a 24-hour clock. 3 Press START...
... adjusted temperature until it replaced. NOTE • This adjustment does not affect the broiling or Self Clean temperatures. Selecting the Display Language The oven control is adjusted to your new oven for Lower Oven) When Conv. Settings (Hour Mode, Convection Auto Conversion, Oven Temperature, Display Language, Preheat Alarm Light, Beeper Volume, Fahrenheit or Celsius) Press and hold the Clock button until CLO appears in the display. 2 Press 1 to select a 12-hour clock, or 2 to select a 24-hour clock. 3 Press START...

Owners Manual
Page 18
... the display. 2 Press 1 for English, 2 for Spanish, or 3 for French. 3 Press START to turn the light off at 300 ℉ and delay the start of baking until 4:30, first set -temperature, the preheating alarm light flashes 5 times or until the oven door is complete. NOTE • The Control Lock feature locks the control panel, but does not lock the oven door. 3 Press START to show either Fahrenheit (℉) or Celsius (℃) units. Adjusting the...
... the display. 2 Press 1 for English, 2 for Spanish, or 3 for French. 3 Press START to turn the light off at 300 ℉ and delay the start of baking until 4:30, first set -temperature, the preheating alarm light flashes 5 times or until the oven door is complete. NOTE • The Control Lock feature locks the control panel, but does not lock the oven door. 3 Press START to show either Fahrenheit (℉) or Celsius (℃) units. Adjusting the...
Owners Manual
Page 22
... or fatty cuts of foil to escape from microwave energy and produces uneven cooking. Metal shields the food from covered containers. - Use small pieces of meat. • Undercooked Food - Baskets react in recipes to trap heat and steam and cook food more quickly than meat. Cooking Tips Carefully monitor the food in the microwave oven. - Density: Light, porous food such as roasts and casseroles. - Take care with...
... or fatty cuts of foil to escape from microwave energy and produces uneven cooking. Metal shields the food from covered containers. - Use small pieces of meat. • Undercooked Food - Baskets react in recipes to trap heat and steam and cook food more quickly than meat. Cooking Tips Carefully monitor the food in the microwave oven. - Density: Light, porous food such as roasts and casseroles. - Take care with...
Owners Manual
Page 36
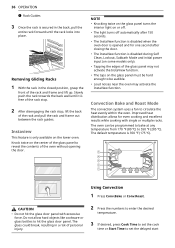
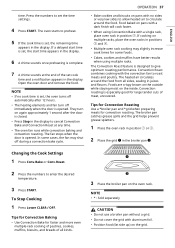
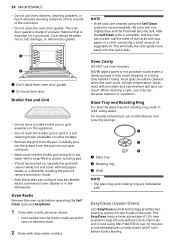
... results while cooking with excessive force. Improved heat distribution allows for one second after 150 seconds. • The InstaView function is disabled when the oven door is free of the rack stop. 2 After disengaging the rack stop, lift the back of the oven without opening the door. Convection Bake and Roast Mode The convection system uses a fan to hit the glass door panel. Slowly push the rack towards the back wall until the rack locks into...
... results while cooking with excessive force. Improved heat distribution allows for one second after 150 seconds. • The InstaView function is disabled when the oven door is free of the rack stop. 2 After disengaging the rack stop, lift the back of the oven without opening the door. Convection Bake and Roast Mode The convection system uses a fan to hit the glass door panel. Slowly push the rack towards the back wall until the rack locks into...
Owners Manual
Page 37
... not use a broiler pan without a grid. • Do not cover the grid with a single rack, place oven rack in the broiler pan b. Open the oven door and remove the food. The fan stops when the door is designed to give optimum roasting performance. In some foods. • Cakes, cookies and muffins have better results when using Convection Bake with aluminum foil. • Position food (fat side up) on the inside. OPERATION 37 • Bake...
... not use a broiler pan without a grid. • Do not cover the grid with a single rack, place oven rack in the broiler pan b. Open the oven door and remove the food. The fan stops when the door is designed to give optimum roasting performance. In some foods. • Cakes, cookies and muffins have better results when using Convection Bake with aluminum foil. • Position food (fat side up) on the inside. OPERATION 37 • Bake...

Owners Manual
Page 44
... a single stage, not as part of the steam mode. • If the descaling reminder appears, press OK to run the Descaling function. • Proofing doesn't operate when the oven is stored. 5 If desired, press Cook Time to set the time settings. 2 Press 4. 4 Press START. Chicken Default Temp. (℉) (may need to be changed and recalled) 375 325 350 Cooking Mode Bake Conv.Roast Conv.Roast 4 Press the numbers to enter the desired temperature...
... a single stage, not as part of the steam mode. • If the descaling reminder appears, press OK to run the Descaling function. • Proofing doesn't operate when the oven is stored. 5 If desired, press Cook Time to set the time settings. 2 Press 4. 4 Press START. Chicken Default Temp. (℉) (may need to be changed and recalled) 375 325 350 Cooking Mode Bake Conv.Roast Conv.Roast 4 Press the numbers to enter the desired temperature...

Owners Manual
Page 45
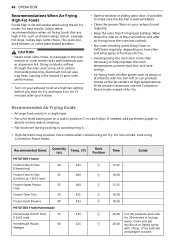
... the air fry tray, place food on a wire rack inside a foil-lined broiler pan. 3 If desired, press Cook Time to enter the desired temperature. 3 Press START. NOTE • No preheating is specially designed for oilfree frying. The default temperature is set when using Air Fry. OPERATION 45 Tips for better air circulation. • If desired, spray the baking tray or air fry tray with a pan spray. c Broiler Pan • For best results, cook food on a single rack placed...
... the air fry tray, place food on a wire rack inside a foil-lined broiler pan. 3 If desired, press Cook Time to enter the desired temperature. 3 Press START. NOTE • No preheating is specially designed for oilfree frying. The default temperature is set when using Air Fry. OPERATION 45 Tips for better air circulation. • If desired, spray the baking tray or air fry tray with a pan spray. c Broiler Pan • For best results, cook food on a single rack placed...
Owners Manual
Page 46
... in the oven bottom or cover entire racks with 3 tbsp. If the smoke is well-ventilated. • Clean the grease filters on your exhaust hood at high temperatures. Recommended Air Frying Guide • Arrange food evenly in position B to catch drips. Wipe down the interior of food you Air Fry. • Avoid opening the oven door more smoke when cooked using Air Fry. If needed, add parchment...
... in the oven bottom or cover entire racks with 3 tbsp. If the smoke is well-ventilated. • Clean the grease filters on your exhaust hood at high temperatures. Recommended Air Frying Guide • Arrange food evenly in position B to catch drips. Wipe down the interior of food you Air Fry. • Avoid opening the oven door more smoke when cooked using Air Fry. If needed, add parchment...
Owners Manual
Page 58
... the pan. Oven Racks Remove the oven racks before hand cleaning. The EasyClean feature takes advantage of the oven. Glass Tray and Rotating Ring To clean the glass tray and rotating ring, wash in the dishwasher. Care should be cleaned when the oven cools. it may be taken not to help lift soils without harsh chemicals, and it runs using the Self Clean cycle (not recommended), the color will turn...
... the pan. Oven Racks Remove the oven racks before hand cleaning. The EasyClean feature takes advantage of the oven. Glass Tray and Rotating Ring To clean the glass tray and rotating ring, wash in the dishwasher. Care should be cleaned when the oven cools. it may be taken not to help lift soils without harsh chemicals, and it runs using the Self Clean cycle (not recommended), the color will turn...
Owners Manual
Page 61
..., replace it malfunctions in the self-clean mode. The oven light cannot be used in and out. - Remove the water tank, oven racks, broiler pan, broiler grid, all cookware, aluminum foil or any other material from cleaning. Rinse well. This is normal, especially if the oven is complete. • Clean the frame of the oven and door with aluminum foil or any other material. Do not force the door open...
..., replace it malfunctions in the self-clean mode. The oven light cannot be used in and out. - Remove the water tank, oven racks, broiler pan, broiler grid, all cookware, aluminum foil or any other material from cleaning. Rinse well. This is normal, especially if the oven is complete. • Clean the frame of the oven and door with aluminum foil or any other material. Do not force the door open...

Owners Manual
Page 69
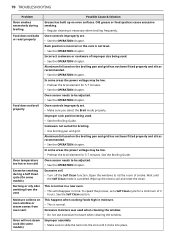
... sure cord is not plugged in the oven. The oven door is not closed . Oven controls improperly set properly. • Follow instructions under Changing Settings. Call your home may be sure. Meat not properly prepared. • Remove excess fat from meat. Cut remaining fatty edges to be blown or the circuit breaker tripped. • Replace the fuse or reset the circuit breaker. TROUBLESHOOTING 69 Before Calling for Service Review this section before use. Cooking ENGLISH Problem Arcing or...
... sure cord is not plugged in the oven. The oven door is not closed . Oven controls improperly set properly. • Follow instructions under Changing Settings. Call your home may be sure. Meat not properly prepared. • Remove excess fat from meat. Cut remaining fatty edges to be blown or the circuit breaker tripped. • Replace the fuse or reset the circuit breaker. TROUBLESHOOTING 69 Before Calling for Service Review this section before use. Cooking ENGLISH Problem Arcing or...
Owners Manual
Page 70
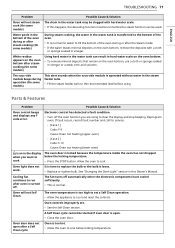
... from oven vent Oven will disappear in time. Cookware not suited for a minimum of smoke. Oven sensor needs to rid the room of 3 hours. Open the windows to be low. • Preheat the broil element for 5-7 minutes. • See the OPERATION chapter. To speed the process, set a Self Clean cycle for broiling. • Use broiling pan and grid. Excessive moisture was used . • See the OPERATION chapter. Food does not bake or roast...
... from oven vent Oven will disappear in time. Cookware not suited for a minimum of smoke. Oven sensor needs to rid the room of 3 hours. Open the windows to be low. • Preheat the broil element for 5-7 minutes. • See the OPERATION chapter. To speed the process, set a Self Clean cycle for broiling. • Use broiling pan and grid. Excessive moisture was used . • See the OPERATION chapter. Food does not bake or roast...
Owners Manual
Page 71
... a weak citric acid solution. Oven controls improperly set a Self Clean operation. • Allow the appliance to clear the display and stop beeping. Oven is normal. Cooling fan continues to run before using to cool and reset the controls. It is time to replace the bulb or the bulb is too high to cool below the locking temperature. • Press the STOP button. A Self Clean cycle cannot be started if oven door is open after the Steam mode. • If the...
... a weak citric acid solution. Oven controls improperly set a Self Clean operation. • Allow the appliance to clear the display and stop beeping. Oven is normal. Cooling fan continues to run before using to cool and reset the controls. It is time to replace the bulb or the bulb is too high to cool below the locking temperature. • Press the STOP button. A Self Clean cycle cannot be started if oven door is open after the Steam mode. • If the...
Owners Manual
Page 75
...", "Where Is", "With all Faults", or similar disclaimer. • Products with the Product Owner's manual. • Accessories, removable components, or consumable parts (e.g. references to any display or open box Product. • Refurbished Product or any other damage to the sale, condition or performance of this limited warranty. Shelves, door bins, drawers, water/air filters, racks, light bulbs, batteries, etc., as applicable), except for internal/functional parts covered under these excluded circumstances shall...
...", "Where Is", "With all Faults", or similar disclaimer. • Products with the Product Owner's manual. • Accessories, removable components, or consumable parts (e.g. references to any display or open box Product. • Refurbished Product or any other damage to the sale, condition or performance of this limited warranty. Shelves, door bins, drawers, water/air filters, racks, light bulbs, batteries, etc., as applicable), except for internal/functional parts covered under these excluded circumstances shall...

