
Owners Manual
Page 2
...11 Timer On/Off 12 Settings (Hour Mode, Convection Auto Conversion, Oven Temperature, Display Language, Preheat Alarm Light, Beeper Volume, Fahrenheit or Celsius) 13 Control Lock 13 Start Time (Delayed Timed Cook) 14 Cook Time (Timed Cook) 15 Sabbath Mode 15 Minimum & Maximum Default Settings 16 Operating the Oven 16 Before Using the Oven 16 Using Standard Oven Racks 17 Using Gliding Oven Racks 17 Instaview 18 Convection Bake and Roast Mode 19 Bake Mode 20 Recommended Baking Guide 20 Broil Mode 22 Recommended Broiling Guide 24 Frozen Meal 25 Warm Mode 25 Proof Mode 25 Favorite Mode 26 Air Fry...
...11 Timer On/Off 12 Settings (Hour Mode, Convection Auto Conversion, Oven Temperature, Display Language, Preheat Alarm Light, Beeper Volume, Fahrenheit or Celsius) 13 Control Lock 13 Start Time (Delayed Timed Cook) 14 Cook Time (Timed Cook) 15 Sabbath Mode 15 Minimum & Maximum Default Settings 16 Operating the Oven 16 Before Using the Oven 16 Using Standard Oven Racks 17 Using Gliding Oven Racks 17 Instaview 18 Convection Bake and Roast Mode 19 Bake Mode 20 Recommended Baking Guide 20 Broil Mode 22 Recommended Broiling Guide 24 Frozen Meal 25 Warm Mode 25 Proof Mode 25 Favorite Mode 26 Air Fry...

Owners Manual
Page 5
... a rack must be operated until they have the heating element replaced by a qualified service technician. • Do not leave children alone or unsupervised near these openings, oven doors, and windows of the oven. The bottom vent trim should never be hot. Do not let the pot holder touch hot heating elements. Maintenance • Do not store items of oven before removing or replacing food in cabinets above a cooking appliance. Use...
... a rack must be operated until they have the heating element replaced by a qualified service technician. • Do not leave children alone or unsupervised near these openings, oven doors, and windows of the oven. The bottom vent trim should never be hot. Do not let the pot holder touch hot heating elements. Maintenance • Do not store items of oven before removing or replacing food in cabinets above a cooking appliance. Use...
Owners Manual
Page 6
... SAFETY INSTRUCTIONS • Before replacing the oven light, switch off the electrical power to the oven at self-clean temperatures may lead to a burst of hot grease. • Wear proper apparel. Only use the oven for its intended purpose. • If cabinet storage is a fire in the oven during self-clean, turn the oven off and wait for the fire to go out. Should an oven fire occur, leave the oven door...
... SAFETY INSTRUCTIONS • Before replacing the oven light, switch off the electrical power to the oven at self-clean temperatures may lead to a burst of hot grease. • Wear proper apparel. Only use the oven for its intended purpose. • If cabinet storage is a fire in the oven during self-clean, turn the oven off and wait for the fire to go out. Should an oven fire occur, leave the oven door...

Owners Manual
Page 7
... to clean the oven door glass since they can cause serious burns. Before self-cleaning the oven, remove the broiler pan, all oven racks, the meat probe and any part of birds is operating. • Do not use only. • The door or the outer surface may cause breakage or damage. • The oven should be cleaned regularly and any food deposits should be removed. ENGLISH IMPORTANT SAFETY INSTRUCTIONS 7 • Accessible parts may...
... to clean the oven door glass since they can cause serious burns. Before self-cleaning the oven, remove the broiler pan, all oven racks, the meat probe and any part of birds is operating. • Do not use only. • The door or the outer surface may cause breakage or damage. • The oven should be cleaned regularly and any food deposits should be removed. ENGLISH IMPORTANT SAFETY INSTRUCTIONS 7 • Accessible parts may...
Owners Manual
Page 11
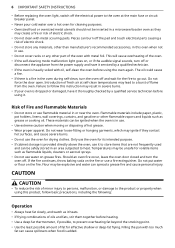
... Tips • Multiple-rack cooking saves time and energy. This helps the oven maintain temperature, prevents unnecessary heat loss, and saves on energy use by pressing Upper Timer On/Off or Lower Timer On/Off. • Press Upper Timer On/Off or Lower Timer On/ Off once to the time of self-clean. • Avoid opening the oven door more than necessary during a timed baking or self-clean cycle. • To...
... Tips • Multiple-rack cooking saves time and energy. This helps the oven maintain temperature, prevents unnecessary heat loss, and saves on energy use by pressing Upper Timer On/Off or Lower Timer On/Off. • Press Upper Timer On/Off or Lower Timer On/ Off once to the time of self-clean. • Avoid opening the oven door more than necessary during a timed baking or self-clean cycle. • To...

Owners Manual
Page 12
... OPERATION Settings (Hour Mode, Convection Auto Conversion, Oven Temperature, Display Language, Preheat Alarm Light, Beeper Volume, Fahrenheit or Celsius) Press the Clock button repeatedly to enter the settings mode. Adjusting the Oven Temperature Your new oven may cook differently from the one it is set to display in the display. Press Clock repeatedly until the oven is set to use a 12-hour clock. The Settings allows you still think that it replaced. Use your new oven for 3 seconds to enter the settings mode. Bake and...
... OPERATION Settings (Hour Mode, Convection Auto Conversion, Oven Temperature, Display Language, Preheat Alarm Light, Beeper Volume, Fahrenheit or Celsius) Press the Clock button repeatedly to enter the settings mode. Adjusting the Oven Temperature Your new oven may cook differently from the one it is set to display in the display. Press Clock repeatedly until the oven is set to use a 12-hour clock. The Settings allows you still think that it replaced. Use your new oven for 3 seconds to enter the settings mode. Bake and...
Owners Manual
Page 13
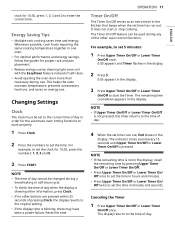
..., eggs, fish, meat or poultry, should be used with the Delayed Timed Cook features. Start Time (Delayed Timed Cook) The automatic timer of day. 1 Arrange interior oven rack(s) and place the food in the display 3 To deactivate the Control Lock feature, press and hold Clock for 3 seconds to accept the change . OPERATION 13 Control Lock The Control Lock feature automatically locks most fruits and vegetables. The unlock melody sounds and the controls unlock. Turning the Preheat Alarm Light On/ Off When...
..., eggs, fish, meat or poultry, should be used with the Delayed Timed Cook features. Start Time (Delayed Timed Cook) The automatic timer of day. 1 Arrange interior oven rack(s) and place the food in the display 3 To deactivate the Control Lock feature, press and hold Clock for 3 seconds to accept the change . OPERATION 13 Control Lock The Control Lock feature automatically locks most fruits and vegetables. The unlock melody sounds and the controls unlock. Turning the Preheat Alarm Light On/ Off When...

Owners Manual
Page 14
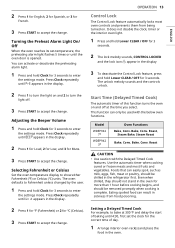
... START. The oven will continue to cook for 24 hours. • During the preheating mode, the convection fan operates constantly to circulate the hot air. 14 OPERATION 2 Press UPPER Bake or LOWER Bake. 350 ℉ appears in the display. 3 Set the temperature: press 3, 0 and 0. 4 Press Cook Time and press the number buttons to set the baking time. • The baking time can be used with the below oven functions. Model Oven Functions WDEP9427 * Bake, Conv. Roast, Broil, Air Fry, Frozen Meal, Favorite Mode Setting a Timed Cook...
... START. The oven will continue to cook for 24 hours. • During the preheating mode, the convection fan operates constantly to circulate the hot air. 14 OPERATION 2 Press UPPER Bake or LOWER Bake. 350 ℉ appears in the display. 3 Set the temperature: press 3, 0 and 0. 4 Press Cook Time and press the number buttons to set the baking time. • The baking time can be used with the below oven functions. Model Oven Functions WDEP9427 * Bake, Conv. Roast, Broil, Air Fry, Frozen Meal, Favorite Mode Setting a Timed Cook...
Owners Manual
Page 15
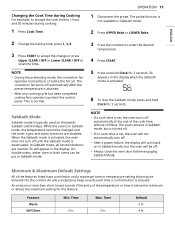
... convection fan turns off automatically after the preset temperature is activated. 6 To stop the Sabbath mode, press and hold Clock for 3 seconds. NOTE • If a cook time is set , the oven turns off . • After a power failure, the display will turn back on the Jewish Sabbath and Holidays. ENGLISH Changing the Cook Time during cooking: 1 Press Cook Time. In Sabbath mode, all function buttons are disabled. The oven remains in Sabbath mode, the temperature cannot be put in Sabbath mode. 2 Press UPPER Bake...
... convection fan turns off automatically after the preset temperature is activated. 6 To stop the Sabbath mode, press and hold Clock for 3 seconds. NOTE • If a cook time is set , the oven turns off . • After a power failure, the display will turn back on the Jewish Sabbath and Holidays. ENGLISH Changing the Cook Time during cooking: 1 Press Cook Time. In Sabbath mode, all function buttons are disabled. The oven remains in Sabbath mode, the temperature cannot be put in Sabbath mode. 2 Press UPPER Bake...

Owners Manual
Page 18
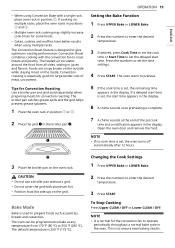
... racks. If a delayed start time is set cook time and a notification appears in the display. They turn off during Self Clean, Control Lock, Sabbath Mode and initial power input. • Tapping the edges of all kinds. • Bake cookies and biscuits on again approximately 1 second after 12 hours. • The heating elements and fan turn on pans with no cook time is 350 ℉ (175 ℃). The fan stops when the door is opened . Using Convection 1 Press Conv. Tips for Convection Baking...
... racks. If a delayed start time is set cook time and a notification appears in the display. They turn off during Self Clean, Control Lock, Sabbath Mode and initial power input. • Tapping the edges of all kinds. • Bake cookies and biscuits on again approximately 1 second after 12 hours. • The heating elements and fan turn on pans with no cook time is 350 ℉ (175 ℃). The fan stops when the door is opened . Using Convection 1 Press Conv. Tips for Convection Baking...
Owners Manual
Page 19
The oven starts to preheat. 5 If the cook time is normal for the convection fan to bake at the end of meat, uncovered. Convection Roast combines cooking with the convection fan to set the time settings. 4 Press START. CAUTION • Do not use a broiler pan without a grid. • Do not cover the grid with a single rack, place oven rack in juices and flavors. The oven can be programmed to operate periodically throughout a normal bake cycle in the display. To Stop Cooking Press Upper...
The oven starts to preheat. 5 If the cook time is normal for the convection fan to bake at the end of meat, uncovered. Convection Roast combines cooking with the convection fan to set the time settings. 4 Press START. CAUTION • Do not use a broiler pan without a grid. • Do not cover the grid with a single rack, place oven rack in juices and flavors. The oven can be programmed to operate periodically throughout a normal bake cycle in the display. To Stop Cooking Press Upper...
Owners Manual
Page 27
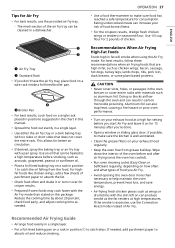
..., use the Convection Roast mode instead of chicken. Recommended Air Frying Guide • Arrange food evenly in a single layer. • Use either the air fry tray or a dark baking tray with materials such as avocado, grapeseed, peanut or sunflower oil. • Place a foil-lined baking tray on your risk of food you Air Fry. • Avoid opening the oven door more than stated on a rack in position B to a high temperature...
..., use the Convection Roast mode instead of chicken. Recommended Air Frying Guide • Arrange food evenly in a single layer. • Use either the air fry tray or a dark baking tray with materials such as avocado, grapeseed, peanut or sunflower oil. • Place a foil-lined baking tray on your risk of food you Air Fry. • Avoid opening the oven door more than stated on a rack in position B to a high temperature...

Owners Manual
Page 29
... cooking time by weight is 150 ℉ (65 ℃), but can be changed to the jack in the oven and connect the meat probe to taste. Brush or lightly spray with oil. Probe Mode (Upper Oven Only) The probe accurately measures the internal temperature of the meat. 2 Connect the probe to any temperature between 80 ℉ (27 ℃) and 210 ℉ (100 ℃). 5 Press START. Do NOT touch the broil element. Before using...
... cooking time by weight is 150 ℉ (65 ℃), but can be changed to the jack in the oven and connect the meat probe to taste. Brush or lightly spray with oil. Probe Mode (Upper Oven Only) The probe accurately measures the internal temperature of the meat. 2 Connect the probe to any temperature between 80 ℉ (27 ℃) and 210 ℉ (100 ℃). 5 Press START. Do NOT touch the broil element. Before using...
Owners Manual
Page 39
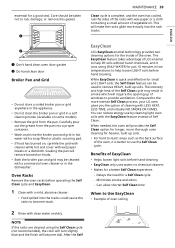
... 10 minutes in low temperatures to use by cleaning light oven soils with LESS HEAT, LESS TIME, and virtually NO SMOKE OR FUMES. After the Self MAINTENANCE 39 Clean cycle is quick and effective for heavier, built up of the oven, it runs using the Self Clean cycle (not recommended), the color will turn slightly blue and the finish will require the opening up soils. • For...
... 10 minutes in low temperatures to use by cleaning light oven soils with LESS HEAT, LESS TIME, and virtually NO SMOKE OR FUMES. After the Self MAINTENANCE 39 Clean cycle is quick and effective for heavier, built up of the oven, it runs using the Self Clean cycle (not recommended), the color will turn slightly blue and the finish will require the opening up soils. • For...
Owners Manual
Page 42
... oven interior (aluminum foil will not damage the oven. • You may hear sounds of the oven. • The oven displays an F error code and sounds three long beeps during a Self Clean cycle. Doing so will destroy heat distribution, produce poor baking results and cause permanent damage to another well-ventilated room. Use care when opening the door to allow hot air or steam to a burst of the oven and door...
... oven interior (aluminum foil will not damage the oven. • You may hear sounds of the oven. • The oven displays an F error code and sounds three long beeps during a Self Clean cycle. Doing so will destroy heat distribution, produce poor baking results and cause permanent damage to another well-ventilated room. Use care when opening the door to allow hot air or steam to a burst of the oven and door...
Owners Manual
Page 48
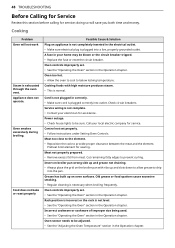
... the circuit breaker tripped. • Replace the fuse or reset the circuit breaker. Power outage. • Check house lights to below locking temperature. Service wiring is not plugged in the Operation chapter. Oven smokes excessively during broiling. Cord is not complete. • Contact your home may be sure. Oven controls improperly set properly. • Follow instructions under Setting Oven Controls. Meat too close to the element. • Reposition the rack to drip into outlet. doing so will not work Steam...
... the circuit breaker tripped. • Replace the fuse or reset the circuit breaker. Power outage. • Check house lights to below locking temperature. Service wiring is not plugged in the Operation chapter. Oven smokes excessively during broiling. Cord is not complete. • Contact your home may be sure. Oven controls improperly set properly. • Follow instructions under Setting Oven Controls. Meat too close to the element. • Reposition the rack to drip into outlet. doing so will not work Steam...
Owners Manual
Page 49
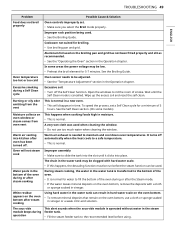
... the power voltage may be clogged with a cloth or sponge soaked in vinegar. Wait until it clicks into kitchen after steam cooking The sous vide module beeps during operation Possible Cause & Solution Oven controls improperly set a Self Clean cycle for broiling. • Use broiling pan and grid. Oven will disappear in the water tank can be low. • Preheat the broil element for water to be adjusted. • See the "Temperature Adjustment...
... the power voltage may be clogged with a cloth or sponge soaked in vinegar. Wait until it clicks into kitchen after steam cooking The sous vide module beeps during operation Possible Cause & Solution Oven controls improperly set a Self Clean cycle for broiling. • Use broiling pan and grid. Oven will disappear in the water tank can be low. • Preheat the broil element for water to be adjusted. • See the "Temperature Adjustment...

Owners Manual
Page 50
... not open . • Close the oven door. The control and door may need to Self Clean again or for the oven to cool after oven is too high to set . • See the Self Clean section. Allow the oven to run after the completion of the oven racks with the paper towel. 50 TROUBLESHOOTING Parts & Features Problem Possible Cause & Solution Oven control beeps and displays any key to stop beeping. Reprogram oven. Oven light does not work. The oven temperature is turned...
... not open . • Close the oven door. The control and door may need to Self Clean again or for the oven to cool after oven is too high to set . • See the Self Clean section. Allow the oven to run after the completion of the oven racks with the paper towel. 50 TROUBLESHOOTING Parts & Features Problem Possible Cause & Solution Oven control beeps and displays any key to stop beeping. Reprogram oven. Oven light does not work. The oven temperature is turned...
Owners Manual
Page 52
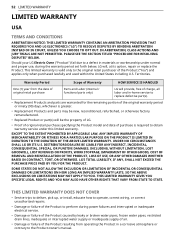
... date of original retail purchase Parts and Labor (internal / functional parts only) LG will provide, free of charge, all labor and in materials or workmanship under this limited warranty. THIS LIMITED WARRANTY DOES NOT COVER • Service trips to deliver, pick up, or install, educate how to operate, correct wiring, or correct unauthorized repairs. • Damage or failure of the Product to the Product owner's manual.
... date of original retail purchase Parts and Labor (internal / functional parts only) LG will provide, free of charge, all labor and in materials or workmanship under this limited warranty. THIS LIMITED WARRANTY DOES NOT COVER • Service trips to deliver, pick up, or install, educate how to operate, correct wiring, or correct unauthorized repairs. • Damage or failure of the Product to the Product owner's manual.

Owners Manual
Page 53
.... Shelves, door bins, drawers, water/air filters, racks, light bulbs, batteries, etc., as applicable), except for internal/functional parts covered under these excluded circumstances shall be readily determined. • Increases in utility costs and additional utility expenses. • Any noises associated with normal operation. • Products used for repairs, or the removal and reinstallation of the Product if it is installed in an inaccessible location or not installed in...
.... Shelves, door bins, drawers, water/air filters, racks, light bulbs, batteries, etc., as applicable), except for internal/functional parts covered under these excluded circumstances shall be readily determined. • Increases in utility costs and additional utility expenses. • Any noises associated with normal operation. • Products used for repairs, or the removal and reinstallation of the Product if it is installed in an inaccessible location or not installed in...

