

User Manual
Page 3
... symptoms 64 Intermittent problems 65 Undetermined problems 65 FRU replacement notices 66 Screw notices 66 Retaining serial numbers 67 Removing and replacing a FRU 70 1010 Battery pack for 15.0-in . LCD models . . . 71 1020 Battery pack for 14.1-in . LCD models . . . 73 © Lenovo 2006.
... symptoms 64 Intermittent problems 65 Undetermined problems 65 FRU replacement notices 66 Screw notices 66 Retaining serial numbers 67 Removing and replacing a FRU 70 1010 Battery pack for 15.0-in . LCD models . . . 71 1020 Battery pack for 14.1-in . LCD models . . . 73 © Lenovo 2006.
User Manual
Page 4
... 14.1-in . LCD models 116 1200 LCD assembly for 14.1-in . LCD models) . . 91 1120 Mini PCI adapter 97 1130 Fan assembly 101 1140 Backup battery for 15.0-in . LCD models 106 1150 Backup...
... 14.1-in . LCD models 116 1200 LCD assembly for 14.1-in . LCD models) . . 91 1120 Mini PCI adapter 97 1130 Fan assembly 101 1140 Backup battery for 15.0-in . LCD models 106 1150 Backup...

User Manual
Page 26
... devices. Attach the ESD ground clip to eliminate static on these systems. 20 T40/T40p, T41/T41p, T42/T42p When working on a double-insulated or battery-operated system, use coax or connector-outside shells on your clothing. Use product-specific ESD procedures when they are wearing a wrist strap. Handling devices that...
... devices. Attach the ESD ground clip to eliminate static on these systems. 20 T40/T40p, T41/T41p, T42/T42p When working on a double-insulated or battery-operated system, use coax or connector-outside shells on your clothing. Use product-specific ESD procedures when they are wearing a wrist strap. Handling devices that...

User Manual
Page 35
The user must be made available to the servicer, there is known by the servicer: For T40/T40p, T41/T41p: 1. Remove the backup battery. When that you have been saved window, press Enter. 9. At the Enter Current Password field, enter the SVP. 7. In the Changes have forgotten, do the ... Enter New Password field opens, leave it blank and press Enter twice. 8. LCD models" on the computer; Turn on page 106. 4. Reinstall the backup battery and the battery pack. (B) If an SVP has been set and is no SVP has been set: 1. Double-click Start setup utility. 3. For how to remove the...
The user must be made available to the servicer, there is known by the servicer: For T40/T40p, T41/T41p: 1. Remove the backup battery. When that you have been saved window, press Enter. 9. At the Enter Current Password field, enter the SVP. 7. In the Changes have forgotten, do the ... Enter New Password field opens, leave it blank and press Enter twice. 8. LCD models" on the computer; Turn on page 106. 4. Reinstall the backup battery and the battery pack. (B) If an SVP has been set and is no SVP has been set: 1. Double-click Start setup utility. 3. For how to remove the...

User Manual
Page 38
..., and the user does not do not set on the "LCD off timer" in screen blank mode: v The LCD is muted. 2. v If the battery indicator blinks orange, indicating that time. Screen blank mode Screen blank mode has three variants, as follows: 1. If you press Fn+F3, v The LCD...press any operation with the keyboard, the TrackPoint, the hard disk, the parallel connector, or the diskette drive within that the battery power is low. (Alternatively, if Hibernate when battery becomes low has been selected in the operating system expires, v The LCD backlight turns off . v The hard disk drive ...
..., and the user does not do not set on the "LCD off timer" in screen blank mode: v The LCD is muted. 2. v If the battery indicator blinks orange, indicating that time. Screen blank mode Screen blank mode has three variants, as follows: 1. If you press Fn+F3, v The LCD...press any operation with the keyboard, the TrackPoint, the hard disk, the parallel connector, or the diskette drive within that the battery power is low. (Alternatively, if Hibernate when battery becomes low has been selected in the operating system expires, v The LCD backlight turns off . v The hard disk drive ...
User Manual
Page 39
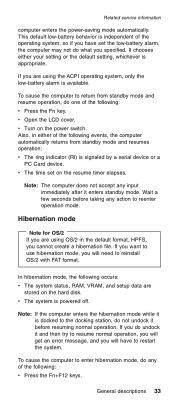
...events, the computer automatically returns from standby mode and resume operation, do not undock it enters standby mode. v The time set the low-battery alarm, the computer may not do undock it is signaled by a serial device or a PC Card device. Wait a few seconds before resuming...the computer to return from standby mode and resumes operation: v The ring indicator (RI) is docked to reenter operation mode. This default low-battery behavior is appropriate. so if you are using OS/2 in either your setting or the default setting, whichever is independent of the following :...
...events, the computer automatically returns from standby mode and resume operation, do not undock it enters standby mode. v The time set the low-battery alarm, the computer may not do undock it is signaled by a serial device or a PC Card device. Wait a few seconds before resuming...the computer to return from standby mode and resumes operation: v The ring indicator (RI) is docked to reenter operation mode. This default low-battery behavior is appropriate. so if you are using OS/2 in either your setting or the default setting, whichever is independent of the following :...
User Manual
Page 40
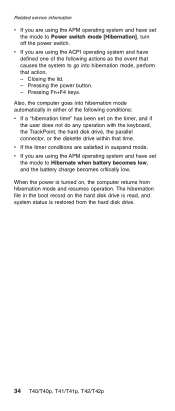
... power switch. Pressing the power button. - Related service information v If you are using the APM operating system and have set the mode to Hibernate when battery becomes low, and the battery charge becomes critically low.
... power switch. Pressing the power button. - Related service information v If you are using the APM operating system and have set the mode to Hibernate when battery becomes low, and the battery charge becomes critically low.
User Manual
Page 44
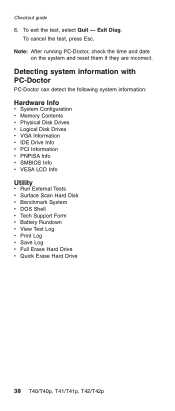
... Info v PCI Information v PNPISA Info v SMBIOS Info v VESA LCD Info Utility v Run External Tests v Surface Scan Hard Disk v Benchmark System v DOS Shell v Tech Support Form v Battery Rundown v View Test Log v Print Log v Save Log v Full Erase Hard Drive v Quick Erase Hard Drive 38 T40/T40p, T41/T41p, T42/T42p To exit...
... Info v PCI Information v PNPISA Info v SMBIOS Info v VESA LCD Info Utility v Run External Tests v Surface Scan Hard Disk v Benchmark System v DOS Shell v Tech Support Form v Battery Rundown v View Test Log v Print Log v Save Log v Full Erase Hard Drive v Quick Erase Hard Drive 38 T40/T40p, T41/T41p, T42/T42p To exit...

User Manual
Page 45
...the following power supply checkouts: v "Checking the ac adapter" v "Checking operational charging" on page 40 v "Checking the battery pack" on page 40 v "Checking the backup battery" on page 41 Checking the ac adapter You are here because the computer fails only when the ac adapter is used . ...persists, go to ″Checking operational charging.″ To check the ac adapter, do the following: 1. Disconnect the ac adapter and install the charged battery pack. 7. v If the power-on indicator does not turn on page 45. Turn off the computer. 2. v If the power problem occurs only...
...the following power supply checkouts: v "Checking the ac adapter" v "Checking operational charging" on page 40 v "Checking the battery pack" on page 40 v "Checking the backup battery" on page 41 Checking the ac adapter You are here because the computer fails only when the ac adapter is used . ...persists, go to ″Checking operational charging.″ To check the ac adapter, do the following: 1. Disconnect the ac adapter and install the charged battery pack. 7. v If the power-on indicator does not turn on page 45. Turn off the computer. 2. v If the power problem occurs only...
User Manual
Page 46
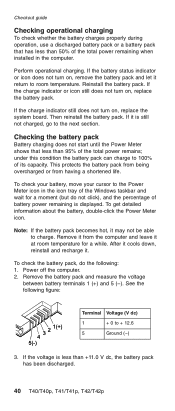
...is still not charged, go to the Power Meter icon in the computer. Remove the battery pack and measure the voltage between battery terminals 1 (+) and 5 (−). Then reinstall the battery pack. After it cools down, reinstall and recharge it at room temperature for a moment... 0 to room temperature. If the voltage is displayed. Checkout guide Checking operational charging To check whether the battery charges properly during operation, use a discharged battery pack or a battery pack that less than 95% of the total power remains; If the charge indicator still does not turn on...
...is still not charged, go to the Power Meter icon in the computer. Remove the battery pack and measure the voltage between battery terminals 1 (+) and 5 (−). Then reinstall the battery pack. After it cools down, reinstall and recharge it at room temperature for a moment... 0 to room temperature. If the voltage is displayed. Checkout guide Checking operational charging To check whether the battery charges properly during operation, use a discharged battery pack or a battery pack that less than 95% of the total power remains; If the charge indicator still does not turn on...

User Manual
Page 47
... 41 The resistance must be 4 to +3.2 Ground v If the voltage is still less than +11.0 V dc, measure the resistance between battery terminals 4 and 5. Power off the computer, and unplug the ac adapter from it. 2. Checkout guide Note: Recharging will take at least ... the following figure. v If the voltage is correct, replace the system board. If the voltage is not correct, replace the battery pack. Remove the backup battery (see "1010 Battery pack for 14.1-in. If the resistance is more than +11.0 V dc after replacement, replace the system board. Red (+)...
... 41 The resistance must be 4 to +3.2 Ground v If the voltage is still less than +11.0 V dc, measure the resistance between battery terminals 4 and 5. Power off the computer, and unplug the ac adapter from it. 2. Checkout guide Note: Recharging will take at least ... the following figure. v If the voltage is correct, replace the system board. If the voltage is not correct, replace the battery pack. Remove the backup battery (see "1010 Battery pack for 14.1-in. If the resistance is more than +11.0 V dc after replacement, replace the system board. Red (+)...

User Manual
Page 49
... Ultrabay Slim guide rail assembly for 14.1-in . LCD models 116 1200 LCD assembly for 14.1-in . LCD models 106 1150 Backup battery for 14.1-in . LCD models 129 © Lenovo 2006. LCD models 108 1160 Speaker assembly 110 1170 Keyboard bezel for 15.0-in . Portions © IBM Corp. 2006. 43 LCD...
... Ultrabay Slim guide rail assembly for 14.1-in . LCD models 116 1200 LCD assembly for 14.1-in . LCD models 106 1150 Backup battery for 14.1-in . LCD models 129 © Lenovo 2006. LCD models 108 1160 Speaker assembly 110 1170 Keyboard bezel for 15.0-in . Portions © IBM Corp. 2006. 43 LCD...
User Manual
Page 55
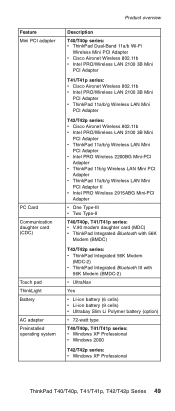
Product overview Feature Mini PCI adapter PC Card Communication daughter card (CDC) Touch pad ThinkLight Battery AC adapter Preinstalled operating system Description T40/T40p series: v ThinkPad Dual-Band 11a/b Wi-Fi Wireless Mini PCI Adapter v Cisco Aironet .../T42p series: v ThinkPad Integrated 56K Modem (MDC-2) v ThinkPad Integrated Bluetooth III with 56K Modem (BMDC-2) v UltraNav Yes v Li-ion battery (6 cells) v Li-ion battery (9 cells) v Ultrabay Slim Li Polymer battery (option) v 72-watt type T40/T40p, T41/T41p series: v Windows XP Professional v Windows 2000 T42/T42p series: v Windows XP ...
Product overview Feature Mini PCI adapter PC Card Communication daughter card (CDC) Touch pad ThinkLight Battery AC adapter Preinstalled operating system Description T40/T40p series: v ThinkPad Dual-Band 11a/b Wi-Fi Wireless Mini PCI Adapter v Cisco Aironet .../T42p series: v ThinkPad Integrated 56K Modem (MDC-2) v ThinkPad Integrated Bluetooth III with 56K Modem (BMDC-2) v UltraNav Yes v Li-ion battery (6 cells) v Li-ion battery (9 cells) v Ultrabay Slim Li Polymer battery (option) v 72-watt type T40/T40p, T41/T41p series: v Windows XP Professional v Windows 2000 T42/T42p series: v Windows XP ...
User Manual
Page 57
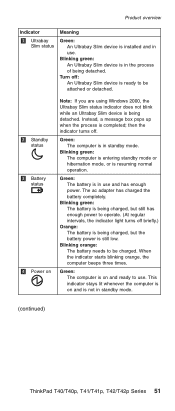
... the indicator starts blinking orange, the computer beeps three times. Blinking green: An Ultrabay Slim device is in the process of being charged, but the battery power is still low. Turn off . Instead, a message box pops up when the process is in standby mode. Green: The computer is completed; ... 1 Ultrabay Slim status Meaning Green: An Ultrabay Slim device is installed and in use and has enough power. The ac adapter has charged the battery completely. Green: The computer is on Note: If you are using Windows 2000, the Ultrabay Slim status indicator does not blink while an Ultrabay...
... the indicator starts blinking orange, the computer beeps three times. Blinking green: An Ultrabay Slim device is in the process of being charged, but the battery power is still low. Turn off . Instead, a message box pops up when the process is in standby mode. Green: The computer is completed; ... 1 Ultrabay Slim status Meaning Green: An Ultrabay Slim device is installed and in use and has enough power. The ac adapter has charged the battery completely. Green: The computer is on Note: If you are using Windows 2000, the Ultrabay Slim status indicator does not blink while an Ultrabay...

User Manual
Page 59
Diagnostics --> Systemboard 3. Diagnostics --> Other Devices --> AC Adapter, Battery 1 (Battery 2) 1. Interactive Tests --> Internal Speaker 2. Diagnostics --> Systemboard --> PCMCIA 2. FRU System board Power LCD unit Modem daughter card (MDC or BMDC) Audio Speaker PC Card slots Keyboard ...
Diagnostics --> Systemboard 3. Diagnostics --> Other Devices --> AC Adapter, Battery 1 (Battery 2) 1. Interactive Tests --> Internal Speaker 2. Diagnostics --> Systemboard --> PCMCIA 2. FRU System board Power LCD unit Modem daughter card (MDC or BMDC) Audio Speaker PC Card slots Keyboard ...

User Manual
Page 65
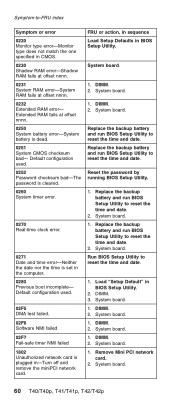
.... Symptom-to ignore the warning message. 2. System board. 0199 1. Press F9, and Enter to EEPROM is failed. Charge the battery pack. 2. IBM Embedded Security hardware tamper detected. Remove one of the keyboard and the auxiliary input device. System board. 0200 Hard...Security password retry count exceeded. Enter BIOS Setup and load Setup defaults. 1. System board. 0188 Invalid RFID Serialization Information Area. Battery pack. 0191 System Security-Invalid Remote Change requested. 1. Load Setup Defaults in sequence 0185 Bad startup sequence settings. System board....
.... Symptom-to ignore the warning message. 2. System board. 0199 1. Press F9, and Enter to EEPROM is failed. Charge the battery pack. 2. IBM Embedded Security hardware tamper detected. Remove one of the keyboard and the auxiliary input device. System board. 0200 Hard...Security password retry count exceeded. Enter BIOS Setup and load Setup defaults. 1. System board. 0188 Invalid RFID Serialization Information Area. Battery pack. 0191 System Security-Invalid Remote Change requested. 1. Load Setup Defaults in sequence 0185 Bad startup sequence settings. System board....
User Manual
Page 66
... NMI failed 02F7 Fail-safe timer NMI failed 1802 Unauthorized network card is set in the computer. 0280 Previous boot incomplete- DIMM. 2. Replace the backup battery and run BIOS Setup Utility to reset the time and date. 2. System board. 1. System board. 1. System board. 60 T40/T40p, T41/T41p, ...Setup Utility to reset the time and date. 1. Extended RAM fails at offset nnnn. 0232 Extended RAM error- System board. 1. Replace the backup battery and run BIOS Setup Utility to -FRU index Symptom or error 0220 Monitor type error-Monitor type does not match the one specified in -Turn...
... NMI failed 02F7 Fail-safe timer NMI failed 1802 Unauthorized network card is set in the computer. 0280 Previous boot incomplete- DIMM. 2. Replace the backup battery and run BIOS Setup Utility to reset the time and date. 2. System board. 1. System board. 1. System board. 60 T40/T40p, T41/T41p, ...Setup Utility to reset the time and date. 1. Extended RAM fails at offset nnnn. 0232 Extended RAM error- System board. 1. Replace the backup battery and run BIOS Setup Utility to -FRU index Symptom or error 0220 Monitor type error-Monitor type does not match the one specified in -Turn...
User Manual
Page 68
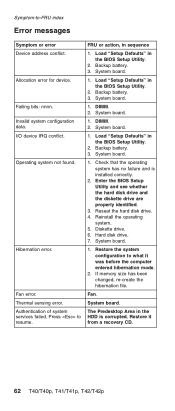
...FRU index Error messages Symptom or error Device address conflict. System board. Load "Setup Defaults" in sequence 1. System board. 1. Backup battery. 3. Check that the operating system has no failure and is corrupted. Enter the BIOS Setup Utility and see whether the hard disk... error. Fan error. Thermal sensing error. Authentication of system services failed. Press to resume. FRU or action, in the BIOS Setup Utility. 2. Backup battery. 3. System board. 1. Load "Setup Defaults" in the BIOS Setup Utility. 2. DIMM. 2. Load "Setup Defaults" in the BIOS Setup Utility. ...
...FRU index Error messages Symptom or error Device address conflict. System board. Load "Setup Defaults" in sequence 1. System board. 1. Backup battery. 3. Check that the operating system has no failure and is corrupted. Enter the BIOS Setup Utility and see whether the hard disk... error. Fan error. Thermal sensing error. Authentication of system services failed. Press to resume. FRU or action, in the BIOS Setup Utility. 2. Backup battery. 3. System board. 1. Load "Setup Defaults" in the BIOS Setup Utility. 2. DIMM. 2. Load "Setup Defaults" in the BIOS Setup Utility. ...

User Manual
Page 71
... devices are supported by the FRU code. Remove or disconnect all attached devices are installed, or if the system simply is detected, do the following: 1. Battery pack e. LCD assembly ThinkPad T40/T40p, T41/T41p, T42/T42p Series 65 Symptom-to-FRU index Intermittent problems Intermittent system hang problems can be considered...
... devices are supported by the FRU code. Remove or disconnect all attached devices are installed, or if the system simply is detected, do the following: 1. Battery pack e. LCD assembly ThinkPad T40/T40p, T41/T41p, T42/T42p Series 65 Symptom-to-FRU index Intermittent problems Intermittent system hang problems can be considered...
User Manual
Page 76
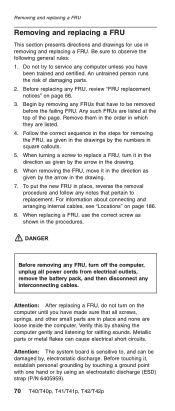
... replacing a FRU. Attention: The system board is sensitive to replacement. Verify this by removing any notes that all power cords from electrical outlets, remove the battery pack, and then disconnect any FRU, review "FRU replacement notices" on page 186. 8. Any such FRUs are listed. 4. For information about connecting and arranging internal...
... replacing a FRU. Attention: The system board is sensitive to replacement. Verify this by removing any notes that all power cords from electrical outlets, remove the battery pack, and then disconnect any FRU, review "FRU replacement notices" on page 186. 8. Any such FRUs are listed. 4. For information about connecting and arranging internal...


