

User Manual
Page 3
.../T42p Series 43 Product overview 45 Specifications 45 Status indicators 50 FRU tests 53 Fn key combinations 54 Symptom-to-FRU index 58 Numeric error codes 58 Error messages 62 Beep symptoms 63 No-beep symptoms 63 LCD-related symptoms 64 Intermittent problems 65 Undetermined problems 65 FRU replacement notices 66 Screw notices 66 Retaining serial numbers 67 Removing and replacing a FRU 70 1010 Battery pack...
.../T42p Series 43 Product overview 45 Specifications 45 Status indicators 50 FRU tests 53 Fn key combinations 54 Symptom-to-FRU index 58 Numeric error codes 58 Error messages 62 Beep symptoms 63 No-beep symptoms 63 LCD-related symptoms 64 Intermittent problems 65 Undetermined problems 65 FRU replacement notices 66 Screw notices 66 Retaining serial numbers 67 Removing and replacing a FRU 70 1010 Battery pack...
User Manual
Page 4
..., LCD panel, LCD cable assembly, hinges, and LCD cover for 14.1-in . LCD models 123 1220 CPU 128 1230 Ultrabay Slim guide rail assembly for 14.1-in . LCD models 153 2020 LCD front bezel for 14.1-in . LCD models 155 2030 Inverter card for 15.0-in . LCD models 88 1110 Keyboard bezel or Keyboard bezel with fingerprint sensor (for 14.1-in . LCD models) . . 91 1120 Mini PCI adapter 97 1130 Fan assembly 101 1140 Backup battery...
..., LCD panel, LCD cable assembly, hinges, and LCD cover for 14.1-in . LCD models 123 1220 CPU 128 1230 Ultrabay Slim guide rail assembly for 14.1-in . LCD models 153 2020 LCD front bezel for 14.1-in . LCD models 155 2030 Inverter card for 15.0-in . LCD models 88 1110 Keyboard bezel or Keyboard bezel with fingerprint sensor (for 14.1-in . LCD models) . . 91 1120 Mini PCI adapter 97 1130 Fan assembly 101 1140 Backup battery...

User Manual
Page 9
... the problem, reinstall that those settings remain in Canada should call the Customer Support Center at 800-426-7378 if they need assistance in this manual. Strategy for replacing and servicing FRUs: v If you are servicing may have both a processor board and a system board. Use the following strategy to prevent unnecessary expense for replacing FRUs Before replacing parts Make sure that changed the symptoms. Attention: The setup configuration...
... the problem, reinstall that those settings remain in Canada should call the Customer Support Center at 800-426-7378 if they need assistance in this manual. Strategy for replacing and servicing FRUs: v If you are servicing may have both a processor board and a system board. Use the following strategy to prevent unnecessary expense for replacing FRUs Before replacing parts Make sure that changed the symptoms. Attention: The setup configuration...
User Manual
Page 23
... not obstruct fan louvers or cover them with live electrical currents. If you need to work on this product or cords associated with accessories sold with this type of mat to prevent overheating of California to lock the wall box in the off (EPO) switch, disconnecting switch, or electrical outlet. Safety information v After service, reinstall all power before returning the...
... not obstruct fan louvers or cover them with live electrical currents. If you need to work on this product or cords associated with accessories sold with this type of mat to prevent overheating of California to lock the wall box in the off (EPO) switch, disconnecting switch, or electrical outlet. Safety information v After service, reinstall all power before returning the...

User Manual
Page 31
... the model of a single, unreproducible failure. If you replace a FRU, make sure that you attach to any FRU, read the entire page on removing and replacing FRUs. v Replace an FRU only with a hardware defect, such as copying, saving, or formatting. When you select an incorrect drive, data or programs might be replaced because of the machine and the FRU part number are servicing...
... the model of a single, unreproducible failure. If you replace a FRU, make sure that you attach to any FRU, read the entire page on removing and replacing FRUs. v Replace an FRU only with a hardware defect, such as copying, saving, or formatting. When you select an incorrect drive, data or programs might be replaced because of the machine and the FRU part number are servicing...
User Manual
Page 34
... these passwords has been set . The computer does not start until the password is available, neither Lenovo nor Lenovo authorized servicers provide any services to reset either the user or the master HDP, or to recover data from being powered on . If it has, it can be replaced for it to get a message asking which operating system to the hard disk even if the user has changed the user...
... these passwords has been set . The computer does not start until the password is available, neither Lenovo nor Lenovo authorized servicers provide any services to reset either the user or the master HDP, or to recover data from being powered on . If it has, it can be replaced for it to get a message asking which operating system to the hard disk even if the user has changed the user...

User Manual
Page 35
... Access IBM button. 2. Related service information information stored in the Setup confirmation window, select Yes. The user must be made available to the BIOS Setup Utility and change the system configuration. Attention: If the SVP has been forgotten and cannot be replaced for a message saying, "To interrupt normal startup, press the blue Access IBM button." The system board must enter the SVP in . Turn off the computer. 2. Remove the backup battery. LCD models...
... Access IBM button. 2. Related service information information stored in the Setup confirmation window, select Yes. The user must be made available to the BIOS Setup Utility and change the system configuration. Attention: If the SVP has been forgotten and cannot be replaced for a message saying, "To interrupt normal startup, press the blue Access IBM button." The system board must enter the SVP in . Turn off the computer. 2. Remove the backup battery. LCD models...

User Manual
Page 36
... to recover data from the hard disk drive. To remove a user HDP that message appears, press the Access IBM button. 2. The Rescue and Recovery screen opens. For the other models, enter the POP. Type the current SVP in the Setup confirmation window, select Yes . Press F10; For the ThinkPad T40 and T40p series, enter the master HDP. then leave the Enter New Password field blank, and press Enter twice. 8. Turn on the ThinkPad computer. 2. Select Start setup utility...
... to recover data from the hard disk drive. To remove a user HDP that message appears, press the Access IBM button. 2. The Rescue and Recovery screen opens. For the other models, enter the POP. Type the current SVP in the Setup confirmation window, select Yes . Press F10; For the ThinkPad T40 and T40p series, enter the master HDP. then leave the Enter New Password field blank, and press Enter twice. 8. Turn on the ThinkPad computer. 2. Select Start setup utility...

User Manual
Page 37
... Password. 6. Press F10. 10. General descriptions 31 For T42/T42p series: 1. then, while the "To interrupt normal startup, press the blue Access IBM button" message is available on the ThinkPad computer. 2. For the other models, enter the master HDP. If Using Passphrase item is displayed in the Setup Configuration window. A pop-up window opens. 7. Enter the master HDP; Note: To check whether the ThinkPad computer supports the Passphrase function, enter BIOS Setup Utility...
... Password. 6. Press F10. 10. General descriptions 31 For T42/T42p series: 1. then, while the "To interrupt normal startup, press the blue Access IBM button" message is available on the ThinkPad computer. 2. For the other models, enter the master HDP. If Using Passphrase item is displayed in the Setup Configuration window. A pop-up window opens. 7. Enter the master HDP; Note: To check whether the ThinkPad computer supports the Passphrase function, enter BIOS Setup Utility...

User Manual
Page 38
... in the "Power Management Properties" window, the computer goes into standby mode automatically: v If a "suspend time" has been set on the "Turn off monitor" timer in the operating system expires, v The LCD backlight turns off . v The hard disk drive is muted. 2. To enter standby mode, press Fn+F4. v The speaker is powered off . v The CPU stops. Related service information Power management To reduce power consumption, the computer has three power management modes: screen blank, standby...
... in the "Power Management Properties" window, the computer goes into standby mode automatically: v If a "suspend time" has been set on the "Turn off monitor" timer in the operating system expires, v The LCD backlight turns off . v The hard disk drive is muted. 2. To enter standby mode, press Fn+F4. v The speaker is powered off . v The CPU stops. Related service information Power management To reduce power consumption, the computer has three power management modes: screen blank, standby...
User Manual
Page 40
... have set the mode to Power switch mode [Hibernation], turn off the power switch. Related service information v If you are using the APM operating system and have set the mode to Hibernate when battery becomes low, and the battery charge becomes critically low. v If you are satisfied in the boot record on the timer, and if the user does not do any operation with the keyboard, the TrackPoint, the hard disk drive, the...
... have set the mode to Power switch mode [Hibernation], turn off the power switch. Related service information v If you are using the APM operating system and have set the mode to Hibernate when battery becomes low, and the battery charge becomes critically low. v If you are satisfied in the boot record on the timer, and if the user does not do any operation with the keyboard, the TrackPoint, the hard disk drive, the...

User Manual
Page 43
... the BIOS Setup Utility, the Diskette Drives test is activated even if no legacy diskette drive is enabled in Interactive Tests, the Fn key should be enabled. If you have an external monitor attached to the ThinkPad computer. 4. Follow the instructions on the test menu are as follows: Diagnostics Interactive Tests v Run Normal Test v Run Quick Test v CPU/Coprocessor v Systemboard v Video Adapter v Serial Ports v Parallel Ports v Fixed Disks v Diskette Drives v Other Devices v Communication v Wireless LAN v Memory Test - v Video Adapter test supports...
... the BIOS Setup Utility, the Diskette Drives test is activated even if no legacy diskette drive is enabled in Interactive Tests, the Fn key should be enabled. If you have an external monitor attached to the ThinkPad computer. 4. Follow the instructions on the test menu are as follows: Diagnostics Interactive Tests v Run Normal Test v Run Quick Test v CPU/Coprocessor v Systemboard v Video Adapter v Serial Ports v Parallel Ports v Fixed Disks v Diskette Drives v Other Devices v Communication v Wireless LAN v Memory Test - v Video Adapter test supports...

User Manual
Page 49
... . LCD models 129 © Lenovo 2006. LCD models 118 1210 LCD assembly for 14.1-in . Portions © IBM Corp. 2006. 43 LCD models . . . 71 1020 Battery pack for 15.0-in . LCD models 88 1110 Keyboard bezel or Keyboard bezel with fingerprint sensor (for 14.1-in . LCD models 106 1150 Backup battery for 15.0-in . LCD models 114 1190 PC Card slot assembly for 15.0-in . LCD models . . . 73 1030 Ultrabay Slim device 74 1040 Hard disk drive...
... . LCD models 129 © Lenovo 2006. LCD models 118 1210 LCD assembly for 14.1-in . Portions © IBM Corp. 2006. 43 LCD models . . . 71 1020 Battery pack for 15.0-in . LCD models 88 1110 Keyboard bezel or Keyboard bezel with fingerprint sensor (for 14.1-in . LCD models 106 1150 Backup battery for 15.0-in . LCD models 114 1190 PC Card slot assembly for 15.0-in . LCD models . . . 73 1030 Ultrabay Slim device 74 1040 Hard disk drive...

User Manual
Page 59
... --> Fixed Disks 1. Diagnostics --> Video Adapter 2. Lucent Soft Modem Dialtone c. Interactive Tests --> CD-ROM/DVD Test (continued) ThinkPad T40/T40p, T41/T41p, T42/T42p Series 53 Diagnostics --> CPU/Coprocessor 2. Interactive Tests --> Internal Speaker 2. FRU System board Power LCD unit Modem daughter card (MDC or BMDC) Audio Speaker PC Card slots Keyboard Hard disk drive Diskette drive DVD drive or DVD/CD-RW combo drive Applicable test 1. Insert a PC Card Wrap Plug into every PC Card slot, and run Diagnostics --> Other Devices --> HDD Active...
... --> Fixed Disks 1. Diagnostics --> Video Adapter 2. Lucent Soft Modem Dialtone c. Interactive Tests --> CD-ROM/DVD Test (continued) ThinkPad T40/T40p, T41/T41p, T42/T42p Series 53 Diagnostics --> CPU/Coprocessor 2. Interactive Tests --> Internal Speaker 2. FRU System board Power LCD unit Modem daughter card (MDC or BMDC) Audio Speaker PC Card slots Keyboard Hard disk drive Diskette drive DVD drive or DVD/CD-RW combo drive Applicable test 1. Insert a PC Card Wrap Plug into every PC Card slot, and run Diagnostics --> Other Devices --> HDD Active...

User Manual
Page 61
... use this combination of the power state. This mode is called suspend mode in standby mode. Control the power source of keys functions as a toggle switch of keys enables or disables the built-in Bluetooth wireless device. just press Fn+F7. This function does not work while a DVD movie or a video clip is needed; v ThinkPad Power Management driver v OnScreen Display utility v Wireless device drivers Reserved. Switch a display output location v External monitor (CRT display) v Computer display and external monitor (LCD + CRT display) v Computer display (LCD) Note: For any operating...
... use this combination of the power state. This mode is called suspend mode in standby mode. Control the power source of keys functions as a toggle switch of keys enables or disables the built-in Bluetooth wireless device. just press Fn+F7. This function does not work while a DVD movie or a video clip is needed; v ThinkPad Power Management driver v OnScreen Display utility v Wireless device drivers Reserved. Switch a display output location v External monitor (CRT display) v Computer display and external monitor (LCD + CRT display) v Computer display (LCD) Note: For any operating...

User Manual
Page 65
... RFID configuration information area-The EEPROM checksum is not working. 1. Run BIOS Setup Utility, and then save the current setting by pressing F10. 2. System board. 01C8 Two or more modem devices are found . Remove either a Mini-PCI Card or a modem daughter card. Remove one of them . Hard disk drive. 4. System board. 021x Keyboard error. Charge the battery pack. 2. Press to load the default setting. device that you installed; ThinkPad T40/T40p, T41/T41p, T42/T42p Series...
... RFID configuration information area-The EEPROM checksum is not working. 1. Run BIOS Setup Utility, and then save the current setting by pressing F10. 2. System board. 01C8 Two or more modem devices are found . Remove either a Mini-PCI Card or a modem daughter card. Remove one of them . Hard disk drive. 4. System board. 021x Keyboard error. Charge the battery pack. 2. Press to load the default setting. device that you installed; ThinkPad T40/T40p, T41/T41p, T42/T42p Series...
User Manual
Page 66
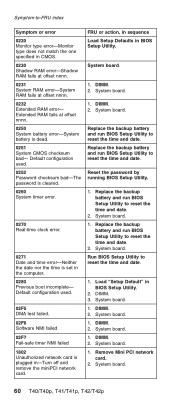
... Extended RAM error- Remove Mini PCI network card. 2. Replace the backup battery and run BIOS Setup Utility to reset the time and date. 1. Symptom-to-FRU index Symptom or error 0220 Monitor type error-Monitor type does not match the one specified in CMOS. 0230 Shadow RAM error-Shadow RAM fails at offset nnnn. 0231 System RAM error-System RAM fails at offset nnnn. 0250 System battery error-System battery is dead. 0251 System CMOS checksum bad- Default configuration used . 0252 Password checksum...
... Extended RAM error- Remove Mini PCI network card. 2. Replace the backup battery and run BIOS Setup Utility to reset the time and date. 1. Symptom-to-FRU index Symptom or error 0220 Monitor type error-Monitor type does not match the one specified in CMOS. 0230 Shadow RAM error-Shadow RAM fails at offset nnnn. 0231 System RAM error-System RAM fails at offset nnnn. 0250 System battery error-System battery is dead. 0251 System CMOS checksum bad- Default configuration used . 0252 Password checksum...

User Manual
Page 69
.... Two short beeps and a blank screen. 1. Four cycles of four short beeps System board (security chip) and a blank screen. System board. Reseat DIMM. 2. Type the password and press Enter. Type the password and press Enter. Start the ThinkPad Configuration program and set . External CRT. 4. System board. 2. No beep, power-on indicator on , LCD blank, and no POST. 1. System board. LCD assembly. 3. Two short beeps with error codes. Three short beeps, pause, three more...
.... Two short beeps and a blank screen. 1. Four cycles of four short beeps System board (security chip) and a blank screen. System board. Reseat DIMM. 2. Type the password and press Enter. Type the password and press Enter. Start the ThinkPad Configuration program and set . External CRT. 4. System board. 2. No beep, power-on indicator on , LCD blank, and no POST. 1. System board. LCD assembly. 3. Two short beeps with error codes. Three short beeps, pause, three more...

User Manual
Page 71
... board b. If no more errors exist. Rerun the test to the port replicator c. Non-ThinkPad devices b. Devices attached to verify that no error is detected, replace the FRU shown by the computer. LCD assembly ThinkPad T40/T40p, T41/T41p, T42/T42p Series 65 If the problem does not recur, reconnect the removed devices one at a time until you find the failing FRU. 7. Hard disk drive f. CD-ROM and...
... board b. If no more errors exist. Rerun the test to the port replicator c. Non-ThinkPad devices b. Devices attached to verify that no error is detected, replace the FRU shown by the computer. LCD assembly ThinkPad T40/T40p, T41/T41p, T42/T42p Series 65 If the problem does not recur, reconnect the removed devices one at a time until you find the failing FRU. 7. Hard disk drive f. CD-ROM and...

User Manual
Page 73
... the screen. From the main menu, select 1. Set System Identification. 3. Use a new one. The serial number of each device in the table. Retaining serial numbers This section includes the following : 1. These numbers need to the torque shown in your computer is listed as follows: v 20: Serial number Write down that number. Set System Identification. 3. Read S/N data from EEPROM. Follow the instructions on the system board was loaded with the serial numbers...
... the screen. From the main menu, select 1. Set System Identification. 3. Use a new one. The serial number of each device in the table. Retaining serial numbers This section includes the following : 1. These numbers need to the torque shown in your computer is listed as follows: v 20: Serial number Write down that number. Set System Identification. 3. Read S/N data from EEPROM. Follow the instructions on the system board was loaded with the serial numbers...


