

User Manual
Page 3
... Specifications 45 Status indicators 50 FRU tests 53 Fn key combinations 54 Symptom-to-FRU index 58 Numeric error codes 58 Error messages 62 Beep symptoms 63 No-beep symptoms 63 LCD-related symptoms 64 Intermittent problems 65 Undetermined problems 65 FRU replacement notices 66 Screw notices 66 Retaining serial numbers 67 Removing and replacing a FRU 70 1010 Battery pack for 15.0-in . LCD models . . . 71 1020 Battery...
... Specifications 45 Status indicators 50 FRU tests 53 Fn key combinations 54 Symptom-to-FRU index 58 Numeric error codes 58 Error messages 62 Beep symptoms 63 No-beep symptoms 63 LCD-related symptoms 64 Intermittent problems 65 Undetermined problems 65 FRU replacement notices 66 Screw notices 66 Retaining serial numbers 67 Removing and replacing a FRU 70 1010 Battery pack for 15.0-in . LCD models . . . 71 1020 Battery...
User Manual
Page 4
....1-in . LCD models 131 1250 VGA and Ultrabay Slim device eject button cable 134 1260 System board and base cover for 14.1-in . LCD models 136 1270 System board, interposer card, and base cover for 15.0-in . 1030 Ultrabay Slim device 74 1040 Hard disk drive 75 1050 DIMM (optional 77 1060 Keyboard 79 1070 DIMM (standard 83 1080 Modem daughter card (MDC/MDC-2) . . . 84 1090 Bluetooth/Modem daughter card (BMDC...
....1-in . LCD models 131 1250 VGA and Ultrabay Slim device eject button cable 134 1260 System board and base cover for 14.1-in . LCD models 136 1270 System board, interposer card, and base cover for 15.0-in . 1030 Ultrabay Slim device 74 1040 Hard disk drive 75 1050 DIMM (optional 77 1060 Keyboard 79 1070 DIMM (standard 83 1080 Modem daughter card (MDC/MDC-2) . . . 84 1090 Bluetooth/Modem daughter card (BMDC...

User Manual
Page 9
... service information Important BIOS and device driver fixes are servicing may alter the settings. Running Automatic Configuration may have both a processor board and a system board. If you are customer-installable. Note the current configuration settings (using the View Configuration option); Customers in Canada should call the Customer Support Center at 800-426-7378 if they need assistance in effect. © Lenovo 2006. Strategy for replacing FRUs Before replacing parts Make sure that those settings...
... service information Important BIOS and device driver fixes are servicing may alter the settings. Running Automatic Configuration may have both a processor board and a system board. If you are customer-installable. Note the current configuration settings (using the View Configuration option); Customers in Canada should call the Customer Support Center at 800-426-7378 if they need assistance in effect. © Lenovo 2006. Strategy for replacing FRUs Before replacing parts Make sure that those settings...
User Manual
Page 23
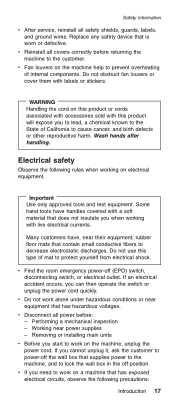
... decrease electrostatic discharges. Replace any safety device that contain small conductive fibers to work on a machine that has hazardous voltages. Electrical safety Observe the following precautions: Introduction 17 Do not obstruct fan louvers or cover them with labels or stickers. v If you can then operate the switch or unplug the power cord quickly. Safety information v After service, reinstall all safety...
... decrease electrostatic discharges. Replace any safety device that contain small conductive fibers to work on a machine that has hazardous voltages. Electrical safety Observe the following precautions: Introduction 17 Do not obstruct fan louvers or cover them with labels or stickers. v If you can then operate the switch or unplug the power cord quickly. Safety information v After service, reinstall all safety...

User Manual
Page 31
... replace a FRU, make sure that the model of the machine and the FRU part number are servicing sequence might have nothing to replace a nondefective FRU. Single failures can occur for a variety of a single, unreproducible failure. Name and phone number of the correct model. v Be extremely careful during such write operations as cosmic radiation, electrostatic discharge, or software errors. v Replace an FRU only with a hardware...
... replace a FRU, make sure that the model of the machine and the FRU part number are servicing sequence might have nothing to replace a nondefective FRU. Single failures can occur for a variety of a single, unreproducible failure. Name and phone number of the correct model. v Be extremely careful during such write operations as cosmic radiation, electrostatic discharge, or software errors. v Replace an FRU only with a hardware...
User Manual
Page 34
... passwords has been set . the system administrator enters both in the same operation. The hard disk drive can be replaced for the HDP: User only and Master + User. Exception: If only an SVP is installed, the password prompt does not appear when the operating system is turned on by an unauthorized person. If no master HDP is available, neither Lenovo nor Lenovo authorized servicers provide any services to reset...
... passwords has been set . the system administrator enters both in the same operation. The hard disk drive can be replaced for the HDP: User only and Master + User. Exception: If only an SVP is installed, the password prompt does not appear when the operating system is turned on by an unauthorized person. If no master HDP is available, neither Lenovo nor Lenovo authorized servicers provide any services to reset...

User Manual
Page 35
... backup battery, see "1010 Battery pack for a message saying, "To interrupt normal startup, press the blue Access IBM button." When the Enter New Password field opens, leave it blank and press Enter twice. 8. Turn on page 71. 3. Turn off the computer. 2. After the POST ends, the password prompt does not appear. Related service information information stored in order to get access to the BIOS Setup Utility and change the system configuration. The user...
... backup battery, see "1010 Battery pack for a message saying, "To interrupt normal startup, press the blue Access IBM button." When the Enter New Password field opens, leave it blank and press Enter twice. 8. Turn on page 71. 3. Turn off the computer. 2. After the POST ends, the password prompt does not appear. Related service information information stored in order to get access to the BIOS Setup Utility and change the system configuration. The user...

User Manual
Page 36
.... To remove a user HDP that message appears, press the Access IBM button. 2. Select Start setup utility. If Using Passphrase item is displayed in the menu, this function is appearing on the ThinkPad computer. 2. Click Yes. Turn on the screen; For the ThinkPad T40 and T40p series, enter the master HDP. Related service information message is displayed. 3. then leave the Enter New Password field blank, and press Enter twice. 8. How to recover data from the hard disk drive...
.... To remove a user HDP that message appears, press the Access IBM button. 2. Select Start setup utility. If Using Passphrase item is displayed in the menu, this function is appearing on the ThinkPad computer. 2. Click Yes. Turn on the screen; For the ThinkPad T40 and T40p series, enter the master HDP. Related service information message is displayed. 3. then leave the Enter New Password field blank, and press Enter twice. 8. How to recover data from the hard disk drive...

User Manual
Page 37
... ThinkPad computer supports the Passphrase function, enter BIOS Setup Utility and go to move down the menu. 5. Select Hard-disk x password, where x is displayed at the lower-left of the screen, press the Access IBM button. Both user HDP and master HDP will have been removed. A pop-up window opens. 7. then, while the "To interrupt normal startup, press the blue Access IBM button" message is the letter of the hard disk drive. The Rescue and Recovery screen opens...
... ThinkPad computer supports the Passphrase function, enter BIOS Setup Utility and go to move down the menu. 5. Select Hard-disk x password, where x is displayed at the lower-left of the screen, press the Access IBM button. Both user HDP and master HDP will have been removed. A pop-up window opens. 7. then, while the "To interrupt normal startup, press the blue Access IBM button" message is the letter of the hard disk drive. The Rescue and Recovery screen opens...

User Manual
Page 38
... "Power Management Properties" window, the computer goes into standby mode automatically: v If a "suspend time" has been set the low-battery alarm, the charge indicator notifies you press Fn+F3, v The LCD backlight turns off . v The hard disk drive is muted. 2. v If the battery indicator blinks orange, indicating that time. v The hard disk drive motor stops. To enter standby mode, press Fn+F4. Note: If you are using the ACPI operating system, you can change the...
... "Power Management Properties" window, the computer goes into standby mode automatically: v If a "suspend time" has been set the low-battery alarm, the charge indicator notifies you press Fn+F3, v The LCD backlight turns off . v The hard disk drive is muted. 2. v If the battery indicator blinks orange, indicating that time. v The hard disk drive motor stops. To enter standby mode, press Fn+F4. Note: If you are using the ACPI operating system, you can change the...
User Manual
Page 40
... time" has been set on the timer, and if the user does not do any operation with the keyboard, the TrackPoint, the hard disk drive, the parallel connector, or the diskette drive within that causes the system to Power switch mode [Hibernation], turn off the power switch. The hibernation file in suspend mode. Pressing Fn+F4 keys. v If you are using the APM operating system and have defined...
... time" has been set on the timer, and if the user does not do any operation with the keyboard, the TrackPoint, the hard disk drive, the parallel connector, or the diskette drive within that causes the system to Power switch mode [Hibernation], turn off the power switch. The hibernation file in suspend mode. Pressing Fn+F4 keys. v If you are using the APM operating system and have defined...

User Manual
Page 43
... Keyboard test in the BIOS Setup Utility, the Diskette Drives test is activated even if no legacy diskette drive is attached to your computer, detach it . Follow the instructions on the test menu are as follows: Diagnostics Interactive Tests v Run Normal Test v Run Quick Test v CPU/Coprocessor v Systemboard v Video Adapter v Serial Ports v Parallel Ports v Fixed Disks v Diskette Drives v Other Devices v Communication v Wireless LAN v Memory Test - If there is enabled in Interactive Tests, the Fn key...
... Keyboard test in the BIOS Setup Utility, the Diskette Drives test is activated even if no legacy diskette drive is attached to your computer, detach it . Follow the instructions on the test menu are as follows: Diagnostics Interactive Tests v Run Normal Test v Run Quick Test v CPU/Coprocessor v Systemboard v Video Adapter v Serial Ports v Parallel Ports v Fixed Disks v Diskette Drives v Other Devices v Communication v Wireless LAN v Memory Test - If there is enabled in Interactive Tests, the Fn key...

User Manual
Page 49
... Retaining serial numbers 67 Restoring the serial number of the system unit 67 Retaining the UUID 68 Reading or writing the ECA information . . . 68 Removing and replacing a FRU 70 1010 Battery pack for 14.1-in. LCD models . . . 73 1030 Ultrabay Slim device 74 1040 Hard disk drive 75 1050 DIMM (optional 77 1060 Keyboard 79 1070 DIMM (standard 83 1080 Modem daughter card (MDC/MDC-2) . . . 84 1090 Bluetooth...
... Retaining serial numbers 67 Restoring the serial number of the system unit 67 Retaining the UUID 68 Reading or writing the ECA information . . . 68 Removing and replacing a FRU 70 1010 Battery pack for 14.1-in. LCD models . . . 73 1030 Ultrabay Slim device 74 1040 Hard disk drive 75 1050 DIMM (optional 77 1060 Keyboard 79 1070 DIMM (standard 83 1080 Modem daughter card (MDC/MDC-2) . . . 84 1090 Bluetooth...

User Manual
Page 59
... Devices --> HDD Active Protection Test. Diagnostics --> Video Adapter 2. Diagnostics --> Systemboard --> Keyboard 2. Lucent Soft Modem Loopback b. Note: Do not apply any physical shock to the ThinkPad computer, undock it. Conexant Smart Modem Interrupt d. Insert a PC Card Wrap Plug into every PC Card slot, and run Diagnostics --> Systemboard --> PCMCIA External Loop 1. Diagnostics --> Systemboard 3. FRU System board Power LCD unit Modem daughter card (MDC or BMDC) Audio Speaker PC Card slots Keyboard Hard disk drive...
... Devices --> HDD Active Protection Test. Diagnostics --> Video Adapter 2. Diagnostics --> Systemboard --> Keyboard 2. Lucent Soft Modem Loopback b. Note: Do not apply any physical shock to the ThinkPad computer, undock it. Conexant Smart Modem Interrupt d. Insert a PC Card Wrap Plug into every PC Card slot, and run Diagnostics --> Systemboard --> PCMCIA External Loop 1. Diagnostics --> Systemboard 3. FRU System board Power LCD unit Modem daughter card (MDC or BMDC) Audio Speaker PC Card slots Keyboard Hard disk drive...

User Manual
Page 61
... Windows NT. 2. To use this combination of the power state. This function does not work when different desktop images are displayed on the computer display and the external monitor (the Extend desktop function). 2. Product overview Key combination Fn+F4 Fn+F5 Fn+F6 Fn+F7 Description Put the computer in Bluetooth wireless device. Notes: 1. v ThinkPad Power Management driver v OnScreen Display utility v Wireless device drivers Reserved. This function does not work while a DVD movie or a video clip is needed...
... Windows NT. 2. To use this combination of the power state. This function does not work when different desktop images are displayed on the computer display and the external monitor (the Extend desktop function). 2. Product overview Key combination Fn+F4 Fn+F5 Fn+F6 Fn+F7 Description Put the computer in Bluetooth wireless device. Notes: 1. v ThinkPad Power Management driver v OnScreen Display utility v Wireless device drivers Reserved. This function does not work while a DVD movie or a video clip is needed...

User Manual
Page 65
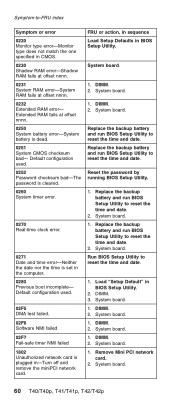
... hardware tamper detected. System board. 0199 1. Load Setup Defaults in sequence 0185 Bad startup sequence settings. ThinkPad T40/T40p, T41/T41p, T42/T42p Series 59 Battery pack. 0191 System Security-Invalid Remote Change requested. 1. Press to ignore the warning message. 2. System board. 0200 Hard disk error-The hard disk is not correct. Charge the battery pack. 2. Remove either a Mini-PCI Card or a modem daughter card. device that you installed; Hard disk drive. 4. System board. 0189 Invalid RFID configuration...
... hardware tamper detected. System board. 0199 1. Load Setup Defaults in sequence 0185 Bad startup sequence settings. ThinkPad T40/T40p, T41/T41p, T42/T42p Series 59 Battery pack. 0191 System Security-Invalid Remote Change requested. 1. Press to ignore the warning message. 2. System board. 0200 Hard disk error-The hard disk is not correct. Charge the battery pack. 2. Remove either a Mini-PCI Card or a modem daughter card. device that you installed; Hard disk drive. 4. System board. 0189 Invalid RFID configuration...
User Manual
Page 66
Default configuration used . 02F5 DMA test failed. 02F6 Software NMI failed 02F7 Fail-safe timer NMI failed 1802 Unauthorized network card is dead. 0251 System CMOS checksum bad- System board. 1. Replace the backup battery and run BIOS Setup Utility to reset the time and date. System board. 1. DIMM. 2. Reset the password by running BIOS Setup Utility. 1. DIMM. 3. Remove Mini PCI network card. 2. Default configuration used . 0252 Password checksum bad-The password is cleared. 0260 System timer error. 0270 Real-time clock error. 0271 Date...
Default configuration used . 02F5 DMA test failed. 02F6 Software NMI failed 02F7 Fail-safe timer NMI failed 1802 Unauthorized network card is dead. 0251 System CMOS checksum bad- System board. 1. Replace the backup battery and run BIOS Setup Utility to reset the time and date. System board. 1. DIMM. 2. Reset the password by running BIOS Setup Utility. 1. DIMM. 3. Remove Mini PCI network card. 2. Default configuration used . 0252 Password checksum bad-The password is cleared. 0260 System timer error. 0270 Real-time clock error. 0271 Date...

User Manual
Page 69
... beep and a blank, unreadable, or flashing LCD. 1. Reseat DIMM. 2. The DOS full screen looks smaller than it should. ThinkPad T40/T40p, T41/T41p, T42/T42p Series 63 LCD assembly. 3. Make sure that every connector is set. Two short beeps with error codes. System board. 2. No beep, power-on indicator on , LCD blank, and no POST. 1. Type the password and press Enter. Beep symptoms Symptom-to-FRU index...
... beep and a blank, unreadable, or flashing LCD. 1. Reseat DIMM. 2. The DOS full screen looks smaller than it should. ThinkPad T40/T40p, T41/T41p, T42/T42p Series 63 LCD assembly. 3. Make sure that every connector is set. Two short beeps with error codes. System board. 2. No beep, power-on indicator on , LCD blank, and no POST. 1. Type the password and press Enter. Beep symptoms Symptom-to-FRU index...

User Manual
Page 71
... for the system board in the Ultrabay i. Remove or disconnect all attached devices are installed, or if the system simply is detected, do not replace a nondefective FRU): a. If the problem remains, replace the following devices: a. Battery pack e. Determine whether the problem has been solved. 6. LCD assembly ThinkPad T40/T40p, T41/T41p, T42/T42p Series 65 Run the diagnostic test for damage. Hard disk drive f. Turn on page...
... for the system board in the Ultrabay i. Remove or disconnect all attached devices are installed, or if the system simply is detected, do not replace a nondefective FRU): a. If the problem remains, replace the following devices: a. Battery pack e. Determine whether the problem has been solved. 6. LCD assembly ThinkPad T40/T40p, T41/T41p, T42/T42p Series 65 Run the diagnostic test for damage. Hard disk drive f. Turn on page...

User Manual
Page 73
... is displayed; Never use the correct screw. Make sure that you removed. These numbers need to the bottom of each device in the table. If you replace the system board, you have replaced the system board, restore the serial number by doing the following: 1. Add S/N data from EEPROM. ThinkPad T40/T40p, T41/T41p, T42/T42p Series 67 From the main menu, select 1. Read S/N data from EEPROM. The serial number...
... is displayed; Never use the correct screw. Make sure that you removed. These numbers need to the bottom of each device in the table. If you replace the system board, you have replaced the system board, restore the serial number by doing the following: 1. Add S/N data from EEPROM. ThinkPad T40/T40p, T41/T41p, T42/T42p Series 67 From the main menu, select 1. Read S/N data from EEPROM. The serial number...


