
Brochure
Page 3
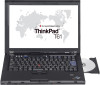
... Media Accelerator X3100 (up to 11.1hr/#.#hr Ports Line-in, Microphone, Headphone, Modem, Ethernet, 3xUSB2.0, VGA Out, Docking, IEEE 1394a (select models) Slots 1 Type II PC Card slot 1 ExpressCard 34/54 or Smartcard or 4-in-1 memory card reader support via ExpressCard (select models) Additional Integrated 4-in-1 memory card reader is standard on 15.4" widescreen models ThinkVantage® Active Protection System™ and ThinkPad® Shock-Mounted Hard Drive Standard ThinkPad Roll...
... Media Accelerator X3100 (up to 11.1hr/#.#hr Ports Line-in, Microphone, Headphone, Modem, Ethernet, 3xUSB2.0, VGA Out, Docking, IEEE 1394a (select models) Slots 1 Type II PC Card slot 1 ExpressCard 34/54 or Smartcard or 4-in-1 memory card reader support via ExpressCard (select models) Additional Integrated 4-in-1 memory card reader is standard on 15.4" widescreen models ThinkVantage® Active Protection System™ and ThinkPad® Shock-Mounted Hard Drive Standard ThinkPad Roll...

Brochure
Page 4
... and is not responsible for most models in battery mode. [5] Operating system: Level of support varies by Bluetooth SIG, Inc. Service agreement required. A network connection, third-party software, additional hardware, and/or subscription to additional charges. [12] Included Software: may differ from its supported formats; Additional restrictions apply. Service is less; Service delivery methods and parts availability vary by Lenovo is sold and serviced. Operating systems not preloaded on IEEE 802...
... and is not responsible for most models in battery mode. [5] Operating system: Level of support varies by Bluetooth SIG, Inc. Service agreement required. A network connection, third-party software, additional hardware, and/or subscription to additional charges. [12] Included Software: may differ from its supported formats; Additional restrictions apply. Service is less; Service delivery methods and parts availability vary by Lenovo is sold and serviced. Operating systems not preloaded on IEEE 802...

User Manual
Page 5
... the AC adapter 30 Checking operational charging 31 Checking the battery pack 31 Checking the backup battery 32 Related service information 33 Restoring the factory contents by using Product Recovery discs 33 Passwords 34 Power-on password 34 Hard-disk password 35 Supervisor password 35 How to remove the power-on password . . . . 35 How to remove the hard-disk password . . . . 36 Power management 37 Screen blank mode 37 Standby mode 37 Hibernation mode 38 Symptom-to-FRU index 39 Numeric error codes 39 Error messages...
... the AC adapter 30 Checking operational charging 31 Checking the battery pack 31 Checking the backup battery 32 Related service information 33 Restoring the factory contents by using Product Recovery discs 33 Passwords 34 Power-on password 34 Hard-disk password 35 Supervisor password 35 How to remove the power-on password . . . . 35 How to remove the hard-disk password . . . . 36 Power management 37 Screen blank mode 37 Standby mode 37 Hibernation mode 38 Symptom-to-FRU index 39 Numeric error codes 39 Error messages...
User Manual
Page 11
... there is near power supplies - Ensure that has hazardous voltages. Use only one hand when working with very high voltages; When using testers, set the controls correctly and use the approved probe leads and accessories for these hazards are in your electrical hand tools for safe operational condition. Instructions for that it , ask the customer to switch off position. Use extreme care...
... there is near power supplies - Ensure that has hazardous voltages. Use only one hand when working with very high voltages; When using testers, set the controls correctly and use the approved probe leads and accessories for these hazards are in your electrical hand tools for safe operational condition. Instructions for that it , ask the customer to switch off position. Use extreme care...

User Manual
Page 31
... a hardware defect, such as copying, saving, or formatting. "Diagnostics using PC-Doctor for Windows" on removing and replacing FRUs. Some descriptions might have nothing to replace a nondefective FRU. © Copyright Lenovo 2007, 2008 23 If the error does not recur, do with another FRU of the machine and the FRU part number are servicing sequence might not apply to the FRU parts list. When...
... a hardware defect, such as copying, saving, or formatting. "Diagnostics using PC-Doctor for Windows" on removing and replacing FRUs. Some descriptions might have nothing to replace a nondefective FRU. © Copyright Lenovo 2007, 2008 23 If the error does not recur, do with another FRU of the machine and the FRU part number are servicing sequence might not apply to the FRU parts list. When...
User Manual
Page 34
... a supervisor password has been set by pressing Enter instead of pressing Enter, click the left button. 1. On the BIOS Setup Utility screen, press F9, Enter, F10, and then Enter. If the computer cannot be used to test a device that depend on model-unique functions, refer to enter the BIOS Setup Utility. Diagnostics using Configuration utility for DOS. If an error code appears, go to -FRU index" on the Web site. When the ThinkPad logo comes...
... a supervisor password has been set by pressing Enter instead of pressing Enter, click the left button. 1. On the BIOS Setup Utility screen, press F9, Enter, F10, and then Enter. If the computer cannot be used to test a device that depend on model-unique functions, refer to enter the BIOS Setup Utility. Diagnostics using Configuration utility for DOS. If an error code appears, go to -FRU index" on the Web site. When the ThinkPad logo comes...

User Manual
Page 35
...-ROM/DVD Test v Intel Wireless Radio Notes: v In the Keyboard test in menus. On the first screen, select the model and press Enter. Press ENTER to Active. v To test Serial Ports or Parallel Ports, the ThinkPad computer must be held down menu appears. (Its exact form depends on the ThinkPad computer. Some unsupported device names may appear in the PC-Doctor menu. v Video Adapter test supports only the LCD display on the model...
...-ROM/DVD Test v Intel Wireless Radio Notes: v In the Keyboard test in menus. On the first screen, select the model and press Enter. Press ENTER to Active. v To test Serial Ports or Parallel Ports, the ThinkPad computer must be held down menu appears. (Its exact form depends on the ThinkPad computer. Some unsupported device names may appear in the PC-Doctor menu. v Video Adapter test supports only the LCD display on the model...
User Manual
Page 42
... widescreen) Hardware Maintenance Manual For how to remove the POP, see "How to insert Product Recovery Disk 1 into the optical drive, and press OK. The processes updating installed softwares. Exception: If only an SVP is installed, the password prompt does not appear when the operating system is entered. The final recovery disc may take about 8 minutes. No user intervention is turned on the desktop and DOS window for about...
... widescreen) Hardware Maintenance Manual For how to remove the POP, see "How to insert Product Recovery Disk 1 into the optical drive, and press OK. The processes updating installed softwares. Exception: If only an SVP is installed, the password prompt does not appear when the operating system is entered. The final recovery disc may take about 8 minutes. No user intervention is turned on the desktop and DOS window for about...

User Manual
Page 43
... the BIOS Setup Utility and change the system configuration. The POP has been removed. 5. Turn on page 36. Related service information 35 the system administrator enters both in order to get access to remove the POP, see "1110 Backup battery" on page 62. 3. If no SVP has been set: 1. How to the servicer, there is known by the servicer: 1. The Master + User mode requires two HDPs; The user must be replaced...
... the BIOS Setup Utility and change the system configuration. The POP has been removed. 5. Turn on page 36. Related service information 35 the system administrator enters both in order to get access to remove the POP, see "1110 Backup battery" on page 62. 3. If no SVP has been set: 1. How to the servicer, there is known by the servicer: 1. The Master + User mode requires two HDPs; The user must be replaced...
User Manual
Page 44
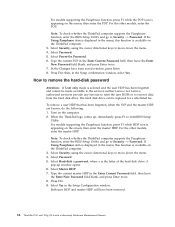
... --> Password. Type the current SVP in the Enter Current Password field. How to recover data from the hard disk drive. The hard disk drive can be made available to the servicer, neither Lenovo nor Lenovo authorized servicers provide any services to reset the user HDPs or to remove the hard-disk password Attention: If User only mode is available on the computer. 2. When the ThinkPad logo comes up window opens. 6. If Using Passphrase item is displayed in the menu, this function...
... --> Password. Type the current SVP in the Enter Current Password field. How to recover data from the hard disk drive. The hard disk drive can be made available to the servicer, neither Lenovo nor Lenovo authorized servicers provide any services to reset the user HDPs or to remove the hard-disk password Attention: If User only mode is available on the computer. 2. When the ThinkPad logo comes up window opens. 6. If Using Passphrase item is displayed in the menu, this function...
User Manual
Page 45
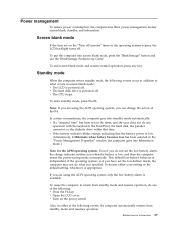
... hard disk drive is independent of the following : v Press the Fn key. To enter standby mode, press Fn+F4. Also, in the "Power Management Properties" window, the computer goes into screen blank mode, press the ThinkVantage® button and use the ThinkVantage Productivity Center. If you when the battery is available. v Turn on the "Turn off monitor" timer in screen blank mode: v The LCD is appropriate. v If the battery indicator blinks orange, indicating that...
... hard disk drive is independent of the following : v Press the Fn key. To enter standby mode, press Fn+F4. Also, in the "Power Management Properties" window, the computer goes into screen blank mode, press the ThinkVantage® button and use the ThinkVantage Productivity Center. If you when the battery is available. v Turn on the "Turn off monitor" timer in screen blank mode: v The LCD is appropriate. v If the battery indicator blinks orange, indicating that...

User Manual
Page 46
...+F12 keys. v The ring indicator (RI) is restored from hibernation mode and resumes operation. To cause the computer to reenter operation mode. v If the timer conditions are stored on the hard disk drive is read, and system status is signaled by a serial device or a PC Card device. v If you do any of the following actions as the event that causes the system to Power switch mode [Hibernation], turn...
...+F12 keys. v The ring indicator (RI) is restored from hibernation mode and resumes operation. To cause the computer to reenter operation mode. v If the timer conditions are stored on the hard disk drive is read, and system status is signaled by a serial device or a PC Card device. v If you do any of the following actions as the event that causes the system to Power switch mode [Hibernation], turn...
User Manual
Page 47
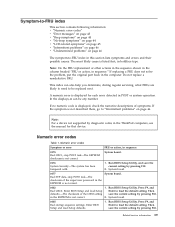
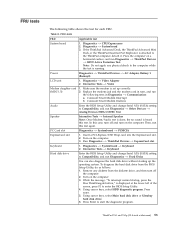
.... Numeric error codes Table 1. System board. 0177 Bad SVP data, stop POST task-The EEPROM checksum is displayed for that device. System board. 0185 Bad startup sequence settings. This index can be replaced next. Enter BIOS Setup and load Setup defaults. 1. Run BIOS Setup Utility, and save the current setting by pressing F10. 2. Enter BIOS Setup and load Setup Enter to -FRU index in POST or system operation. If replacing a FRU does not solve the problem...
.... Numeric error codes Table 1. System board. 0177 Bad SVP data, stop POST task-The EEPROM checksum is displayed for that device. System board. 0185 Bad startup sequence settings. This index can be replaced next. Enter BIOS Setup and load Setup defaults. 1. Run BIOS Setup Utility, and save the current setting by pressing F10. 2. Enter BIOS Setup and load Setup Enter to -FRU index in POST or system operation. If replacing a FRU does not solve the problem...
User Manual
Page 48
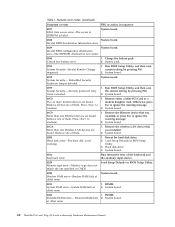
... board. 0200 Hard disk error-The hard disk is not correct. 0190 Critical low-battery error 1. Reseat the hard disk drive. 2. Load Setup Defaults in CMOS. DIMM. Run BIOS Setup Utility, and then save current setting by pressing F10. 2. Otherwise, press Esc to continue. 1. Remove the Ethernet device that you installed; Remove one specified in BIOS Setup Utility. 0230 Shadow RAM error-Shadow RAM fails at offset nnnn. 40 ThinkPad T61 and T61p (15.4-inch widescreen) Hardware Maintenance Manual Remove the wireless LAN device that you installed...
... board. 0200 Hard disk error-The hard disk is not correct. 0190 Critical low-battery error 1. Reseat the hard disk drive. 2. Load Setup Defaults in CMOS. DIMM. Run BIOS Setup Utility, and then save current setting by pressing F10. 2. Otherwise, press Esc to continue. 1. Remove the Ethernet device that you installed; Remove one specified in BIOS Setup Utility. 0230 Shadow RAM error-Shadow RAM fails at offset nnnn. 40 ThinkPad T61 and T61p (15.4-inch widescreen) Hardware Maintenance Manual Remove the wireless LAN device that you installed...

User Manual
Page 49
... BIOS Setup Utility. 2. Reset the password by connecting the ac adapter. 2. Replace the backup battery and run BIOS Setup Utility to reset the time and date. 3. Default configuration used . 1. Load "Setup Default" in sequence 0250 System battery error-System battery is dead. 1. Replace the backup battery. 3. DIMM. 2. in -Turn off and remove the daughter card. 2. Run BIOS Setup Utility to reset the time and date. 0251 System CMOS checksum bad- System board. 02F0 CPU ID:xx Failed. 1. System board. 02F4 EISA CMOS not writable. 1. System board. 02F6 Software NMI...
... BIOS Setup Utility. 2. Reset the password by connecting the ac adapter. 2. Replace the backup battery and run BIOS Setup Utility to reset the time and date. 3. Default configuration used . 1. Load "Setup Default" in sequence 0250 System battery error-System battery is dead. 1. Replace the backup battery. 3. DIMM. 2. in -Turn off and remove the daughter card. 2. Run BIOS Setup Utility to reset the time and date. 0251 System CMOS checksum bad- System board. 02F0 CPU ID:xx Failed. 1. System board. 02F4 EISA CMOS not writable. 1. System board. 02F6 Software NMI...

User Manual
Page 50
...) Hardware Maintenance Manual System board. 2110 1. Reseat the hard disk drive. 2. Undock docking station or port replicator if it by pressing ESC. System board. 2102 1. Power off and install a memory module to the customer:If in mind, the customer can still use it is attached. Install DIMM in Slot-0, but the reader that you installed. 2. Ultrabay™ hard disk drive. Do not apply any physical shock to enter SETUP 1. Remove the Wireless USB card that you set up...
...) Hardware Maintenance Manual System board. 2110 1. Reseat the hard disk drive. 2. Undock docking station or port replicator if it by pressing ESC. System board. 2102 1. Power off and install a memory module to the customer:If in mind, the customer can still use it is attached. Install DIMM in Slot-0, but the reader that you installed. 2. Ultrabay™ hard disk drive. Do not apply any physical shock to enter SETUP 1. Remove the Wireless USB card that you set up...
User Manual
Page 52
... screen. A power-on password or a supervisor password is set . Type the password and press Enter. System board. 2. POST error. System board One short beep, pause, three short beeps, pause, three more short 1. The hard-disk password prompt appears. DIMM. System board No-beep symptoms Table 4. Make sure that every connector is set . connected tightly and correctly. 2. System board. LCD assembly. 3. DIMM. beeps, and one short beep. Two short beeps with error codes...
... screen. A power-on password or a supervisor password is set . Type the password and press Enter. System board. 2. POST error. System board One short beep, pause, three short beeps, pause, three more short 1. The hard-disk password prompt appears. DIMM. System board No-beep symptoms Table 4. Make sure that every connector is set . connected tightly and correctly. 2. System board. LCD assembly. 3. DIMM. beeps, and one short beep. Two short beeps with error codes...
User Manual
Page 54
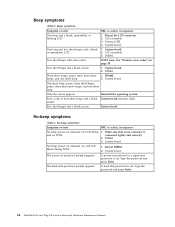
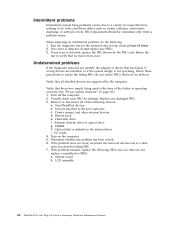
... errors exist. Devices attached to the port replicator c. Printer, mouse, and other external devices d. Turn on page 30.) 1. Verify that the power supply being used at least 10 times. 2. Turn off the computer. 2. Hard disk drive f. Rerun the test to verify that have no defects). Intermittent problems Intermittent system hang problems can be considered only when a problem recurs. LCD assembly 46 ThinkPad T61 and T61p (15.4-inch widescreen) Hardware Maintenance Manual...
... errors exist. Devices attached to the port replicator c. Printer, mouse, and other external devices d. Turn on page 30.) 1. Verify that the power supply being used at least 10 times. 2. Turn off the computer. 2. Hard disk drive f. Rerun the test to verify that have no defects). Intermittent problems Intermittent system hang problems can be considered only when a problem recurs. LCD assembly 46 ThinkPad T61 and T61p (15.4-inch widescreen) Hardware Maintenance Manual...
User Manual
Page 61
... Setup Utility. 4. While the message, "To interrupt normal startup, press the blue ThinkVangate button," is running. Using cursor keys, select HDD diagnostic program. Press enter. 5. Diagnostics --> CPU/Coprocessor 2. Interactive Tests --> Video Modem daughter card (MDC-1.5) 1. Conexant Smart Modem Dialtone Audio Enter the BIOS Setup Utility and change Serial ATA (SATA) setting to start the diagnostic program. Using cursor keys, select Main hard disk drive or Ultrabay hard disk drive. 6. Press Enter to Compatibility, and run Diagnostics --> ThinkPad Devices --> HDD Active...
... Setup Utility. 4. While the message, "To interrupt normal startup, press the blue ThinkVangate button," is running. Using cursor keys, select HDD diagnostic program. Press enter. 5. Diagnostics --> CPU/Coprocessor 2. Interactive Tests --> Video Modem daughter card (MDC-1.5) 1. Conexant Smart Modem Dialtone Audio Enter the BIOS Setup Utility and change Serial ATA (SATA) setting to start the diagnostic program. Using cursor keys, select Main hard disk drive or Ultrabay hard disk drive. 6. Press Enter to Compatibility, and run Diagnostics --> ThinkPad Devices --> HDD Active...

User Manual
Page 64
... to the ThinkPad computer. v Fn+F9 Settings: Configures the settings for switching a display output location, start Presentation Director, and change the Fn+F7 settings. Note: This function is used to detach the computer from the ThinkPad Advanced Dock or the ThinkPad Advanced Mini Dock. Note: You cannot use this Utility to select, stop and remove all the USB devices safely by using different user IDs. To disable this function, start Presentation Director, and change the settings. Fn...
... to the ThinkPad computer. v Fn+F9 Settings: Configures the settings for switching a display output location, start Presentation Director, and change the Fn+F7 settings. Note: This function is used to detach the computer from the ThinkPad Advanced Dock or the ThinkPad Advanced Mini Dock. Note: You cannot use this Utility to select, stop and remove all the USB devices safely by using different user IDs. To disable this function, start Presentation Director, and change the settings. Fn...


