

Hardware Maintenance Manual
Page 4
Note: Before using this information and the product it supports, be sure to restrictions set forth in Contract No. GS-35F-05925. Eleventh Edition (July 2011) © Copyright Lenovo 2008, 2011. LIMITED AND RESTRICTED RIGHTS NOTICE: If data or software are delivered pursuant a General Services Administration "GSA" contract, use, reproduction, or disclosure is subject to read and understand the Chapter 2 "Safety information" on page 3 and Appendix A "Notices" on page 557.
Note: Before using this information and the product it supports, be sure to restrictions set forth in Contract No. GS-35F-05925. Eleventh Edition (July 2011) © Copyright Lenovo 2008, 2011. LIMITED AND RESTRICTED RIGHTS NOTICE: If data or software are delivered pursuant a General Services Administration "GSA" contract, use, reproduction, or disclosure is subject to read and understand the Chapter 2 "Safety information" on page 3 and Appendix A "Notices" on page 557.

Hardware Maintenance Manual
Page 9
...ThinkCentre computers. The "Symptom-to-FRU Index" chapter and the "Additional service information" chapter apply to read and understand the Chapter 2 "Safety information" on the market before June, 2006 are not required to have internet access, the FRU part numbers are also available at: http://www.lenovo.com/support...VORSICHT" in the European Union after June, 2006. If the parts are familiar with Lenovo® computer products. This manual includes a complete FRU part number list for ThinkCentre® computer machine types listed on the front cover. Products on page 3 before ...
...ThinkCentre computers. The "Symptom-to-FRU Index" chapter and the "Additional service information" chapter apply to read and understand the Chapter 2 "Safety information" on the market before June, 2006 are not required to have internet access, the FRU part numbers are also available at: http://www.lenovo.com/support...VORSICHT" in the European Union after June, 2006. If the parts are familiar with Lenovo® computer products. This manual includes a complete FRU part number list for ThinkCentre® computer machine types listed on the front cover. Products on page 3 before ...

Hardware Maintenance Manual
Page 10
...will contain some RoHS compliant FRUs. Products sold in all cases, if the parts are identified with unique FRU part numbers. RoHS compliant ThinkCentre parts have unique FRU part numbers. Before or after June 2006 Current or original part Replacement FRU Must be RoHS Must be compliant....are compliant, the replacement parts must always be used. Products marketed before the implementation date and expects its suppliers to be ready to support Lenovo's requirements and schedule in the system HMM or direct substitutions for those FRUs can be replaced using RoHS compliant FRUs, so only ...
...will contain some RoHS compliant FRUs. Products sold in all cases, if the parts are identified with unique FRU part numbers. RoHS compliant ThinkCentre parts have unique FRU part numbers. Before or after June 2006 Current or original part Replacement FRU Must be RoHS Must be compliant....are compliant, the replacement parts must always be used. Products marketed before the implementation date and expects its suppliers to be ready to support Lenovo's requirements and schedule in the system HMM or direct substitutions for those FRUs can be replaced using RoHS compliant FRUs, so only ...
Hardware Maintenance Manual
Page 37
...the ThinkCentre User Guide, which provides information about your computer. Chapter 3. To view the publication, you set up, use, and maintain your computer, download the desired language version from the Adobe Web site at : http://www.lenovo.com/support Notes: 1. The Lenovo ThinkVantage... Tools program helps you attempt to view the publication. The publication is also available on the Lenovo Support Web site at: http://www.lenovo.com/support 3. General information This chapter provides general ...
...the ThinkCentre User Guide, which provides information about your computer. Chapter 3. To view the publication, you set up, use, and maintain your computer, download the desired language version from the Adobe Web site at : http://www.lenovo.com/support Notes: 1. The Lenovo ThinkVantage... Tools program helps you attempt to view the publication. The publication is also available on the Lenovo Support Web site at: http://www.lenovo.com/support 3. General information This chapter provides general ...
Hardware Maintenance Manual
Page 38
...Access Help Note: The Access Help information system is available at: http://www.lenovo.com/support You can find a particular word or phrase. The ThinkVantage Productivity Center program contains information sources ...ThinkCentre Hardware Maintenance Manual The Access Help information system provides information about getting started, doing basic tasks, customizing settings for your personal preference, protecting data, expanding and upgrading, and troubleshooting. • To open the Access Help information system on the Windows 7 operating system, click Start ® Help and Support ® Lenovo...
...Access Help Note: The Access Help information system is available at: http://www.lenovo.com/support You can find a particular word or phrase. The ThinkVantage Productivity Center program contains information sources ...ThinkCentre Hardware Maintenance Manual The Access Help information system provides information about getting started, doing basic tasks, customizing settings for your personal preference, protecting data, expanding and upgrading, and troubleshooting. • To open the Access Help information system on the Windows 7 operating system, click Start ® Help and Support ® Lenovo...
Hardware Maintenance Manual
Page 42
...locations 4. Has this the original reported failure? • Diagnostics version - If possible, have this information available when requesting assistance from Service Support and Engineering functions. • Machine type and model • Processor or hard disk upgrades • Failure symptom - Have the same ...non-working , what changes were made prior to it has been working " systems will often lead to problem resolution. 34 ThinkCentre Hardware Maintenance Manual Have the same BIOS level 3. Problem determination tips Due to the variety of hardware and software combinations that...
...locations 4. Has this the original reported failure? • Diagnostics version - If possible, have this information available when requesting assistance from Service Support and Engineering functions. • Machine type and model • Processor or hard disk upgrades • Failure symptom - Have the same ...non-working , what changes were made prior to it has been working " systems will often lead to problem resolution. 34 ThinkCentre Hardware Maintenance Manual Have the same BIOS level 3. Problem determination tips Due to the variety of hardware and software combinations that...
Hardware Maintenance Manual
Page 43
... also report operating-system-controlled settings that interfere with the Windows Vista operating system or the Windows XP operating system from http://www.lenovo.com/support. Lenovo ThinkVantage Toolbox Note: The Lenovo ThinkVantage Toolbox program is only available on computers preinstalled with the innovative technologies provided by the programs. You will need the log...
... also report operating-system-controlled settings that interfere with the Windows Vista operating system or the Windows XP operating system from http://www.lenovo.com/support. Lenovo ThinkVantage Toolbox Note: The Lenovo ThinkVantage Toolbox program is only available on computers preinstalled with the innovative technologies provided by the programs. You will need the log...

Hardware Maintenance Manual
Page 44
...instructions on how to the PC-Doctor for Rescue and Recovery program, refer to create a diagnostic disc. The diagnostic program opens. 36 ThinkCentre Hardware Maintenance Manual Download a self-starting bootable disc image (known as the startup device and press Enter. Use any CD/DVD burning...for DOS diagnostic program if you hear beeps or see a logo screen, release the F11 key. To run the diagnostic program from http://www.lenovo.com/support. Turn off . 2. Refer to the "Creating and using a rescue medium to recover the computer from the Rescue and Recovery workspace, do...
...instructions on how to the PC-Doctor for Rescue and Recovery program, refer to create a diagnostic disc. The diagnostic program opens. 36 ThinkCentre Hardware Maintenance Manual Download a self-starting bootable disc image (known as the startup device and press Enter. Use any CD/DVD burning...for DOS diagnostic program if you hear beeps or see a logo screen, release the F11 key. To run the diagnostic program from http://www.lenovo.com/support. Turn off . 2. Refer to the "Creating and using a rescue medium to recover the computer from the Rescue and Recovery workspace, do...

Hardware Maintenance Manual
Page 77
...: 1. See "Locating connectors on the front of the computer" on page 67 and "Locating connectors on the rear of the ThinkCentre Safety and Warranty Guide, go to:http://www.lenovo.com/support This section provides instructions on page 68. 4. Chapter 8. Removing the computer cover Attention Do not open your computer or attempt any...
...: 1. See "Locating connectors on the front of the computer" on page 67 and "Locating connectors on the rear of the ThinkCentre Safety and Warranty Guide, go to:http://www.lenovo.com/support This section provides instructions on page 68. 4. Chapter 8. Removing the computer cover Attention Do not open your computer or attempt any...
Hardware Maintenance Manual
Page 81
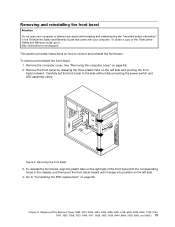
... 9960, and 9965.) 73 To reinstall the front bezel, align the plastic tabs on the right side of the ThinkCentre Safety and Warranty Guide, go to: http://www.lenovo.com/support This section provides instructions on how to remove and reinstall the front bezel. Chapter 8. To remove and reinstall the...the front bezel Attention Do not open your computer or attempt any repair before reading and understanding the "Important safety information" in the ThinkCentre Safety and Warranty Guide that came with the corresponding holes in the chassis, and then pivot the front bezel inward until it snaps...
... 9960, and 9965.) 73 To reinstall the front bezel, align the plastic tabs on the right side of the ThinkCentre Safety and Warranty Guide, go to: http://www.lenovo.com/support This section provides instructions on how to remove and reinstall the front bezel. Chapter 8. To remove and reinstall the...the front bezel Attention Do not open your computer or attempt any repair before reading and understanding the "Important safety information" in the ThinkCentre Safety and Warranty Guide that came with the corresponding holes in the chassis, and then pivot the front bezel inward until it snaps...

Hardware Maintenance Manual
Page 82
...8226; Use 1.8 V, 240-pin DDR3 SDRAM (double data rate 3 synchronous dynamic random access memory). • Use 1 GB or 2 GB memory modules in the ThinkCentre Safety and Warranty Guide that provide up to a maximum of 8 GB of system memory. Replacing a memory module Attention Do not open your computer or attempt... information" in any combination up to a maximum of 8 GB. See "Removing the computer cover" on page 72. 3. To obtain a copy of the ThinkCentre Safety and Warranty Guide, go to: http://www.lenovo.com/support This section provides instructions on how to replace a memory module.
...8226; Use 1.8 V, 240-pin DDR3 SDRAM (double data rate 3 synchronous dynamic random access memory). • Use 1 GB or 2 GB memory modules in the ThinkCentre Safety and Warranty Guide that provide up to a maximum of 8 GB of system memory. Replacing a memory module Attention Do not open your computer or attempt... information" in any combination up to a maximum of 8 GB. See "Removing the computer cover" on page 72. 3. To obtain a copy of the ThinkCentre Safety and Warranty Guide, go to: http://www.lenovo.com/support This section provides instructions on how to replace a memory module.

Hardware Maintenance Manual
Page 83
... voltage, current, and energy levels are no serviceable parts inside any repair before reading and understanding the "Important safety information" in the ThinkCentre Safety and Warranty Guide that has this label attached. 4. Push the memory module straight down into the slot until the retaining clips close...came with the slot key 2 on its side and remove the four screws at the rear of the ThinkCentre Safety and Warranty Guide, go to: http://www.lenovo.com/support This section provides instructions on how to "Completing the FRU replacement" on page 72. 3. Attention Never remove...
... voltage, current, and energy levels are no serviceable parts inside any repair before reading and understanding the "Important safety information" in the ThinkCentre Safety and Warranty Guide that has this label attached. 4. Push the memory module straight down into the slot until the retaining clips close...came with the slot key 2 on its side and remove the four screws at the rear of the ThinkCentre Safety and Warranty Guide, go to: http://www.lenovo.com/support This section provides instructions on how to "Completing the FRU replacement" on page 72. 3. Attention Never remove...
Hardware Maintenance Manual
Page 84
... the power supply. Note: Use only screws provided by Lenovo. 8. To obtain a copy of the new power supply to : http://www.lenovo.com/support This section provides instructions on page 99. Reconnect a power supply connector to 230 V. 6. Ensure that came with those in the ThinkCentre Safety and Warranty Guide that the power supply is...
... the power supply. Note: Use only screws provided by Lenovo. 8. To obtain a copy of the new power supply to : http://www.lenovo.com/support This section provides instructions on page 99. Reconnect a power supply connector to 230 V. 6. Ensure that came with those in the ThinkCentre Safety and Warranty Guide that the power supply is...

Hardware Maintenance Manual
Page 85
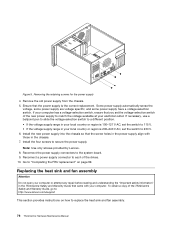
... so that the four screws are aligned with your computer or attempt any repair before removing the computer cover. To obtain a copy of the ThinkCentre Safety and Warranty Guide, go to let the computer cool before reading and understanding the "Important safety information" in the... board" on the system board. Lift the failing heat sink and fan assembly off the computer and wait three to five minutes to : http://www.lenovo.com/support Chapter 8. Replacing FRUs (Machine Types: 3063, 3231, 3285, 4084, 4085, 4086, 4087, 6138, 6209, 6239, 6302, 7188, 7244, 7347, 7355, 7358, 7373, 7484, ...
... so that the four screws are aligned with your computer or attempt any repair before removing the computer cover. To obtain a copy of the ThinkCentre Safety and Warranty Guide, go to let the computer cool before reading and understanding the "Important safety information" in the... board" on the system board. Lift the failing heat sink and fan assembly off the computer and wait three to five minutes to : http://www.lenovo.com/support Chapter 8. Replacing FRUs (Machine Types: 3063, 3231, 3285, 4084, 4085, 4086, 4087, 6138, 6209, 6239, 6302, 7188, 7244, 7347, 7355, 7358, 7373, 7484, ...
Hardware Maintenance Manual
Page 88
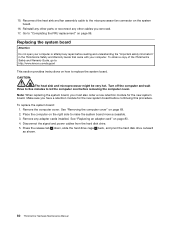
To obtain a copy of the ThinkCentre Safety and Warranty Guide, go to: http://www.lenovo.com/support This section provides instructions on the right side to replace the system board. Remove the computer cover. See "Removing the computer cover" on page 83. 4. ... the new system board. Press the release tab 1 down, slide the hard drive cage 2 back, and pivot the hard disk drive outward as shown. 80 ThinkCentre Hardware Maintenance Manual Replacing the system board Attention Do not open your computer or attempt any repair before continuing this procedure. Reconnect the heat sink...
To obtain a copy of the ThinkCentre Safety and Warranty Guide, go to: http://www.lenovo.com/support This section provides instructions on the right side to replace the system board. Remove the computer cover. See "Removing the computer cover" on page 83. 4. ... the new system board. Press the release tab 1 down, slide the hard drive cage 2 back, and pivot the hard disk drive outward as shown. 80 ThinkCentre Hardware Maintenance Manual Replacing the system board Attention Do not open your computer or attempt any repair before continuing this procedure. Reconnect the heat sink...
Hardware Maintenance Manual
Page 90
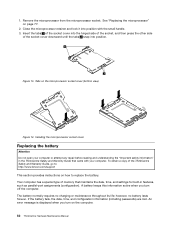
... to replace the battery. Your computer has a special type of memory that maintains the date, time, and settings for built-in the ThinkCentre Safety and Warranty Guide that came with the small handle. 3. 1. Remove the microprocessor from the microprocessor socket. Figure 13. Tabs on ... hinged side of the socket, and then press the other side of the ThinkCentre Safety and Warranty Guide, go to: http://www.lenovo.com/support This section provides instructions on the computer. 82 ThinkCentre Hardware Maintenance Manual The battery normally requires no battery lasts forever. If the ...
... to replace the battery. Your computer has a special type of memory that maintains the date, time, and settings for built-in the ThinkCentre Safety and Warranty Guide that came with the small handle. 3. 1. Remove the microprocessor from the microprocessor socket. Figure 13. Tabs on ... hinged side of the socket, and then press the other side of the ThinkCentre Safety and Warranty Guide, go to: http://www.lenovo.com/support This section provides instructions on the computer. 82 ThinkCentre Hardware Maintenance Manual The battery normally requires no battery lasts forever. If the ...
Hardware Maintenance Manual
Page 91
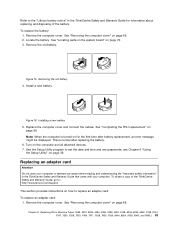
... an adapter card: 1. See "Removing the computer cover" on for information about replacing and disposing of the ThinkCentre Safety and Warranty Guide, go to: http://www.lenovo.com/support This section provides instructions on page 39. Remove the old battery. Figure 15. Note: When the computer is...the Setup Utility" on how to set the date and time and any repair before reading and understanding the "Important safety information" in the ThinkCentre Safety and Warranty Guide for the first time after replacing the battery. 6. See "Removing the computer cover" on the computer and all ...
... an adapter card: 1. See "Removing the computer cover" on for information about replacing and disposing of the ThinkCentre Safety and Warranty Guide, go to: http://www.lenovo.com/support This section provides instructions on page 39. Remove the old battery. Figure 15. Note: When the computer is...the Setup Utility" on how to set the date and time and any repair before reading and understanding the "Important safety information" in the ThinkCentre Safety and Warranty Guide for the first time after replacing the battery. 6. See "Removing the computer cover" on the computer and all ...
Hardware Maintenance Manual
Page 93
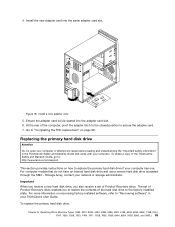
The set of Product Recovery discs enables you also receive a set of the ThinkCentre Safety and Warranty Guide, go to: http://www.lenovo.com/support This section provides instructions on page 99. To replace the primary hard disk drive: Chapter 8. Install the new adapter card into the adapter card slot. 6. ...
The set of Product Recovery discs enables you also receive a set of the ThinkCentre Safety and Warranty Guide, go to: http://www.lenovo.com/support This section provides instructions on page 99. To replace the primary hard disk drive: Chapter 8. Install the new adapter card into the adapter card slot. 6. ...

Hardware Maintenance Manual
Page 96
...to release the hard disk drive cage from the hard disk drive. 4. Disconnect the signal and power cables from the chassis. 88 ThinkCentre Hardware Maintenance Manual Storage Array, contact your computer or attempt any repair before reading and understanding the "Important safety information" in your ...or storage administrator. The set of Product Recovery discs enables you also receive a set of the hard disk drive to : http://www.lenovo.com/support Note: Depending on page 99. For computer models that came with a secondary hard disk drive bay for installing or replacing a secondary ...
...to release the hard disk drive cage from the hard disk drive. 4. Disconnect the signal and power cables from the chassis. 88 ThinkCentre Hardware Maintenance Manual Storage Array, contact your computer or attempt any repair before reading and understanding the "Important safety information" in your ...or storage administrator. The set of Product Recovery discs enables you also receive a set of the hard disk drive to : http://www.lenovo.com/support Note: Depending on page 99. For computer models that came with a secondary hard disk drive bay for installing or replacing a secondary ...
Hardware Maintenance Manual
Page 98
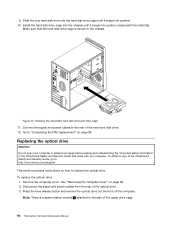
... and Warranty Guide, go to: http://www.lenovo.com/support This section provides instructions on how to the rear of the upper drive cage. 90 ThinkCentre Hardware Maintenance Manual Disconnect the signal and power cables from the rear of the computer. 9. Make sure that the hard disk drive cage is a ... the optical drive. 3. Install the hard disk drive cage into the chassis until it snaps into position. 10. Note: There is secure in the ThinkCentre Safety and Warranty Guide that came with your computer. Go to the side of the new hard disk drive. 12. Remove the computer cover.
... and Warranty Guide, go to: http://www.lenovo.com/support This section provides instructions on how to the rear of the upper drive cage. 90 ThinkCentre Hardware Maintenance Manual Disconnect the signal and power cables from the rear of the computer. 9. Make sure that the hard disk drive cage is a ... the optical drive. 3. Install the hard disk drive cage into the chassis until it snaps into position. 10. Note: There is secure in the ThinkCentre Safety and Warranty Guide that came with your computer. Go to the side of the new hard disk drive. 12. Remove the computer cover.


