

User Manual
Page 5
...Standby mode 37 Hibernation mode 38 Symptom-to-FRU index 39 Numeric error codes 39 Error messages 43 Beep symptoms 44 © Copyright Lenovo 2008 No-beep symptoms 44 LCD-related symptoms 45 Intermittent problems 46 Undetermined problems 46 ThinkPad X200 and X200s 47 Specifications 48 Status ...replacement notices 58 Screw notices 58 Retaining serial numbers 59 Removing and replacing a FRU 62 Before servicing ThinkPad X200 and X200s . . . 63 1010 Battery pack 64 1020 Hard disk drive (HDD) cover, HDD, and HDD rubber rails or solid state drive (SSD) and storage converter 65 1030 ...
...Standby mode 37 Hibernation mode 38 Symptom-to-FRU index 39 Numeric error codes 39 Error messages 43 Beep symptoms 44 © Copyright Lenovo 2008 No-beep symptoms 44 LCD-related symptoms 45 Intermittent problems 46 Undetermined problems 46 ThinkPad X200 and X200s 47 Specifications 48 Status ...replacement notices 58 Screw notices 58 Retaining serial numbers 59 Removing and replacing a FRU 62 Before servicing ThinkPad X200 and X200s . . . 63 1010 Battery pack 64 1020 Hard disk drive (HDD) cover, HDD, and HDD rubber rails or solid state drive (SSD) and storage converter 65 1030 ...

User Manual
Page 13
..., use good judgment to identify potential safety hazards due to the safety of fire or smoke damage. 8. Check the power cord for cracked or bulging batteries. 5. As each machine was designed and built, required safety items were installed to measure third-wire ground continuity for any obvious unsafe conditions, such as...
..., use good judgment to identify potential safety hazards due to the safety of fire or smoke damage. 8. Check the power cord for cracked or bulging batteries. 5. As each machine was designed and built, required safety items were installed to measure third-wire ground continuity for any obvious unsafe conditions, such as...
User Manual
Page 14
... handling ESD-sensitive parts: v Keep the parts in charge between objects. v Use the black side of a grounded work surface. When working on a double-insulated or battery-operated system, use coax or connector-outside shells on these systems. - Attach the ESD ground clip to provide a static-free work mat to any frame...
... handling ESD-sensitive parts: v Keep the parts in charge between objects. v Use the black side of a grounded work surface. When working on a double-insulated or battery-operated system, use coax or connector-outside shells on these systems. - Attach the ESD ground clip to provide a static-free work mat to any frame...
User Manual
Page 36
...Info v VESA LCD Info v Hardware Events Log Utility v Run External Tests v Surface Scan Hard Disk v Benchmark System v DOS Shell v Tech Support Form v Battery Rundown v View Test Log v Print Log v Save Log v Full Erase Hard Drive v Quick Erase Hard Drive PC-Doctor for Rescue and Recovery In some ...of the computer. Select one of the categories listed below to display symptoms and solutions: v Check System Health v System and Device Tests v Lenovo Troubleshooting Center v System Reports v Updates and Support PC-Doctor for Windows This product is designed to help you to run the test, click...
...Info v VESA LCD Info v Hardware Events Log Utility v Run External Tests v Surface Scan Hard Disk v Benchmark System v DOS Shell v Tech Support Form v Battery Rundown v View Test Log v Print Log v Save Log v Full Erase Hard Drive v Quick Erase Hard Drive PC-Doctor for Rescue and Recovery In some ...of the computer. Select one of the categories listed below to display symptoms and solutions: v Check System Health v System and Device Tests v Lenovo Troubleshooting Center v System Reports v Updates and Support PC-Doctor for Windows This product is designed to help you to run the test, click...

User Manual
Page 37
... ac adapter does not always indicate a defect. If the voltage is used . Note: Noise from the computer. 2. Disconnect the ac adapter and install the charged battery pack. 7. See the following figure: 3 2 1 (20V) Pin Voltage (V dc) 1 +20 2 0 3 Ground Note: Output voltage of pin no.2 ...2. Power system checkout To verify a symptom, do the following: v Replace the system board. Turn off the computer. 6. Check that the battery pack supplies power when you are here because the computer fails only when the ac adapter is not correct, replace the ac adapter. 4. If...
... ac adapter does not always indicate a defect. If the voltage is used . Note: Noise from the computer. 2. Disconnect the ac adapter and install the charged battery pack. 7. See the following figure: 3 2 1 (20V) Pin Voltage (V dc) 1 +20 2 0 3 Ground Note: Output voltage of pin no.2 ...2. Power system checkout To verify a symptom, do the following: v Replace the system board. Turn off the computer. 6. Check that the battery pack supplies power when you are here because the computer fails only when the ac adapter is not correct, replace the ac adapter. 4. If...
User Manual
Page 38
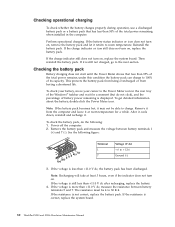
... your cursor to the Power Meter icon in the computer. Remove it is more than +11.0 V dc, measure the resistance between battery terminals 1 (+) and 7 (-). Note: Recharging will take at room temperature for a moment (but do the following figure: 7(-) 3 4 5 6(-) 2(+) 1(+) Terminal 1 7...return to + 12.6 Ground (-) 3. Checking operational charging To check whether the battery charges properly during operation, use a discharged battery pack or a battery pack that less than 95% of battery power remaining is correct, replace the system board. 30 ThinkPad X200 and X200s Hardware...
... your cursor to the Power Meter icon in the computer. Remove it is more than +11.0 V dc, measure the resistance between battery terminals 1 (+) and 7 (-). Note: Recharging will take at room temperature for a moment (but do the following figure: 7(-) 3 4 5 6(-) 2(+) 1(+) Terminal 1 7...return to + 12.6 Ground (-) 3. Checking operational charging To check whether the battery charges properly during operation, use a discharged battery pack or a battery pack that less than 95% of battery power remaining is correct, replace the system board. 30 ThinkPad X200 and X200s Hardware...
User Manual
Page 39
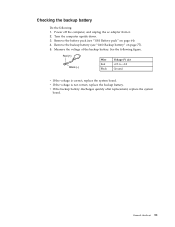
... the ac adapter from it. 2. Remove the backup battery (see "1010 Battery pack" on page 77). 5. v If the backup battery discharges quickly after replacement, replace the system board. General checkout 31 Remove the battery pack (see "1060 Backup battery" on page 64). 4. Measure the voltage of the backup battery. Turn the computer upside down. 3. Red (+) Black...
... the ac adapter from it. 2. Remove the backup battery (see "1010 Battery pack" on page 77). 5. v If the backup battery discharges quickly after replacement, replace the system board. General checkout 31 Remove the battery pack (see "1060 Backup battery" on page 64). 4. Measure the voltage of the backup battery. Turn the computer upside down. 3. Red (+) Black...
User Manual
Page 43
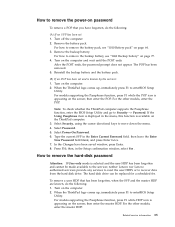
...has been forgotten and cannot be replaced for a scheduled fee. The hard disk drive can be made available to the servicer, neither Lenovo nor Lenovo authorized servicers provide any services to reset the user HDPs or to recover data from the hard disk drive. Related service information 35 ...How to remove the hard-disk password Attention: If User only mode is available on the ThinkPad computer. 3. For how to remove the backup battery, see "1010 Battery pack" on page 64. 3. then enter the POP. Select Power-On Password. 6. If the Using Passphrase item is appearing on the ...
...has been forgotten and cannot be replaced for a scheduled fee. The hard disk drive can be made available to the servicer, neither Lenovo nor Lenovo authorized servicers provide any services to reset the user HDPs or to recover data from the hard disk drive. Related service information 35 ...How to remove the hard-disk password Attention: If User only mode is available on the ThinkPad computer. 3. For how to remove the backup battery, see "1010 Battery pack" on page 64. 3. then enter the POP. Select Power-On Password. 6. If the Using Passphrase item is appearing on the ...
User Manual
Page 45
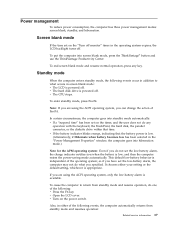
... in the "Power Management Properties" window, the computer goes into hibernation mode.) Note for the APM operating system: Even if you when the battery is powered off. v The CPU stops. In certain circumstances, the computer goes into screen blank mode, press the ThinkVantage® button and...consumption, the computer has three power management modes: screen blank, standby, and hibernation. v The hard disk drive is available. This default low-battery behavior is appropriate. It chooses either of the following events occur in screen blank mode: v The LCD is low, and then the computer ...
... in the "Power Management Properties" window, the computer goes into hibernation mode.) Note for the APM operating system: Even if you when the battery is powered off. v The CPU stops. In certain circumstances, the computer goes into screen blank mode, press the ThinkVantage® button and...consumption, the computer has three power management modes: screen blank, standby, and hibernation. v The hard disk drive is available. This default low-battery behavior is appropriate. It chooses either of the following events occur in screen blank mode: v The LCD is low, and then the computer ...
User Manual
Page 46
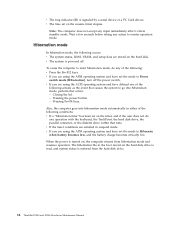
... a "hibernation time" has been set the mode to go into hibernation mode automatically in suspend mode. To cause the computer to Hibernate when battery becomes low, and the battery charge becomes critically low. v If you are using the ACPI operating system and have set on the timer, and if the user does...
... a "hibernation time" has been set the mode to go into hibernation mode automatically in suspend mode. To cause the computer to Hibernate when battery becomes low, and the battery charge becomes critically low. v If you are using the ACPI operating system and have set on the timer, and if the user does...
User Manual
Page 48
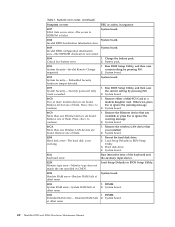
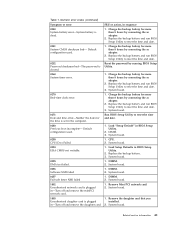
... to continue. 1. System board. 0200 Hard disk error-The hard disk is not correct. 0190 Critical low-battery error 1. Reseat the hard disk drive. 2. System board. 021x Keyboard error. DIMM. 2. Extended RAM error- Charge the battery pack. 2. Security password retry count exceeded. 1. Remove all but one Ethernet devices are found. System board...
... to continue. 1. System board. 0200 Hard disk error-The hard disk is not correct. 0190 Critical low-battery error 1. Reseat the hard disk drive. 2. System board. 021x Keyboard error. DIMM. 2. Extended RAM error- Charge the battery pack. 2. Security password retry count exceeded. 1. Remove all but one Ethernet devices are found. System board...
User Manual
Page 49
...02F6 Software NMI failed 1. System board. 1803 1. System board. Reset the password by connecting the ac adapter. 2. Replace the backup battery and run BIOS Setup Utility to reset the time and date. 0252 Password checksum bad-The password is cleared. Load "Setup Default" in...boot incomplete- Run BIOS Setup Utility to reset the time and date. 3. DIMM. 2. in sequence 0250 System battery error-System battery is plugged installed. Charge the backup battery for more than 8 hours by connecting the ac adapter. 2. Numeric error codes (continued) Symptom or error FRU ...
...02F6 Software NMI failed 1. System board. 1803 1. System board. Reset the password by connecting the ac adapter. 2. Replace the backup battery and run BIOS Setup Utility to reset the time and date. 0252 Password checksum bad-The password is cleared. Load "Setup Default" in...boot incomplete- Run BIOS Setup Utility to reset the time and date. 3. DIMM. 2. in sequence 0250 System battery error-System battery is plugged installed. Charge the backup battery for more than 8 hours by connecting the ac adapter. 2. Numeric error codes (continued) Symptom or error FRU ...
User Manual
Page 51
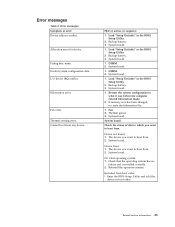
...Error. 1. Check that the operating system has no failure and is installed correctly. 2. Failing bits: nnnn. Thermal sensing error. System board. 1. Backup battery. 3. System board. System board. System board. Excluded from . I/O device IRQ conflict. Hibernation error. Fan error. FRU or action, in the ... the BIOS Setup Utility and add the device in the BIOS Setup Utility. 2. Allocation error for device. Cannot boot from . 2. Backup battery. 3. System board. 1. Restore the system configuration to boot from any device. The device you want to boot from boot order. Invalid...
...Error. 1. Check that the operating system has no failure and is installed correctly. 2. Failing bits: nnnn. Thermal sensing error. System board. 1. Backup battery. 3. System board. System board. System board. Excluded from . I/O device IRQ conflict. Hibernation error. Fan error. FRU or action, in the ... the BIOS Setup Utility and add the device in the BIOS Setup Utility. 2. Allocation error for device. Cannot boot from . 2. Backup battery. 3. System board. 1. Restore the system configuration to boot from any device. The device you want to boot from boot order. Invalid...
User Manual
Page 54
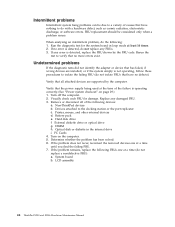
... more errors exist. Non-ThinkPad devices b. Devices attached to do not replace any damaged FRU. 3. Turn on page 29.) 1. Run the diagnostic test for damage. Battery pack e. External diskette drive or optical drive g. When analyzing an intermittent problem, do not isolate FRUs that has failed, if wrong devices are supported by...
... more errors exist. Non-ThinkPad devices b. Devices attached to do not replace any damaged FRU. 3. Turn on page 29.) 1. Run the diagnostic test for damage. Battery pack e. External diskette drive or optical drive g. When analyzing an intermittent problem, do not isolate FRUs that has failed, if wrong devices are supported by...
User Manual
Page 58
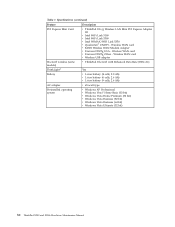
Wireless WAN card v Wireless USB adapter Bluetooth wireless (some models) ThinkLight® v ThinkPad Bluetooth with Enhanced Data Rate (BDC-2.1) Yes Battery v Li-ion battery (4 cells, 2.0 Ah) v Li-ion battery (6 cells, 2.6 Ah) v Li-ion battery (9 cells, 2.6 Ah) AC adapter v 65-watt type Preinstalled operating system v Windows XP Professional v Windows Vista® Home Basic (32 bit) v Windows...
Wireless WAN card v Wireless USB adapter Bluetooth wireless (some models) ThinkLight® v ThinkPad Bluetooth with Enhanced Data Rate (BDC-2.1) Yes Battery v Li-ion battery (4 cells, 2.0 Ah) v Li-ion battery (6 cells, 2.6 Ah) v Li-ion battery (9 cells, 2.6 Ah) AC adapter v 65-watt type Preinstalled operating system v Windows XP Professional v Windows Vista® Home Basic (32 bit) v Windows...

User Manual
Page 60
... Caps Lock key. 7 Num lock Green: The numeric keypad on , do not put the computer into standby mode or turn off the computer. Orange: The battery is on and ready to 80% of the capacity. When this indicator is on the keyboard is being charged. Green: Caps Lock mode is ready... for use . Blinking orange (rapid): The battery is charged between 5% to 20% of the capacity, and being discharged between 0% to 80% of the capacity, and being read from or written to the...
... Caps Lock key. 7 Num lock Green: The numeric keypad on , do not put the computer into standby mode or turn off the computer. Orange: The battery is on and ready to 80% of the capacity. When this indicator is on the keyboard is being charged. Green: Caps Lock mode is ready... for use . Blinking orange (rapid): The battery is charged between 5% to 20% of the capacity, and being discharged between 0% to 80% of the capacity, and being read from or written to the...
User Manual
Page 61
... turn off and turn , and run this test again. Interactive Tests --> Diskette ThinkPad X200 and X200s 53 Diagnostics --> Systemboard 3. Power Diagnostics --> ThinkPad Devices --> AC Adapter, Battery 1 (Battery2) LCD unit 1. Turn on the computer. 3. Diagnostics --> CPU/Coprocessor 2. Using cursor keys, select Main hard disk drive or Ultrabay hard disk drive. 6. Press Enter...
... turn off and turn , and run this test again. Interactive Tests --> Diskette ThinkPad X200 and X200s 53 Diagnostics --> Systemboard 3. Power Diagnostics --> ThinkPad Devices --> AC Adapter, Battery 1 (Battery2) LCD unit 1. Turn on the computer. 3. Diagnostics --> CPU/Coprocessor 2. Using cursor keys, select Main hard disk drive or Ultrabay hard disk drive. 6. Press Enter...
User Manual
Page 70
... general rules: 1. Follow the correct sequence in place, reverse the removal procedure and follow any notes that all power cords from electrical outlets, remove the battery pack, and then disconnect any computer unless you have to replace a FRU, turn it in the direction as given by the arrow in the drawing...
... general rules: 1. Follow the correct sequence in place, reverse the removal procedure and follow any notes that all power cords from electrical outlets, remove the battery pack, and then disconnect any computer unless you have to replace a FRU, turn it in the direction as given by the arrow in the drawing...
User Manual
Page 71
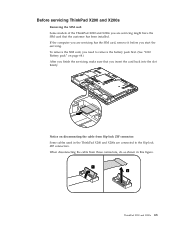
... have the SIM card that you insert the card back into the slot firmly. If the computer you are connected to remove the battery pack first. (See "1010 Battery pack" on disconnecting the cable from those connectors, do as shown in the ThinkPad X200 and X200s are servicing has the SIM card...
... have the SIM card that you insert the card back into the slot firmly. If the computer you are connected to remove the battery pack first. (See "1010 Battery pack" on disconnecting the cable from those connectors, do as shown in the ThinkPad X200 and X200s are servicing has the SIM card...
User Manual
Page 72
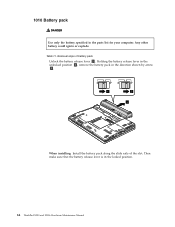
1010 Battery pack DANGER Use only the battery specified in the locked position. 64 ThinkPad X200 and X200s Hardware Maintenance Manual Removal steps of the slot. Then make sure that the battery release lever is in the parts list for your computer. Table 11. Any other battery could ignite or explode. Holding the battery release lever in the unlocked position 2 , remove the battery pack in the direction shown by arrow 3. 1 2 3 When installing: Install the battery pack along the slide rails of battery pack Unlock the battery release lever 1 .
1010 Battery pack DANGER Use only the battery specified in the locked position. 64 ThinkPad X200 and X200s Hardware Maintenance Manual Removal steps of the slot. Then make sure that the battery release lever is in the parts list for your computer. Table 11. Any other battery could ignite or explode. Holding the battery release lever in the unlocked position 2 , remove the battery pack in the direction shown by arrow 3. 1 2 3 When installing: Install the battery pack along the slide rails of battery pack Unlock the battery release lever 1 .


