
Hardware Maintenance Manual
Page 5
...Locating connectors on the rear of the computer . . 24 Opening the cover 25 Locating components 26 Accessing system board components and drives . . 27 Identifying parts on the system board . . . . . 28 Replacing memory 29 Replacing a PCI adapter 30 © Copyright IBM Corp. 2005 Replacing the battery ...diagnostics tests 13 Test selection 14 Test results 14 Fixed disk advanced test (FDAT 15 Quick and Full erase - Parts listing 91 Machine Type 8127 91 Machine Type 8183 95 Machine Type 8184 109 Machine Type 8320 116 Machine Type 8416 125 Machine Type 8417 127 Machine Type 8418 ...
...Locating connectors on the rear of the computer . . 24 Opening the cover 25 Locating components 26 Accessing system board components and drives . . 27 Identifying parts on the system board . . . . . 28 Replacing memory 29 Replacing a PCI adapter 30 © Copyright IBM Corp. 2005 Replacing the battery ...diagnostics tests 13 Test selection 14 Test results 14 Fixed disk advanced test (FDAT 15 Quick and Full erase - Parts listing 91 Machine Type 8127 91 Machine Type 8183 95 Machine Type 8184 109 Machine Type 8320 116 Machine Type 8416 125 Machine Type 8417 127 Machine Type 8418 ...
Hardware Maintenance Manual
Page 7
...divided into product service sections and a related service section, as follows: v The product service sections include procedures for IBM computer Types 8127, 8183, 8184, 8320, 8416, 8417, 8418, 8419 and 8429. v The related service section includes safety notices and safety information, and problem ... par les instructions. Before servicing an IBM product, be sure to -FRU Index, additional service information and an illustrated parts catalog. Accertarsi di leggere tutti gli avvisi di attenzione e di pericolo prima di effettuare qualsiasi operazione. © Copyright IBM Corp. 2005 ...
...divided into product service sections and a related service section, as follows: v The product service sections include procedures for IBM computer Types 8127, 8183, 8184, 8320, 8416, 8417, 8418, 8419 and 8429. v The related service section includes safety notices and safety information, and problem ... par les instructions. Before servicing an IBM product, be sure to -FRU Index, additional service information and an illustrated parts catalog. Accertarsi di leggere tutti gli avvisi di attenzione e di pericolo prima di effettuare qualsiasi operazione. © Copyright IBM Corp. 2005 ...
Hardware Maintenance Manual
Page 9
... system boards, microprocessors, Liquid Crystal Displays (LCDs), and memory. General Announce Variant (GAV) This is the primary source for identifying FRU part numbers and FRU descriptions for the key commodities for CTO, CMV, and GAV products There are three information resources to identify which FRUs are... and GAV products at the following Web site: http://www.ibm.com/pc/support v To view the key commodities, click on PARTS INFORMATION, then PARTS LOOKUP. These sources are not found in the PEW record under SYSTEM DETAILS. v Business Partners using Eclaim will be returned in PEW...
... system boards, microprocessors, Liquid Crystal Displays (LCDs), and memory. General Announce Variant (GAV) This is the primary source for identifying FRU part numbers and FRU descriptions for the key commodities for CTO, CMV, and GAV products There are three information resources to identify which FRUs are... and GAV products at the following Web site: http://www.ibm.com/pc/support v To view the key commodities, click on PARTS INFORMATION, then PARTS LOOKUP. These sources are not found in the PEW record under SYSTEM DETAILS. v Business Partners using Eclaim will be returned in PEW...
Hardware Maintenance Manual
Page 10
Under 'View by Category' select SERVICE PARTS. The list of service parts by Date' select SYSTEM SERVICE PARTS. v To view the complete list of FRUs, type in the machine type and model (Example: 1829-CTO) under QUICK PATH. Using the HMM v Use the ... as a back-up to PEW and eSupport to view the complete list of FRUs for a machine type and model. Under 'Filter by Document Type' select PARTS INFORMATION. For the Remaining FRUs (the complete list of FRUs at the MT Model level. 4 Hardware Maintenance Manual Under...
Under 'View by Category' select SERVICE PARTS. The list of service parts by Date' select SYSTEM SERVICE PARTS. v To view the complete list of FRUs, type in the machine type and model (Example: 1829-CTO) under QUICK PATH. Using the HMM v Use the ... as a back-up to PEW and eSupport to view the complete list of FRUs for a machine type and model. Under 'Filter by Document Type' select PARTS INFORMATION. For the Remaining FRUs (the complete list of FRUs at the MT Model level. 4 Hardware Maintenance Manual Under...

Hardware Maintenance Manual
Page 11
...IBM Corp. 2005 5 General information Access IBM To find the following information: v CRU removal and installation instructions v Publications v Troubleshooting information v Parts information v Downloads and drivers v Links to other useful sources of information To access this information, point your browser to 1 GB of PC2700 ...the computer you have Internet access, the most up to : http://www.ibm.com/pc/support/site.wss/document.do?Lndocid=part-video Features This section provides an overview of 2 GB. Additional information resources If you can support up -to-date information ...
...IBM Corp. 2005 5 General information Access IBM To find the following information: v CRU removal and installation instructions v Publications v Troubleshooting information v Parts information v Downloads and drivers v Links to other useful sources of information To access this information, point your browser to 1 GB of PC2700 ...the computer you have Internet access, the most up to : http://www.ibm.com/pc/support/site.wss/document.do?Lndocid=part-video Features This section provides an overview of 2 GB. Additional information resources If you can support up -to-date information ...
Hardware Maintenance Manual
Page 18
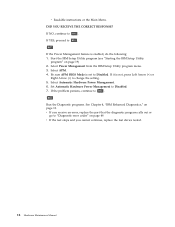
... Utility program menu. 3. Select APM. 4. Set Automatic Hardware Power Management to change the setting. 5. v If the test stops and you receive an error, replace the part that the diagnostic program calls out or go to "Diagnostic error codes" on page 49. If NO, continue to Disabled. Be sure APM BIOS Mode...
... Utility program menu. 3. Select APM. 4. Set Automatic Hardware Power Management to change the setting. 5. v If the test stops and you receive an error, replace the part that the diagnostic program calls out or go to "Diagnostic error codes" on page 49. If NO, continue to Disabled. Be sure APM BIOS Mode...
Hardware Maintenance Manual
Page 34
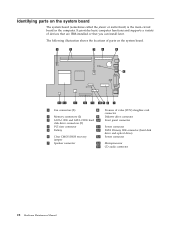
Identifying parts on the system board. 1 Fan connectors (2) 8 Promise of devices that are IBM-installed or that you can install later. It provides basic computer functions and .../BIOS recovery 13 Power connector jumper 7 Speaker connector 14 Microprocessor 15 CD audio connector 28 Hardware Maintenance Manual The following illustration shows the locations of parts on the system board The system board (sometimes called the planar or motherboard) is the main circuit board in the computer.
Identifying parts on the system board. 1 Fan connectors (2) 8 Promise of devices that are IBM-installed or that you can install later. It provides basic computer functions and .../BIOS recovery 13 Power connector jumper 7 Speaker connector 14 Microprocessor 15 CD audio connector 28 Hardware Maintenance Manual The following illustration shows the locations of parts on the system board The system board (sometimes called the planar or motherboard) is the main circuit board in the computer.
Hardware Maintenance Manual
Page 35
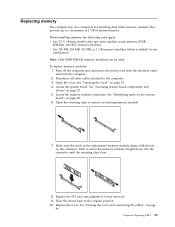
v Use 128 MB, 256 MB, 512 MB, or 1 GB memory modules (when available) in the replacement memory module aligns with the tab on page 27. 5. Replace the PCI riser and adapters if .... When installing memory, the following rules apply: v Use 2.5 V, 184-pin, double data rate static random access memory (DDR SDRAM), non-ECC memory modules. See "Identifying parts on the system board" on page 28. 6. Turn off the computer and disconnect the power cord from the electrical outlet and from the computer. 2. Place...
v Use 128 MB, 256 MB, 512 MB, or 1 GB memory modules (when available) in the replacement memory module aligns with the tab on page 27. 5. Replace the PCI riser and adapters if .... When installing memory, the following rules apply: v Use 2.5 V, 184-pin, double data rate static random access memory (DDR SDRAM), non-ECC memory modules. See "Identifying parts on the system board" on page 28. 6. Turn off the computer and disconnect the power cord from the electrical outlet and from the computer. 2. Place...
Hardware Maintenance Manual
Page 37
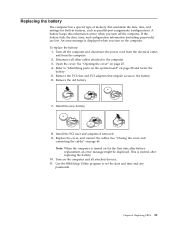
... FRUs 31 Open the cover. This is turned on page 46. See "Opening the cover" on the computer and all other cables attached to "Identifying parts on the system board" on the computer. A battery keeps this information active when you turn off the computer and disconnect the power cord from the...
... FRUs 31 Open the cover. This is turned on page 46. See "Opening the cover" on the computer and all other cables attached to "Identifying parts on the system board" on the computer. A battery keeps this information active when you turn off the computer and disconnect the power cord from the...
Hardware Maintenance Manual
Page 47
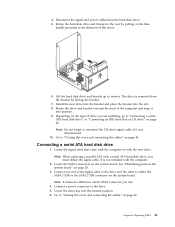
... the computer. 2. 4. Locate the SATA connectors on page 28. 3. Locate the signal cable that came with the computer or with the new drive. See "Identifying parts on the system board" on the system board. Replacing FRUs 41
... the computer. 2. 4. Locate the SATA connectors on page 28. 3. Locate the signal cable that came with the computer or with the new drive. See "Identifying parts on the system board" on the system board. Replacing FRUs 41
Hardware Maintenance Manual
Page 48
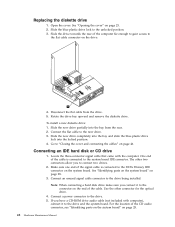
... and slide the blue plastic drive lock into the bay from the drive. 5. Connecting an IDE hard disk or CD drive 1. See "Identifying parts on the system board" on page 28. 42 Hardware Maintenance Manual Slide the new drive partially into the locked position. 4. One end of the... CD audio connector, see "Identifying parts on the system board" on page 28. 3. Connect a power connector to the unlocked position. 3. For the location of the cable is connected to ...
... and slide the blue plastic drive lock into the bay from the drive. 5. Connecting an IDE hard disk or CD drive 1. See "Identifying parts on the system board" on page 28. 42 Hardware Maintenance Manual Slide the new drive partially into the locked position. 4. One end of the... CD audio connector, see "Identifying parts on the system board" on page 28. 3. Connect a power connector to the unlocked position. 3. For the location of the cable is connected to ...
Hardware Maintenance Manual
Page 49
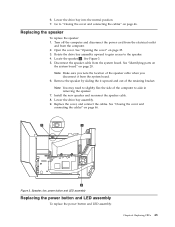
..." on page 28. Disconnect the speaker cable from the computer. 2. Note: You may need to slightly flex the side of the retaining bracket. See "Identifying parts on the system board" on page 25. 3. Replacing the speaker To replace the speaker: 1. Figure 3. Locate the speaker 1 . Lower the drive bay assembly. 9. See "Closing...
..." on page 28. Disconnect the speaker cable from the computer. 2. Note: You may need to slightly flex the side of the retaining bracket. See "Identifying parts on the system board" on page 25. 3. Replacing the speaker To replace the speaker: 1. Figure 3. Locate the speaker 1 . Lower the drive bay assembly. 9. See "Closing...

Hardware Maintenance Manual
Page 50
... the power button and LED assembly 2 out. Rotate the drive bay assembly upward to gain access to the power button and LED assembly. 4. See "Identifying parts on the system board" on page 46. See "Closing the cover and connecting the cables" on page 28. See "Opening the cover" on page 43... and LED assembly cable from the system board. Open the cover. Replace the cover, and connect the cables. See Figure 3 on page 25. 3. See "Identifying parts on the system board" on page 28. Note: Make sure you note the location of the fan cable when you disconnect it from the system...
... the power button and LED assembly 2 out. Rotate the drive bay assembly upward to gain access to the power button and LED assembly. 4. See "Identifying parts on the system board" on page 46. See "Closing the cover and connecting the cables" on page 28. See "Opening the cover" on page 43... and LED assembly cable from the system board. Open the cover. Replace the cover, and connect the cables. See Figure 3 on page 25. 3. See "Identifying parts on the system board" on page 28. Note: Make sure you note the location of the fan cable when you disconnect it from the system...
Hardware Maintenance Manual
Page 52
.... Make sure that the drive locks are left inside the computer. 2. Also, depending on the FRU that might need to the computer. Clear any removed parts, close the cover. 4. Reconnect the external cables and power cords to install any cables that is installed, you might impede the replacement of the computer...
.... Make sure that the drive locks are left inside the computer. 2. Also, depending on the FRU that might need to the computer. Clear any removed parts, close the cover. 4. Reconnect the external cables and power cords to install any cables that is installed, you might impede the replacement of the computer...
Hardware Maintenance Manual
Page 53
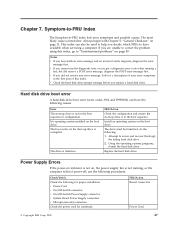
... problems" on , the power supply fan is corrupted. Power Supply Errors If the power-on indicator is not in the boot sequence in the first part of this index, go to access and recover (back-up drive is not running a test, but did not receive any error message, look for a description...
... problems" on , the power supply fan is corrupted. Power Supply Errors If the power-on indicator is not in the boot sequence in the first part of this index, go to access and recover (back-up drive is not running a test, but did not receive any error message, look for a description...
Hardware Maintenance Manual
Page 97
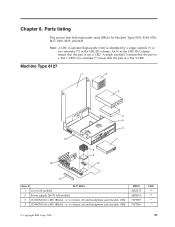
... identified by a single asterisk (*) or two asterisks (**) in the CRU ID Column means that the part is not a CRU. w/o volume ctrl and headphone jack (models 11M) 3 CD-ROM Drive 48X (Black) - Machine Type 8127 1 2 3 13 12 8 9 10 4 5 6 7 11 Item # ... jack (models 11M) FRU# 26K1217 24R2614 71P7367 71P7369 CRU ** ** * * © Copyright IBM Corp. 2005 91 two asterisks (**) mean that the part is a Tier 2 CRU. An N in the CRU ID column. Parts listing This section lists field replaceable units (FRUs) for Machine Types 8183, 8184, 8320, 8417, 8418, 8419, and 8429.
... identified by a single asterisk (*) or two asterisks (**) in the CRU ID Column means that the part is not a CRU. w/o volume ctrl and headphone jack (models 11M) 3 CD-ROM Drive 48X (Black) - Machine Type 8127 1 2 3 13 12 8 9 10 4 5 6 7 11 Item # ... jack (models 11M) FRU# 26K1217 24R2614 71P7367 71P7369 CRU ** ** * * © Copyright IBM Corp. 2005 91 two asterisks (**) mean that the part is a Tier 2 CRU. An N in the CRU ID column. Parts listing This section lists field replaceable units (FRUs) for Machine Types 8183, 8184, 8320, 8417, 8418, 8419, and 8429.

Hardware Maintenance Manual
Page 99
Parts listing 93 The FRUs listed in the following table are not illustrated. 8127 FRUs Tool-less hardfile tray (all models) Cable, pwr/LED (all models) ...
Parts listing 93 The FRUs listed in the following table are not illustrated. 8127 FRUs Tool-less hardfile tray (all models) Cable, pwr/LED (all models) ...
Hardware Maintenance Manual
Page 101
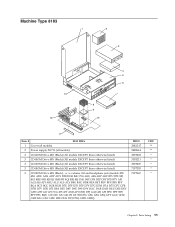
Parts listing 95 w/o volume ctrl and headphone jack (models 47U 45G ADU ADS ADP ADY D2B D2H B4U 79G AEU AES AEP AEY B7U B7F 8FJ ... GHU GHF H1G H1C H2U H2F DUE DUJ DWJ GWB GWH) FRU# 26K1217 24R2614 33P3203 33P3211 33P3207 71P7353 71P7367 CRU Chapter 8. Machine Type 8183 1 2 3 13 12 8 9 10 4 5 6 7 11 Item # 8183 FRUs 1 Cover (all models) 2 Power supply 200 W (all models) 3 CD-ROM Drive 48X (Black) (All models EXCEPT those otherwise listed) 3 CD-ROM...
Parts listing 95 w/o volume ctrl and headphone jack (models 47U 45G ADU ADS ADP ADY D2B D2H B4U 79G AEU AES AEP AEY B7U B7F 8FJ ... GHU GHF H1G H1C H2U H2F DUE DUJ DWJ GWB GWH) FRU# 26K1217 24R2614 33P3203 33P3211 33P3207 71P7353 71P7367 CRU Chapter 8. Machine Type 8183 1 2 3 13 12 8 9 10 4 5 6 7 11 Item # 8183 FRUs 1 Cover (all models) 2 Power supply 200 W (all models) 3 CD-ROM Drive 48X (Black) (All models EXCEPT those otherwise listed) 3 CD-ROM...
Hardware Maintenance Manual
Page 107
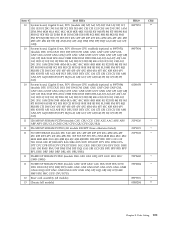
Parts listing 101 Item # 8183 FRUs 10 System board, Gigabit E-net, POV (models A4J A5J A6J A7J A8J 1AE 1AJ 1BJ 1CJ 1DJ 1EJ 1FJ 2BG 39J 3AJ 3BJ 3CJ ... CUJ C1J DJJ AMJ ANJ APJ AQJ DMJ DNJ DPJ DQJ GAJ GBJ GCJ G9J GDJ 64J 65J 66J 67J 68J 69J 6AJ) 11 128 MB NP SDRAM PC2700 (models CAU CBU CCU CDU A2G AAG ABU ABS ABP ABY CKU CLU CMU CNU CPU CQU CPU CQU 8LJ) 11... 256 MB NP SDRAM PC2700 (All models EXCEPT those otherwise listed) 11 512 MB SDRAM (models 23U 34U 42U 43U 43F 43S 43P 43Y 43G 43M 43A 43T 43C 43B 43H 43V 43J...
Parts listing 101 Item # 8183 FRUs 10 System board, Gigabit E-net, POV (models A4J A5J A6J A7J A8J 1AE 1AJ 1BJ 1CJ 1DJ 1EJ 1FJ 2BG 39J 3AJ 3BJ 3CJ ... CUJ C1J DJJ AMJ ANJ APJ AQJ DMJ DNJ DPJ DQJ GAJ GBJ GCJ G9J GDJ 64J 65J 66J 67J 68J 69J 6AJ) 11 128 MB NP SDRAM PC2700 (models CAU CBU CCU CDU A2G AAG ABU ABS ABP ABY CKU CLU CMU CNU CPU CQU CPU CQU 8LJ) 11... 256 MB NP SDRAM PC2700 (All models EXCEPT those otherwise listed) 11 512 MB SDRAM (models 23U 34U 42U 43U 43F 43S 43P 43Y 43G 43M 43A 43T 43C 43B 43H 43V 43J...

Hardware Maintenance Manual
Page 109
Parts listing 103 8183 FRUs Mouse, 3 button wheel (models A2G 55G 35G 46G 45G A4J A5J A6J A7J A8J 1AE 1AJ 1BJ 1CJ 1DJ 1EJ 1FJ 39J 3AJ 3BJ ...) RJ11 connector adapter (Switzerland) (All "G" models) FRU# 24P0491 89P5089 88P7258 25P4726 10K2587 60H6043 60H6045 60H6046 60H6047 60H6048 60H6049 60H6050 60H6051 60H6052 60H6053 60H6054 60H6055 CRU * 8183 (Preferred Pro) Keyboards US English (models B7U CRU CSU 8HE 7AG 7BG CPU CQU AKU ALU B8G BAU BBG BEA BFU BGA BGC BGH D7U...
Parts listing 103 8183 FRUs Mouse, 3 button wheel (models A2G 55G 35G 46G 45G A4J A5J A6J A7J A8J 1AE 1AJ 1BJ 1CJ 1DJ 1EJ 1FJ 39J 3AJ 3BJ ...) RJ11 connector adapter (Switzerland) (All "G" models) FRU# 24P0491 89P5089 88P7258 25P4726 10K2587 60H6043 60H6045 60H6046 60H6047 60H6048 60H6049 60H6050 60H6051 60H6052 60H6053 60H6054 60H6055 CRU * 8183 (Preferred Pro) Keyboards US English (models B7U CRU CSU 8HE 7AG 7BG CPU CQU AKU ALU B8G BAU BBG BEA BFU BGA BGC BGH D7U...


