User Manual
Page 3
...Service and Support A-1 Online technical support A-1 Telephone technical support A-1 Worldwide telephone list A-1 Appendix B. Reference information 3-1 Monitor specifications ...3-1 Troubleshooting ...3-2 Manual Image setup ...3-3 Manually installing the monitor driver 3-4 Service information ...3-7 Appendix A. Notices B-1 Recycling information B-2 Trademarks ...B-3 Turkish statement of adjustments 1-2 User controls ...1-3 Cable lock slot ...1-4 Setting up your monitor 1-4 Connecting and turning on your monitor 1-4 Registering your monitor 2-7 Detaching the monitor stand...
...Service and Support A-1 Online technical support A-1 Telephone technical support A-1 Worldwide telephone list A-1 Appendix B. Reference information 3-1 Monitor specifications ...3-1 Troubleshooting ...3-2 Manual Image setup ...3-3 Manually installing the monitor driver 3-4 Service information ...3-7 Appendix A. Notices B-1 Recycling information B-2 Trademarks ...B-3 Turkish statement of adjustments 1-2 User controls ...1-3 Cable lock slot ...1-4 Setting up your monitor 1-4 Connecting and turning on your monitor 1-4 Registering your monitor 2-7 Detaching the monitor stand...
User Manual
Page 5
... monitor. Turn off when not in the monitor. 6. CAUTION: Do not use with a dry, soft, clean cloth. These chemicals may damage the monitor. Never user water to rest on an unstable surface. ■ When removing the monitor base, you plug the power cord into cabinet slots or other position. Wipe the screen with your Lenovo authorized dealer, reseller, or service provider. ■ Adjust only those controls that the grounded power...
... monitor. Turn off when not in the monitor. 6. CAUTION: Do not use with a dry, soft, clean cloth. These chemicals may damage the monitor. Never user water to rest on an unstable surface. ■ When removing the monitor base, you plug the power cord into cabinet slots or other position. Wipe the screen with your Lenovo authorized dealer, reseller, or service provider. ■ Adjust only those controls that the grounded power...
User Manual
Page 6
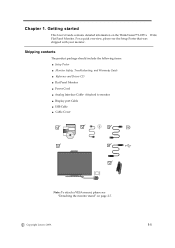
... contents The product package should include the following items: ● Setup Poster ● Monitor Safety, Troubleshooting, and Warranty Guide ● Reference and Driver CD ● Flat Panel Monitor ● Power Cord ● Analog Interface Cable- Attached to monitor ● Display port Cable ● USB Cable ● Cable Cover Note: To attach a VESA mount, please see the Setup Poster that was shipped with your monitor. Chapter 1. For a quick overview, please see "Detaching the monitor stand" on the ThinkVision™ L2251x Wide Flat Panel Monitor.
... contents The product package should include the following items: ● Setup Poster ● Monitor Safety, Troubleshooting, and Warranty Guide ● Reference and Driver CD ● Flat Panel Monitor ● Power Cord ● Analog Interface Cable- Attached to monitor ● Display port Cable ● USB Cable ● Cable Cover Note: To attach a VESA mount, please see the Setup Poster that was shipped with your monitor. Chapter 1. For a quick overview, please see "Detaching the monitor stand" on the ThinkVision™ L2251x Wide Flat Panel Monitor.
User Manual
Page 7
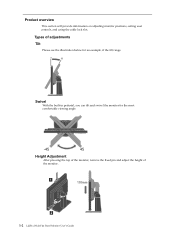
Product overview This section will provide information on adjusting monitor positions, setting user controls, and using the cable lock slot. Types of adjustments Tilt Please see the illustration below for an example of the tilt range. 0 30 Swivel With the built-in pedestal, you can tilt and swivel the monitor for the most comfortable viewing angle. -45 45 Height Adjustment After pressing the top of the monitor, remove the fixed pin and adjust the height of the monitor. 1 110mm 2 1-2 L2251x Wide Flat Panel Monitor User's Guide
Product overview This section will provide information on adjusting monitor positions, setting user controls, and using the cable lock slot. Types of adjustments Tilt Please see the illustration below for an example of the tilt range. 0 30 Swivel With the built-in pedestal, you can tilt and swivel the monitor for the most comfortable viewing angle. -45 45 Height Adjustment After pressing the top of the monitor, remove the fixed pin and adjust the height of the monitor. 1 110mm 2 1-2 L2251x Wide Flat Panel Monitor User's Guide
User Manual
Page 9
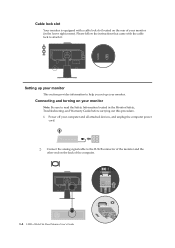
.... Connect the analog signal cable to the D-SUB connector of the monitor and the other end on your monitor (in the Monitor Safety, Troubleshooting, and Warranty Guide before carrying out this procedure. 1. Power off your monitor. Please follow the instructions that came with a cable lock slot located on the rear of the computer. 1-4 L2251x Wide Flat Panel Monitor User's Guide Connecting and turning on the back of your monitor Note: Be sure to help you set up...
.... Connect the analog signal cable to the D-SUB connector of the monitor and the other end on your monitor (in the Monitor Safety, Troubleshooting, and Warranty Guide before carrying out this procedure. 1. Power off your monitor. Please follow the instructions that came with a cable lock slot located on the rear of the computer. 1-4 L2251x Wide Flat Panel Monitor User's Guide Connecting and turning on the back of your monitor Note: Be sure to help you set up...

User Manual
Page 13
Replace the Cable Cover. 9. To install the monitor driver, insert the Reference and Driver CD, click Install driver, and follow the on the monitor and the computer. 10. 8. Power on -screen instructions. 1-8 L2251x Wide Flat Panel Monitor User's Guide
Replace the Cable Cover. 9. To install the monitor driver, insert the Reference and Driver CD, click Install driver, and follow the on the monitor and the computer. 10. 8. Power on -screen instructions. 1-8 L2251x Wide Flat Panel Monitor User's Guide

User Manual
Page 15
... is at : http://www.lenovo.com/healthycomputing Arranging your work in a comfortable and neutral (vertical, or upright) position. Keep your work area Use a work surface of work area to avoid discomfort. Use a viewing distance that you . ● Monitor height: Position the monitor so your head and neck are in a relaxed stated. ● Tilt : Adjust the tilt of your monitor to optimize the appearance of the screen content and to accommodate your...
... is at : http://www.lenovo.com/healthycomputing Arranging your work in a comfortable and neutral (vertical, or upright) position. Keep your work area Use a work surface of work area to avoid discomfort. Use a viewing distance that you . ● Monitor height: Position the monitor so your head and neck are in a relaxed stated. ● Tilt : Adjust the tilt of your monitor to optimize the appearance of the screen content and to accommodate your...
User Manual
Page 16
... screen's contents. Also, be sure to use the adjustment capabilities of your computer components and office furniture to best suit your computer. ● Good posture starts with disabilities. Periodically, stand up you use of any one posture for an extended period of these technologies are performing. ● Use the monitor brightness, contrast, and image adjustment controls, if equipped, to optimize the image on page 2-1 so you do work...
... screen's contents. Also, be sure to use the adjustment capabilities of your computer components and office furniture to best suit your computer. ● Good posture starts with disabilities. Periodically, stand up you use of any one posture for an extended period of these technologies are performing. ● Use the monitor brightness, contrast, and image adjustment controls, if equipped, to optimize the image on page 2-1 so you do work...
User Manual
Page 17
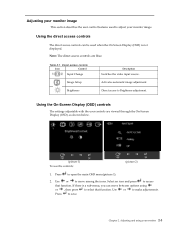
... the On-Screen Display (OSD) controls The settings adjustable with the user controls are blue. Select an icon and press to select that function. Chapter 2. Direct access controls Icon Control Input Change Image Setup Brightness Description Switches the video input source. If there is not displayed. Use or to save. Activates automatic image adjustment. Press to move between options using your monitor 2-3 Note: The direct access controls are viewed through the On-Screen Display (OSD), as shown below. (picture 1) To use the controls: (picture 2) 1. Use or...
... the On-Screen Display (OSD) controls The settings adjustable with the user controls are blue. Select an icon and press to select that function. Chapter 2. Direct access controls Icon Control Input Change Image Setup Brightness Description Switches the video input source. If there is not displayed. Use or to save. Activates automatic image adjustment. Press to move between options using your monitor 2-3 Note: The direct access controls are viewed through the On-Screen Display (OSD), as shown below. (picture 1) To use the controls: (picture 2) 1. Use or...
User Manual
Page 18
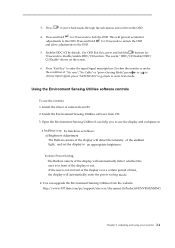
... back to use the controls: 1. Open the Environment Sensing Utilities It can upgrade the Environment Sensing Utilities from the OSD. 4. Adjusting and using your monitor 2-4 3. If the user is under the condition of camera from CD. 3. Install the Environment Sensing Utilities software from CD. 2. The words " DDC/CI Disable/DDC/ CI/Enable" shows on the screen. 6. Install the driver of "No sync","No Cable" or "power Saving Mode".press or...
... back to use the controls: 1. Open the Environment Sensing Utilities It can upgrade the Environment Sensing Utilities from the OSD. 4. Adjusting and using your monitor 2-4 3. If the user is under the condition of camera from CD. 3. Install the Environment Sensing Utilities software from CD. 2. The words " DDC/CI Disable/DDC/ CI/Enable" shows on the screen. 6. Install the driver of "No sync","No Cable" or "power Saving Mode".press or...
User Manual
Page 19
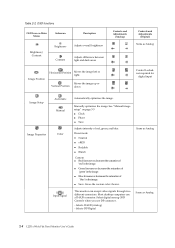
... as Analog 2-5 L2251x Wide Flat Panel Monitor User's Guide Most desktop computers use DP connector. - Select digital among OSD Controls when you use a D-SUB connector. OSD functions OSD Icon on page 3-3 ● Clock ● Phase ● Save Adjusts intensity of 'blue' in the image. ● Blue: Increases or decreases the saturation of red, green, and blue. See "Manual image setup" on Main Menu Submenu Descirption Brightness/ Contrast Brightness Adjusts overall brightness Contrast Adjusts difference between light and dark areas Image Position Horizontal Position...
... as Analog 2-5 L2251x Wide Flat Panel Monitor User's Guide Most desktop computers use DP connector. - Select digital among OSD Controls when you use a D-SUB connector. OSD functions OSD Icon on page 3-3 ● Clock ● Phase ● Save Adjusts intensity of 'blue' in the image. ● Blue: Increases or decreases the saturation of red, green, and blue. See "Manual image setup" on Main Menu Submenu Descirption Brightness/ Contrast Brightness Adjusts overall brightness Contrast Adjusts difference between light and dark areas Image Position Horizontal Position...
User Manual
Page 21
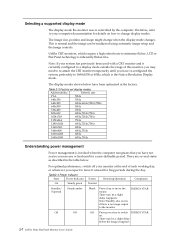
... image reappears. 2-7 L2251x Wide Flat Panel Monitor User's Guide Table 2-3.Factory set display modes Addressability Refersh rate PAL 50Hz 640x350 70Hz 640x480 60Hz,66Hz,72Hz,75Hz 640x500 58Hz 720x400 70Hz 800x600 60Hz,72Hz,75Hz 1024x768 60Hz,70Hz,75Hz 1152x864 75Hz 1280x1024 60Hz,72Hz,75Hz 1360x768 60Hz 1440x900 60Hz,75Hz 1600x1000 60Hz 1680x1050 60Hz,75Hz Understanding power management Power management is currently configured to a display mode outside the range...
... image reappears. 2-7 L2251x Wide Flat Panel Monitor User's Guide Table 2-3.Factory set display modes Addressability Refersh rate PAL 50Hz 640x350 70Hz 640x480 60Hz,66Hz,72Hz,75Hz 640x500 58Hz 720x400 70Hz 800x600 60Hz,72Hz,75Hz 1024x768 60Hz,70Hz,75Hz 1152x864 75Hz 1280x1024 60Hz,72Hz,75Hz 1360x768 60Hz 1440x900 60Hz,75Hz 1600x1000 60Hz 1680x1050 60Hz,75Hz Understanding power management Power management is currently configured to a display mode outside the range...
User Manual
Page 22
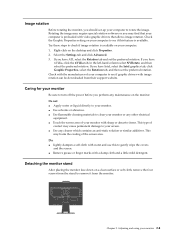
... the monitor stand After placing the monitor face down on a clean surface or soft cloth, remove the four screws from the monitor. Chapter 2. Adjusting and using your computer to remove it from the stand to see if graphic drivers with water and use this feature is available. Check with video graphic drivers that your computer is available on the monitor. This may find that allows image rotation. Do...
... the monitor stand After placing the monitor face down on a clean surface or soft cloth, remove the four screws from the monitor. Chapter 2. Adjusting and using your computer to remove it from the stand to see if graphic drivers with water and use this feature is available. Check with video graphic drivers that your computer is available on the monitor. This may find that allows image rotation. Do...
User Manual
Page 23
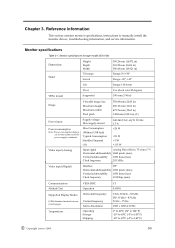
...) VESA mount Supported 100 mm (3.94 in) Image Viewable image size Maximum height Maximum width Pixel pitch 558.68 mm (22.00 in) 296.10 mm (11.66 in) 473.76 mm (18.65 in) 0.282 mm (0.011 in) (V) Power input Power consumption Note: Power consumption figures are for the monitor and the power supply combined. Monitor specifications Table 3-1. Reference information This section contains monitor specifications, instructions to manually install the monitor drover, troubleshooting...
...) VESA mount Supported 100 mm (3.94 in) Image Viewable image size Maximum height Maximum width Pixel pitch 558.68 mm (22.00 in) 296.10 mm (11.66 in) 473.76 mm (18.65 in) 0.282 mm (0.011 in) (V) Power input Power consumption Note: Power consumption figures are for the monitor and the power supply combined. Monitor specifications Table 3-1. Reference information This section contains monitor specifications, instructions to manually install the monitor drover, troubleshooting...

User Manual
Page 24
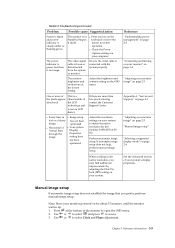
... 95% 5% to 95% Troubleshooting If you have a problem setting up or using your monitor, you are shown on the screen, and the power indicator is flashing green. Select another electrical outlet. switched on page 1-4 3-2 L2251x Wide Flat Panel Monitor User's Guide The system is not image. The automatic image setup function was not performed. "Connecting and turning on your monitor" on page 1-4 "Adjusting your monitor image" on page 2-3 "Adjusting your monitor" on . ● The power cord is loose or disconnected...
... 95% 5% to 95% Troubleshooting If you have a problem setting up or using your monitor, you are shown on the screen, and the power indicator is flashing green. Select another electrical outlet. switched on page 1-4 3-2 L2251x Wide Flat Panel Monitor User's Guide The system is not image. The automatic image setup function was not performed. "Connecting and turning on your monitor" on page 1-4 "Adjusting your monitor image" on page 2-3 "Adjusting your monitor" on . ● The power cord is loose or disconnected...
User Manual
Page 25
... native resolution, you prefer, perform manual image setup. Reference "Understanding power management" on page 2-6 "Connecting and turning on your monitor" on page 1-4 "Adjusting your monitor image" on page 2-3 Appendix A, "Service and Support," on page A-1 "Adjusting your monitor image" on page 2-3 "Manual image setup" "Selecting a supported display mode" on the OSD menu. If automatic image setup does not help, perform manual image setup. Use or to select and press to select Clock and Phase adjustment. Press at the lowest setting. Use or to access. 3. The video signal...
... native resolution, you prefer, perform manual image setup. Reference "Understanding power management" on page 2-6 "Connecting and turning on your monitor" on page 1-4 "Adjusting your monitor image" on page 2-3 Appendix A, "Service and Support," on page A-1 "Adjusting your monitor image" on page 2-3 "Manual image setup" "Selecting a supported display mode" on the OSD menu. If automatic image setup does not help, perform manual image setup. Use or to select and press to select Clock and Phase adjustment. Press at the lowest setting. Use or to access. 3. The video signal...
User Manual
Page 26
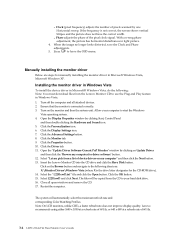
... a refresh rate of 60 Hz. 3-4 L2251x Wide Flat Panel Monitor User's Guide Open the "Update Driver Software-Generic PnP Monitor" window by clicking on the Browse button and navigate to use the Plug and Play feature in light picture. 4. Click the Personalization icon. 6. Click the OK button. 15. Restart the computer. Manually installing the monitor driver Below are steps for driver software" button. 12. Click the Properties button. 10. When the image no longer looks distorted, save the Clock and Phase adjustments...
... a refresh rate of 60 Hz. 3-4 L2251x Wide Flat Panel Monitor User's Guide Open the "Update Driver Software-Generic PnP Monitor" window by clicking on the Browse button and navigate to use the Plug and Play feature in light picture. 4. Click the Personalization icon. 6. Click the OK button. 15. Restart the computer. Manually installing the monitor driver Below are steps for driver software" button. 12. Click the Properties button. 10. When the image no longer looks distorted, save the Clock and Phase adjustments...
User Manual
Page 27
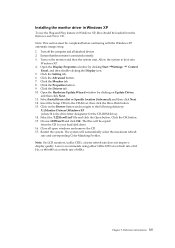
... connected correctly. 3. Open the Display Properties window by clicking on the monitor and then the system unit. Click the Advanced button. 7. Click the OK button. 15. Turn on Update Driver, and then click Next. 11. Clink the Monitor tab. 8. The files will automatically select the maximum refresh rate and corresponding Color Matching Profiles. Close all attached devices 2. Note: On LCD monitors, unlike CRTs, a faster refresh rate...
... connected correctly. 3. Open the Display Properties window by clicking on the monitor and then the system unit. Click the Advanced button. 7. Click the OK button. 15. Turn on Update Driver, and then click Next. 11. Clink the Monitor tab. 8. The files will automatically select the maximum refresh rate and corresponding Color Matching Profiles. Close all attached devices 2. Note: On LCD monitors, unlike CRTs, a faster refresh rate...
User Manual
Page 28
... screen saver or power management. ● Physical damage to covers, bezel, base and cables. ● Scratches or punctures on the side of the display bezel as shown below. Getting further help If you still can't solve your monitor is preventable by warranty: ● Images burned on page A-1. Chapter 3. For more information on contacting the Customer Support Center, please see Appendix A, "Service...
... screen saver or power management. ● Physical damage to covers, bezel, base and cables. ● Scratches or punctures on the side of the display bezel as shown below. Getting further help If you still can't solve your monitor is preventable by warranty: ● Images burned on page A-1. Chapter 3. For more information on contacting the Customer Support Center, please see Appendix A, "Service...
User Manual
Page 29
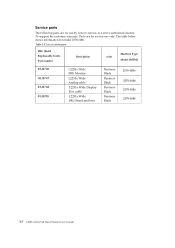
... information for model 2578-HB6. Parts are for use only. List of service parts FRU (Field Replaceable Unit) Part number Description color Machine Type Model (MTM) 45J8746 45J8747 45J8748 45J8749 L2251x Wide FRU Monitor L2251x Wide Analog cable L2251x Wide Display Port cable L2251x Wide FRU Stand and base Business Black Business Black Business Black Business Black 2578-HB6 2578-HB6 2578-HB6 2578-HB6 3-7 L2251x Wide Flat Panel Monitor User's Guide Table 3-3. Service parts The following parts are for service use by Lenovo service, or Lenovo authorized dealers, To support the...
... information for model 2578-HB6. Parts are for use only. List of service parts FRU (Field Replaceable Unit) Part number Description color Machine Type Model (MTM) 45J8746 45J8747 45J8748 45J8749 L2251x Wide FRU Monitor L2251x Wide Analog cable L2251x Wide Display Port cable L2251x Wide FRU Stand and base Business Black Business Black Business Black Business Black 2578-HB6 2578-HB6 2578-HB6 2578-HB6 3-7 L2251x Wide Flat Panel Monitor User's Guide Table 3-3. Service parts The following parts are for service use by Lenovo service, or Lenovo authorized dealers, To support the...

