Manual
Page 4
... 10 Chapter 3 Web-Based Management 13 3.1 Start the Web-Based Management Interface 13 3.2 The Graphic User Interface 14 3.3 Setup Wizard 17 3.4 Wireless 20 3.4.1 Basic Settings 20 3.4.2 Advanced Settings 23 3.4.3 Security 24 3.4.4 Access Control 28 3.4.5 Wireless ...Site Survey 29 3.4.6 WPS Settings 33 3.5 TCP/IP Settings 35 3.5.1 LAN Interface Setup 35 3.5.2 WAN Interface Setup 36 3.6 Firewall Settings 41 MAC Filtering 41 3.7 Management 42 3.7.1 Status 42 3.7.2 Statistics 43 3.7.3 Log 43 3.7.4 Upgrade...
... 10 Chapter 3 Web-Based Management 13 3.1 Start the Web-Based Management Interface 13 3.2 The Graphic User Interface 14 3.3 Setup Wizard 17 3.4 Wireless 20 3.4.1 Basic Settings 20 3.4.2 Advanced Settings 23 3.4.3 Security 24 3.4.4 Access Control 28 3.4.5 Wireless ...Site Survey 29 3.4.6 WPS Settings 33 3.5 TCP/IP Settings 35 3.5.1 LAN Interface Setup 35 3.5.2 WAN Interface Setup 36 3.6 Firewall Settings 41 MAC Filtering 41 3.7 Management 42 3.7.1 Status 42 3.7.2 Statistics 43 3.7.3 Log 43 3.7.4 Upgrade...

Manual
Page 8
... router, and put the other Ethernet network devices. WAN: This WAN port is ready. WPS/Reset Button: Click this port, you can easy setup WPS connection.
... router, and put the other Ethernet network devices. WAN: This WAN port is ready. WPS/Reset Button: Click this port, you can easy setup WPS connection.
Manual
Page 17
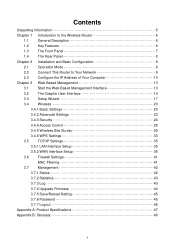
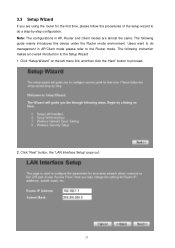
... makes an overall introduction to proceed. 2. Click "Next" button, the "LAN Interface Setup" pops out. 17 3.3 Setup Wizard If you are using the router for the first time, please follow the procedures of the setup wizard to do management in AP, Router and Client modes are almost the same. Note...: The configurations in AP/Client mode please refer to do a step-by-step configuration. Click "Setup Wizard" on the left menu link, and then click the "Next" button to the Setup Wizard 1. The following guide mainly introduces this device under the Router mode environment. Users want to the...
... makes an overall introduction to proceed. 2. Click "Next" button, the "LAN Interface Setup" pops out. 17 3.3 Setup Wizard If you are using the router for the first time, please follow the procedures of the setup wizard to do management in AP, Router and Client modes are almost the same. Note...: The configurations in AP/Client mode please refer to do a step-by-step configuration. Click "Setup Wizard" on the left menu link, and then click the "Next" button to the Setup Wizard 1. The following guide mainly introduces this device under the Router mode environment. Users want to the...
Manual
Page 18
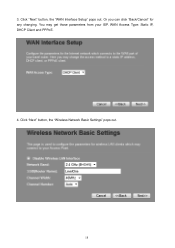
Click "Next" button, the "WAN Interface Setup" pops out. 3. Or you can click "Back/Cancel" for any changing. WAN Access Type: Static IP, DHCP Client and PPPoE. 4. Click "Next" button, the "Wireless Network Basic Settings" pops out. 18 You may get those parameters from your ISP.
Click "Next" button, the "WAN Interface Setup" pops out. 3. Or you can click "Back/Cancel" for any changing. WAN Access Type: Static IP, DHCP Client and PPPoE. 4. Click "Next" button, the "Wireless Network Basic Settings" pops out. 18 You may get those parameters from your ISP.
Manual
Page 19
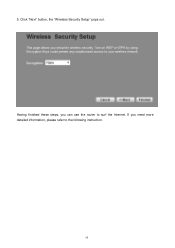
Click "Next" button, the "Wireless Security Setup" pops out. Having finished these steps, you need more detailed information, please refer to surf the Internet. 5. If you can use the router to the following instruction. 19
Click "Next" button, the "Wireless Security Setup" pops out. Having finished these steps, you need more detailed information, please refer to surf the Internet. 5. If you can use the router to the following instruction. 19
Manual
Page 25
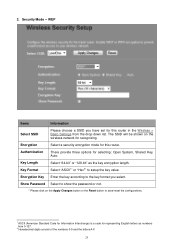
.... 2 Hexadecimal digits consist of the numbers 0-9 and the letters A-F. 25 2. The SSID will be shown on the Apply Changes button or the Reset button to setup the key value. Key Length Select "64-bit" or "128-bit" as numbers from the drop-down list. Encryption Select a security encryption mode for this...
.... 2 Hexadecimal digits consist of the numbers 0-9 and the letters A-F. 25 2. The SSID will be shown on the Apply Changes button or the Reset button to setup the key value. Key Length Select "64-bit" or "128-bit" as numbers from the drop-down list. Encryption Select a security encryption mode for this...
Manual
Page 33
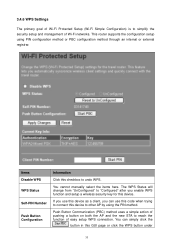
...select the items here. The WPS Status will change from "UnConfigured" to reach the function of easy setup WPS connection. If you use this device as a client, you enable WPS function and setup a wireless security key for this device to other AP by using PIN configuration method or PBC configuration ... on both the AP and the new STA to "Configured" after you can simply click the button in this checkbox to simplify the security setup and management of Wi-Fi networks. Items Disable WPS WPS Status Self-PIN Number Push Button Configuration Information Click this GUI page or click the...
...select the items here. The WPS Status will change from "UnConfigured" to reach the function of easy setup WPS connection. If you use this device as a client, you enable WPS function and setup a wireless security key for this device to other AP by using PIN configuration method or PBC configuration ... on both the AP and the new STA to "Configured" after you can simply click the button in this checkbox to simplify the security setup and management of Wi-Fi networks. Items Disable WPS WPS Status Self-PIN Number Push Button Configuration Information Click this GUI page or click the...
Manual
Page 35
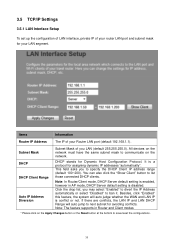
... system will auto jump to save/reset the configurations. 35 This field asks you to list those connected DHCP clients. 3.5 TCP/IP Settings 3.5.1 LAN Interface Setup To set up the configuration of LAN interface, private IP of your router LAN port and subnet mask for avoiding conflicts. If there are conflicts...
... system will auto jump to save/reset the configurations. 35 This field asks you to list those connected DHCP clients. 3.5 TCP/IP Settings 3.5.1 LAN Interface Setup To set up the configuration of LAN interface, private IP of your router LAN port and subnet mask for avoiding conflicts. If there are conflicts...
Manual
Page 36
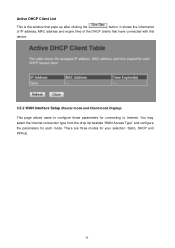
You may select the Internet connection type from the drop list besides "WAN Access Type" and configure the parameters for your selection: Static, DHCP and PPPoE. 36 There are three modes for each mode. Active DHCP Client List This is the window that have connected with this device. 3.5.2 WAN Interface Setup (Router mode and Client mode Display) This page allows users to configure those parameters for connecting to Internet. It shows the information of IP address, MAC address and expire time of the DHCP clients that pops up after clicking the button.
You may select the Internet connection type from the drop list besides "WAN Access Type" and configure the parameters for your selection: Static, DHCP and PPPoE. 36 There are three modes for each mode. Active DHCP Client List This is the window that have connected with this device. 3.5.2 WAN Interface Setup (Router mode and Client mode Display) This page allows users to configure those parameters for connecting to Internet. It shows the information of IP address, MAC address and expire time of the DHCP clients that pops up after clicking the button.
Manual
Page 38
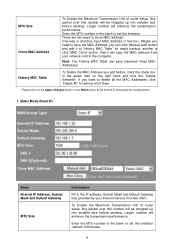
.... One way is click 'MAC Clone' button, then it to set the limitation (default 1500 bytes). 38 To Enable the Maximum Transmission Unit of router setup. History MAC Table To Delete the MAC Address you add before sending. Any packet over this number will copy the MAC address from your network... up into suitable size before , mark the check box in text box. MTU Size Clone MAC Address To Enable the Maximum Transmission Unit of router setup.
.... One way is click 'MAC Clone' button, then it to set the limitation (default 1500 bytes). 38 To Enable the Maximum Transmission Unit of router setup. History MAC Table To Delete the MAC Address you add before sending. Any packet over this number will copy the MAC address from your network... up into suitable size before , mark the check box in text box. MTU Size Clone MAC Address To Enable the Maximum Transmission Unit of router setup.
Manual
Page 39
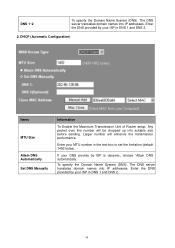
... Domain Name System (DNS). DHCP (Automatic Configuration) Items MTU Size Attain DNS Automatically Set DNS Manually Information To Enable the Maximum Transmission Unit of Router setup. Any packet over this number will enhance the transmission performance. The DNS server translates domain names into IP addresses. If your MTU number in the...
... Domain Name System (DNS). DHCP (Automatic Configuration) Items MTU Size Attain DNS Automatically Set DNS Manually Information To Enable the Maximum Transmission Unit of Router setup. Any packet over this number will enhance the transmission performance. The DNS server translates domain names into IP addresses. If your MTU number in the...
Manual
Page 40
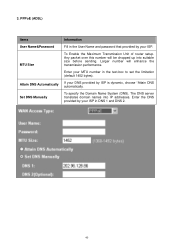
... that provided by ISP is dynamic, choose "Attain DNS automatically. To specify the Domain Name System (DNS). 3. To Enable the Maximum Transmission Unit of router setup. Enter the DNS provided by your DNS provided by your ISP. If your ISP in DNS 1 and DNS 2. 40
... that provided by ISP is dynamic, choose "Attain DNS automatically. To specify the Domain Name System (DNS). 3. To Enable the Maximum Transmission Unit of router setup. Enter the DNS provided by your DNS provided by your ISP. If your ISP in DNS 1 and DNS 2. 40
Quick Install Guide
Page 7
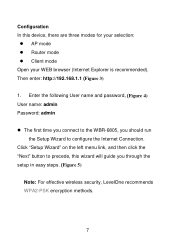
Enter the following User name and password. (Figure 4) User name: admin Password: admin The first time you connect to the WBR-6805, you should run the Setup Wizard to precede, this device, there are three modes for your selection: AP mode Router mode Client... mode Open your WEB browser (Internet Explorer is recommended). Click "Setup Wizard" on the left menu link, and then click the "Next" button to configure the Internet Connection. Then enter: http://192.168.1.1 (Figure ...
Enter the following User name and password. (Figure 4) User name: admin Password: admin The first time you connect to the WBR-6805, you should run the Setup Wizard to precede, this device, there are three modes for your selection: AP mode Router mode Client... mode Open your WEB browser (Internet Explorer is recommended). Click "Setup Wizard" on the left menu link, and then click the "Next" button to configure the Internet Connection. Then enter: http://192.168.1.1 (Figure ...

Quick Install Guide
Page 31
User name 과 password 를 admin Figure 4) User name: admin Password: admin WBR-6805 Setup Wizard Next Figure 5) Note Level One 에서 WPA2-PSK encryption methods 31 3 AP mode Router mode Client mode http://192.168.1.1 (Figure 3) 1.
User name 과 password 를 admin Figure 4) User name: admin Password: admin WBR-6805 Setup Wizard Next Figure 5) Note Level One 에서 WPA2-PSK encryption methods 31 3 AP mode Router mode Client mode http://192.168.1.1 (Figure 3) 1.