Manual
Page 4
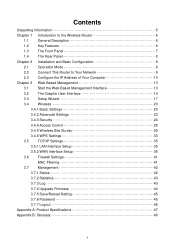
... Network 9 2.3 Configure the IP Address of Your Computer 10 Chapter 3 Web-Based Management 13 3.1 Start the Web-Based Management Interface 13 3.2 The Graphic User Interface 14 3.3 Setup Wizard 17 3.4 Wireless 20 3.4.1 Basic Settings 20 3.4.2 Advanced Settings 23 3.4.3 Security 24 3.4.4 Access Control 28 3.4.5 Wireless Site Survey 29 3.4.6 WPS Settings 33 3.5 TCP/IP Settings 35 3.5.1 LAN Interface Setup 35 3.5.2 WAN Interface Setup 36 3.6 Firewall Settings 41 MAC Filtering 41 3.7 Management 42 3.7.1 Status 42 3.7.2 Statistics 43 3.7.3 Log 43...
... Network 9 2.3 Configure the IP Address of Your Computer 10 Chapter 3 Web-Based Management 13 3.1 Start the Web-Based Management Interface 13 3.2 The Graphic User Interface 14 3.3 Setup Wizard 17 3.4 Wireless 20 3.4.1 Basic Settings 20 3.4.2 Advanced Settings 23 3.4.3 Security 24 3.4.4 Access Control 28 3.4.5 Wireless Site Survey 29 3.4.6 WPS Settings 33 3.5 TCP/IP Settings 35 3.5.1 LAN Interface Setup 35 3.5.2 WAN Interface Setup 36 3.6 Firewall Settings 41 MAC Filtering 41 3.7 Management 42 3.7.1 Status 42 3.7.2 Statistics 43 3.7.3 Log 43...
Manual
Page 6
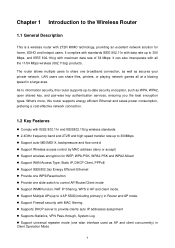
...; Support WAN Access Type: Static IP, DHCP Client, PPPoE Support IEEE802.3az Energy Efficient Ethernet Provide one WPS/Reset button Provide one slide switch to information security, this router supports energy efficient Ethernet and saves power consumption, prefering a cost-effective network connection. 1.2 Key Features Comply with all at a blazing speed in a large area. The router allows multiple users to provide clients auto IP addresses assignment Supports Statistics, VPN Pass-through, System Log Support universal repeater mode (one...
...; Support WAN Access Type: Static IP, DHCP Client, PPPoE Support IEEE802.3az Energy Efficient Ethernet Provide one WPS/Reset button Provide one slide switch to information security, this router supports energy efficient Ethernet and saves power consumption, prefering a cost-effective network connection. 1.2 Key Features Comply with all at a blazing speed in a large area. The router allows multiple users to provide clients auto IP addresses assignment Supports Statistics, VPN Pass-through, System Log Support universal repeater mode (one...
Manual
Page 7
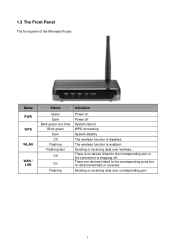
... reboot WPS connecting System stability The wireless function is enabled. Sending or receiving data over wireless. The wireless function is disabled. There are devices linked to the corresponding port or the connection is no device linked to the corresponding ports but no data transmitted or received. 1.3 The Front Panel The front panel of the Wireless Router: Name PWR WPS WLAN WAN / LAN Status Green Dark Blink green one time Blink green Dark Off Flashing Flashing fast Off On Flashing Indication Power...
... reboot WPS connecting System stability The wireless function is enabled. Sending or receiving data over wireless. The wireless function is disabled. There are devices linked to the corresponding port or the connection is no device linked to the corresponding ports but no data transmitted or received. 1.3 The Front Panel The front panel of the Wireless Router: Name PWR WPS WLAN WAN / LAN Status Green Dark Blink green one time Blink green Dark Off Flashing Flashing fast Off On Flashing Indication Power...

Manual
Page 8
...; Incomplete factory setting recovery procedure will cause the Wireless Router malfunction!If you are unfortunately in which users can connect the router to your local distributor for once it , the system will return to enhance the wireless signal and expand the range of signal. Consult your PCs and the other Ethernet network devices. WAN: This WAN port is where you will connect the cable/DSL Modem, or Ethernet. ...
...; Incomplete factory setting recovery procedure will cause the Wireless Router malfunction!If you are unfortunately in which users can connect the router to your local distributor for once it , the system will return to enhance the wireless signal and expand the range of signal. Consult your PCs and the other Ethernet network devices. WAN: This WAN port is where you will connect the cable/DSL Modem, or Ethernet. ...
Manual
Page 9
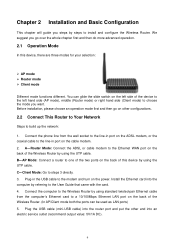
... ADSL or cable modem to the Ethernet WAN port on the back of the Wireless Router. (In AP/Client mode both the ports can glide the slide switch on the left hand side (AP mode), middle (Router mode) or right hand side (Client mode) to a 10/100Mbps Ethernet LAN port on the back of the Wireless Router by using the UTP cable. C---Client Mode: Go to install and configure the Wireless Router. Connect the computer to the Wireless Router by using the UTP cable. Connect the phone line...
... ADSL or cable modem to the Ethernet WAN port on the back of the Wireless Router. (In AP/Client mode both the ports can glide the slide switch on the left hand side (AP mode), middle (Router mode) or right hand side (Client mode) to a 10/100Mbps Ethernet LAN port on the back of the Wireless Router by using the UTP cable. C---Client Mode: Go to install and configure the Wireless Router. Connect the computer to the Wireless Router by using the UTP cable. Connect the phone line...
Manual
Page 10
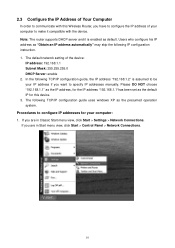
... Start > Settings > Network Connections. The following TCP/IP configuration guide uses windows XP as "Obtain an IP address automatically" may skip the following TCP/IP configuration guide, the IP address "192.168.1.2" is enabled as the default IP for your computer to make it is assumed to configure IP addresses for this Wireless Router, you are in Start menu view, click Start > Control Panel > Network Connections. 10 The default network setting of your computer: 1. In the following IP configuration instruction...
... Start > Settings > Network Connections. The following TCP/IP configuration guide uses windows XP as "Obtain an IP address automatically" may skip the following TCP/IP configuration guide, the IP address "192.168.1.2" is enabled as the default IP for your computer to make it is assumed to configure IP addresses for this Wireless Router, you are in Start menu view, click Start > Control Panel > Network Connections. 10 The default network setting of your computer: 1. In the following IP configuration instruction...
Manual
Page 13
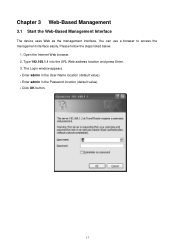
Please follow the steps listed below. 1. You can use a browser to access the management interface easily. Type 192.168.1.1 into the URL Web address location and press Enter. 3. Click OK button. 13 Open the Internet Web browser. 2. Enter admin in the User Name location (default value). - The Login window appears. - Enter admin in the Password location (default value). - Chapter 3 Web-Based Management 3.1 Start the Web-Based Management Interface The device uses Web as the management interface.
Please follow the steps listed below. 1. You can use a browser to access the management interface easily. Type 192.168.1.1 into the URL Web address location and press Enter. 3. Click OK button. 13 Open the Internet Web browser. 2. Enter admin in the User Name location (default value). - The Login window appears. - Enter admin in the Password location (default value). - Chapter 3 Web-Based Management 3.1 Start the Web-Based Management Interface The device uses Web as the management interface.
Manual
Page 21
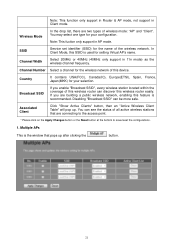
... SSID If you are two types of this SSID is the window that are connecting to the access point. * Please click on the Apply Changes button or the Reset button at the bottom to save/reset the configurations. 1. Associated Client Click "Show Active Clients" button, then an "Active Wireless Client Table" will pop up after clicking the button. 21 Wireless Mode In the drop list, there are building a public wireless network, enabling this wireless router easily.
... SSID If you are two types of this SSID is the window that are connecting to the access point. * Please click on the Apply Changes button or the Reset button at the bottom to save/reset the configurations. 1. Associated Client Click "Show Active Clients" button, then an "Active Wireless Client Table" will pop up after clicking the button. 21 Wireless Mode In the drop list, there are building a public wireless network, enabling this wireless router easily.
Manual
Page 24
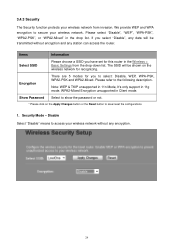
...-down list. The SSID will be shown on the Apply Changes button or the Reset button to show the password or not. * Please click on the wireless network for you to the following description. Items Information Select SSID Please choose a SSID you select "Disable", any station can access the router. Encryption There are 5 modes for recognizing. Security Mode - If you have set for this router in Client mode...
...-down list. The SSID will be shown on the Apply Changes button or the Reset button to show the password or not. * Please click on the wireless network for you to the following description. Items Information Select SSID Please choose a SSID you select "Disable", any station can access the router. Encryption There are 5 modes for recognizing. Security Mode - If you have set for this router in Client mode...
Manual
Page 25
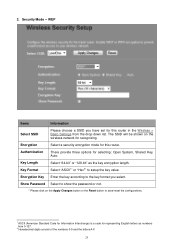
... on the wireless network for this router in the Wireless > Basic Settings from 0-127. 2 Hexadecimal digits consist of the numbers 0-9 and the letters A-F. 25 2. The SSID will be shown on the Apply Changes button or the Reset button to setup the key value. Key Format Select "ASCII1" or "Hex2" to save/reset the configurations. 1 ASCII (American Standard Code for Information Interchange) is a code for selecting: Open System, Shared Key, Auto. Security Mode --
... on the wireless network for this router in the Wireless > Basic Settings from 0-127. 2 Hexadecimal digits consist of the numbers 0-9 and the letters A-F. 25 2. The SSID will be shown on the Apply Changes button or the Reset button to setup the key value. Key Format Select "ASCII1" or "Hex2" to save/reset the configurations. 1 ASCII (American Standard Code for Information Interchange) is a code for selecting: Open System, Shared Key, Auto. Security Mode --
Manual
Page 28
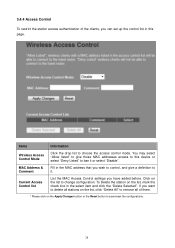
... device or select "Deny Listed" to ban it . Click on the list to choose the access control mode. MAC Address & Comment Fill in the MAC address that you can set up the control list in the select item and click the "Delete Selected". Items Information Wireless Access Control Mode Click the drop list to change configuration. 3.4.4 Access Control To restrict the station access authentication of them. * Please click on the Apply Changes button or the Reset button...
... device or select "Deny Listed" to ban it . Click on the list to choose the access control mode. MAC Address & Comment Fill in the MAC address that you can set up the control list in the select item and click the "Delete Selected". Items Information Wireless Access Control Mode Click the drop list to change configuration. 3.4.4 Access Control To restrict the station access authentication of them. * Please click on the Apply Changes button or the Reset button...
Manual
Page 35
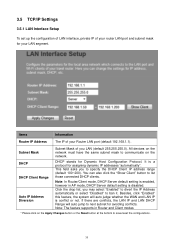
... devices on the network must have the same subnet mask to list those connected DHCP clients. You can also click the "Show Client" button to communicate on the Apply Changes button or the Reset button at the bottom to specify the DHCP Client IP address range (default 100~200). 3.5 TCP/IP Settings 3.5.1 LAN Interface Setup To set up the configuration of LAN interface, private IP of your Router LAN port (default 192.168.1.1). Note: In Router/Client mode, DHCP Server default setting is enabled, however in Router and Client modes...
... devices on the network must have the same subnet mask to list those connected DHCP clients. You can also click the "Show Client" button to communicate on the Apply Changes button or the Reset button at the bottom to specify the DHCP Client IP address range (default 100~200). 3.5 TCP/IP Settings 3.5.1 LAN Interface Setup To set up the configuration of LAN interface, private IP of your Router LAN port (default 192.168.1.1). Note: In Router/Client mode, DHCP Server default setting is enabled, however in Router and Client modes...
Manual
Page 36
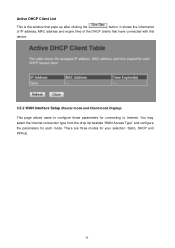
There are three modes for each mode. Active DHCP Client List This is the window that have connected with this device. 3.5.2 WAN Interface Setup (Router mode and Client mode Display) This page allows users to configure those parameters for connecting to Internet. You may select the Internet connection type from the drop list besides "WAN Access Type" and configure the parameters for your selection: Static, DHCP and PPPoE. 36 It shows the information of IP address, MAC address and expire time of the DHCP clients that pops up after clicking the button.
There are three modes for each mode. Active DHCP Client List This is the window that have connected with this device. 3.5.2 WAN Interface Setup (Router mode and Client mode Display) This page allows users to configure those parameters for connecting to Internet. You may select the Internet connection type from the drop list besides "WAN Access Type" and configure the parameters for your selection: Static, DHCP and PPPoE. 36 It shows the information of IP address, MAC address and expire time of the DHCP clients that pops up after clicking the button.
Manual
Page 38
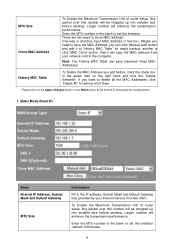
... MAC Address you add before sending. Any packet over this number will be chopped up into suitable size before , mark the check box in the computer. Static Mode (fixed IP) Items Internet IP Address, Subnet Mask and Default Gateway MTU Size Information Fill in the IP address, Subnet Mask and Default Gateway that provided by your network card in the select item on the Apply Changes button or the Reset button...
... MAC Address you add before sending. Any packet over this number will be chopped up into suitable size before , mark the check box in the computer. Static Mode (fixed IP) Items Internet IP Address, Subnet Mask and Default Gateway MTU Size Information Fill in the IP address, Subnet Mask and Default Gateway that provided by your network card in the select item on the Apply Changes button or the Reset button...
Manual
Page 39
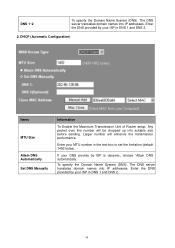
DHCP (Automatic Configuration) Items MTU Size Attain DNS Automatically Set DNS Manually Information To Enable the Maximum Transmission Unit of Router setup. Larger number will be chopped up into IP addresses. The DNS server translates domain names into suitable size before sending. Any packet over this number will enhance the transmission performance. Enter the DNS provided by ISP is dynamic, choose "Attain DNS automatically. Enter your ISP in...
DHCP (Automatic Configuration) Items MTU Size Attain DNS Automatically Set DNS Manually Information To Enable the Maximum Transmission Unit of Router setup. Larger number will be chopped up into IP addresses. The DNS server translates domain names into suitable size before sending. Any packet over this number will enhance the transmission performance. Enter the DNS provided by ISP is dynamic, choose "Attain DNS automatically. Enter your ISP in...
Manual
Page 45
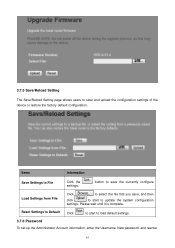
... the Username, New password, and reenter 45 Reset Settings to Default Click to start to save , and then click to start to File Click the settings. Please wait until it is complete. button to save the currently configure Load Settings from File Click to select the file that you save and upload the configuration settings of the device or restore the factory default configuration. 3.7.5 Save/Reload Setting The Save/Reload Setting page allows users to update...
... the Username, New password, and reenter 45 Reset Settings to Default Click to start to save , and then click to start to File Click the settings. Please wait until it is complete. button to save the currently configure Load Settings from File Click to select the file that you save and upload the configuration settings of the device or restore the factory default configuration. 3.7.5 Save/Reload Setting The Save/Reload Setting page allows users to update...
Manual
Page 47
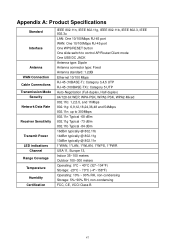
Appendix A: Product Specifications Standard Interface Antenna WAN Connection Cable Connections Transmission Mode Security Network Data Rate Receiver Sensitivity Transmit Power LED indications Channel Range Coverage Temperature Humidity Certification IEEE 802.11n, IEEE 802.11g, IEEE 802.11b, IEEE 802.3, IEEE 802.3u LAN: One 10/100Mbps RJ-45 port WAN: One 10/100Mbps RJ-45 port One WPS/RESET button One slide switch to control AP/Router/Client mode One USB DC JACK Antenna type: Dipole Antenna...
Appendix A: Product Specifications Standard Interface Antenna WAN Connection Cable Connections Transmission Mode Security Network Data Rate Receiver Sensitivity Transmit Power LED indications Channel Range Coverage Temperature Humidity Certification IEEE 802.11n, IEEE 802.11g, IEEE 802.11b, IEEE 802.3, IEEE 802.3u LAN: One 10/100Mbps RJ-45 port WAN: One 10/100Mbps RJ-45 port One WPS/RESET button One slide switch to control AP/Router/Client mode One USB DC JACK Antenna type: Dipole Antenna...
Manual
Page 48
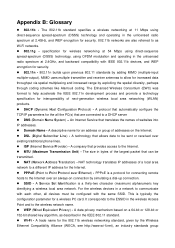
...) alphanumeric key identifying a wireless local area network. A data privacy mechanism based on the Internet. DSL (Digital Subscriber Line) - For the wireless devices in the unlicensed radio spectrum at 2.4GHz, and backward compatibility with the same SSID. specification for an address or group of websites into IP addresses. Domain Name - An Internet Service that are also referred to the Internet over Ethernet) - A descriptive name for wireless networking at...
...) alphanumeric key identifying a wireless local area network. A data privacy mechanism based on the Internet. DSL (Digital Subscriber Line) - For the wireless devices in the unlicensed radio spectrum at 2.4GHz, and backward compatibility with the same SSID. specification for an address or group of websites into IP addresses. Domain Name - An Internet Service that are also referred to the Internet over Ethernet) - A descriptive name for wireless networking at...
Quick Install Guide
Page 6
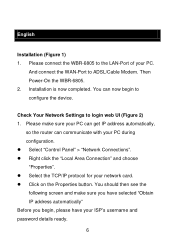
... have selected "Obtain IP address automatically" Before you begin to the LAN-Port of your network card. Click on the Properties button. Check Your Network Settings to ADSL/Cable Modem. You can communicate with your PC during configuration. Select "Control Panel" > "Network Connections". Right click the "Local Area Connection" and choose "Properties". Select the TCP/IP protocol for your PC. And connect the WAN-Port to login web UI (Figure 2) 1.
... have selected "Obtain IP address automatically" Before you begin to the LAN-Port of your network card. Click on the Properties button. Check Your Network Settings to ADSL/Cable Modem. You can communicate with your PC during configuration. Select "Control Panel" > "Network Connections". Right click the "Local Area Connection" and choose "Properties". Select the TCP/IP protocol for your PC. And connect the WAN-Port to login web UI (Figure 2) 1.
Quick Install Guide
Page 7
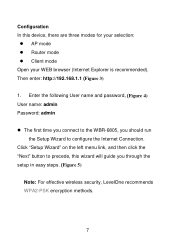
... left menu link, and then click the "Next" button to precede, this device, there are three modes for your selection: AP mode Router mode Client mode Open your WEB browser (Internet Explorer is recommended). Enter the following User name and password. (Figure 4) User name: admin Password: admin The first time you connect to the WBR-6805, you through the setup in easy steps. (Figure 5) Note: For effective wireless security, LevelOne recommends WPA2...
... left menu link, and then click the "Next" button to precede, this device, there are three modes for your selection: AP mode Router mode Client mode Open your WEB browser (Internet Explorer is recommended). Enter the following User name and password. (Figure 4) User name: admin Password: admin The first time you connect to the WBR-6805, you through the setup in easy steps. (Figure 5) Note: For effective wireless security, LevelOne recommends WPA2...