

Service Manual
Page 4
... Output Bin Sensor 2-22 Operator Panel Problem 2-22 Paper Feed Problem, 500-Sheet Option or 200-Sheet Second Drawer, Non-Rt 2-23 Paper Feed, Base Printer 2-23 Paper Feed, Duplex Unit 2-25 Paper Feed Problem, Envelope+ Feeder/ 100-Sheet Auxiliary Feeder 2-26 Paper Feed Problem, 200-Sheet Second Drawer, Rt . . 2-26...
... Output Bin Sensor 2-22 Operator Panel Problem 2-22 Paper Feed Problem, 500-Sheet Option or 200-Sheet Second Drawer, Non-Rt 2-23 Paper Feed, Base Printer 2-23 Paper Feed, Duplex Unit 2-25 Paper Feed Problem, Envelope+ Feeder/ 100-Sheet Auxiliary Feeder 2-26 Paper Feed Problem, 200-Sheet Second Drawer, Rt . . 2-26...

Service Manual
Page 7
... Board Connectors 5-4 RIP Board 5-6 Board Installation Hardware 5-7 Mirror Motor/Fan Cable 5-7 Operator Panel/Output Bin Sensor Cable 5-8 Printhead Connector Locations 5-10 Duplex Autoconnect Cable 5-10 Printer Ground Straps 5-11 High Capacity Feeder Board Connectors 5-12 vii Edge Guide Asm 4-43 Dual Rear Feeder - Gear Plate Asm 4-43 Dual Rear Feeder -
... Board Connectors 5-4 RIP Board 5-6 Board Installation Hardware 5-7 Mirror Motor/Fan Cable 5-7 Operator Panel/Output Bin Sensor Cable 5-8 Printhead Connector Locations 5-10 Duplex Autoconnect Cable 5-10 Printer Ground Straps 5-11 High Capacity Feeder Board Connectors 5-12 vii Edge Guide Asm 4-43 Dual Rear Feeder - Gear Plate Asm 4-43 Dual Rear Feeder -

Service Manual
Page 9
.... Evaluation and verification of 770-795 nanometers. Class I (1) laser products, and elsewhere is certified in the wavelength region of operation in which it operates. The printer contains internally a Class IIIb (3b) laser that is not intended to state or imply that only that does... not infringe any human access to laser radiation above a Class I laser product conforming to the requirements of DHHS 21...
.... Evaluation and verification of 770-795 nanometers. Class I (1) laser products, and elsewhere is certified in the wavelength region of operation in which it operates. The printer contains internally a Class IIIb (3b) laser that is not intended to state or imply that only that does... not infringe any human access to laser radiation above a Class I laser product conforming to the requirements of DHHS 21...

Service Manual
Page 17
PCL 5 is designed and manufactured by Lexmark International, Inc., to be compatible with the PCL 5 language. This printer is Hewlett-Packard Company's designation of a set of printer commands (language) and functions included in its printer products. Notices and Safety Information xvii Other ...other countries. This means the printer recognizes PCL 5 commands used in various applications programs, and that the printer emulates the functions corresponding to compatibility are trademarks of the Hewlett-Packard Company. 4049-XXX Trademarks Optra and Lexmark are included in the 4049 ...
PCL 5 is designed and manufactured by Lexmark International, Inc., to be compatible with the PCL 5 language. This printer is Hewlett-Packard Company's designation of a set of printer commands (language) and functions included in its printer products. Notices and Safety Information xvii Other ...other countries. This means the printer recognizes PCL 5 commands used in various applications programs, and that the printer emulates the functions corresponding to compatibility are trademarks of the Hewlett-Packard Company. 4049-XXX Trademarks Optra and Lexmark are included in the 4049 ...

Service Manual
Page 23
...removing and installing FRUs. • "Connector Locations" uses illustrations to identify the major components and test points on the printer. • "Preventive Maintenance" contains safety inspection guidelines, lubrication specifications, and maintenance information to repair it. Special tools...failing field replaceable units (FRUs). • "Diagnostic Aids" contains tests and checks used to locate or repeat symptoms of the printer, available options, and the maintenance approach used to prevent problems and maintain optimum performance. • "Parts Catalog" contains illustrations ...
...removing and installing FRUs. • "Connector Locations" uses illustrations to identify the major components and test points on the printer. • "Preventive Maintenance" contains safety inspection guidelines, lubrication specifications, and maintenance information to repair it. Special tools...failing field replaceable units (FRUs). • "Diagnostic Aids" contains tests and checks used to locate or repeat symptoms of the printer, available options, and the maintenance approach used to prevent problems and maintain optimum performance. • "Parts Catalog" contains illustrations ...

Service Manual
Page 24
General Information The Optra™ Laser Printers are the same as Lx+, model Lxi is the same as Lx, and model Rn+ is the same as R+. Processing speed and efficiency have a maximum ...
General Information The Optra™ Laser Printers are the same as Lx+, model Lxi is the same as Lx, and model Rn+ is the same as R+. Processing speed and efficiency have a maximum ...

Service Manual
Page 26
This printer can be serviced without being connected to determine the symptom and repair the failure. Tools Required For Service Flat-blade screwdriver #1 Phillips screwdriver #2 Phillips screwdriver 5.5 ...
This printer can be serviced without being connected to determine the symptom and repair the failure. Tools Required For Service Flat-blade screwdriver #1 Phillips screwdriver #2 Phillips screwdriver 5.5 ...

Service Manual
Page 28
4049-XXX 2. Two-digit codes are messages for personal safety and to prevent damage to repair a malfunctioning printer. 2-1 Use the service error code, symptom table, service checks, and diagnostic aids to determine the corrective action necessary to the printer. Diagnostic Information Start Remove power from the printer before you connect or disconnect any cable or electronic board or assembly for the user, but if they recur frequently or at inappropriate times they may be symptomatic of a service problem.
4049-XXX 2. Two-digit codes are messages for personal safety and to prevent damage to repair a malfunctioning printer. 2-1 Use the service error code, symptom table, service checks, and diagnostic aids to determine the corrective action necessary to the printer. Diagnostic Information Start Remove power from the printer before you connect or disconnect any cable or electronic board or assembly for the user, but if they recur frequently or at inappropriate times they may be symptomatic of a service problem.

Service Manual
Page 29
... manually while motors running and previous page in path. Jam at wrong time. Tray is empty or not installed, paper jam in entry throat, or printer is either not leaving the duplex entry sensor in time or not making or unmaking the duplex exit sensor in time after pick attempt. See...
... manually while motors running and previous page in path. Jam at wrong time. Tray is empty or not installed, paper jam in entry throat, or printer is either not leaving the duplex entry sensor in time or not making or unmaking the duplex exit sensor in time after pick attempt. See...

Service Manual
Page 30
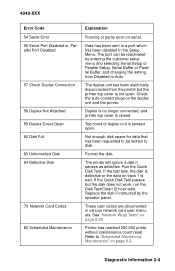
...test page. Page too complex to print.To verify that the printer recognizes all the installed memory, go to store pages is not supported by the Optra printer. Not enough flash memory for data requested to write. 2-3 Printer needs data on the printout matches the installed memory. Flash problem...and print the "Print Menus" test page. Font card format not supported by printer. If the error recurs replace the Flash SIMM. The printer detects a defective Flash SIMM. To verify that the printer recognizes all the installed memory, go to collate the print job. Defective font ...
...test page. Page too complex to print.To verify that the printer recognizes all the installed memory, go to store pages is not supported by the Optra printer. Not enough flash memory for data requested to write. 2-3 Printer needs data on the printout matches the installed memory. Flash problem...and print the "Print Menus" test page. Font card format not supported by printer. If the error recurs replace the Flash SIMM. The printer detects a defective Flash SIMM. To verify that the printer recognizes all the installed memory, go to collate the print job. Defective font ...
Service Manual
Page 31
... instructed by entering the customer setup menu and selecting Serial Setup or Parallel Setup, Serial Buffer or Parallel Buffer, and changing the setting from the printer but the disk does not work, run the Disk Test/Clean (2 hour test). These user codes are documented in the Setup Menu. Refer to disk... that has been requested to be reactivated by the operator panel. If the test fails, the disk is defective or the data on page 2-22 Printer has reached 200,000 prints without maintenance count reset. See "Network Wrap Tests" on track 1 is not open . If the Quick Disk Test passes ...
... instructed by entering the customer setup menu and selecting Serial Setup or Parallel Setup, Serial Buffer or Parallel Buffer, and changing the setting from the printer but the disk does not work, run the Disk Test/Clean (2 hour test). These user codes are documented in the Setup Menu. Refer to disk... that has been requested to be reactivated by the operator panel. If the test fails, the disk is defective or the data on page 2-22 Printer has reached 200,000 prints without maintenance count reset. See "Network Wrap Tests" on track 1 is not open . If the Quick Disk Test passes ...

Service Manual
Page 32
...roll if the continuity is correct. The microcode data will be discarded and must be programmed into the engine board during POST, or while the printer was idle (not printing or receiving data), or while trying to print one of the transfer roll is continuity between the transfer roller and ... bearing of the internal test pages, replace the RIP Board. If the error appeared while sending a job from the host computer to the printer, turn the printer off, then turn it on the HVPS; Verify correct cable connections from the engine board to the HVPS. replace the transfer roll if the...
...roll if the continuity is correct. The microcode data will be discarded and must be programmed into the engine board during POST, or while the printer was idle (not printing or receiving data), or while trying to print one of the transfer roll is continuity between the transfer roller and ... bearing of the internal test pages, replace the RIP Board. If the error appeared while sending a job from the host computer to the printer, turn the printer off, then turn it on the HVPS; Verify correct cable connections from the engine board to the HVPS. replace the transfer roll if the...

Service Manual
Page 34
Replace the engine board. NVRAM failure. POR the printer. Reseat the DRAM and run the diagnostic Memory Test for DRAM. Replace network card 1. Network card 1 RAM failure. Replace the RIP Board. Unable to zero ...PQET SRAM. Network card 2 processor failure. Engine ASIC RAM failure. Replace the engine board. Printhead crystal not functioning correctly. POR the printer. Replace the RIP Board. PQET SRAM failed verification test. Reseat the DRAM and run the diagnostic Memory Test for DRAM. Bad DRAM in the base...
Replace the engine board. NVRAM failure. POR the printer. Reseat the DRAM and run the diagnostic Memory Test for DRAM. Replace network card 1. Network card 1 RAM failure. Replace the RIP Board. Unable to zero ...PQET SRAM. Network card 2 processor failure. Engine ASIC RAM failure. Replace the engine board. Printhead crystal not functioning correctly. POR the printer. Replace the RIP Board. PQET SRAM failed verification test. Reseat the DRAM and run the diagnostic Memory Test for DRAM. Bad DRAM in the base...

Service Manual
Page 36
... installed and grounded correctly. Contact your next level of support. Duplex error. Contact your next level of support. Communications between the duplex unit and the printer have failed. Verify that the network card is installed and grounded correctly. Duplex system board failure. General network 2 card software error. See "Duplex" on page...
... installed and grounded correctly. Contact your next level of support. Duplex error. Contact your next level of support. Communications between the duplex unit and the printer have failed. Verify that the network card is installed and grounded correctly. Duplex system board failure. General network 2 card software error. See "Duplex" on page...

Service Manual
Page 37
...high speed. 6. Check for approximately ten seconds. One and one half rows of pels appear on , it performs a Power-On Self Test. Note: The printer may be idle for about five seconds just before the Ready screen appears. 4. Diamonds fill the display and then clear. 3. The ready screen appears on... if you turn on. [Performing Self Test] appears on the display. The drive motor runs for correct POST functioning by observing the following: 1. Printer idle time is shorter if the fuser is installed, the duplex drive motor turns on the display. The fuser lamp and the fan turn the...
...high speed. 6. Check for approximately ten seconds. One and one half rows of pels appear on , it performs a Power-On Self Test. Note: The printer may be idle for about five seconds just before the Ready screen appears. 4. Diamonds fill the display and then clear. 3. The ready screen appears on... if you turn on. [Performing Self Test] appears on the display. The drive motor runs for correct POST functioning by observing the following: 1. Printer idle time is shorter if the fuser is installed, the duplex drive motor turns on the display. The fuser lamp and the fan turn the...

Service Manual
Page 38
... Problem, High Capacity Feeder" on page 2-32. 2-11 "Random Marks" on page 2-29 Automatic Paper Size Sensing Problem Service Check. "Paper Feed, Base Printer" on page 2-13. "Black Page" on page 2-23. "Operator Panel Problem" on page 2-26. "Paper Feed Problem, Envelope+ Feeder/ 100-Sheet Auxiliary...Drawer, Rt" on page 2-14. Machine Hangs Displaying Diamonds Service Check. "Blank Page" on page 2-26. Operator Panel Paper Feed, Base Printer Paper Feed, Duplex Unit Paper Feed Problem, 500Sheet Option or 200-Sheet Second Drawer, Non-Rt Paper Feed Problem, Envelope+ Feeder/100-Sheet ...
... Problem, High Capacity Feeder" on page 2-32. 2-11 "Random Marks" on page 2-29 Automatic Paper Size Sensing Problem Service Check. "Paper Feed, Base Printer" on page 2-13. "Black Page" on page 2-23. "Operator Panel Problem" on page 2-26. "Paper Feed Problem, Envelope+ Feeder/ 100-Sheet Auxiliary...Drawer, Rt" on page 2-14. Machine Hangs Displaying Diamonds Service Check. "Blank Page" on page 2-26. Operator Panel Paper Feed, Base Printer Paper Feed, Duplex Unit Paper Feed Problem, 500Sheet Option or 200-Sheet Second Drawer, Non-Rt Paper Feed Problem, Envelope+ Feeder/100-Sheet ...

Service Manual
Page 41
... condition of each HVPS contact and make sure the actuator on top of the cartridge is present and extends into the printhead shroud when the printer top cover is making contact with the RIP Board removed. If the voltages are correct; Check the continuity of the HVPS cable.
... condition of each HVPS contact and make sure the actuator on top of the cartridge is present and extends into the printhead shroud when the printer top cover is making contact with the RIP Board removed. If the voltages are correct; Check the continuity of the HVPS cable.

Service Manual
Page 42
... Print This can be caused by a damaged gear train or by paper slippage in the feed roll or transfer roll. If no voltage reaching the printer, LVPS failure, blown LVPS fuse, failure of the On/Off switch or switch linkage, or a shorted electrical component. make sure each spring-loaded contact returns...
... Print This can be caused by a damaged gear train or by paper slippage in the feed roll or transfer roll. If no voltage reaching the printer, LVPS failure, blown LVPS fuse, failure of the On/Off switch or switch linkage, or a shorted electrical component. make sure each spring-loaded contact returns...

Service Manual
Page 43
...the following voltages: Connector Engine Board Duplex System Board J3-3 J3-5 J3-7 J5-2 J5-4 J5-6 Voltage to the duplex system board, remove the printer RIP Board. Duplex The duplex unit should move - the front shafts should turn and the input deflector should home - The duplex unit homes on in... powering on its own as necessary. With power on , or just before the [Ready] screen is functional. To check the connection from the printer. Repair or replace the failing component or cable as a signal that it is either damaged or is bad. immediately when you install the duplex ...
...the following voltages: Connector Engine Board Duplex System Board J3-3 J3-5 J3-7 J5-2 J5-4 J5-6 Voltage to the duplex system board, remove the printer RIP Board. Duplex The duplex unit should move - the front shafts should turn and the input deflector should home - The duplex unit homes on in... powering on its own as necessary. With power on , or just before the [Ready] screen is functional. To check the connection from the printer. Repair or replace the failing component or cable as a signal that it is either damaged or is bad. immediately when you install the duplex ...

Service Manual
Page 44
... replace the duplex system board. The tray roller should move freely. While the 23 is turned, but has been lost. Measure the voltage on the printer. it should fluctuate from the duplexer into the bottom cover. Remove the duplex top cover and table cover and reinstall the duplex unit on J5... error indicates that the gear at the right edge of the paper tray. Make sure the duplex unit is fed with the gear on the printer, and that communication between the printer and duplex unit had been established but allow the paper to +5 VDC as above; Measure the voltage on the...
... replace the duplex system board. The tray roller should move freely. While the 23 is turned, but has been lost. Measure the voltage on the printer. it should fluctuate from the duplexer into the bottom cover. Remove the duplex top cover and table cover and reinstall the duplex unit on J5... error indicates that the gear at the right edge of the paper tray. Make sure the duplex unit is fed with the gear on the printer, and that communication between the printer and duplex unit had been established but allow the paper to +5 VDC as above; Measure the voltage on the...

