
Service Manual
Page 4
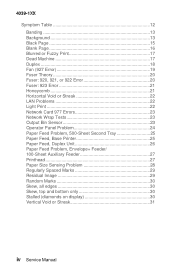
... Black Page 15 Blank Page 16 Blurred or Fuzzy Print 17 Dead Machine 17 Duplex 18 Fan (927 Error 19 Fuser Theory 20 Fuser: 920, 921, or 922 Error 20 Fuser: 923 Error 21 Honeycomb 21 Horizontal Void or Streak 22 LAN Problems 22 Light Print 22 Network Card 977 Errors 23 Network Wrap Tests 23 Output Bin Sensor 23 Operator Panel Problem 24 Paper Feed Problem, 500-Sheet Second Tray 25 Paper Feed, Base Printer 25 Paper Feed, Duplex Unit 26 Paper Feed Problem, Envelope+ Feeder/ 100-Sheet Auxiliary Feeder 27 Printhead 27 Paper Size Sensing Problem...
... Black Page 15 Blank Page 16 Blurred or Fuzzy Print 17 Dead Machine 17 Duplex 18 Fan (927 Error 19 Fuser Theory 20 Fuser: 920, 921, or 922 Error 20 Fuser: 923 Error 21 Honeycomb 21 Horizontal Void or Streak 22 LAN Problems 22 Light Print 22 Network Card 977 Errors 23 Network Wrap Tests 23 Output Bin Sensor 23 Operator Panel Problem 24 Paper Feed Problem, 500-Sheet Second Tray 25 Paper Feed, Base Printer 25 Paper Feed, Duplex Unit 26 Paper Feed Problem, Envelope+ Feeder/ 100-Sheet Auxiliary Feeder 27 Printhead 27 Paper Size Sensing Problem...
Service Manual
Page 6
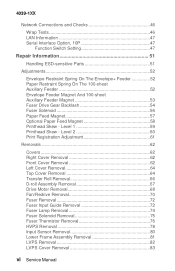
... Front Cover Removal 62 Left Cover Removal 64 Top Cover Removal 64 Transfer Roll Removal 66 D-roll Assembly Removal 67 Drive Motor Removal 68 Fan/Redrive Removal 70 Fuser Removal 72 Fuser Input Guide Removal 72 Fuser Lamp Removal 74 Fuser Solenoid Removal 75 Fuser Thermistor Removal 76 HVPS Removal 78 Input Sensor Removal 80 Lower Frame Assembly Removal 81 LVPS Removal 82 LVPS Cover Removal 83 vi Service Manual 4039-1XX Network Connections and Checks 46 Wrap Tests 46 LAN Information 47 Serial Interface Option, 10P 47 Function Switch Setting 47 Repair...
... Front Cover Removal 62 Left Cover Removal 64 Top Cover Removal 64 Transfer Roll Removal 66 D-roll Assembly Removal 67 Drive Motor Removal 68 Fan/Redrive Removal 70 Fuser Removal 72 Fuser Input Guide Removal 72 Fuser Lamp Removal 74 Fuser Solenoid Removal 75 Fuser Thermistor Removal 76 HVPS Removal 78 Input Sensor Removal 80 Lower Frame Assembly Removal 81 LVPS Removal 82 LVPS Cover Removal 83 vi Service Manual 4039-1XX Network Connections and Checks 46 Wrap Tests 46 LAN Information 47 Serial Interface Option, 10P 47 Function Switch Setting 47 Repair...

Service Manual
Page 14
... environmental and safety instructions. • "Diagnostic Information" contains error code table, symptom table, and service checks used to isolate failing field replaceable units (FRUs). • "Diagnostic Aids" contains tests and checks used to locate or repeat symptoms of the printer and the maintenance approach used to prevent problems and maintain optimum performance. • "Parts Catalog" contains illustrations and part numbers for making printer adjustments and removing and installing FRUs. • "Connector Locations" uses illustrations to identify...
... environmental and safety instructions. • "Diagnostic Information" contains error code table, symptom table, and service checks used to isolate failing field replaceable units (FRUs). • "Diagnostic Aids" contains tests and checks used to locate or repeat symptoms of the printer and the maintenance approach used to prevent problems and maintain optimum performance. • "Parts Catalog" contains illustrations and part numbers for making printer adjustments and removing and installing FRUs. • "Connector Locations" uses illustrations to identify...

Service Manual
Page 18
... Customer Setup Dynamic Random Access Memory Electrically Erasable Programmable ReadOnly Memory Electrophotographic Process Electrostatic Discharge Field Replaceable Unit High Voltage Power Supply Local Area Network Light Amplification by Stimulated Emission of Radiation Liquid Crystal Display Light-Emitting Diode Low Voltage Power Supply Nonvolatile Random Access Memory Original Equipment Manufacturer Problem Isolation Charts Picture Element Power-On Reset Power-On Self Test Print Quality Enhancement Technology Raster Image Processor Read-Only Storage Static Random Access Memory Used Parts...
... Customer Setup Dynamic Random Access Memory Electrically Erasable Programmable ReadOnly Memory Electrophotographic Process Electrostatic Discharge Field Replaceable Unit High Voltage Power Supply Local Area Network Light Amplification by Stimulated Emission of Radiation Liquid Crystal Display Light-Emitting Diode Low Voltage Power Supply Nonvolatile Random Access Memory Original Equipment Manufacturer Problem Isolation Charts Picture Element Power-On Reset Power-On Self Test Print Quality Enhancement Technology Raster Image Processor Read-Only Storage Static Random Access Memory Used Parts...

Service Manual
Page 19
... in time. See "Paper Feed, Base Printer" on page 25. Error/Code 20 Paper Jam 21 Paper Jam 22 Paper Jam 23 Paper Jam 24 Short Paper 25 Incorrect Manual Feed 27 Change Envelope/Paper 28 Load Envelope/Paper 29 Output Bin Full 30 Top Cover Open or Print Cartridge Missing Action The input sensor was not unmade in path. Jam at inappropriate times they recur frequently or at the duplex unit. The defined paper size is requesting a manual feed. 4039-1XX Diagnostic Information 4039 Diagnostics: Failures With Error Codes Two-digit codes are wrong size.
... in time. See "Paper Feed, Base Printer" on page 25. Error/Code 20 Paper Jam 21 Paper Jam 22 Paper Jam 23 Paper Jam 24 Short Paper 25 Incorrect Manual Feed 27 Change Envelope/Paper 28 Load Envelope/Paper 29 Output Bin Full 30 Top Cover Open or Print Cartridge Missing Action The input sensor was not unmade in path. Jam at inappropriate times they recur frequently or at the duplex unit. The defined paper size is requesting a manual feed. 4039-1XX Diagnostic Information 4039 Diagnostics: Failures With Error Codes Two-digit codes are wrong size.
Service Manual
Page 20
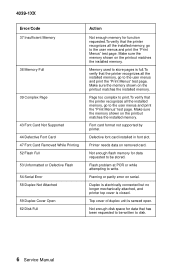
... printer recognizes all the installed memory, go to the user menus and print the "Print Menus" test page. Flash problem at POR or while attempting to the user menus and print the "Print Menus" test page. 4039-1XX Error/Code 37 Insufficient Memory 38 Memory Full 39 Complex Page 43 Font Card Not Supported 44 Defective Font Card 47 Font Card Removed While Printing 52 Flash Full 53 Unformatted or Defective Flash 54 Serial Error 58 Duplex Not Attached 59 Duplex Cover Open 62 Disk Full Action Not enough memory...
... printer recognizes all the installed memory, go to the user menus and print the "Print Menus" test page. Flash problem at POR or while attempting to the user menus and print the "Print Menus" test page. 4039-1XX Error/Code 37 Insufficient Memory 38 Memory Full 39 Complex Page 43 Font Card Not Supported 44 Defective Font Card 47 Font Card Removed While Printing 52 Flash Full 53 Unformatted or Defective Flash 54 Serial Error 58 Duplex Not Attached 59 Duplex Cover Open 62 Disk Full Action Not enough memory...
Service Manual
Page 21
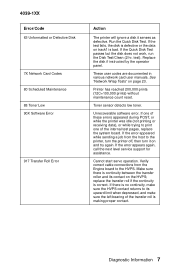
... Network Card Codes 80 Scheduled Maintenance 88 Toner Low 90X Software Error 917 Transfer Roll Error Action The printer will ignore a disk it on the HVPS; Printer has reached 200,000 prints (12C=100,000 prints) without maintenance count reset. If one of the transfer roll is bad. Verify correct cable connections from the host to the HVPS. Diagnostic Information 7 test). If the Quick Disk Test passes but the disk does not work, run the Disk Test/Clean (2 hr. Replace...
... Network Card Codes 80 Scheduled Maintenance 88 Toner Low 90X Software Error 917 Transfer Roll Error Action The printer will ignore a disk it on the HVPS; Printer has reached 200,000 prints (12C=100,000 prints) without maintenance count reset. If one of the transfer roll is bad. Verify correct cable connections from the host to the HVPS. Diagnostic Information 7 test). If the Quick Disk Test passes but the disk does not work, run the Disk Test/Clean (2 hr. Replace...

Service Manual
Page 26
... only Light Print Fuzzy or Blurred Print Residual Image Honeycomb Background Horizontal Void or Streak Action or Service Check Dead Machine Service Check Operator Panel Service Check Machine Hangs Displaying Diamonds Service Check Operator Panel Service Check Paper Feed, Base Printer Service Check Paper Feed, Duplex Unit Service Check Paper Feed Problem, 500-sheet Second Tray Service Check Paper Feed Problem, Envelope+ Feeder/100-Sheet Auxiliary Feeder Service Check Automatic Paper Size Sensing Problem Service Check LAN Service Check Blank Page Service Check Black Page Service Check Random...
... only Light Print Fuzzy or Blurred Print Residual Image Honeycomb Background Horizontal Void or Streak Action or Service Check Dead Machine Service Check Operator Panel Service Check Machine Hangs Displaying Diamonds Service Check Operator Panel Service Check Paper Feed, Base Printer Service Check Paper Feed, Duplex Unit Service Check Paper Feed Problem, 500-sheet Second Tray Service Check Paper Feed Problem, Envelope+ Feeder/100-Sheet Auxiliary Feeder Service Check Automatic Paper Size Sensing Problem Service Check LAN Service Check Blank Page Service Check Black Page Service Check Random...
Service Manual
Page 27
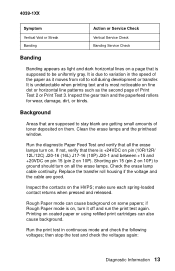
... continuous mode and check the following voltages; 4039-1XX Symptom Vertical Void or Streak Banding Action or Service Check Vertical Service Check Banding Service Check Banding Banding appears as light and dark horizontal lines on a page that are supposed to stay blank are good. Shorting pin 15 (pin 2 on fine dot or horizontal line patterns such as it off and run the print test again. Rough Paper mode can...
... continuous mode and check the following voltages; 4039-1XX Symptom Vertical Void or Streak Banding Action or Service Check Vertical Service Check Banding Service Check Banding Banding appears as light and dark horizontal lines on a page that are supposed to stay blank are good. Shorting pin 15 (pin 2 on fine dot or horizontal line patterns such as it off and run the print test again. Rough Paper mode can...

Service Manual
Page 32
... tray gear is turned, but has been lost. Check the cable as necessary. Check that the gear at a time, reconnect the system board cables, powering on the top of the duplex unit meshes with the duplexer installed. With the cable connected, these voltages should also be pulled by the D-roll when it is either damaged or is in place. Make sure the duplex unit is bad. Make 18 Service Manual...
... tray gear is turned, but has been lost. Check the cable as necessary. Check that the gear at a time, reconnect the system board cables, powering on the top of the duplex unit meshes with the duplexer installed. With the cable connected, these voltages should also be pulled by the D-roll when it is either damaged or is in place. Make sure the duplex unit is bad. Make 18 Service Manual...
Service Manual
Page 36
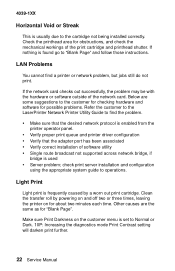
... the customer for checking hardware and software for "Blank Page". check print server installation and configuration using the appropriate system guide to Normal or Dark. 10P: Increasing the diagnostics mode Print Contrast setting will darken print further. 22 Service Manual Below are the same as for possible problems. Refer the customer to the LaserPrinter Network Printer Utility Guide to find a printer or network problem, but jobs still do not print. Make sure Print Darkness on for about two minutes each time.
... the customer for checking hardware and software for "Blank Page". check print server installation and configuration using the appropriate system guide to Normal or Dark. 10P: Increasing the diagnostics mode Print Contrast setting will darken print further. 22 Service Manual Below are the same as for possible problems. Refer the customer to the LaserPrinter Network Printer Utility Guide to find a printer or network problem, but jobs still do not print. Make sure Print Darkness on for about two minutes each time.
Service Manual
Page 42
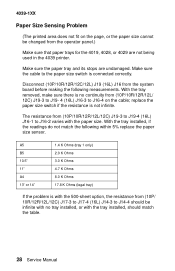
... 5% replace the paper size sensor. replace the paper size switch if the resistance is connected correctly. 4039-1XX Paper Size Sensing Problem (The printed area does not fit on the cable; Disconnect (10P/10R/12R/12C/12L) J19 (16L) J16 from (10P/10R/12R/12L/12C) J19-3 to J19-4 (16L) J16-1 to J14-4 should match the table. 28 Service Manual With the tray removed, make sure there is with the paper size...
... 5% replace the paper size sensor. replace the paper size switch if the resistance is connected correctly. 4039-1XX Paper Size Sensing Problem (The printed area does not fit on the cable; Disconnect (10P/10R/12R/12C/12L) J19 (16L) J16 from (10P/10R/12R/12L/12C) J19-3 to J19-4 (16L) J16-1 to J14-4 should match the table. 28 Service Manual With the tray removed, make sure there is with the paper size...
Service Manual
Page 49
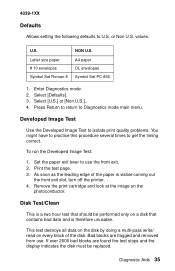
Letter size paper # 10 envelopes Symbol Set Roman-8 NON U.S. A4 paper DL envelopes Symbol Set PC-850 1. Enter Diagnostics mode. 2. Developed Image Test Use the Developed Image Test to isolate print quality problems. You might have to practice this procedure several times to use . Bad blocks are found the test stops and the display indicates the disk must be performed only on the photoconductor. If over 2000 bad blocks are flagged and removed from use the...
Letter size paper # 10 envelopes Symbol Set Roman-8 NON U.S. A4 paper DL envelopes Symbol Set PC-850 1. Enter Diagnostics mode. 2. Developed Image Test Use the Developed Image Test to isolate print quality problems. You might have to practice this procedure several times to use . Bad blocks are found the test stops and the display indicates the disk must be performed only on the photoconductor. If over 2000 bad blocks are flagged and removed from use the...

Service Manual
Page 52
... only once. Select [CLEAR] and then [CONTINUE] to Diagnostics mode main menu. The envelope feeds from the automatic envelope feeder if present. If the same error occurs consecutively it is discarded. Enter Diagnostics mode. 2. Error Log ("plus" machines only) The error log records the last 6 "2X Paper Jam" or "9XX Service" errors. Select [Envelope Print]. 3. 4039-1XX Envelope Enhance Use this procedure to set the fuser solenoid power level to low, medium, or high...
... only once. Select [CLEAR] and then [CONTINUE] to Diagnostics mode main menu. The envelope feeds from the automatic envelope feeder if present. If the same error occurs consecutively it is discarded. Enter Diagnostics mode. 2. Error Log ("plus" machines only) The error log records the last 6 "2X Paper Jam" or "9XX Service" errors. Select [Envelope Print]. 3. 4039-1XX Envelope Enhance Use this procedure to set the fuser solenoid power level to low, medium, or high...
Service Manual
Page 53
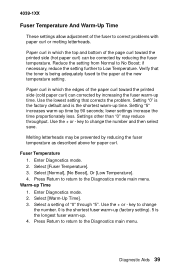
... Diagnostics main menu. Setting "0" is the factory default and is the longest fuser warm-up. 4. Select [Warm-Up Time]. 3. Press Return to return to No Boost; Melting letterheads may reduce throughput. Enter Diagnostics mode. 2. Fuser Temperature 1. Select [Fuser Temperature]. 3. key to correct problems with paper curl or melting letterheads. 4039-1XX Fuser Temperature And Warm-Up Time These settings allow adjustment of the fuser to change the number and...
... Diagnostics main menu. Setting "0" is the factory default and is the longest fuser warm-up. 4. Select [Warm-Up Time]. 3. Press Return to return to No Boost; Melting letterheads may reduce throughput. Enter Diagnostics mode. 2. Fuser Temperature 1. Select [Fuser Temperature]. 3. key to correct problems with paper curl or melting letterheads. 4039-1XX Fuser Temperature And Warm-Up Time These settings allow adjustment of the fuser to change the number and...
Service Manual
Page 56
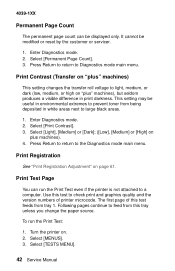
... Page Count]. 3. Use this test feeds from tray 1. The first page of this test to check print and graphics quality and the version numbers of printer microcode. Select [MENUS]. 3. This setting may be useful in print darkness. Print Registration See "Print Registration Adjustment" on . 2. To run the Print Test even if the printer is not attached to prevent toner from this tray unless you change the paper source. Press Return to return to the Diagnostics mode main menu...
... Page Count]. 3. Use this test feeds from tray 1. The first page of this test to check print and graphics quality and the version numbers of printer microcode. Select [MENUS]. 3. This setting may be useful in print darkness. Print Registration See "Print Registration Adjustment" on . 2. To run the Print Test even if the printer is not attached to prevent toner from this tray unless you change the paper source. Press Return to return to the Diagnostics mode main menu...

Service Manual
Page 60
Turn the printer off , then remove the wrap plug from the interface connector. 46 Service Manual Select [CANCEL] to communicate with the host computer. Note: Ignore the number displayed after a failure is good. 4039-1XX Network Connections and Checks Wrap Tests The Wrap Tests check the circuits used to stop continuous. Disconnect the interface cable. 3. A [PASSED] message indicates the printer connection to the Diagnostics mode main menu. 10. Install the wrap plug in one of the interface cable connectors...
Turn the printer off , then remove the wrap plug from the interface connector. 46 Service Manual Select [CANCEL] to communicate with the host computer. Note: Ignore the number displayed after a failure is good. 4039-1XX Network Connections and Checks Wrap Tests The Wrap Tests check the circuits used to stop continuous. Disconnect the interface cable. 3. A [PASSED] message indicates the printer connection to the Diagnostics mode main menu. 10. Install the wrap plug in one of the interface cable connectors...
Service Manual
Page 133
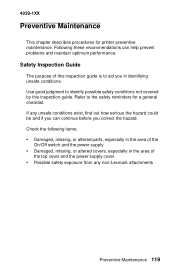
... for printer preventive maintenance. Safety Inspection Guide The purpose of the On/Off switch and the power supply • Damaged, missing, or altered covers, especially in identifying unsafe conditions. Following these recommendations can continue before you can help prevent problems and maintain optimum performance. 4039-1XX Preventive Maintenance This chapter describes procedures for a general checklist. If any non-Lexmark attachments Preventive Maintenance 119 Check...
... for printer preventive maintenance. Safety Inspection Guide The purpose of the On/Off switch and the power supply • Damaged, missing, or altered covers, especially in identifying unsafe conditions. Following these recommendations can continue before you can help prevent problems and maintain optimum performance. 4039-1XX Preventive Maintenance This chapter describes procedures for a general checklist. If any non-Lexmark attachments Preventive Maintenance 119 Check...

Service Manual
Page 156
... Spring, Arm Tray Bias Screw, Redrive Mtg., Parts Packet Guide, Fuser Input Redrive Assembly 12L/16L,With HandleMounted Bin Sensor Redrive Assembly 12L/16L,With RedriveMounted Bin Sensor Redrive Assembly 10R/10P Redrive Assembly 12R/12C Screw Parts Packet Spring, Bias, Transfer Housing Output Bin Sensor 12L/16L, redrive mounted sensor Cable, Output Bin/Op Panel 12L/16L, redrive mounted sensor Kit, Bail, Minibail, and Guide 12L/16L, redrive mounted sensor 142 Service Manual
... Spring, Arm Tray Bias Screw, Redrive Mtg., Parts Packet Guide, Fuser Input Redrive Assembly 12L/16L,With HandleMounted Bin Sensor Redrive Assembly 12L/16L,With RedriveMounted Bin Sensor Redrive Assembly 10R/10P Redrive Assembly 12R/12C Screw Parts Packet Spring, Bias, Transfer Housing Output Bin Sensor 12L/16L, redrive mounted sensor Cable, Output Bin/Op Panel 12L/16L, redrive mounted sensor Kit, Bail, Minibail, and Guide 12L/16L, redrive mounted sensor 142 Service Manual
Service Manual
Page 185
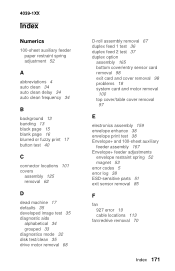
... 100-sheet auxiliary feeder paper restraint spring adjustment 52 A abbreviations 4 auto clean 34 auto clean delay 34 auto clean frequency 34 B background 13 banding 13 black page 15 blank page 16 blurred or fuzzy print 17 button test 40 C connector locations 101 covers assembly 125 removal 62 D dead machine 17 defaults 35 developed image test 35 diagnostic aids alphabetical 34 grouped 33 diagnostics mode 32 disk test/clean 35 drive motor removal 68 D-roll assembly removal 67 duplex feed 1 test 36 duplex feed 2 test 37 duplex option assembly...
... 100-sheet auxiliary feeder paper restraint spring adjustment 52 A abbreviations 4 auto clean 34 auto clean delay 34 auto clean frequency 34 B background 13 banding 13 black page 15 blank page 16 blurred or fuzzy print 17 button test 40 C connector locations 101 covers assembly 125 removal 62 D dead machine 17 defaults 35 developed image test 35 diagnostic aids alphabetical 34 grouped 33 diagnostics mode 32 disk test/clean 35 drive motor removal 68 D-roll assembly removal 67 duplex feed 1 test 36 duplex feed 2 test 37 duplex option assembly...


